-
Posts
1,797 -
Joined
Everything posted by Aammppaa
-
1. Look at the guides manager. Set up your basic grid of blocks, then drag snap text frames, image frames as required. 2. Snapping panel, snap to gaps and sizes.
-
https://forum.affinity.serif.com/index.php?/topic/81876-isometric-studio/&do=findComment&comment=431409
- 317 replies
-
- mac
- free transform tool
-
(and 5 more)
Tagged with:
-
Check out the isometric panel in 1.7 beta. Draw flash and snap to plane, or draw directly in plane with all designer tools. Very powerful, and not just limited to a standard 60° iso grid. https://forum.affinity.serif.com/index.php?/topic/81876-isometric-studio/&do=findComment&comment=437099
- 317 replies
-
- mac
- free transform tool
-
(and 5 more)
Tagged with:
-
3. Artistic text is unconstrained. Use the Frame Text Tool to define a text area. 4. Can you give more details? What keypress? what happens? Where is it inconsistent? etc. 5. The position of Fill stops on a gradient can be entered as a % in the drop down from the Fill box on the context tool bar (visible with many tools such a Move Tool, Shape Tools etc). 6. Right click pressure dynamics node to delete it.
-

Snap geometric center
Aammppaa replied to Angelos58's topic in Feedback for Affinity Designer V1 on iPad
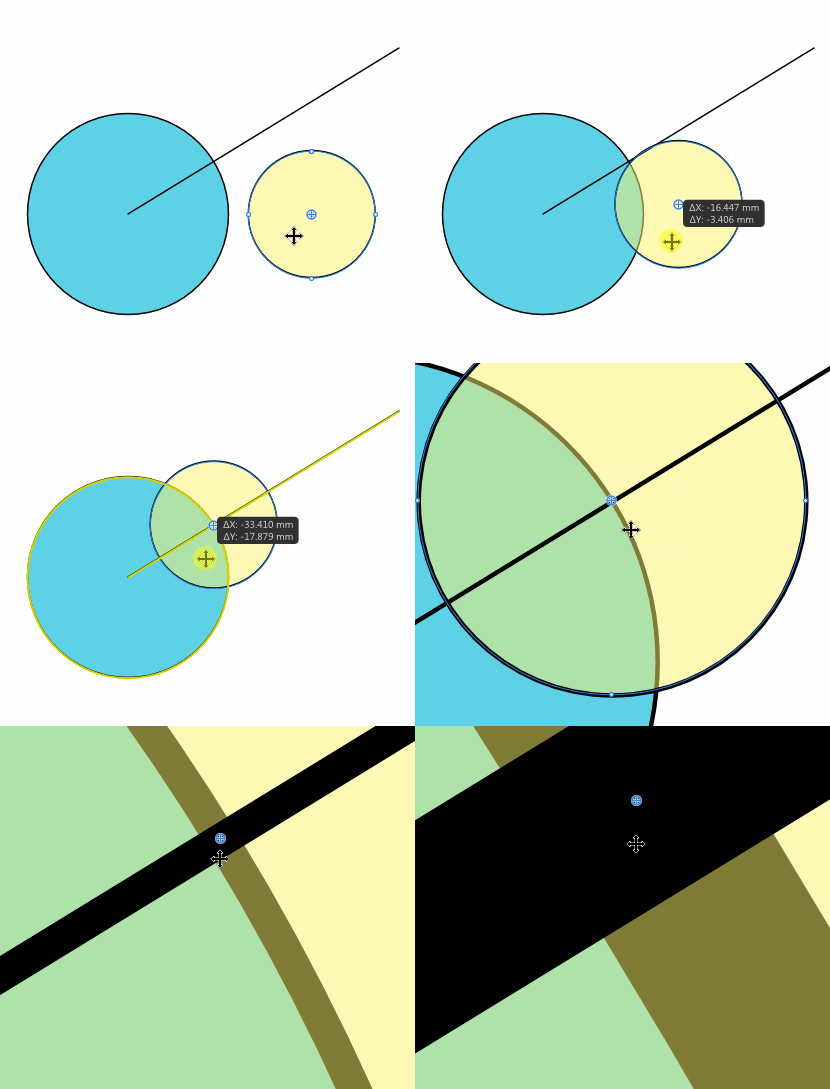
Point transform allows for any combination of move (translate), rotate and scale, around one point, to a destination point. Both source point and destination point can use any of Affinity's snapping options (grid, guides, geometry etc). It is very versatile. In my GIF… The source point is the center of the yellow circle (but it could also be any of the 4 nodes that define the circle, or any other point). You can see Affinity suggesting various snapping locations as I drag, including the intersection of the diagonal line and the blue circle. Which snapping locations are considered is defined by the standard snapping options in the Snapping Panel. The best way is just to play with it for a while so see what can be achieved - but iPad users can't do that quite yet -
Just wanted to let you know that it is a Bank Holiday weekend here in the UK, so Affinity staff will not official be at work until Tuesday. Your error message is coming from Windows rather than affinity publisher. A Google search for the error message should provide solutions, as this is something that has plagued all versions of Windows for many years. From memory you need to kill the general installer process via the task manager.
-

"Border" on rotated images
Aammppaa replied to Grendel's topic in [ARCHIVE] Publisher beta on Windows threads
Hello and welcome to the forum. By default there should not be a line placed around an image in Publisher - certainly not around half of the image! Can you provide the file for people to look at? Is it only one specific image, or does it happen to all images? How are you placing the image? Is it in a frame? -

CPU or GPU
Aammppaa replied to Magi's topic in Pre-V2 Archive of Affinity on Desktop Questions (macOS and Windows)
On Mac GPU is utilized more widely, but on PC everything is done on CPU with GPU just handling the draw to screen. Also: the forum search is your friend - there is so much knowledge on the forum that it is always worth searching -

View > Studio > Symbols
Aammppaa replied to Chris Heath's topic in Feedback for Affinity Publisher V1 on Desktop
Symbols studio will not be available in Publisher. I remember that the panel was mistakenly included in an early beta, and was later removed. However, I would anticipate that it will be available in the Designer Persona of Publisher, if you have Designer installed on the same machine. But, we will only find out the full details of what is in and out of the Designer / Photo personas when they are enabled later in the beta process. -
In the GIF I am duplicating the Red Square (which has some stripes clipped within it) by holding down Ctrl + Shift. Along the way stray objects get picked up because Shift is adding to the selection, and Ctrl is selecting objects nested within the parent shapes - this is not desirable but at least makes sense! After a while all the nested shapes move, leaving (apparently) empty squares - this is mystifying. Why does it affect all the duplicates? They are not Symbols, yet all are simultaneously affected in the same way. Affinity Bug Shift Ctrl Drag Clipped Shape.afdesign
-

Snap geometric center
Aammppaa replied to Angelos58's topic in Feedback for Affinity Designer V1 on iPad
-

Material Properties Dialog
Aammppaa replied to Ron P.'s topic in Feedback for Affinity Photo V1 on Desktop
The functionality is already there, but the (lack of a decent) interface leaves a bit to be desired… https://affinity.help/photo/English.lproj/pages/Clr/clrChords.html- 2 replies
-
- psp
- color-selection
-
(and 1 more)
Tagged with:
-
My frustration is that there is often too much information to show in such a small space (my screen is only 1920px wide). Perhaps it would be better to have a Modifiers Panel that can be sized and placed by the user: docked to the bottom like a status bar, floated on a second screen, or turned off if desired. This would allow for more space to show the various modifiers associated with each tool, would be far more customizable, and could even link through to the main help pages for the tool in question. SketchUp has something similar to this, which actually shows small introductions to the basic use of each tool.
-

Snapshots in History?
Aammppaa replied to World View's topic in Feedback for Affinity Publisher V1 on Desktop
The attached file has history saved. If you look in the first step of the History Panel you will see the Branching History icon. Click this to toggle to the alternative history of this document. You can switch back and forth and continue to work on both branches. Indeed you can start other branches from any point in the history. I'd imagine this could get pretty confusing with too many paths to choose from, and the file size may be come excessively large since you are recording every variation, but it does work in lieu of Snapshots. Affinity Branching History.afpub -

Liquify persona improvement
Aammppaa replied to IPv6's topic in Feedback for Affinity Photo V1 on Desktop
I am not a Liquify expert, and don't have Photoshop to compare with. Sorry I don't have the answer - perhaps someone else does? -
Can't you redraw the rectangle‽ (It is after all just a rectangle.) Or… having rotated the rectangle back to vertical, draw a small shape within the bounds of the rectangle, and then Boolean Add. The result will be the original rectangle, but with the correctly orientated bounding box. This trick will also work on more complex shapes!


