
John Rostron
-
Posts
3,510 -
Joined
-
Last visited
Reputation Activity
-

 John Rostron reacted to MEB in Comment in Macro
Hi John Rostron,
As far as i know no. Would be a nice addition. I'm moving this thread to the Feature Requests section.
-
John Rostron reacted to carl123 in Using Distort > Equations
@John Rostron
Here's another formula you might want to take a look at
r*max(w,h)/clampmax(800,max(w,h))
It uses the Polar coordinate system rather than the Cartesian one
The benefits are that it uses just one line of (relatively simple) code and it will not do anything to images less than 800px on their longest side. Both our macros will distort them
It also works on images where width equals height
Not done extensive testing with it as yet but it appears to work Ok
-
 John Rostron got a reaction from carl123 in Using Distort > Equations
I believe that I have resolved the situation where width equals height. In my original formula, the two floor functions ensured that it chose the larger of width or height, but if they were equal it failed. The solution is instead of adding them, take the maximum. Thus:
(x/800)*(h*floor(clampmax(h/w,1.5))+w*floor(clampmax(w/h,1.5)))
becomes:
(x/800)*max(h*floor(clampmax(h/w,1.5)),w*floor(clampmax(w/h,1.5)))
I have incorporated this into the macro, plus the failsafe checks suggested by @carl123. If this passes more testing, I will produce similar macros with varying maximum target sizes, and (if I can work out how) compile them into a macro library. The real test will be: can I use this macro to batch resize a set of images?
Resize to 800.afmacro
-
John Rostron reacted to microbug in Add a Progress Bar when Stitching Panoramas
When I click 'Stitch Panorama' in the Panorama dialog, there is often a wait of ~1 minute per panorama for the stitching to complete (working with large TIFF files). A progress bar would be helpful here so that the user knows the program is making progress. There is sometimes a spinning progress wheel in the centre of the panorama dialog when stitching panoramas, but it doesn't always appear — this may be a bug.
-
 John Rostron got a reaction from Alfred in Image Cropping
The ppi is proably irrelevant for most purposes. For your image crop to 300px wide and 375px high.
-
John Rostron reacted to carl123 in Using Distort > Equations
I have modified your formulas so that the attached macro will present you with a slider to adjust the "a" value which is used to modify the "target length" in the formulas below.
The slider only has a value from 0 to 1 where (in the formulas below) 1 = 1000px
Therefore slide the slider to 0.8 and the pixel value will be 800px, slide to 0.4 and the pixel value will be 400px, etc, etc.
The good news is that the screen updates when you put in new values on the slider but the bad news is the transform panel does not so you can't watch that to set your required image size
Not great, but it shows how the parameters can be used
(x/1000/a)*(h*floor(clampmax(h/w,1.5))+w*floor(clampmax(w/h,1.5)))
(y/1000/a)*(h*floor(clampmax(h/w,1.5))+w*floor(clampmax(w/h,1.5)))
Macro is attached
Resize-to-1000-with-slider.afmacro
-
John Rostron got a reaction from carl123 in Using Distort > Equations
I think that I have cracked this procedure. The appropriate function to apply to the aspect ratios is floor. For most images floor(h/w) will give zero for Landscape and One for Portrait, and vice versa for floor(w/h). However, this will not work in (say) panoramas where the aspect ratio is greater than two: floor(2.3) is 2, so I had to add an extra fudge, the ClampMax function. ClampMax(w/h,1.5) limits the aspect ratio to a maximum of 1.5, which is then floored to 1. There are just two steps in the macro, the Distort filter and the Clip Canvas. (Rather less than the Omega Transform.)
In the Distort > Equations filter, enter the two formulae in the x and y entries:
(x/800)*(h*floor(clampmax(h/w,1.5))+w*floor(clampmax(w/h,1.5)))
(y/800)*(h*floor(clampmax(h/w,1.5))+w*floor(clampmax(w/h,1.5)))
Then Apply, followed by Document > Clip Canvas
Clearly this will only work for a target maximum length of 800. I have recorded it as a macro, and it works on other images. I would be glad to here from anyone who can tell me how to get the target length in to use as a parameter. The parameter facility within Distort > Equations is just not suitable.
@carl123, Like @R C-R, I would be interested in seeing your equations.
Resize to 800.afmacro
-
John Rostron reacted to carl123 in Using Distort > Equations
The attached Omega Collider Transformation macro should resize JPEGs to 800px or 600px on their longest side. That is landscape images will be resized to 800px in width and portrait pictures will be resized to 600px in height. It can be used on its own or part of a batch job.
The 800px and 600px settings are changeable (within the macro) so you could, for example, resize to 1200px width for Landscape pictures and 900px height for portrait pictures or just to 1000px on the longest size for both landscape and portrait images.
It is designed so that you can mix landscape and portrait images in a batch job to resize to predetermined sizes based on the longest side.
It will not resize images up in size (only reduce them) so your landscape images must be more than 800px width to start with and your portrait images must be more than 600px in height.
I have tested it on what images I have to hand but please check it out on some of your own images to see if it works for you. If you find an image it does not work on please let me know so I can see what is wrong.
The macro contains 9 steps including 2 Equations and I will upload the formulas for them later today if it works OK.
At the moment it is just a concept macro to test the flexibility and unknown potential of the Equation filter. It was written purely to test the resizing function. What it does to image quality, pixel compression, file sizes, DPI etc I really do not know or care about at this time.
PS At the moment it will not work on images that are squarish shaped. So it will not work correctly on a 1500px X 1400px image. Basically anything below a width to height ratio of 1.333333 (800px/600px) will not work correctly. I know why but don't have the time to fix it at the moment so only test it on "real life" landscape and portrait pictures.
( I dare say there may be other configurations that may not work either but I have not tested it for long enough to find them)
PPS Just tested on one panoramic image which appeared to work Ok. Now off to shovel a ton of snow from my drive so I can get the car out and also find my dog.
omega-collider-transformation-macro-VER3-(beta).afmacro
-
John Rostron reacted to R C-R in Using Distort > Equations
Please let us know what you come up with for this!
It occurs to me there should be some way to use w & h to determine if the image has portrait or landscape proportions so a scale factor could be applied that doesn't distort the image, but I have not yet figured out how to do that.
-
John Rostron reacted to R C-R in Using Distort > Equations
w & h do seem to work, but of course the x & y equations I mentioned force any image to 800 x 600 dimensions, which distorts ones that are taller than they are wide.
-
John Rostron reacted to R C-R in Using Distort > Equations
Would not the scaling factors be w/800 & h/600 for use in Filter > Distort > Equations, assuming the desired dimensions are 800 x 600? Setting X = x*w/800 & y = y*h/600 in the equations always seems to produce those dimensions for me. Adding an a, b, or c parameter is tricky because they range from 0 to 1, so anything that divides by a parameter would allow division by zero, which is I think why that makes the equation turn red, even when it works for >0 values.
-
John Rostron reacted to Polygonius in Using Distort > Equations
Please John, as soon as you have a working solution, be so friendly and make a step-by-step guide for resizing lot of docs. Thank you!
The theory-discussion here, is too much abstract for me. (i´m relative new to AP / GFX in general).
-
John Rostron reacted to Polygonius in looking for an idea of workflow or special makro for resizing dozens of jpg
Hi John, thanks.
Yeah, lets combine this "2 questions". I will take a deeper look in your thread. It seems you are deeper in this challenge than me;-)
So, any admin: Please close this thread, thank you! There is no need for redundancy!
-
 John Rostron got a reaction from walt.farrell in Using Distort > Equations
I am aiming to use the min approach, once I have sussed out how to persuade Distort > Equations to get in the right ballpark for size! The Transform panel gives the right scaling OK, but it will not work in macros. You just get the dimensions as the initial values calculated by the macro
-
 John Rostron got a reaction from Polygonius in looking for an idea of workflow or special makro for resizing dozens of jpg
You have the same problem that I have been exploring here.
So far I have discovered that Transform will re-size images correctly, but will not work in a Macro. I am currently exploring Distort.
-
John Rostron reacted to Zach Vegas in Quantum Leap HDR
Came out very cool. Has a unique depth to it.
-
John Rostron reacted to Patrick Connor in Affinity photo workbook (Opening and Saving Images)
I really should have read the thread more carefully, my sincere apologies to the contributors. I have informed the documentation team, who say they had been told.
-
John Rostron reacted to mikep in Affinity photo workbook (Opening and Saving Images)
I hear what you say Patrick, but the book has a heading "Opening and Saving images", and there is nothing about saving. As this is a very important step I think it is a very bad omission from the book. As a complete beginner this step should be in the workbook. The book its self is excellent, but missing this important area is a mistake. Mikep
-
John Rostron reacted to SSK9s in Quantum Leap HDR
Wow,, NICE shot...
THAT is how HDR should look,, clear & clean,,, not 'cartoonish' or oversaturated in crazy amounts of colour...
Thanks for sharing xx
-
 John Rostron got a reaction from SrPx in Adobe Photoshop & InDesign Alternatives
If you really are ready to dump InDesign, then why not use Serif Page Plus in the interim. This is now deemed a legacy product, but you can be seen to be supporting Serif. Note that PP has its own support forum.
-
 John Rostron got a reaction from stokerg in Quantum Leap HDR
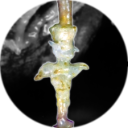
We visited Shrewsbury in mid-September, so the sun was fairly low as well as bright. This meant that there was a strong contrast between the lit areas and shadows.
The four images were merged using Affinity's HRD stack, then the final image straightened to set the far roof horizontally. I think that the merge has been very successful apart, perhaps, from my wife, who must have moved slightly between shots.
The subject was a sculpture called 'Quantum Leap' which celebrated Shrewsbury's connection with Charles Darwin, who was born there. I have to say that, even when wearing my hat as an evolutionary biologist (retired), I was not too clear as to the connection.
The bicycle belonged to another photographer of the sculpture!
-
 John Rostron got a reaction from MEB in Quantum Leap HDR
We visited Shrewsbury in mid-September, so the sun was fairly low as well as bright. This meant that there was a strong contrast between the lit areas and shadows.
The four images were merged using Affinity's HRD stack, then the final image straightened to set the far roof horizontally. I think that the merge has been very successful apart, perhaps, from my wife, who must have moved slightly between shots.
The subject was a sculpture called 'Quantum Leap' which celebrated Shrewsbury's connection with Charles Darwin, who was born there. I have to say that, even when wearing my hat as an evolutionary biologist (retired), I was not too clear as to the connection.
The bicycle belonged to another photographer of the sculpture!
-
 John Rostron got a reaction from Rigorious in Quantum Leap HDR
We visited Shrewsbury in mid-September, so the sun was fairly low as well as bright. This meant that there was a strong contrast between the lit areas and shadows.
The four images were merged using Affinity's HRD stack, then the final image straightened to set the far roof horizontally. I think that the merge has been very successful apart, perhaps, from my wife, who must have moved slightly between shots.
The subject was a sculpture called 'Quantum Leap' which celebrated Shrewsbury's connection with Charles Darwin, who was born there. I have to say that, even when wearing my hat as an evolutionary biologist (retired), I was not too clear as to the connection.
The bicycle belonged to another photographer of the sculpture!
-
 John Rostron got a reaction from Pauls in Quantum Leap HDR
We visited Shrewsbury in mid-September, so the sun was fairly low as well as bright. This meant that there was a strong contrast between the lit areas and shadows.
The four images were merged using Affinity's HRD stack, then the final image straightened to set the far roof horizontally. I think that the merge has been very successful apart, perhaps, from my wife, who must have moved slightly between shots.
The subject was a sculpture called 'Quantum Leap' which celebrated Shrewsbury's connection with Charles Darwin, who was born there. I have to say that, even when wearing my hat as an evolutionary biologist (retired), I was not too clear as to the connection.
The bicycle belonged to another photographer of the sculpture!
-
 John Rostron got a reaction from Reggie1958 in My Avatar
I thought that I would post a larger version of my avatar. This was taken over 40 years ago in Reed's Cave at the Pengelly Cave Centre, Buckfastleigh, Devon. What you see is a helictite. This is a column (where a stalagmite meets a stalactite) that has formed where a drought blows through the cave. The entire helictite is only about 12-15cm high. The Little Man is in a chamber a long way into the cave system. It took us about an hour to reach it. Reed's Cave now has limited access and, as far as I know, there are no published photographs of the Little Man younger than this one. This is a pity, because I would expect that over 40 years or more, the conformation would have changed.
As you might guess from its age, it was taken on film, and the original showed noticeable film grain. I used the denoise filters to reduce it, followed by some sharpening. The atmosphere in the cave was damp, and there are several areas of specular reflection from the flash, some of which I have reduced or removed. (One hazard of cave photography is that the power leaks from the electronics. I found that I had to remove the batteries from the flash until the last minute.)
John Rostron