
John Rostron
-
Posts
3,508 -
Joined
-
Last visited
Everything posted by John Rostron
-

image size in Photo
John Rostron replied to KarinC's topic in Affinity on Desktop Questions (macOS and Windows)
An appropriate downsizing algorithm would probably sharpen an image. However, I would be reluctant to claim that it never created artefacts. If you are upsizing, then it is much more dependant on the kind of image - and on the algorithm. It would also be more likely to cause artefacts because it has to create pixels which were not there before. Having said that, modern specialized upsizing software can do amazing things. John -
image size in Photo
John Rostron replied to KarinC's topic in Affinity on Desktop Questions (macOS and Windows)
If you are using these images in a website, then the dpi is irrelevant. What counts is the xizein pixels. John -
Yes, but it also allows all the angles in between. John
-
So what you actually need to do is to rotate the map rather than flip or mirror it. John
-
Creating a macro to change DPI
John Rostron replied to John Rostron's topic in V1 Bugs found on Windows
I have now re-installed Photo 1.6 and recorded my Change DPI macro for 120ppi. It works OK with Photo 2.4.1 I attach below the macro Change DPI to 1201.6.afmacro and the updated macro library to include this macro Change DPI 1.6.afmacros John Macros Change DPI 1.6.afmacros Change DPI to 120 1.6.afmacro -
@CJP001 I have recorded my macro to change dpi to 120ppi. I was just about to upload these when the Affinity site crashed! I will try again when I have had my tea! John
-
Download Photo 1.6
John Rostron replied to John Rostron's topic in Affinity on Desktop Questions (macOS and Windows)
Thanks @walt.farrell. I was sure that I had seen that page recently, but I could not find it. John -
I have been recording macros to change the dpi of an image without changing the physical size. These macros will not work in the current versions of Photo, but did work in version 1.6. I originally had a copy of the installation file for v1.6, but this was one of the casualties of me transferring to a new computer. I still have a licence for version 1, but I am told that version 1.6 is no longer available. Would it be possible to obtain a copy of the v1.6 installation files. The macros I originally recorded in v1.6 still work, but some users would like versions that create a different dpi to those I already provide. John Rostron
-
If you first create your series of bars using Power Duplicate, you can then use equations on the entire image: Filter > Distort > Equations In the Equations box enter x=x y=y+150*sin(6*pi*x/w) Then click on Apply It should give something like this:

-
Yes, impressive. The depth of field is narrow, but most is in foocus, notably the brakes on the antennae. What is it? I could probably work out what it is from my key (written by my old boss), but I would guess something like a male common mosquito Culex pipiens. John
-
I recorded those dpi-changing macros in V1.6 (I recall), the version before this error crept in. I have recently installed a new computer, so I currently cannot use this old version. When I do, I will record a 120dpi version. John
-
When you download the installation files, the default is to use the MSIX version. You are given the option of an MSI version, but it offers it (unnhelpfully) as an EXE file - it does have an .exe suffix. Just read down few lines to find it. John
-
I am about to transfer everything to a new computer. I have the information supplied by Affinity: I just re-install on the new computer. However, I seem to have lost my passcode for the V2 apps. (I do have them for V1). How can I retrieve my passcode? John
-
You can specify the resampling algorithm using Document > Resize in a macro, but the saved macro always uses the original image propeties when running, not those of the image you apply it to. Using Equations avoids this problem, but you cannot specify the resampling algorthm. John
-
Would this do what you want. This is for pixel images in Photo. John
-
Whilst in nitpicking mode, can I point out that scientific names have only the first word (the generic name) capitalised. The remaining words are all lower case. For example Homo erectus pekinensis. The central skull should be named Homo habilis, not Homo habitus. A very nice poster! John
-
There are two ways of doing this. Either: Locate the default plugin folder. You can find this from the Photoshop Plugins box. Copy your plugin to this folder. Or: In the Photoshop Plugins box, Click on Add, then navigate to the installation folder for your plugin and select the folder where the plugin resides. Have you done either of these? John
-
Or you could have a gradient so that the upper part of the bird is a blue tit and the lower part is a great tit! John
-
I have come to this thread rather late, but would my macro to resize to a fixed maximum size work as part of a batch job? Macro here. John
-
Topaz Gigapixel AI plug in
John Rostron replied to MPH67's topic in Affinity on Desktop Questions (macOS and Windows)
You need to visit the Topaz forum for gigapixel. Just Google 'Topaz gigapixel forum'. John -
Missinng Macros
John Rostron replied to siarkie's topic in Affinity on Desktop Questions (macOS and Windows)
Hello @siarkie, and welcome to the forums. When you say "no longer there", do you mean that it is no longer in your macros panel, or that it is no longer where you saved it on disk? John -
Have a look at this. My post is at the end of the thread. John
-
Works for me with no problem on Windows. Note that this is from the VueScan menu system, not Photo. John
-
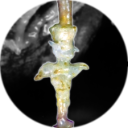
This could probably be done using Equations. Have a look at my macro to wrap an image around a bottle here or here. You could then further scale it so that the upper parts were condensed linearly. John
-
Macro not working in Batch
John Rostron replied to Nigel Kendall's topic in Affinity on Desktop Questions (macOS and Windows)
@Nigel Kendall, I am the author of the ChangeDPI macros recorded with Photo 1.6. I have just tried it using 2.2.1 on my PC and the macro works fine, both as a one-off and as a batch. John


