John Rostron
-
Posts
3,510 -
Joined
-
Last visited
Everything posted by John Rostron
-
 I agree that there is an inconsistency in your outcomes. All I can say is that both work as expected for me. What version of AD are you using? What Operating System? I would guess that you are (like me) on Windows. John
 -
Could you explain what the lower of your two layers is. It is labelled '(Curve)', but appears to be empty. It also seems to come and go during the procedure. John
-
@Friksel, take a look at this video. I first converted the rectangle to curves, which you also seem to have done. I then marquee-selected the top left node and clicked on the Break Curve icon. I then selected the top-left node and pulled it away. As I predicted, it moved away, leaving the false line to accommodate the fill. I then cancelled this and marquee-selected the top two nodes and selected Break Curve. I selected the top right node, then to top left, and each of these moved away as expected. To re-iterate, your curve (square) has not been broken. Note that this recording seems to have included some cut-and-paste which I'm sure I did not perform. John

-
If it was broken, then dragging one node (the top one) would pull away, leaving the other behind. If the fill was, as you say, filling the gap, it would also be seen as such. John
-
It is still behaving as if the curve has not been broken. John
-
I would guess that you have not actually broken the curve, otherwise it would not retain its fill. Have you tried breaking just one corner? John
-
I would see this as an application for scripting rather than macros. You would need to tell the script where the axis of rotation (Pole Star) was then to rotate accordingly. Very often in wider night sky images the background will have more of an effect on the current image alignment algorithms than the stars do. John
-
What were you extracting the LUT from? Was it the topmost adjustment layer, or did you merge the adjustments with the background? You can do this non-destructively with Merge Visible. John
-
What exactly do you mean by this? Are you using Photo or Designer? It would also help if you provided a screenshot of your layers panel. John
-
The Nik collection is targeted at 8-bit RGB pixel images. Did you change the colour format? John
-
I have just tried @HVDB Photography's procedure, recording a macro in the 1.7 beta and it works OK. However, you should be aware that the Select all Layers command selects only visible layers. So if you want to exclude one or more layers, simply turn off their visibility before selecting all layers. Or, you could lock the excluded layer. John
-
Limitations to Macros
John Rostron replied to Blahpics's topic in Feedback for Affinity Photo V1 on Desktop
You would be surprised at what you can accomplish with a combination of a batch job (to handle the input and output) and a macro or two to do the editing. Admittedly Affinity macros could be improved, but they can do many useful things. John -
There are many such macros available, but I am not aware of any general repository. I would suggest that you go to either the Tutorials or the Resources forum and search for 'Retouch' within each forum. John
-
The first thing to do is to convert the image to RGB: Document > Colour Format > RGB 8 (or RGB 16). Then create a fill layer (Layer > New Fill Layer) and fill it with your chosen colour (orange or whatever) by clicking on your favoured colour in the Spectrum in the Colour panel. Drag this coloured fill layer below the Background layer. Now try the various blending modes. I found that Colour Burn and Vivid Light may suit you. Here is an oid black-and-white photograph of me (left) and friends from around 1960. And using Colour Burn: and Vivid Light: Your final step would be to merge the layers and set the background to transparent, but that last trick is above my pay-grade. John
-
The fact that Affinity shows a dotted line around your text (marching ants) implies that just the text has been selected. It would seem that it is your target program that is filling in the white background. John
-
Try this: Rasterize your image (text), Use the Flood select tool to select all the non-text areas, (make sure that 'contiguous' is not selected, Invert the pixel selection (Select > Invert Pixel Selection), You should now have just your text selected. Now copy this (Ctrl-C) Paste into your other editor. John
-
First you need to ask if your plugin is supported. See @MEB's page here. If your plugin is supported, then you need to tell Affinity Photo where to find it. Goto Edit > Preferences and select Photoshop Plugins. Click on Add and browse to the plugin directory with the .8bf file. You will probably also have to tick the ''Allow unknown plugins' box. After closing, you will have to restart Affinity. John
-
I think that it behooves you to try out your batch process with a single file first, and to ensure that your output destination (or filetype) is different from the source. John
-
Stops working after using external filter
John Rostron replied to sdrum's topic in [ARCHIVE] Photo beta on Windows threads
I have not had this problem on any of my external plugins (Nik, Topaz, et al). They either work, and return immediately or within a few seconds, or they don't work at all (Filter Forge 8). John -
Many perfectly workable plugins have this "unknown" status. I would guess that the plugin does not provide Photo with some crucial bit of information that Photo is looking for. Hence the option to allow unknown plugins to work. John
-
Look at the Affinity Help page for Setting White Balance: https://affinity.help/designer/en-US.lproj/index.html?page=pages/Adjustments/adjustment_whiteBalance.html?title=White Balance adjustment John
-
If @SurJones is unwilling to use a beta for production, then would it be possible to use the beta to create the numbered list, then copy it and paste into the Designer 1.6?. John
-
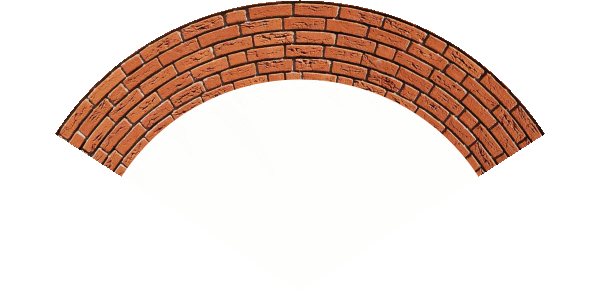
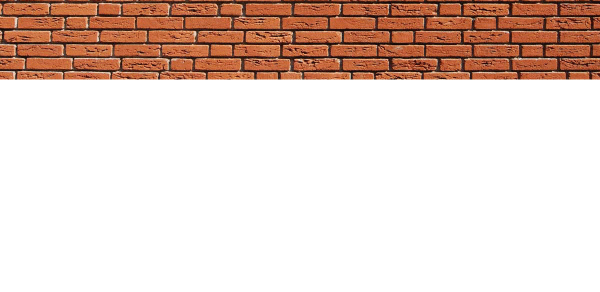
This is an updated version of the Polar Quadrant macro I have posted earlier. Consider a rectangular image that you would like to bend into an arc: The macro has two parameters. The first (a or Sector Width) controls the fraction of a circle that the altered image will occupy. The default value of 1 produces an arc of one eighth of a circle. Reducing this to 0.5 gives one quarter of a circle. This image this parameter set to 0.5: The second parameter (b or Height below Top) controls the position of the centre of the circle. Setting this to 1 places the centre at the bottom edge of the image. Reducing the value places the centre above the bottom, thereby reducing the radius. The following image has this parameter set to 0.75 (and the first to 0.5): A few notes: The parts of the final image outside the sector are transparent. The parts within the sector retain the original background colour. The macro works with the latest 1.7 Beta (333). I have tried to set both the default parameters to 1. However, in the 1.6 version, it insists on setting the default of the second parameter to zero which gives you a blank output! You will need to increase this second parameter. It seems to perform properly in the 1.7 beta. The image layer is rasterized at the start of the macro. If you apply a small value of the Height below Top parameter (below 0.5), You will get a partial (or even full) mirror image in the bottom part of the screen. I have left this, since some users might want to utilise it. Otherwise you can crop the image. The macro comprises a rasterization followed by Filter > Distort > Equations with the following lines for x and y: x=w*atan((x-w/2)/(h*b-y))/(180/pi/a)+w/2 y=h*b-sqrt((x-w/2)^2+(h*b-y)^2) Here are the macro and macro library (containing the one macro). Arcs and Arches.afmacros Polar Sector.afmacro John
-
The control point tools in the Nik plugins are unique and cannot always be emulated in Affinity's tools. One plugin I would like to see working in Affinity is 4N6's Color Deconvolution plugin. It looks to be able to do wondrous things that I cannot see Affinity doing by itself. I also find Topaz's AI Clean works wonders with scanned slides. John
-
I tried DxO Viveza in the new beta 333 on a histological image and it looked fine. John