John Rostron
-
Posts
3,508 -
Joined
-
Last visited
Everything posted by John Rostron
-
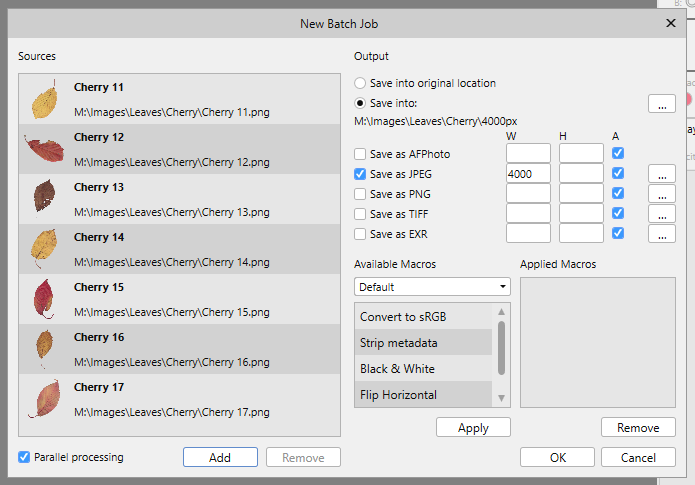
 You don't need a macro to do this, which is just as well because macros do not support save/save as/export functions. A batch job will do what you want. Create your output filder, then select File > New Batch Job and enter your parameters like this: John
-
affinity designer Scientific illustration: Iberian red fox
John Rostron replied to IsabelAracama's topic in Share your work
Very impressive! Kudos to you., @IsabelAracama John- 19 replies
-
- 1
-

-
- scientific illustration
- fox
- (and 3 more)
-
You would have thought so, but I have found that my laser printer will not accept A5 paper, or if it does it chews it up!. John
-
@ygoe, what printer are ou using? On my printer (Brother HL 2270DW) dialogue box, I select duplex, booklet, and it does just what you want from four A5 pages on A4. This works from Word an I would guess it would work from Publisher. John
-
Viveza causing Affinity Photo to crash.
John Rostron replied to ipb's topic in V1 Bugs found on macOS
I have just tried this on my Windows PC, with a freshly-downloaded Nik installation. I tried three different images in succession and they all worked fine. Have you tried a fresh installation? John -
plugins
John Rostron replied to Richard Austin's topic in Pre-V2 Archive of Affinity on Desktop Questions (macOS and Windows)
You can either: Copy all your plugin .8bf files to the Photo default plugins folder (C:\Program Data\Affinity\Photo\1.0\Plugins on Windows). Then, in Photo, choose Edit > Preferences > Photoshop Plugins, then ensure that the box at the bottom left (Allow unknown plugins) is ticked. Then close and restart Photo. Or: Go to Photo and in Edit > Preferences > Photoshop Plugins, click on Add. You will now need to find the .8bf plugin folders in each of your applications and select these folders. Again tick the Allow unknown plugins box as before, close and restart. John -
Have you tried re-installing AP 1.6, either from the install file you downloaded, or a fresh download? John
-
This is a forum for AFFINITY products, Designer, Photo and for Publisher. For your problems you need to contact the Adobe forums, or contact Topaz. John
-
DPI change in macro forces resample/resize
John Rostron replied to TOS's topic in V1 Bugs found on macOS
@TOS, I have produced a set of macros which change the dpi without affecting pixel dimensions here. John -
I have produced a set of macros to change dpi without changing the pixel dimension here. John
-
I have put together a set of macros to change the dpi of an image without changing the pixel dimensions. The set comprises macros to change the dpi to 72, 96, 144, 150, 180, 192, 300 and 400dpi. These macros were recorded in Photo 1.6 because there were reports that similar macros recorded in 1.7 would always resample, even if the Resample box was unticked. I have checked that these macros work in 1.8, which they do. I also note that in 1.8 the Resize function will change the dpi without resampling. Here is the Library file: Change DPI 1.6.afmacros Thanks to @carl123 for setting the ball rolling with his macro here. EDIT: This macro library has been recreated (in 1.6) and re-imported into this message. EDIT: I have now re-recorded them in Photo 1.10, but they still do not work! John
-
Some interesting effects here. Could you please tell us how you achieved them, and if possible let us see the original. John
-
DxO Viewpoint has not worked with Photo for some time, so I thought I would try the recently-updated versions of both. DxO 3 installed OK and appeared in my plugins panel. I loaded an image of a skewed notice board and called up the plugin. It loaded fine and I was able to apply the perspective transformations. I clicked on Apply and then Save but the returned image in Photo was exactly the same as before! No perspective change. The standalone program works with no problems. John
- 9 replies
-
- 1
-

-
- photo
- dxo viewpoint
- (and 1 more)
-
I thinking that you are asking a lot from Affinity. Decoding and translating Photoshop Smart Objects for regular PS commands must have been a major effort. To maintain the status of a plugin would require knowledge of the internal working of the plugin. Not impossible, but be glad of what Affinity has achieved so far. Maybe in 1.9? John
-
smileyrebs
John Rostron replied to smileyrebs's topic in Pre-V2 Archive of Affinity on Desktop Questions (macOS and Windows)
@smileyrebs, it would help if you gave your thread a meaningful title such as "jagged lines in designer". Joh -
It does say as a subheading to this forum that it is not for requests. You might get a better response if you posted your question in the Questions on Affinity Desktop forum. John
-
Just thought that I would report that the plugin for Filter Forge 9 works properly with Photo 1.8 Here is a fairly mundane wooded hiltop: And here is a Filter Forge Distortion filter applied: It now looks like a tugely wood (from Jabberwocky).I do notice some peculiar purple artefacts though John Rostron
-
For those who, like me, prefer the answer in words, here is my text version of @GarryP's video: Place image within the target text box and ensure it is selected (Move tool). Click on the Float with text icon on the toolbar (Looks like a table-tennis bat). This will generate a line from the top of the image . As you hover over the blob at the end of this line, an oblique arrowhead appears. Click on this arrowhead and drag it to the position in the text you want the image to go. Click on the Show Text Wrap Settings on the toolbar (leftmost of the three icons to the left of the Float icon) and select the Jump icon. Click on the image and drag into the desired position. Note that you must click on the Float with text icon (not the Inline in text icon). My image was the right width so it did not matter, but if you need it inline that can be adjusted later. John
-
@GarryP, Thanks again. That worked. Easy when you know how. The problem with the original video I watched was that at the start, the image was already in place. John
-
Thanks, @GarryP, that looks nice and simple. John
-
I think I still have a working copy of 1.6. I will try to re-create this macro for 72 dpi. John
-
@h_d, The tutorial I was trying to follow was this one in the Official Video Tutorials. I tried following your suggestions and ... I'm not sure what you mean by "Flow in the text", but I double clicked within my target frame text. Here is the frame and text. My aim is to insert the image in the gap between the paragraphs. I now place the image and it appears as here: The bottom-left hand corner is in the right place, but it is covering up the prior text. I use the move tool to position the text so that the top-left corner is in the target place. I now select Layer > Inline in text and I get this! If, instead, I leave the image with the bottom-left corner aligned and select Layer > Inline in text, I get:: Here the image is still covering the prior text. I find that using Float instead gives similar results. I would expect this since the image has been created with the same width as the frame text. Thanks for trying @h_d but I am no further than I was. John
-
I am creating a newsletter. The text is in a a series of text frames, linked together for each article and with two columns per page. I would like to place an image into the text inline. I have viewed the Affinity Tutorial video on this, and have tried to follow it, but so far I have failed. I'm sure it is a matter of getting the right order between: placing the image on the page, selecting the insertion point in the text column, selecting the image and clicking on the Inline icon. As Eric Morecambe didn't quite say: I'm clicking all the right things, but not necessarily in the right order. Could someone please explain to me in words (not video) the correct procedure to do this. John
-
I just tried running a batch job on a set of images and just applying two macros: Change DPI to 300 from @Carl123, and Resize to 1000 max length from myself. This successfully applied both macros to a set of five jpg and five aphoto images. I understand that Carl's macro was just a matter of using Document > Resize to reset the dpi without resampling or modifying any other dimension, so you could easily write one to change to 72 dpi. John
-
Use Document > Resize then, in either the width or height box, enter 18%. Ensure that the lock symbol is closed (which it is by default) to maintain the Aspect Ratio.. John