GRAFKOM
-
Posts
366 -
Joined
-
Last visited
Everything posted by GRAFKOM
-

Vector Flood Fill
GRAFKOM replied to Ash's topic in [ARCHIVE] 2.4, 2.3, 2.2 & 2.1 Features and Improvements
StuartRc - What program did you record the screen with? -
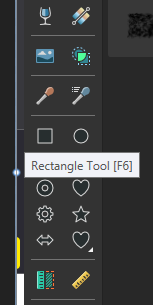
I use Publisher software in the advertising industry on a daily basis. Every day we design business cards, leaflets, signboards, I prepare projects for cutting on a CNC plotter, laser plotter and foil cutting plotter. When designing business cards or leaflets, I often need to draw a rectangle the size of a business card, e.g. 90x50mm, in order to, for example, obtain a background. Of course, I will draw such a rectangle by dragging it on the screen and adjusting the rectangle to the size of the previously determined page, because it will snap to the edges of the page, or I will enter the size of this rectangle in the Transform panel. For business card or flyer printing in a print shop, I also need to get a bleed rectangle, so I have to draw that too. If I am preparing a project of stickers for printing on foil with an Ecosolvent plotter with a contour cut - I have to prepare this contour. It is often the case that the shape of objects to be printed is a rectangle. For example, I insert a 15x20cm picture on the page. I have a selected image. I double click on the rectangle icon + ALT and a new rectangle of 15x20cm is created, I use this rectangle as the cutting line of this image on the plotter for cutting foil. To cut shapes in plywood with a laser plotter, you also often need to prepare an area marked with a rectangle with shapes inside. So simply selecting a few objects and double-clicking on the rectangle icon + ALT will create a new rectangle for me the size of these selected elements - I wouldn't even need to know the size of these elements. So this functionality is very useful for working with Affinity. This functionality works great in CorelDRAW. I will write again: 1. Double-click the Rectangle tool icon to create a new rectangle the size of the page or selected artboard. 2. Double-click the Rectangle tool icon + SHIFT creates a new rectangle the size of (if created) the page margin or the margin of the selected artboard. 3. Double click the Rectangle tool icon + CTRL creates a new rectangle the size (if created) of the bleed or bleed of the selected artboard. 4. Double-click the Rectangle tool icon + ALT to create a new rectangle the size of the selected object(s) on the page or on the artboard. Thank you
-
Yes exactly. I want the created rectangles to be the size of the margin/page/artboards or selected objects when I double click on the rectangle icon. I'm translating via Google Translate, that's probably why there are some misunderstandings.
-
I do not know what you're talking about. In CorelDraw it works, I use it every day at work. You double click on the rectangle icon and a new rectangle is created the size of any page. Easy.
-
All right. But I am asking for the ability to add your own page name. Who doesn't want to name the page, doesn't name it.
-
Please add the New From Clipboard option in Publisher Persona in the File menu. This capability is present in Designer Persona and Photo Persona. Adding this capability in Publisher Persona will streamline your work and add a new shortcut. Thank you.

-
In all Affinity programs: (Windows) 1. Double click on the Rectangle Tool icon to create a rectangle around the page or selected Artboard. 2. Double click on the Rectangle Tool icon + SHIFT creates a rectangle around (if created) the page margin or the margin of the selected Artboard. 3. Double click on the Rectangle Tool icon + CTRL creates a rectangle around (if created) the page bleed or selected Artboard bleed. During my design work, I very often need a rectangle around the created page, so double clicking on the rectangle icon will create a rectangle the fastest, regardless of the size of the page. Of course I will pay for it. Everyone will benefit from it. what cost?
-
All right. But what's stopping you from still being able to add a page name? He thinks it would behave exactly the same way in the layer panel. The name of the layer can be changed, and if, for example, a new layer is added, the order of the previously named layer will change, although the word Layer 1, Layer 2 is not shown in the layers. In the Pages panel, if, for example, Page 3 is named "Page 3 Apple" and we add 1 page before it, we will get - "Page 4 Apple". It is important that the content of a given page is assigned to the given name. Of course if the design is used for flowing text on pages then I would rather not use the page name. But I'd love to have that opportunity. In my day-to-day work at Publisher, this would be very, very useful to me. I work in the advertising industry.
-
For some reason, Serif forgot to add the ability to change the order of icons in the Styles panel. You can create a new style icon, rename and delete it, but you can't manually move the mouse and arrange the order of the icons according to your needs. The swiping mechanism is already used in the Pages panel and in the Assets panel. So you just need to apply it in the Styles panel and add the ability to edit the existing Style. Thank you. How much is it?
-
Vector Flood Fill
GRAFKOM replied to Ash's topic in [ARCHIVE] 2.4, 2.3, 2.2 & 2.1 Features and Improvements
Maybe it's just easier to add a Text Frame to the Designer Panel? -
I would like to be able to add my own name in the Pages panel to existing names Page 1, Page 2 ... If we create a dozen or several dozen pages, it is easier to find logically signed pages, not just Page 1 or other. This should be done exactly as you would now add your own names to objects in the Layers panel.
-
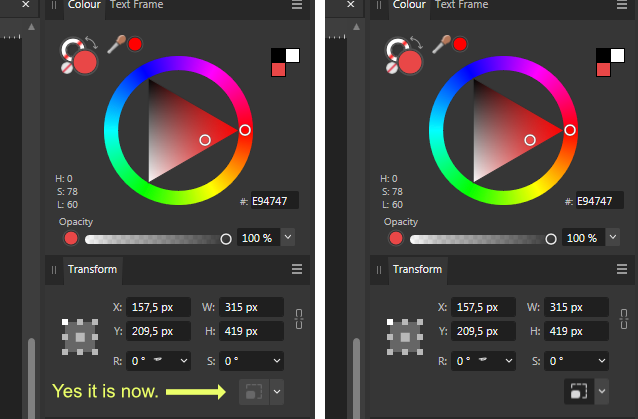
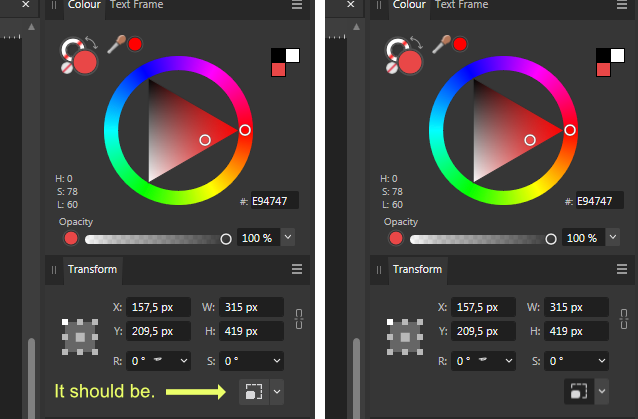
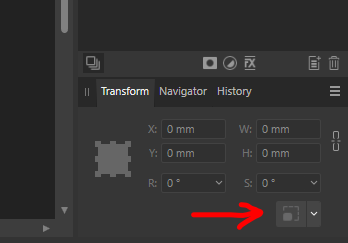
This icon is probably meant to represent proportional scaling.
-
Transform panel
-
3 years ago I asked for this functionality. I repeat the request, because it will make it much easier to work with pages. Maybe in version 2.1 it will be implemented. I'll gladly pay for it. what cost?
-
Personally, I consider it a bug that the Scale override button in the Transform panel looks inactive even though it can actually be pressed. Most users don't even try to press this very important button because it looks like it's inactive. Please change the icon as I gave in my proposal and everything will be clear.
-
Vector Flood Fill
GRAFKOM replied to Ash's topic in [ARCHIVE] 2.4, 2.3, 2.2 & 2.1 Features and Improvements
I don't know why, but after restarting the program I can undo the operation of giving the text frame fill color with this tool, I can later change it to a different color, but it is impossible to remove this fill later. Unless you go to Publisher. I work on Windows. -
Indeed this bug is already fixed in this Beta version 2.1.0.1706. I checked again. Now it's very good. Thank you for the correction. So the topic is now finished.
-
Vector Flood Fill
GRAFKOM replied to Ash's topic in [ARCHIVE] 2.4, 2.3, 2.2 & 2.1 Features and Improvements
I found a bug in this tool regarding using with text. If a word is selected and you click with the Vector Flood Fill Tool in the area between the letters, the text frame of that word will be colored. This operation cannot be undone with CTRL Z and also does not appear in the History panel. If someone uses Designer, he can't do anything with this word anymore, you can only open this file in Publisher and there you can remove the fill color of the frame from the Text Frame panel.
-
Just a reminder to fix this annoying bug. Beta version 2.1.0.1706 did not have this fix yet.
-
Guides improvements
GRAFKOM replied to Ash's topic in [ARCHIVE] 2.4, 2.3, 2.2 & 2.1 Features and Improvements
Of course, there may still be two ways to copy guides and objects by CTRL and ALT and by right-clicking while moving - to choose from. -
Guides improvements
GRAFKOM replied to Ash's topic in [ARCHIVE] 2.4, 2.3, 2.2 & 2.1 Features and Improvements
I just checked the behavior of the guides in CorelDraw. The handling of guides is perfectly thought out in this program. These ideas can be used in Affinity. Guides behave like objects. They can be: mark, select with SHIFT and move e.g. only 3 guides at a time, move, copy, block, turn visibility on or off, also copy with the mouse by clicking the right mouse button while moving, delete with the DELETE key, change the color of the guide - individually or globally, - individually simply by selecting a color from the color palette, rotate - when setting the pivot point, the CTRL key forces rotation every 15 degrees. When copying, moving or rotating the guide, small icons are shown explaining the current action. Due to the fact that the guides behave like objects, they can also be controlled from the level of the transform panel (position and rotation). I will add that the GUIDES layer is created, so everything in the GUIDES layer is treated as something to be snapped to - rectangles, circles, shapes, lines, etc. -
Guides improvements
GRAFKOM replied to Ash's topic in [ARCHIVE] 2.4, 2.3, 2.2 & 2.1 Features and Improvements
My suggestions for the behavior of Windows guides in Affinity programs: CTRL - creates a copy of the guideline when you hold down the key and move the guideline (as it is now). ALT - creates a copy of the guide when moving the guide (as it is now). CTRL+ALT deletes the guide <also right click deletes the guide> (as it should be). SHIFT + CTRL - rotates the guideline - e.g. if you are mouse on the left side of the screen, the start of rotation is on the right side of the screen - similarly as in Vectorstyler (as it should be). Or no extra keys if you are the mouse on the right side of the screen on the client area then the slide guide icon changes to the rotate guide icon and you can rotate it, while holding down the SHIFT key forces it to rotate 45 degrees - similar to Vectorstyler (it should be). Double clicking on the guide opens the GUIDES window - where you can set the color of the guides with live preview (as it should be). -
I also don't understand why this hasn't been added to Publisher and Designer Persona of Publisher
-
Text on paths cannot be scaled proportionally.
GRAFKOM replied to Designer1's topic in V2 Bugs found on Windows
You have to click on this seemingly inactive button, and from now on you can enter in the transformation panel - 10cm and the text on the path will increase proportionally.
-
MSI Installer upadate?
GRAFKOM replied to thegary's topic in Affinity on Desktop Questions (macOS and Windows)
I installed the Publisher windows 2.0.3.exe version - it installed quickly. However, I am concerned that if it will be version 2.0.4 - then nothing is corrected according to previously reported errors - i.e. setting the line thickness in mm (which makes version 2.0.3 completely useless)