

GRAFKOM
-
Posts
366 -
Joined
-
Last visited
Posts posted by GRAFKOM
-
-
Ale dlaczego nie ma opcji eksportu do DWG i DXF w Persona Designer?

-
Nie mogę znaleźć plików DWG i DXF na liście rozwijanej. Wydawca Wersja beta 2.4.0.2240 Windows 11 Czy robię coś źle?
-
Działa to dobrze w Vectorstyle.
Albo Serif nie może tego zrobić - albo nie chce.
-
Unfortunately, the bug in the Export window in the Beta 2.2.0.1971 Windows version has not been fully fixed.
Please watch the video.
I have the impression that corrected errors are not fully checked and Serif counts only on the reaction of Forum users in order to catch these errors.
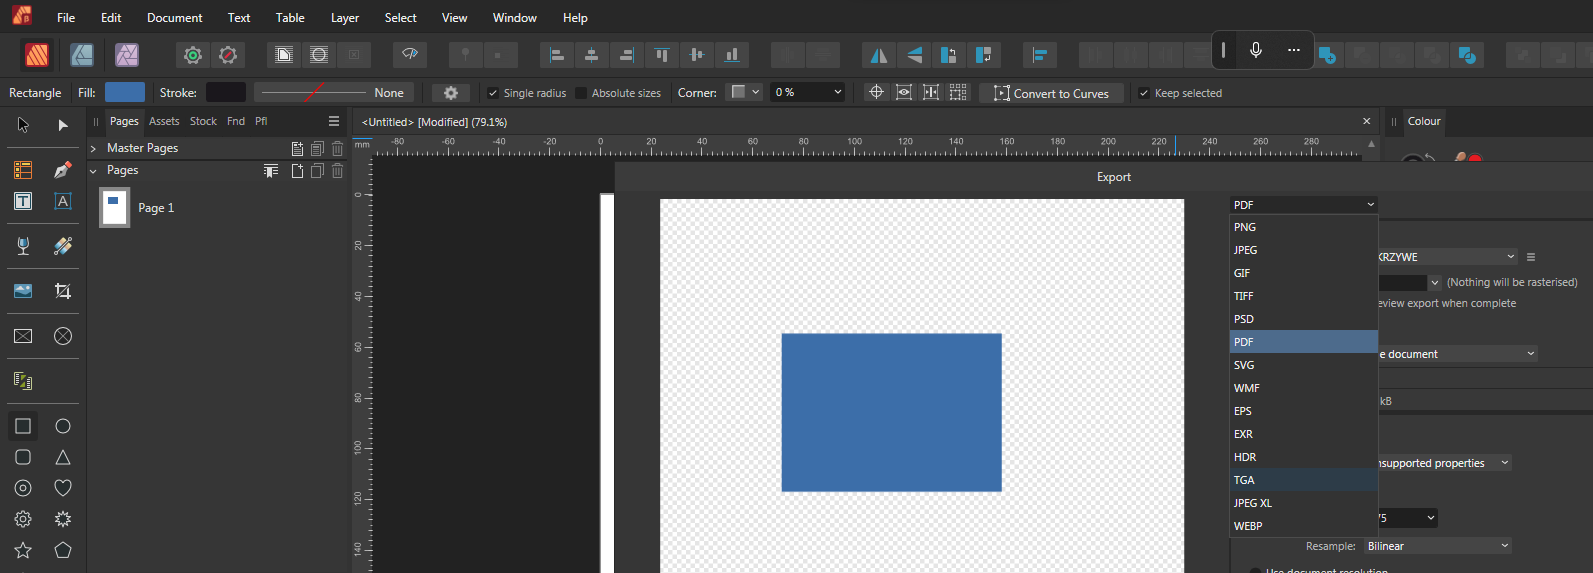
You really need to systematize the Export window thoroughly, unify it, improve the preview mode, give the option of setting other units than just pixels, the Include bleed switch should be in the same place every time you select .png, .tif, pdf, etc. and not like now in different places.
When clicking the Include bleed switch in the File settings tab, the With bleed value is not displayed under the Size values:Shouldn't there be an Include bleed option in every extension type selection?
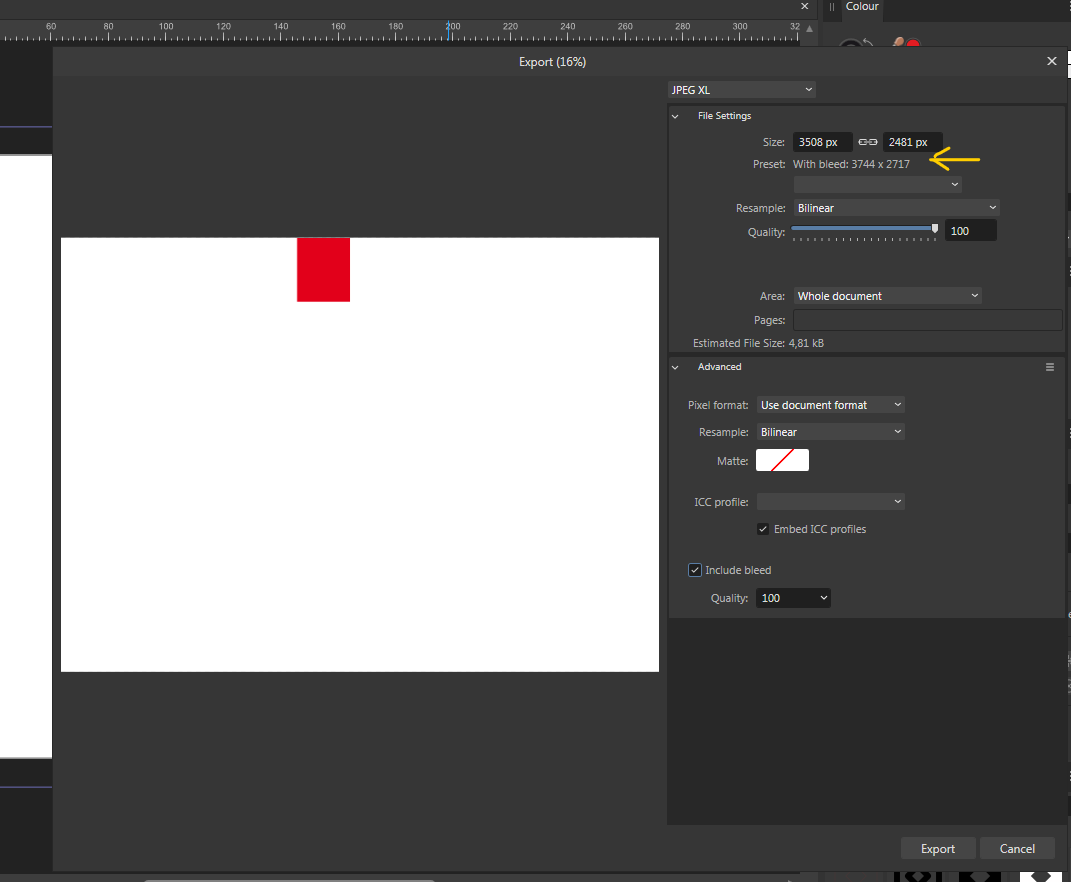
Include bleed is missing in: .psd, .wmf, .exr, .hdr, .tgaWhen exporting to JPEG XL is selected, the With bleed value is displayed in the Preset line:
Didn't the corrector at Serif notice that?
And one more question - why in some extensions the Include bleed button is in the File setting tab and in the Advanced tab and in some only in the Advanced tab?These inconsistencies have existed since version 1 and have never been standardized.
I'm starting to lose hope that this will ever be fixed.
There are so many uncorrected bugs in 3 programs that it's probably all uncorrectable. Maybe in 15 years?
I'd really like to donate a lot of money to fix these frustrating bugs. I use Affinity software in my professional work on a daily basis, I don't want anything for free. Give Serif your account number: I'll pay money to hire an employee to test Beta versions before release.
-
In this Beta version the export of bleeds in the EXPORT window has been broken. Checking the Include bleed box does not display in the preview and does not recalculate the With bleed: value next to the Size: value, or in some cases it is not possible to turn off Include bleed. Only export to .pdf with bleed works fine.
For me personally, this beta version is completely worthless, because 98% of my work is exporting the project to .jpg, .tif, and .pdf with bleed. I described the bleed export bug in version 1931, but these bugs in this 1954 version are even worse.
Hopefully this bug and regression will not go into the major release update. Error shown in the video.
-
Yes, the word With bleed: should be displayed with the given values. Unfortunately, we have also repeatedly reported the need to display these values in units other than pixels. These values should be displayed in the units in which the document is set, e.g. in mm. or it should be possible to select units when exporting.
In 90% of my professional work, I export printouts to .jpg format for a large format printer, where I need the final size in mm or cm. And the size in pixels does not tell me much and I only trust that the program correctly exported the size of the file for printing.
-
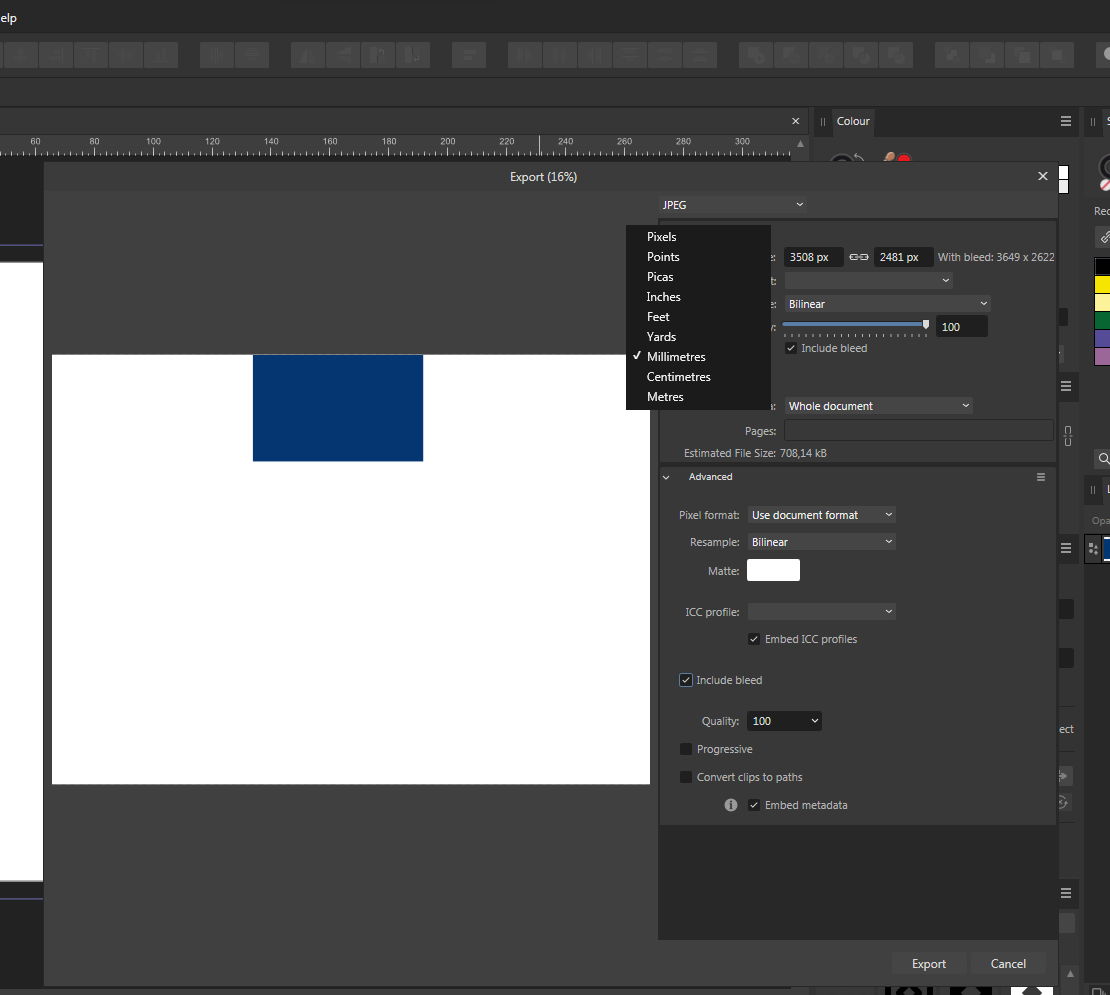
In the latest version of Beta 2, there is an error indicating the bleed value when exporting to .jpg After clicking the Include bleed button in the Export window in the File Settings tab, the value of the size of the exported object, including the bleed, is not shown.
Interestingly, this value is shown after clicking the bleed button in the Advanced tab. So this error occurs only when jpg is selected for export. In addition, you need to unify the location of the Include bleed button in all export tabs, i.e. .pdf, .jpg, .tiff, .png, etc., because now it appears in different places in the Advanced tab, and only in the JPEG, TIFF, PDF options there is this Include bleed button in the File Settings tab.
Error example in the video.
-
3 hours ago, Dave Harris said:
That's now by design. The text caret and text highlight can be in the blank lines, so you need to be able to use the mouse in those lines too. It could a problem in 1.x that you couldn't.
Why do you need to create blank lines that don't draw?
I don't need to create blank lines. They can be created accidentally after pressing Enter at the end of a line. These lines are invisible. If I wanted to select them, of course I could double click on the text and then I would have access to those lines. My video example was just a very simple example showing the problem. In more complex projects, where there are other objects, backgrounds, etc. under the text, there is a problem with selecting these objects. Once again - version 1 of Affinity did not have this problem and I believe that version 1 worked correctly.
And for example working in Affinity 1
-
Correct. The program does not remember that the "Apply to Selection" item was selected And that's why the Real-time Color Picker doesn't work. If you check this option in a program and close the program, then restart it, you will have to check "Apply to Selection" again. This is a regression in terms of the previous full and Beta releases.
-
On 7/13/2023 at 11:21 AM, Serif Info Bot said:
The issue "Selection hit area on text is too large" (REF: AFB-7735) has been fixed by the developers in internal build "2.2.0.1900".
This fix should soon be available as a customer beta and is planned for inclusion in the next customer release.
Customer beta builds are announced here and you can participate by following these instructions.
If you still experience this problem once you are using that build version (or later) please reply to this thread including @Serif Info Bot to notify us.Unfortunately, it's not fully fixed. If using Artistic Text and enter lines below the typed word, an invisible area appears that selects the text - without clicking on the text.
That's how it was before the fix. I note that in Affinity 1 it works correctly, i.e. even though empty lines are inserted with Enter, it is not possible to select the text by clicking below the entered text. The problem is presented in the video from the latest Beta. Please correct it.
-
Z jakiegoś powodu brakuje elementu Efekty warstw w menu głównym - dotyczy to Photo Persona w programie Publisher i Affinity Photo.
Uniemożliwia to dodanie skrótu do ikony Efekty warstwy.
Dodaj to, ponieważ w Publisher Persona, Designer Persona, Affinity Designer znajduje się ten element w menu Warstwa i można przypisać skrót.
-
Zooming in on the arrowhead in the Stroke panel by scrolling the mouse wheel in Windows 11 does not work. The video shows the error.
-
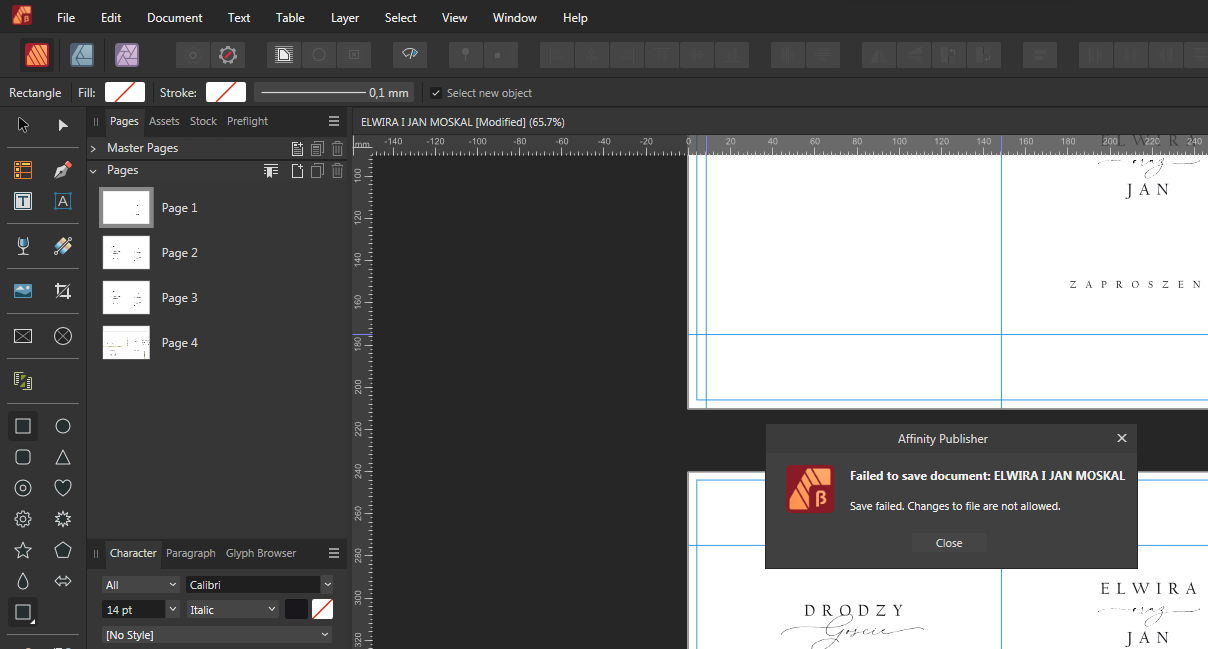
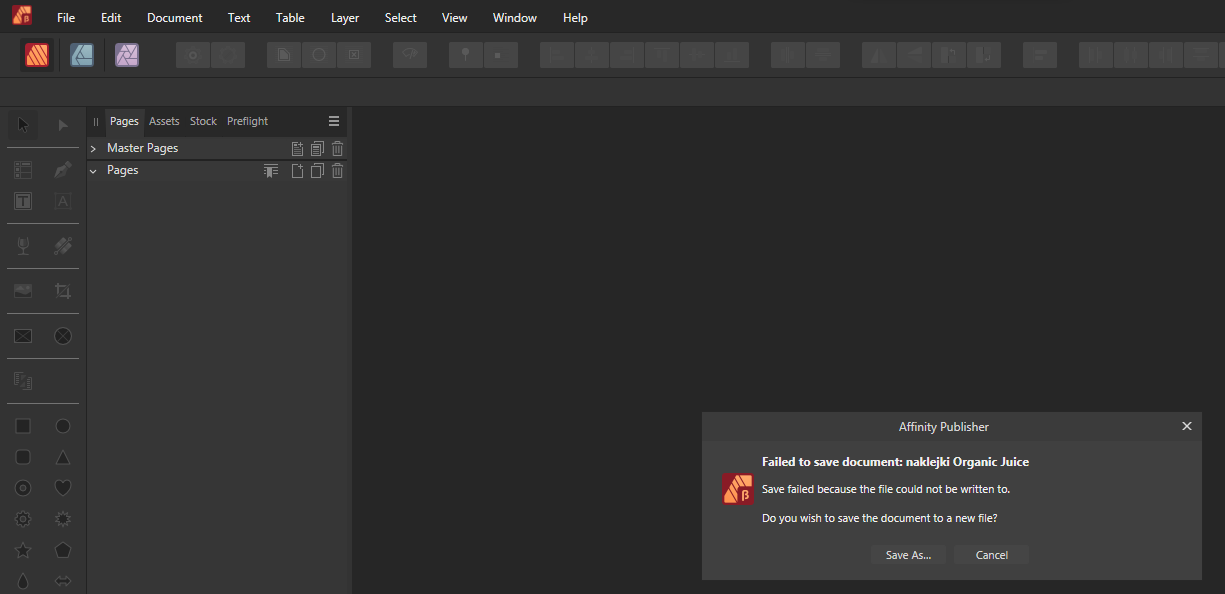
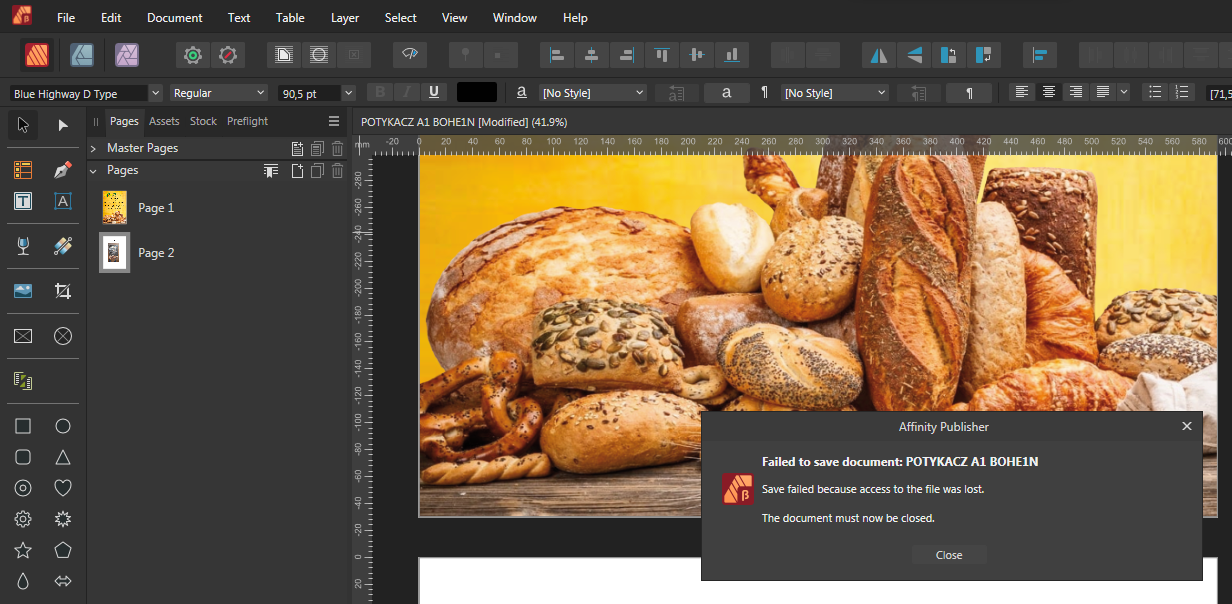
Today, when trying to save a file on a network drive, information about different content appeared without the possibility of saving under a different name and the program crashed.
-
Just now, when trying to save a file that I created 4 hours ago and it was still on the screen, this message showed up. When I pressed the Save As button, Publisher crashed completely. I had to close the program in task manager.
I remind you that the file was saved on a network drive.
This is a problem with files that are stored on a network drive and are open for a long time in Publisher 2.0 and 2.1, after some time 1 - 3 hours. when trying to save the file again, an error message pops up, sometimes with the option to save under a new name, or after pressing the Close button, the file is immediately closed with data loss. -
Affinity Windows 11.
Please correct one annoying issue when setting corner radius in rectangles.
As the video shows.
The problem is this:
Create a rectangle.
In the context bar on the left there is a name: Rectangle.
Move the mouse over the Corner: field and set, for example, 20% with the mouse wheel.
All right.
Now click on the arrow icon and point to the rectangle you just drew. The name will change to Rounded Rectangle.
All right.
Now create a new rectangle.
In the context bar on the left there is a name: Rectangle.
Now click on the arrow icon and point to the rectangle you just drew.
Move the mouse over the Corner: field and set, for example, 20% with the mouse wheel.
And what's going on?
After setting the mouse wheel, 1% moves about 1.5 cm to the right of the field over which the mouse pointer was just placed.
Because the name is immediately changed from Rectangle to Rounded Rectangle, which moves the rest of the context box to the right.
Very often I catch myself that when I want to change the radius of the corner on the rectangle drawn earlier and pointing to it, only 1% is set by moving the mouse wheel over the field, and in a moment I notice that the radius values do not change anymore because the mouse pointer is not over the field radius value field.
In my opinion, it should be so that the name change on the context bar takes place only after clicking on the arrow icon.
Please try to do it as described.Another thing.
If I select the Rounded Rectangle Tool icon in the tool panel and create a rectangle, the name Rectangle appears in the context bar on the left. Only after clicking the arrow icon changes the name on the context bar to Rounded Rectangle.
After selecting the Rounded Rectangle Tool and creating a rectangle with rounded corners, shouldn't the name Rounded Rectangle immediately appear in the context bar?It's a minor thing, but with so many things being fixed and improved in this Beta, maybe those things could be improved as well?
Thank you. -
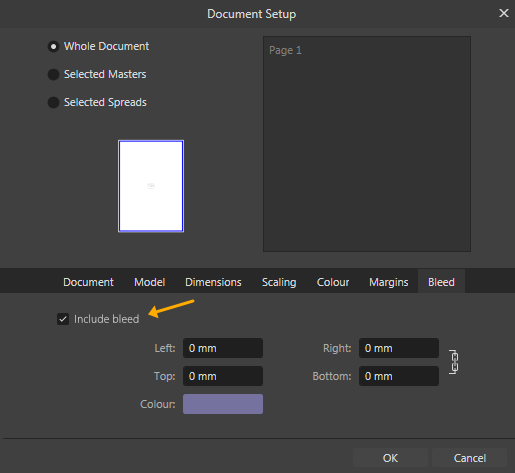
I always wondered why in the Document Setup panel in the Bleed tab it is not possible to select Include bleed, as it is possible in the Margins - Include margins tab.
Please mount this item to the Bleed tab in Affinity programs.
I don't know if this occurs on Mac, but Windows lacks this checkmark.
Many times during normal operation I wanted to remove bleed for a short time (I'm not talking about turning off visibility just setting it to 0) and at the moment it's only possible by setting the value to 0.
However, if there was this Incluide bleed marker, so only for a moment the value would be reset to zero.
Then if I wanted to set bleed again, I would have to remember what value was previously set.
And yes, if I had the option to select, I would only click on the Include bleed badge and I would have what I wanted.
Thank you.
-
I reported this bug in January 2019.
Applies to bleeds in Designer Windows 11.
Create a new document, e.g. A4 size, set bleed to 0mm.
A new document is created.
Check in the View Menu that Show Bleed is checked.
Now go to Document Setup and in the Bleed tab set e.g. 5mm.
Bleed will be shown.
Now try to drag some element from the Assets panel to the bleed area or draw e.g. a rectangle in the bleed area.
It turns out that the objects are not visible in the bleed area even though the bleed visibility is checked in the View Menu.
Now go to Menu View, uncheck Show Bleed, now check Show Bleed and now objects in the bleed area will be visible.So, probably since the very beginning of Designer on Windows, there's this bug that needs to be fixed.
However, there is no error in the visibility of objects in the bleed area if the bleed size, e.g. 5mm, is set when creating a new document.
In my example, the error occurs when I set the bleed amount only after creating a new document and editing the bleed amount.
-
W 2017 roku złożyłem propozycję zmiany koloru punktu na niebieski w panelu Przekształć (i inne propozycje) na tym forum. Gdyby nie zmieniło się to od 6 lat, nie liczyłbym na to.
Chociaż w ostatniej wersji Beta błędy i zmiany zostały wprowadzone przez Serif. -
2 hours ago, Sean P said:
This was an intentional change that came about from feedback from other users who found the icon spacing to be too cramped:
All right.
I haven't seen these reviews before.
Also, is it possible to add a setting to reduce or increase the spacing between icons in the tool panel.
In my work case, now after this change, the ones I use most often do not fit, and in the earlier version of Beta and Affinity 1, they were all visible. -
5 minutes ago, Chris B said:
It is done
")
I've noticed that whenever Chris B shows up, it's already cleaned up.
Thank you very much for the positive responses to forum users' requests.
During the implementation of this Beta version, there is finally contact with the creators of the program.
Thank you again. Mark. -
1 hour ago, Chris B said:
There are exceptions but I think this is just an accidental omission.
All right. Thank you. Then please add this tick icon to this popup menu in Windows Affinity.
-
I already thought that in the latest Beta the bug of saving to a network drive was fixed, but today I got an error when saving an open project. The project was created in the morning and was displayed on the monitor for several hours, saved in the meantime, and after a period of about 2 hours, when trying to save again, this message appeared (attached).
I remind you that this save error occurs on my computer only in all Affinity 2.0 and Beta 2.1 programs
Affinity 1.0 works fine. Other programs on my computer also have no problem saving projects to this network drive. -
12 minutes ago, anto said:
Here is Mac
Thank you.
I wish it was like that in Affinity Windows. -
1 hour ago, PaulEC said:
I'm not sure why you need a tick, it's easy enough to see what units are in use! You can see it on the rulers and, if the View Tool is selected, there's also a dropdown box where you can view and change the units.
Yes, I mean that in this drop-down box the unit in which the document is selected, then you can see exactly what is selected.
If anyone can take a screenshot of this menu on a Mac, it's done there, which is what I'm talking about.At this point in all Affinity Windows programs there is no check mark in the pop-up menu if you right-click on the corner of the rulers.


DWG and DXF Export
in [ARCHIVE] 2.4, 2.3, 2.2 & 2.1 Features and Improvements
Posted
OK
Dziękuję. Ale osobiście uważam, że ten format eksportu powinien pojawić się we wszystkich personach wydawcy. Tak jak poprzednio, wszystkie formaty eksportu są takie same w każdym Persona, więc dlaczego tylko DWG i DXF miałyby być dostępne tylko w Persona Designer?
Thank you. But I personally think that this export format should appear in all Publisher personas. As before, all export formats are the same in every Persona, so why should only DWG and DXF be available only in Persona Designer?