NormanPCN
-
Posts
25 -
Joined
-
Last visited
Recent Profile Visitors
705 profile views

-
 ryobg reacted to a post in a topic:
Add "auto" features to adjust/live layers control panels
ryobg reacted to a post in a topic:
Add "auto" features to adjust/live layers control panels
-
 xlynx reacted to a post in a topic:
Text objects convert to pixel objects when importing PSDs
xlynx reacted to a post in a topic:
Text objects convert to pixel objects when importing PSDs
-
Steps reacted to a post in a topic:
Add "auto" features to adjust/live layers control panels
-
NormanPCN reacted to a post in a topic:
[AP Beta 1.5.2.66] - RAW conversions
-
NormanPCN reacted to a post in a topic:
'Luminosity mask' selection macros
-
Fixx reacted to a post in a topic:
Add "auto" features to adjust/live layers control panels
-

[APh] HDR merge tone mapping
NormanPCN replied to NormanPCN's topic in Older Feedback & Suggestion Posts
Thanks for the reply. It did not occur to me to lower the tone "compression" slider when the default full setting is overblowing the highs. Seems the word "compression" is potentially misleading. At least to me. In my mind I was thinking that less "compression" would leave more highs. Thanks for making me look at that more. Anyway, lowering that does reduce the highs getting overblown with the AP tonemap but then introduces other changes in the tonemap that need to be compensated for, IMO. I choose those examples simply because when I was looking around for HDR software I came across those. In my view they are tough test cases. So I saved them to disk for future reference. What very little I have is way too easy to be a good test to evaluate the ability of an HDR merge and tone mapper to tweak tone range. Yes some of those TIFF examples referenced use the technique of generating extra bracket photos with the raw developer by deliberate over/under exposure. Not necessarily ideal practice but it works and frankly other HDR software handles those with aplomb. Anyway I have SNS-HDR. I have no need for Affinity HDR. I am just commenting about difficulties I have with the Affinity HDR offering on those tough examples. Comments they could maybe use to improve tone map/control capability in the future. With SNS I find it is easy to trivial to handle those test cases. -
The HDR merge works pretty well but we do not have any control over the white and blacks of the tone map/compression. The algorithm very much seems to want a certain amount of tones at the boundaries of the range. Shadow/highlight on tone map both harm contrast. Very much so with shadow. So these are not the best options to adjust these boundary tones. If we run the tone map persona a second time to get "more tone compression", well that does not help because the algorithm seems to want a certain amount of tones on the boundaries. Only the stuff inside those boundary tones gets the second dose of compression. I would suggest that we have some mechanism to control the algorithm needs for tones pushed to the boundaries. Something like whites and blacks controls. Also It could not hurt to have the tone compression control provide a little greater range/power. A double dose of this has issues without control over the tone pushes to the boundaries by the map. Some publicly available HDR bracket examples to demo my comments. Also note my relational comparison for Affinity HDR merge is against SNS-HDR and some Photomatix. "chain bridge" Note how the tone map algorithm really wants to blow out the lights on top of the bridge. Even -100% on highlights is not enough. A second dose of tone "compression" just blows the lights even more. "marble hall" an interior shot. The windows in the APh tone map are really bright and hard to control in relation to the darkness of the rest of the tone map. We lose contrast beyond a certain amount of highlight slider control. "sunset". Here we have two items. The blown brights of the sun and the super dark linear band of plants on the left side. Raising shadows for that dark band turns everything into mush. No contrast. The personal desire on situations like this is to have detail visible but dark. The brights/sun is reasonably controllable with highlights but with some contrast issues. But part of the point is, the tone map is pushing some % of tones to the boundaries and then we needs something else to attempt to compensate for the light/dark push of the tone map. It should be better to just let us control the white/black boundaries in the tone map controls and fine tune with the "standard" image editing controls. Also, it is easier to us to push tones down/up, darker/lighter than the reverse. The reverse can have contrast consequences. The tone map algorithm seems to do a very good job with tone compression while preserving contrast as best as possible. We only need a touch more/better control to be golden. "chain bridge" and "marble hall" HDR samples http://farbspiel-photo.com/learn/hdr-pics-to-play-with "sunset" HDR samples http://captainkimo.com/hdr-software-review-comparison/ Thanks for listening
-
Ruhell reacted to a post in a topic:
[APh] Zoom to Fit
-
It would be very nice if Zoom to fit actually used all the available space. Right now it leaves a very large border around the image to the edges of the workspace. Maybe a preference. Zoom to fit with no border.
-
AP Develop/Tonemap persona curves tool
NormanPCN posted a topic in Older Feedback & Suggestion Posts
Can we have a picker tool in the Develop and Tone map persona curves tool just like in the curves adjustment layer. -
Thanks for posting these macros. They are very instructive and useful. Instructive in that I wanted to see the curves you used in the blend options.
-
.45 beta I have two items in the library panel. If I click the menu for the bottom one only "Move Down" is enabled. This seems backwards as I think only "Move Up" should be enabled since the item can only move up and not down. The same situation exists for the top item in the library panel. The enabled items are reversed.
-
For me, the macros imported but there were no individual macros inside the newly imported/created library group. I'm using the Windows 1.5 beta.
-
JPEG 2000 does have a lossless compression mode. If one is not looking for a highly compressed image, then IMO, we are better off just sticking with things that are widely supported like TIFF.
-
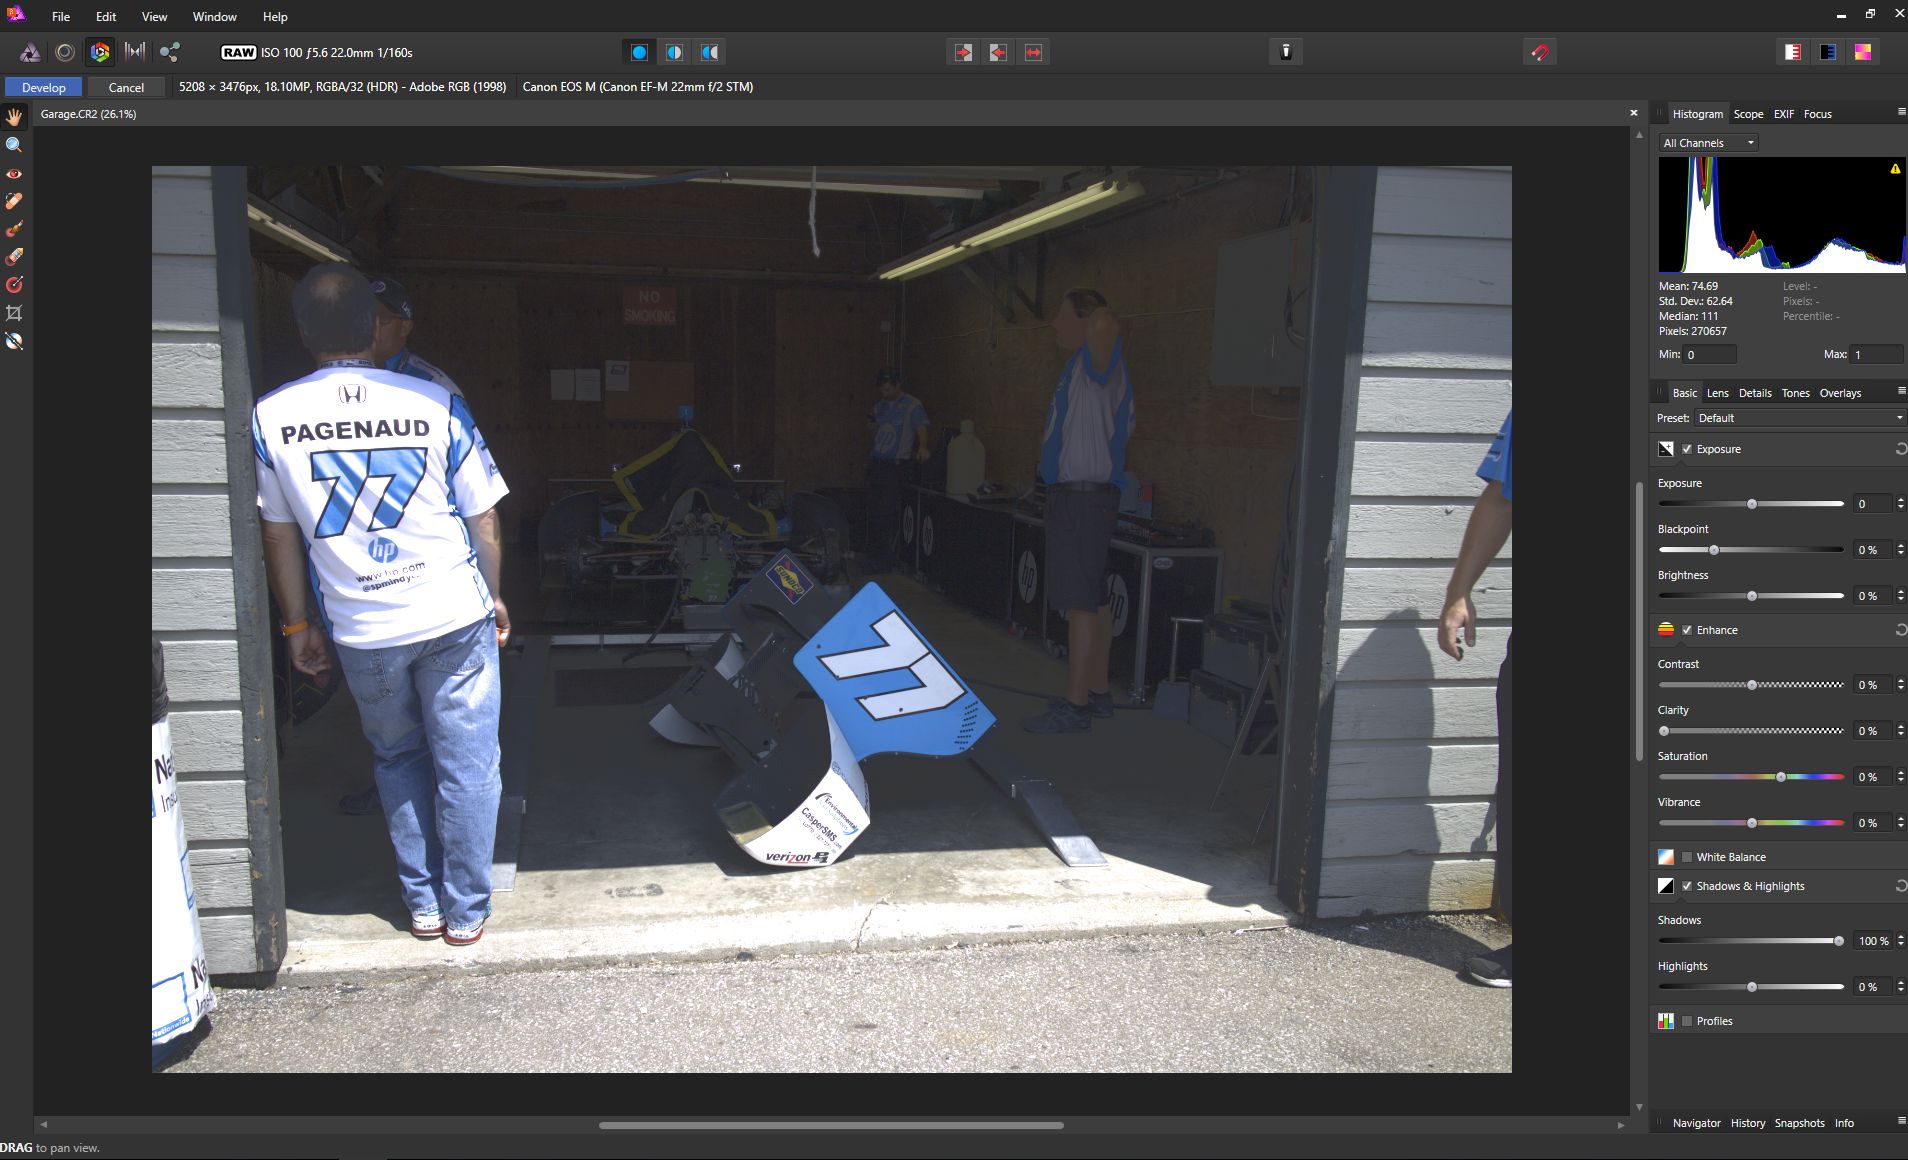
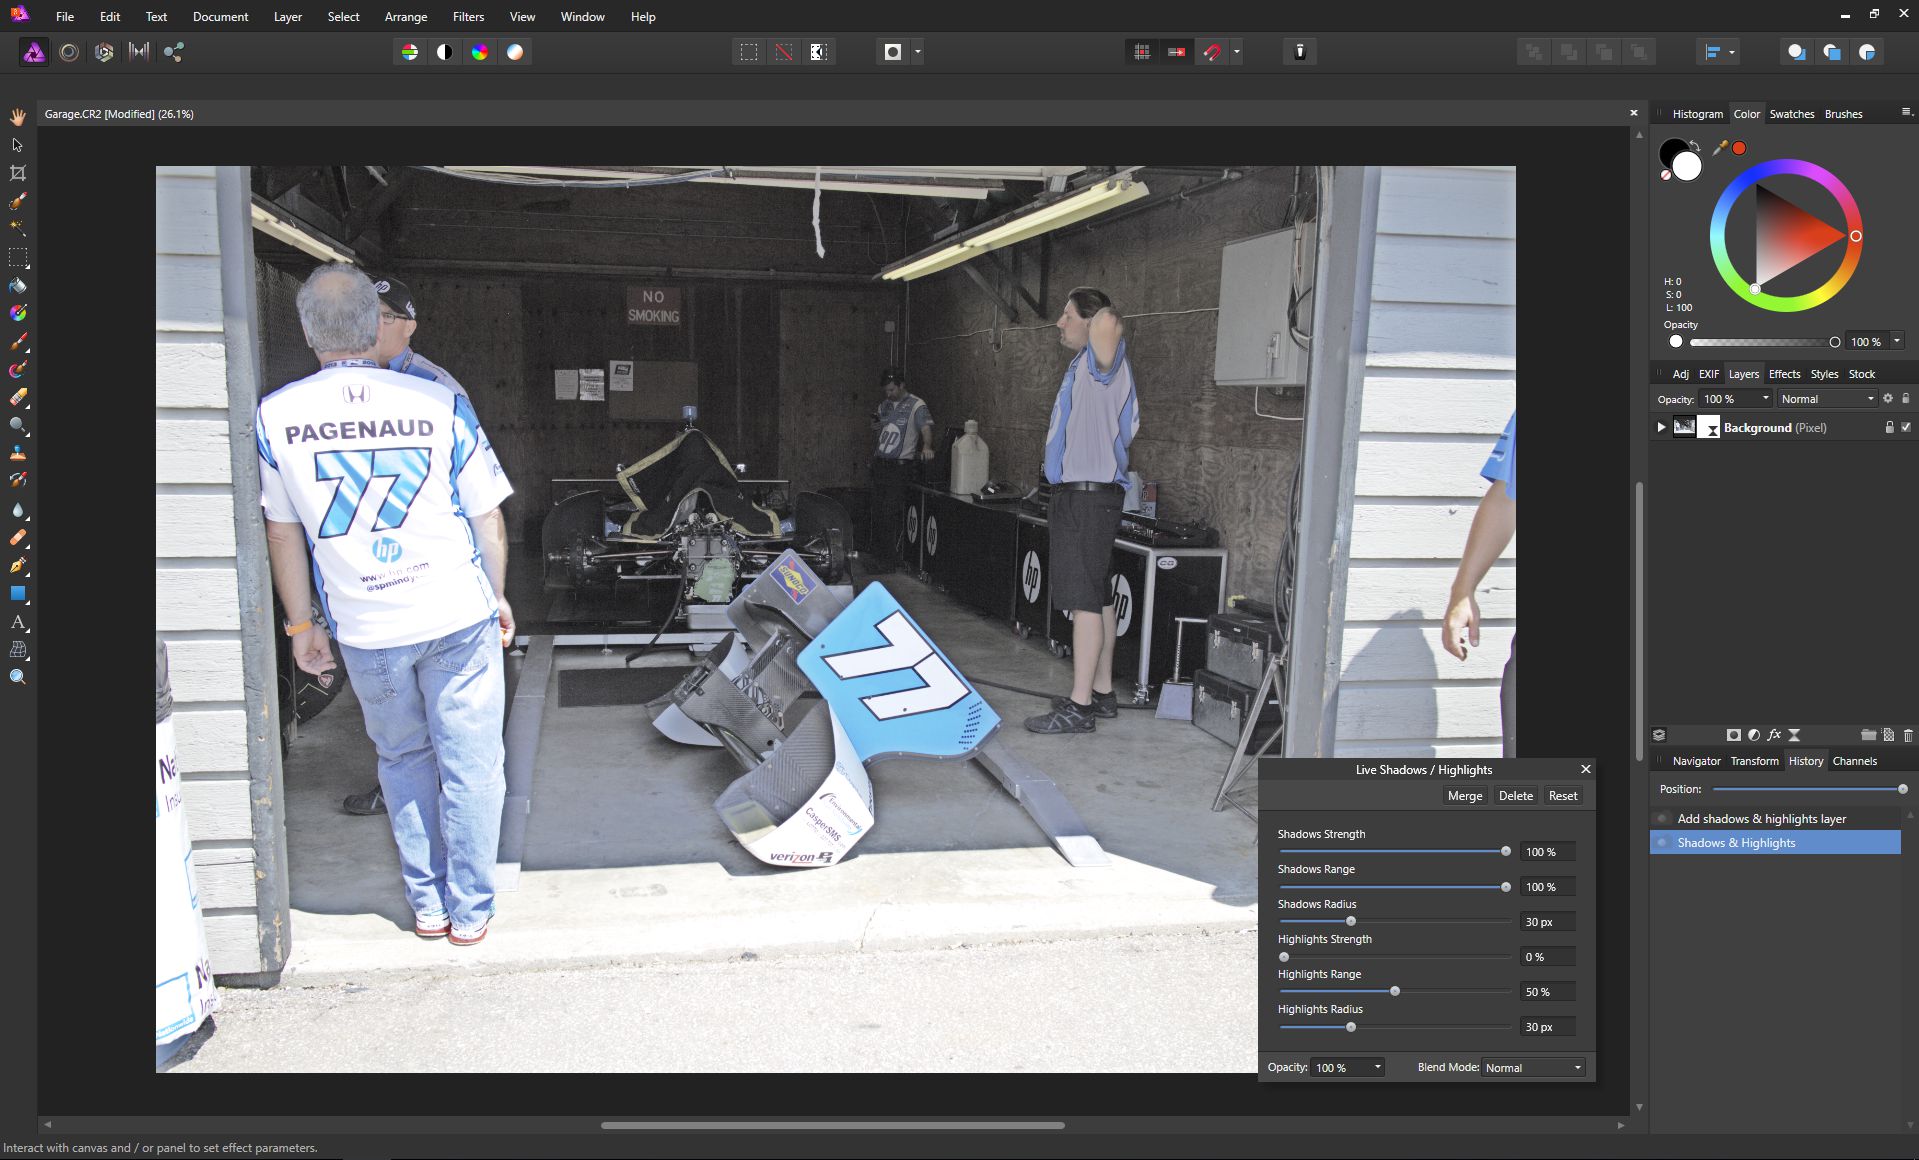
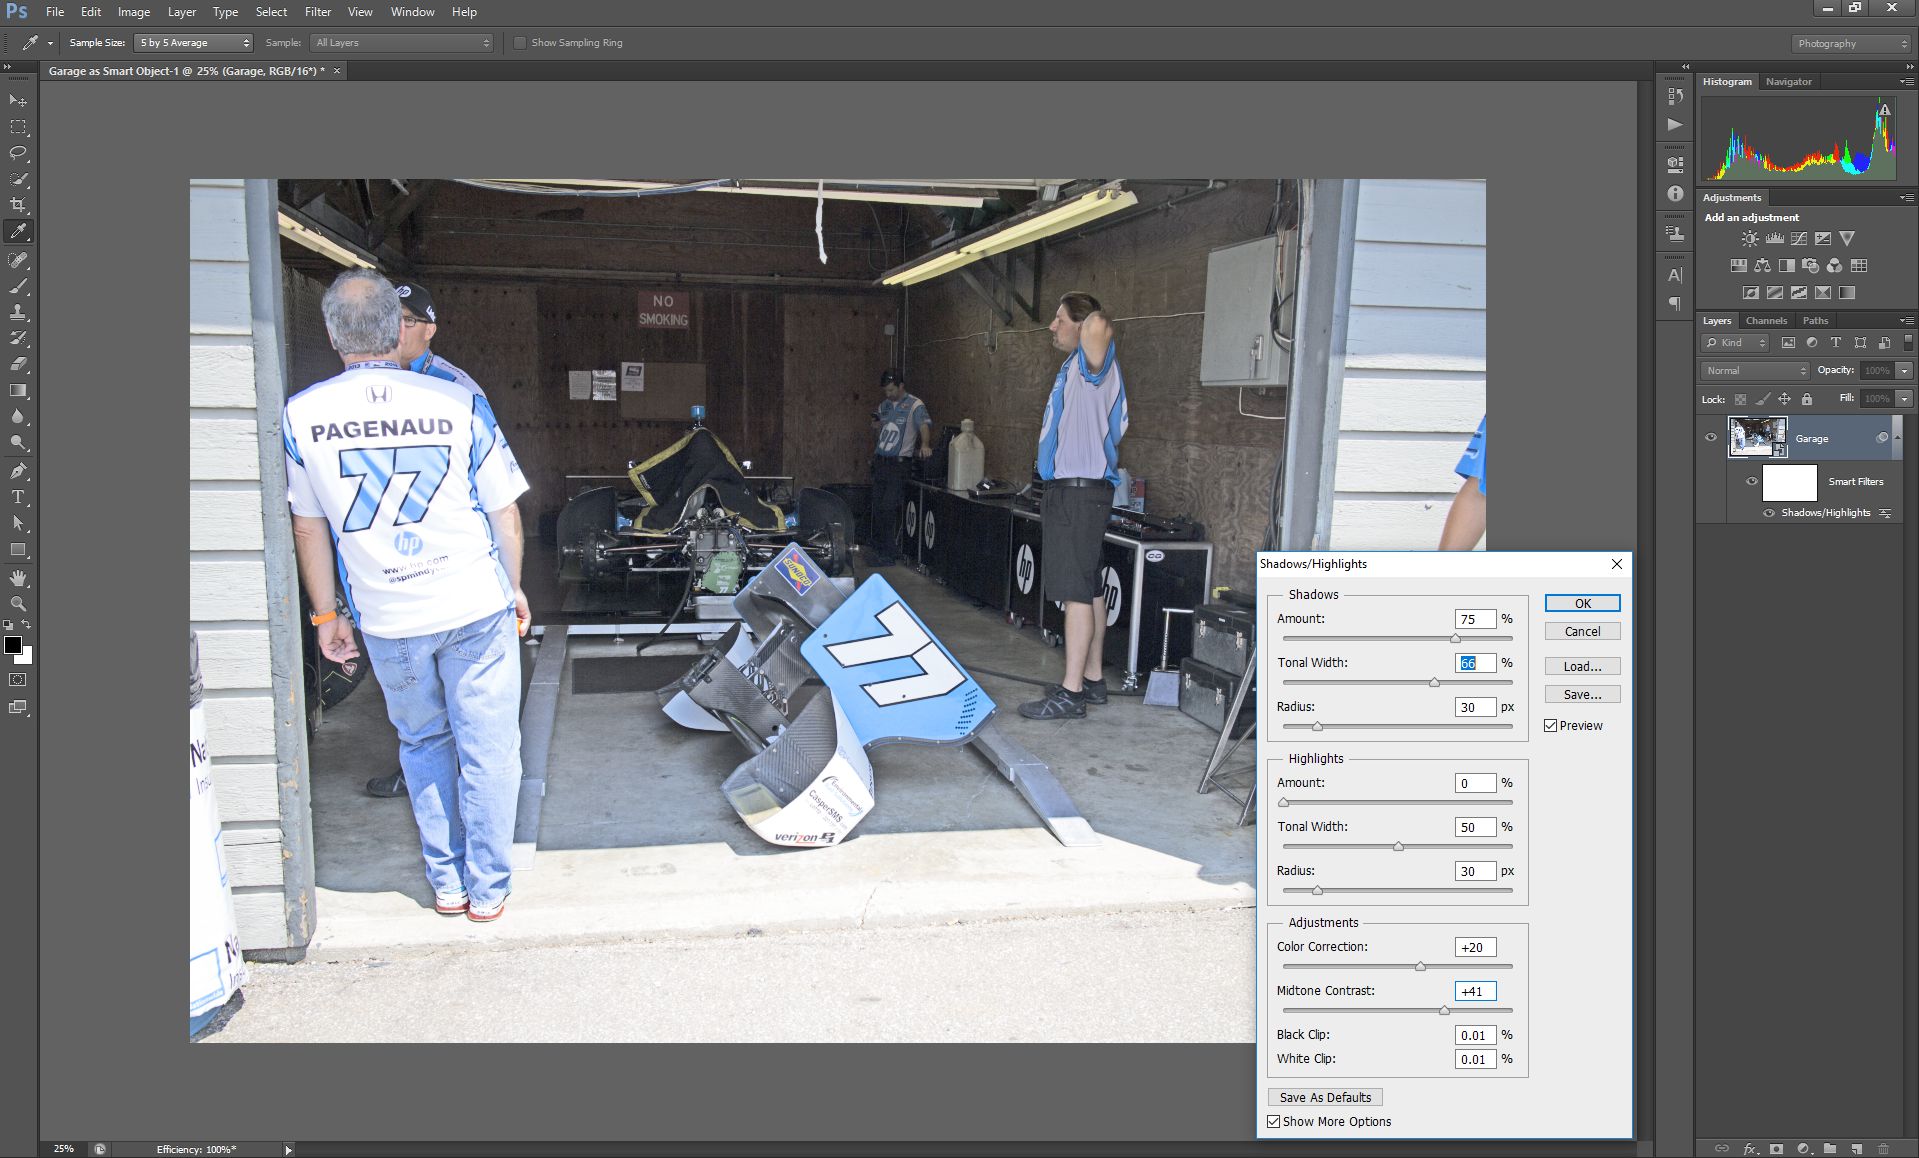
The Shadows/Highlight control in apps like Adobe camera raw, Lightroom, On1 Photo 10 and raw and Capture one are all very similar and very easy to use and very powerful. The control does not reduce contrast as it does in Affinity Photo (AP). It seems the adjustment in AP is similar to a curves like adjustment. They are probably adaptive algorithms to image detail. Attached is a brutal test photo for shadow raising. To keep things short I only list Adobe Photoshop examples as comparison. On1 and Capture One are similar to PS/ACR. Camera raw AP with tone curve AP without tone curve One can see the AP examples reduce contrast. Things that reduce contrast are generally undesirable in photo editing. The suggestion here is to improve these functions to be more like other apps. Easy to use. Preserve contrast. Preserve color. Okay AP has an adaptive S/H function. The Live layer shadows and highlight function. This is clearly modeled after the classic Photoshop shadows/highlight image adjustment. However AP does not have all the controls that the PS adjustment has and IMO those controls are necessary to get a good result. Photoshop AP The AP photo has washed out colors which the color adjust control in PS does fix. I can mimic the AP result in PS by turning the color adjust to 0 and I also have to move the midtone contrast down a touch. My suggestion/request here is to add those controls to your Live filter S/H feature. They clearly help the PS function and would probably help yours as well. I have also tried the Live S/H function on HDR images and again get color washout. Thanks for listening.

-
If raw files are opened in an HDR merge operation does the raw conversion apply the default contrast curve to each conversion. I wonder since I am seeing some bright highs and dark lows. I am wondering out loud since we have a merge and tone map in HDR merege and a contrast curve on raw conversion is probably not useful and maybe(?) harmful. Photomatix and SNS HDR don't seem to exhibit the issue but then they are completely different tone map algorithms so no direct comparison. Maybe AP HDR merge just needs more tone compression range (> 100) or ?. The link has publically available sample test raw HDR bracket files. The sun area is very bright and the plant foreground is very dark. Shadows and highlights control is one of the rare areas AP is pretty weak (contrast reduction (HDR, raw, adjust), washout (live filter)). So I was wondering about getting better (subjective) results from the tone map. http://captainkimo.com/hdr-software-review-comparison/
-
Open Photo Open prefs, color "tab" Change the 32-bit RGB color profile to Prophoto (it defaults to sRGB) Click close to close the prefs dialog. Exit Photo Open Photo and you will notice that the 32-bit color profile is back to sRGB. .39 beta
-
Denoise Live Filter not working
NormanPCN replied to gkaizer's topic in [ARCHIVE] Photo beta on Windows threads
I believe it does remember the slider position when you click extreme. The slider thumb must move because the value range is massively expanded. So the thumb moves to the left when you click extreme because 100 is a low value in the extreme range. The normal range is 0..100. The extreme range is 0..2000. The range is expanded so much that moving the slider thumb can be a bit touchy so small movements make a reasonable difference. I tested one ISO 12800 photo from an APS-C camera and I would get nowhere near 2000. More like 200..500. -
NormanPCN reacted to a post in a topic:
cr2 RAW files and .xmp files
-
Denoise Live Filter not working
NormanPCN replied to gkaizer's topic in [ARCHIVE] Photo beta on Windows threads
You probably have to click the extreme box to get more range in the slider for more reduction. The default 0-100 range does not do very strong noise reduction. -
Masks - my biggest negative so far
NormanPCN replied to Julian_K's topic in [ARCHIVE] Photo beta on Windows threads
I am in the same boat as DavidW. Copy copies the whole layer and when I paste I get a whole duplicate layer. I have found no way to "move" the mask from the new layer to another layer or copy a mask from one layer to another. Here is a quickie video that shows my attempt. No voice as I have no mic. I created a quickie selection, created a live bilateral blur. Then create an adjustment layer and try to copy or move the bilateral blur mask onto the adjustment layer. https://www.youtube.com/watch?v=adaet8bveLY&feature=youtu.be The only steps I have found is that the selection MUST be active at the time of live/adjust layer selection. So create/set a selection from the layer layer and then create the live/adjust layer. No way I've found to copy/move *after* layer creation. I can paint or refine a mask after the fact (creation) but not set a mask. -
Photo has toolbar buttons for Auto levels, contrast, color and white balance. These seem to be destructive. I suggest that where applicable you put an auto button, with possible options, into the adjust/live layer control panel to setup the auto setting on the existing controls. This is non destructive and also provides the user ability to tweak the auto settings. For example, Photoshop has an auto button in levels adjustments with many types of auto adjustments one can choose from. It would seem to me that if it is useful to have a toolbar button for such adjustments then it could be even more useful to have those adjustments be available in non destructive layer(s) that are user tweakable. Some of those four items should fit into currently available adjust/live layers.