WeekendProducer
-
Posts
20 -
Joined
-
Last visited
Recent Profile Visitors
1,230 profile views

-
 I'm stuck with trying to create a new document in Affinity Designer and not being able to see the popup dialog window after choosing "New document" from the File menu. The source of the problem is that I'm using a 4K monitor as a single and Primary screen for my laptop. After I went away with my laptop, the pop-up New document window is showing somewhere out of the visible (FHD) screen of my laptop. This is really annoying. The popup should be rendered in the middle of the parent window, not independently to the last known, and in my case, non-existing and out of reach, screen position.
 -
I run into this problem several times, after importing an image, image was rasterized, so I could select a part of it. After copy and paste that part, it got stuck where it was first pasted. It cannot be moved anymore. I can select it, move it up and down trough layers position, I can hide it and delete it, but move/cut/copy don't work anymore on that pixel element. Deleting it and going again trough the process of selection, copying and pasting and the problem is gone...
-
Yes it still is, so annoying... So what I do (clumsy way) is duplicate (actually triplicate) the object within or on intersection to make the line disappears. This could be fine for some situations, but for other is still makes multiple instances of the same shape which may cause mess when trying to modify the shape(s) in any way... Exporting in formats that needs to be used in production, print, post processing and so on may also be a problem...
-
 WhiteX reacted to a post in a topic:
some visible hairline that irritate
WhiteX reacted to a post in a topic:
some visible hairline that irritate
-
I hate the triple extra workflow (and additional artboards and even additional document) I just did to accomplish something so simple as keeping the rasterized part of the image visible beyound the artboard just to have the bleed visible as it should be. Affinity Designer desktop really needs some love. You (Affinity team) put so much focus into that finger friendly iOS iPad version that it seems it hurts real production versions...
-
After rasterizing an image all the part of the image out of the Artboard has been cut off and the bleed area which has been setup for the document has been ignored - I have no image parts visible out of the Artboard anymore. This of course is not acceptable as I need that part of the image outside of the Arboard to fill the bleed area - that's for the bleed is for. How to solve this? I have special situation where I need image to be rasterized together with some overlay text elements to get the desired output (for some reason what I see is not what I get after print export, so I only get the desired result after rasterizing the visible elements. Less important but a bit strange to see - The command for Rasterize in Affinity Design is written as Rasterise (with S instead of Z).
-
WeekendProducer reacted to a post in a topic:
What Is Missing For Web Design
-
I produce digital content for web, so a per pixel precision is a must. I won't go into all the nonsense of moving and creating objects ending with subzero values (size and position) no matter the "force pixel alignment" and other tools checked, in addition to all above, after exporting (creating slice from some object within artboard placed on some colored background) I got those subpixel thin hairlines visible!!! On the end product?!?! Visible on 1:1 So I just end up with sending to my client this BS (attached) as a solution - unfortunately I noticed the exporting error too late. Check the thin blue right and bottom border that should not be there. Slice size exactly matching the object size. Why should we not consider this as a bug that needs ASAP fix please?
-
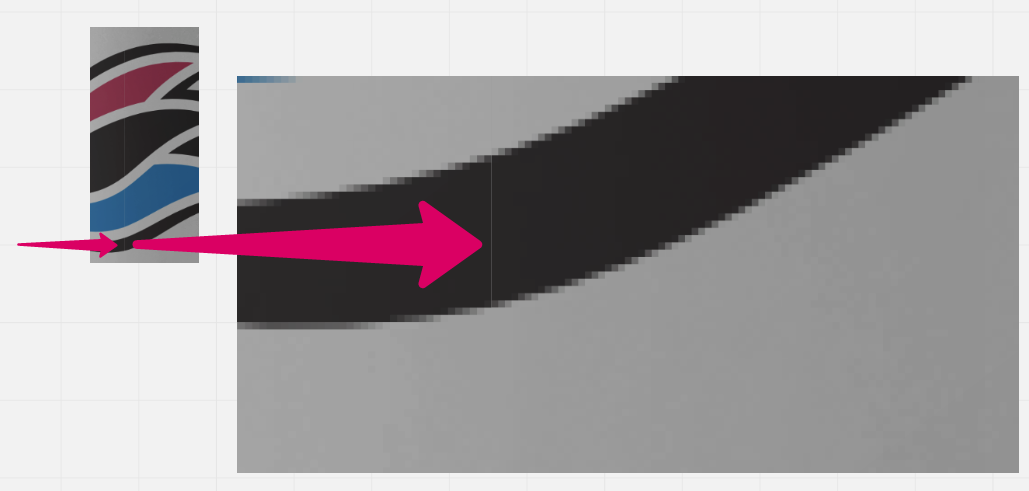
I found new annoyances, within Pixel Persona and with raster image. If you select one part of the raster image, perform a cut & paste (without moving anything from it's original position) you will end up with a same subpixel hair thin line showing the cut which stays visible on the final export file. Duplicating the object(s) doesn't help here.
-
WeekendProducer reacted to a post in a topic:
some visible hairline that irritate
-
I was creating and working with vectors in Adobe Fireworks (!!) and some Inkscape (free) and I found no trace of this problem before I switched to Affinity Designer. However I found more issues I never faced before in any vector software. 1) the stroke inside setting within a filled path leaves visible background fill color visible as a thin line on the outer edge of the stroke (or path, or object). https://www.dropbox.com/s/lm4roklhr6nezee/Affinity%20Designer%20stroke%20inside%20fill%20outline%20visible.PNG?dl=0 2) Another problem is Affinity D only because of nested/masking paths feature is possible within AD only. The thin white line (this one is always white no matter of the BG fill color or if the stroke even exists) is visible when child (nested) path is placed over the edge of the parent path so the child path is partially masked behind the edge of the parent path. The white edge is visible where child and parent paths are "touching" or crossing over each other. So this is a serious rendering problem - obviously not edge near edge related as this is path crossing / overlapping edge - that affects the work and on large projects there are no easy or quick fixes for this as it becomes a designers nightmare. https://www.dropbox.com/s/tzm0958i0epq2gi/20170215%20Affinity%20Designer%20object%20borders%20visible.PNG?dl=0
-
This drives me crazy. Windows version has the same problem so it's the way the App (doesn't) works (well). I need that stroke inside and having a background outline visible around the stroke is a serious flaw. It's a BG (fill) color as if you change the fill color the thin line around the stroke also changes it's color. ASAP fix needed. 1) https://www.dropbox.com/s/lm4roklhr6nezee/Affinity%20Designer%20stroke%20inside%20fill%20outline%20visible.PNG?dl=0 2) And another completely different example with no strokes at all. So completely different PROBLEM. This is just an object path visible as a thin white line no matter of the fill color (I changed the fill color it's always visible as thin white line) but ONLY when and where there is a child path within and crossing over the edge of the parent path (see layers panel). https://www.dropbox.com/s/tzm0958i0epq2gi/20170215%20Affinity%20Designer%20object%20borders%20visible.PNG?dl=0 P.S. direct link included for both examples as the adding image as the dropbox link is not working...