

vovkasolovev
-
Posts
21 -
Joined
-
Last visited
Posts posted by vovkasolovev
-
-
19 hours ago, Maciek Blaźniak said:
Hi,
It's 2020 and there is still no no built-in spatter effect in affinity. Here's how I deal with it with help of live displacement map filter from APhoto. Just o
 pen the attached file (spatter_1.0.afdesign) in Designer or Photo and move the only layer to your project. Works quite well live, when active all the time while creating the illustration. However, it may not work for people who do not have an Affinity Photo license (I didn't check it).
Thank you! It's works! Without AP!
Another great thing is that I can select Displacement map myself. With combination with image size change, there is full control over edges of a objects now. -
Hello!
Please, make me a hint, when we can expect PNG8 with full alpha?
I found myself less working with AD because of lack of this final step that I regularly needs for app and web development, and to keep small file size in AE projects.I searched on forum, and see that this is often requested in last 2 years already.
AD have magnificent Export persona mode, that is great for automatisation, and really need this feature. -
In "Grid and Axis manager" the size of grid spacing measured in pixels. This is right for square grid, but has no sense for any other type of grid. Right now other grid types is defined by diagonal spacing in rotated pixels.
The only reasonable way for artists measure non-square grid in pixels is to define some height or width of the grid in real non-rotated pixels, but not actual side of grid.
To understand it better, please, take a look on my example, with typical for pixel artists 2:1 isometric grid.
-
Affinity Designer have a really great grid tool. But there is no tool to work with grid directly.
I suggest Grid Vector Brush Tool. It will create vector shapes by grid cells shape and connect shapes together. It will have option to unite new object with same object we paint before, it will have option to subtract underlying objects we paint before with another color.
This tool will help you to draw easily isometric art and vector "pixel art". It will be more straightforward to use with grid than Vector Pen tool. It can become more understandable for beginners, and time-saver for pixel-artists.
-
On 05.01.2018 at 8:15 PM, reglico said:
Hello vovkasolovev,
In "Draw Persona" and "Pixel view mode"mode, click on the "Blend ranges" cog in the layer panel.
Click on "Coverage map" and add points to give the line an irregular appearance.
This is just a workaround that may not be right for you...Nice suggestion!
But no: There is no AA, phantom pixels in the clipping, and does not affect the horizontal line. General problem is that this is a modification for each individual object and it depends on the size of the image.
Well, I realized that I was looking for some kind of filter effects over object groups. But in AD there are no filters.
-
On 05.01.2018 at 4:32 PM, gdenby said:
AD is not the right software. AP might. The diffuse live filter set to a very low value with an also low opacity does much the same. Perhaps add a tiny bit of gaussian blur.
Thank you. I do not see any advantages over PS in this workflow.
-
Unfortunately, strokes works only with basic shapes, but add a lot of limitations and makes uncomfortable real workflow, like when you make a lot of changes, use object clipping or gradients.
-
Hi!
Please, help me figure out how to add little noise on the objects edges in AD, like would do Spatter effect in PS?
I wish it can be done non-destructively with vector objects, without brush strokes outline, because I need lots of objects clipping and sometimes gradient fills. -
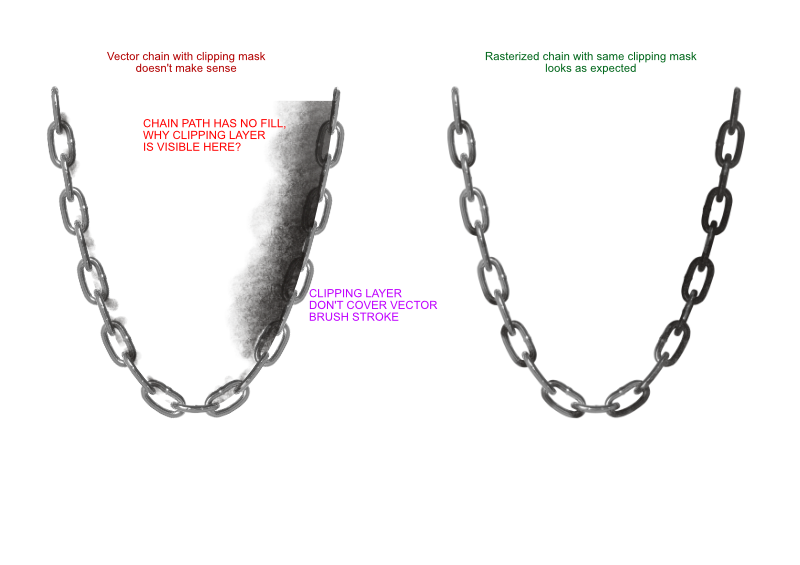
Hi!
The problem is that vector object fill is always define clipping mask and affected by it. Even there is no fill color.At the same time object stroke don't define clipping mask at all and not affected by it.
Here is example:
Chain on the left is vector path with brush stroke with pixel "shadow" layer nested inside for clipping. Looking odd.
On the right is same construction, but chain was rasterized. Please, check attached .afdesign layers to understand.
I see two problems are:
1. Parent object fill is always affect the clipping mask
2. Clipping layer have nothing with parent object strokeI understand, that it's pure boolean logic happens there. But this make no sense and not what artist expected.
My suggestion, that vector chain must be as his raster copy on the right.
-
Thank you for your experience and suggestion. Now I understand that AD vector strokes is not applicable for clippnig. My dream to make full vector brushy illustrations in broken, back to PS now.
… Instead of clipping the inside shape, leave it as a separate. object Copy both shapes. Subtract the inner shape from the outer. Paste the copies in, change the layer stack order, and intersect. There will be 2 vector shapes that fit together, and each can have its own vector stroke applied. Depending on the layer order, one or the others stroke will sit on top. The vector modifications remain available for both. Additional nodes, lines stretched, different strokes, etc.
If I am understand you right, I will get just two separete objects. That not what i want. For my workflow I need one main vector object with custom brush stroke "the hairstyle". And secondary «hair shade», it can be vector or bitmap.
-
The one you made on the right, the smiling face works. So use that method.
Not certain about what you did to make the smiling face, but I had similar results when I drew the outer hair with the fill and the stroke the same color, copied the object, and then rasterized it. Then pasted the former vector form into the pixel layer, where it could be changed in shape and color as desired, but clipped by the pixels. Didn't seem to hard to me.
Thank you, but my question is about how to keep it simple in nondestructive vector shapes. Rasterization is a destructive method and take away main AD advantage, like stroke width, brush type, upscaling. So it's became same raster workflow with clipping like in photoshop. It's a pain if you have to change a shape (like new hair style). In vector shape you just move an anchor point.
-
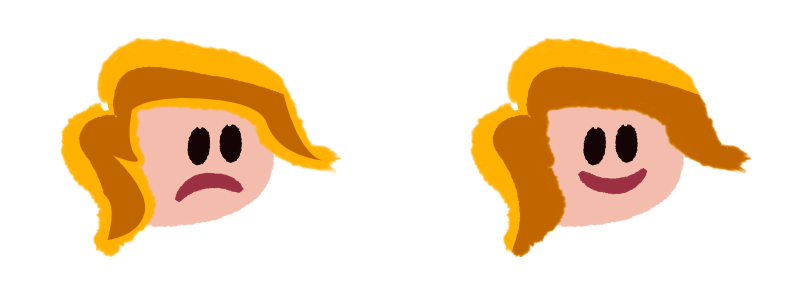
Hello!Is there a way to put a clipping object over a parent stroke?As I understand, right now clipping do not affect a stroke, only on a fill. ("Draw behind fill" do not affect on clipping area). So all clipping conception becomes useless for illustrations with stroked edges. I hope I am wrong.Here is little example: shade on the hairs.On the Left head hairs with the clipping, and you can see light contour on right-bottom parts, with must be covered dark. On the Right head is simulation what I want to achive. It's not very usable on detailed illustration, because you have to edit 2× objects, to make any change.Hope I make my question clear! Sorry for my English.
-
I suggest to impliment point reduction feature like in Astute Graphics InkScribe plugin for Illustrator, please.
This plugin have best tool for point reduction while keeping line paths to be the same, it have very understandable logic and keyboard combinations.
https://youtu.be/P0FnOAamnpw?t=4m2s -
Why price for Russia is 3790 RUB?
It's 58.5 €, not 49.99 €.
-
What tablet model are you using?
Wacom Intuos 3
I've set my brush settings to match yours and I have an Intuos 3 and I can't reproduce this. It almost looks as though you draw the initial line, pause, put pressure on and then carry on drawing the line. Can you send me a screenshot of the context toolbar for the bush so I can see what settings you have enabled on there?I make a video to proof and answer:
https://yadi.sk/i/cCJAOxPpxW5Dc
(Sorry, video file won't attach, no permission)
-
-
Thanks!
(Do not understand why it's available to turning it off.)
-
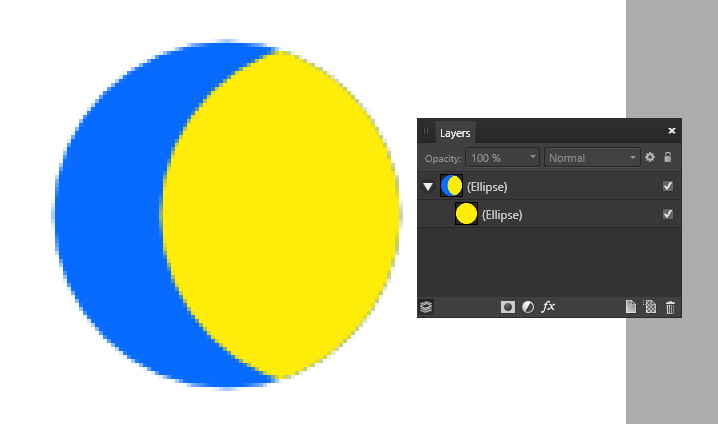
Hello,
Found bad rendering in the Pixel view mode. If you put some light object inside a dark object there is dark outline around the parent edge with alpha pixels.


.png.a889fcd01821232a14f82c428249f0a3.png)


How to create perspective lines like on a bridge from the main image for Affinity Designer 1.8?
in Pre-V2 Archive of Affinity on Desktop Questions (macOS and Windows)
Posted
Hi!
Please, teach me how to create lot of lines that emphasize the perspective of the bridge, as in the main illustration for version Affinity Designer 1.8 (marked in red in my picture).
In the Welcome window, there is a sample file with this image and even a mention for a tutorial, but I did not find such a lesson.
Get sample file in AD: Help→ Welcome→View Samples→(Page2) Sunset Bridge Marianna Orsho
Large preview from this artice.