

Sean P
-
Posts
10,108 -
Joined
-
Last visited
Everything posted by Sean P
-
Hi Claudia_D, Is your border applied from the Layer Effects dialog? If so this is a known issue that is with development to be looked at. Regarding the values themselves, currently it is not possible to get them to display in the same document units, however if you type a value in mm and put 'mm' after it, it will get converted to the equivalent value in pixels.
-

Large selection area around rounded rectangles?
Sean P replied to BradKoerner's topic in V1 Bugs found on Windows
Hi Brad, It looks to be caused by the 'Scale with object' tickbox enabled on the objects. Turning this off will stop them being selected from far away. Regarding those two objects do you know how you created them and got them to the size they were? I have a feeling if they've been scaled with this ticked then it could be the reason the selection is off. -
Text flow broken in existing file (curves and frame)
Sean P replied to oschrenk's topic in V1 Bugs found on macOS
Hi oschrenk, Thank you very much for that, I've reproduced the issue with Nyala and have passed it on to Development to be looked at. -
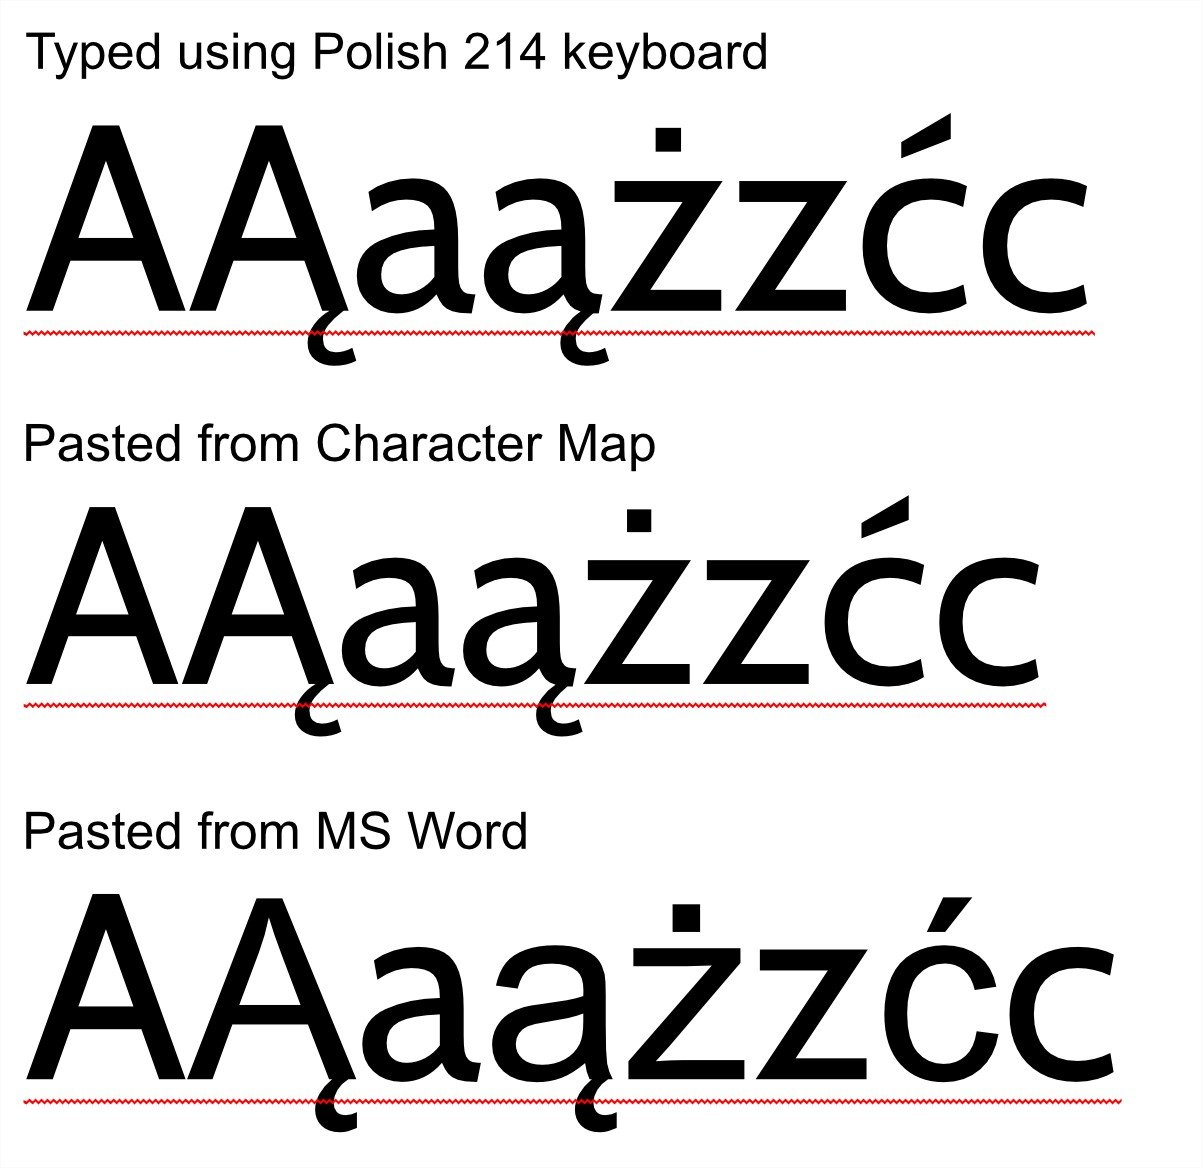
Hi sifatboy, Thank you very much for your files - they've been very helpful. The issues illustrated in your document is a known one that is with development to be resolved. Unfortunately for the meantime you will have to stick with your ANSI fonts. Thanks again for letting us know!
-
EPS export creates a box around text with layer effects
Sean P replied to malayali's topic in V1 Bugs found on Windows
Unfortunately as tudor says, the EPS format does not support transparency and filter effects, so unfortunately it has to rasterise those elements, which means it needs to rasterise them with part of the background, and unfortunately complex gradients mean they don't always match perfectly or look seemless. The issue is that a lot of stock websites expect EPS files to have come from Adobe Illustrator. This is because AI essentially adds a separate stream of data containing a native AI file it can recognise, so when opened back up in AI it is exactly as the author intended and isn't bound to the normal restrictions of the EPS format such as no transparency. With that said it is interesting that your EPS does look fine in both AI and also when converted to PDF using Acrobat. I will pass it on to development to find out why it is drawing so differently!- 6 replies
-
- 1
-

-
- layer effects
- eps
- (and 2 more)
-
Vector pencil tool lines breaking, Apple pencil
Sean P replied to dmstudio's topic in V1 Bugs found on iPads
Just to echo DM1, make sure that the pencil tip is securely fastened and doesn't wobble. I've had it before where it felt the pencil had broken, but the tip was just loose! -
SVG with invalidsize and viewbox causes crash
Sean P replied to DanKolle's topic in V1 Bugs found on Windows
Hi DanKolle, Thank you very much for the file and letting us know. I've reproduced the crash and passed it on to development. -
Hi Craig L, Thank you very much for the files. Unfortunately it was crashing for me using the 1.7.3 Mac App Store build, however I was able to use the 1.8 beta and open the file. When you say Publisher uses nearly 20gb of memory and having less than 1gb left are you referring to Hard Drive space on your Mac? If so then I believe this is happening because your system RAM is getting filled up, and is then using your Hard Drive as a swap disk for the additional memory needed for an image heavy document. I found that after opening your document and scanning through the the pages it took up an additional 15gb of HDD Space I had. Any further actions I wanted to do then started to eat into the remaining HDD space. Unfortunately the only simple 'solution' at the moment is to try and free up (80-100gb if possible!) hard drive space on your Mac. This should help work around the issue in the meantime and hopefully allow you to continue editing your documents. Additional operations will eat up more space, but hopefully you'll have enough to be able to complete the work. Let us know how you get on! I will get it passed onto development to see if the handling can be improved to stop it taking up as much resources as it currently is. Thanks,
-
Hi Andy K, Welcome to the Affinity Forums! Do you still have the 1.0 folder in your Recycle Bin? If so would you be able to zip it up and upload it to our internal Dropbox account please? I take it deleting this folder resolved the crashes you were getting? https://www.dropbox.com/request/1nnqPgDpR7zDcXo1KVP3 Would it be also possible you to attach a copy of your entire Fonts folder to the link above as well please? To do this go to C:\Windows\ and then right click the Fonts folder and select Send To > Compressed (zipped) Folder? Thanks!
-
Rotating embedded drawing doesn't rotate light sources
Sean P replied to pekranodon's topic in V1 Bugs found on Windows
Thanks for confirming. I've passed it on to development to investigate. -
Hi Maciek220, Are you typing these straight into Designer or pasting them from a different application? I've found that I only get the incorrect characters when pasting from MS Word. If I type them straight into Affinity (using Polish 214 keyboard layout) they appear correctly.

-
Problems when switching between the lines styles
Sean P replied to PaRunk's topic in V1 Bugs found on Windows
Hi PaRunk, Do you find the textured brush goes away if you reset the pressure? There is a known issue that if a brush has pressure then switching back to a regular line style will still display the textured brush. If this isn't what you are seeing are you able to get a screen recording that demonstrates the behaviour please? -
Hi Mintsauce, Are you able to attach the source RAW file, rather than just the JPEG at all please? Thanks!
-
Hi Craig L, Welcome to the Affinity Forums, firstly let me apologise for the delay in responding! Would you be able to upload a copy of your document and the images used (presuming they're linked) to our internal Dropbox account using the link below. We will be able to investigate the issues you are encountering with your document. https://www.dropbox.com/request/XlgMeXwTMmCwTZ1BruuU Thanks
-
Alternatively I found Inkscape imports our SVG at the correct size if the document is 96dpi. I would be interested to see if the SVG below works for you. If so then simply work in your desired units at 96dpi. Doc_MM_96dpi.svg
-
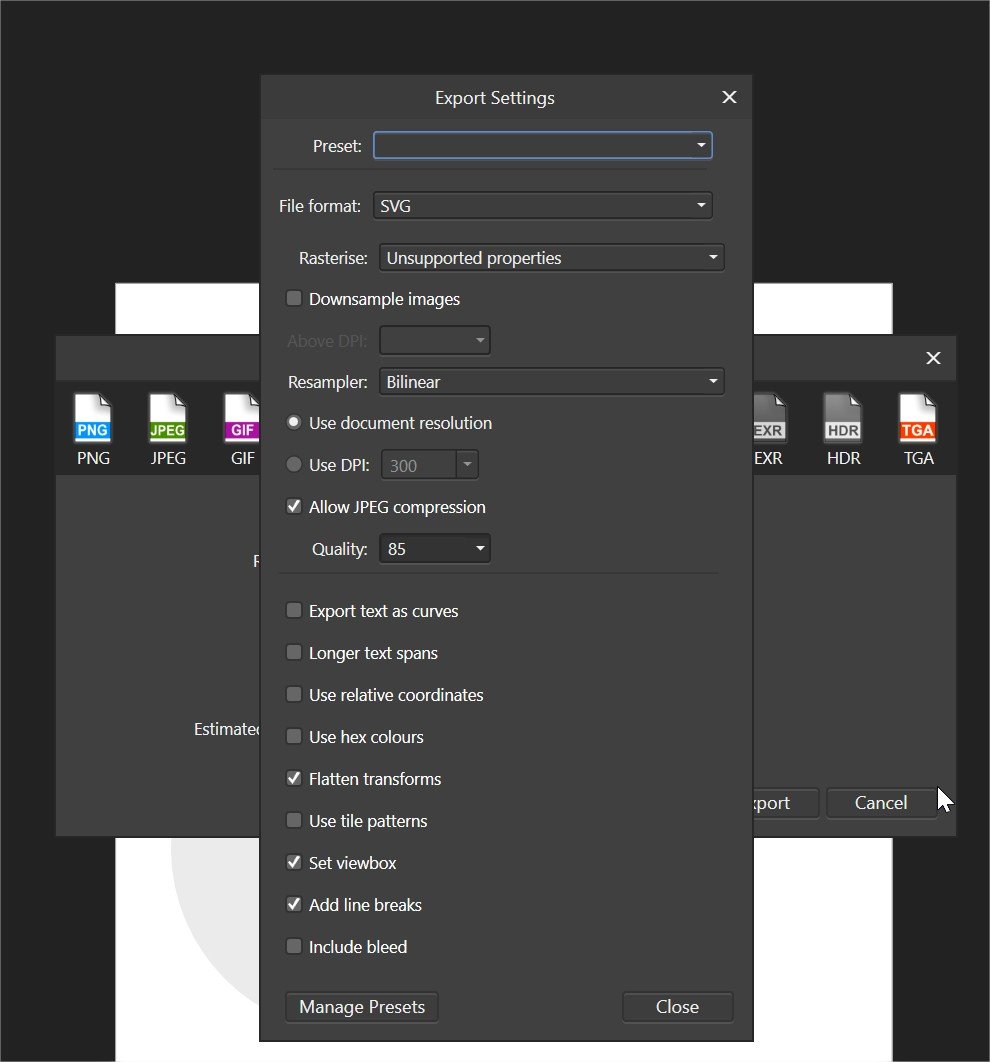
Hi bjoebirk, Unfortunately we don't have access to a Glowforge Laser Cutter or the web-based software to import the SVGs to try this however we've had similar things reported before and I believe it is primarily caused by our exporter not exporting to Physical Units such as mm. Instead it will use pixels which isn't great when it comes to wanting to use lasers. In the meantime I believe the following may work for you it allowed me to import documents correctly into Inkscape with the correct scaling, which has previously been an issue. Use pixels in your Affinity document (but treat them as mm). For example if you want to cut an 18mm square on an A4 sheet then use a document size of 297x210px with an shape size of 18px. When exporting click 'More' and ensure that 'Flatten Transforms' and 'Set Viewbox' is ticked. You may also find you will want to disable 'Use relative co-ordinates'. Once you've exported the SVG open it up in a text editor and look for the <svg width="100%" height="100%".. area. Change these two values to the height and width of your document (should be the same as the viewbox) and ensure you add mm to them. So it should read as <svg width="210mm" height="297mm" This alone should force Glowforge hopefully to import them as mm, and all your other values be sized to this and should match up. This was what I found with Inkscape, if that doesn't work you may need to have a quick look through your SVG and remove any instances of 'px' for sizes. I've attached three documents. The first is the AFDesign document I was using, the second is the SVG straight from Designer with the following settings, and the third is just making that change to the height and width field above. I hope this workaround helps you use Affinity Designer with your Laser Cutter! ExportStraightFromDesigner.svg ExportStraightFromDesigner_PageSizeFixed.svg DesignerTestDocument.afdesign
-
In addition to above, the link I posted suggested that the correct method is to specify 'useDingbats = FALSE' as part of the command line for the ggplot2. From what I can tell it looks like it is used by r, but thats just from a quick look. You'll have a better idea, as I've never used r!
-
The software is treating them as characters because they are characters inside the PDF exported from what I presume is R 3.6.0. I've attached a screenshot showing your PDF in Acrobat Pro with the Preflight opened. This shows that those are text objects using ZapfDingbats. The screenshot shows that that speific object is using 18.53pt font size, which is retained in Designer when opened using Arial. I do believe Acrobat is also doing something different with ZapfDingbats as the actual document properties lists ZapfDingbats as the font, but then says ActualFont 'AdobePiStd' and when you try to edit the text it reports back as being Adobe Pi Std. This link below indicates this font has caused issues with other software when trying to import and someone suggested that installing the font as a normal one helped. With that knowledge I searched my Mac for AdobePiStd.otf and then installed it like a regular font and then when the PDF is opened in Designer I can assign that as a font to use, and it gives you the correct sized objects.
-
Hi jborgbarthet Thanks for the file. The issue here is that the original EPS is an Illustrator formatted EPS file which means it contains two streams of data: Regular EPS data and an Embedded AI file. What this means is that when Illustrator opens the EPS it will read the Illustrator stream showing the file exactly as it was saved when created in Illustrator. However there will be Illustrator elements in the file that aren't compatible with EPS (for example Mesh Fills) and will get rasterised into pixel data in the EPS stream, when saved. But when opened in AI they appear correctly as vector objects because it is using the AI stream. When the EPS file is opened in Affinity we are unable to read the AI stream and instead have to open the EPS stream with the rasterised data. As such this isn't a bug, just an annoyance on how Illustrator exports EPS files and how most stock sites seem to only want to use the EPS format (that isn't quite EPS)!
-
Text flow broken in existing file (curves and frame)
Sean P replied to oschrenk's topic in V1 Bugs found on macOS
Hi oschrenk, Could you attach a file that demonstrates the issues you are getting please? Do you have a file that opened fine in 1.7.2 that now doesn't in 1.7.3? Regarding the text flow, could you also attach a file that demonstrates this please? I've just tried it on a new document and it is fine, this could be down to some formatting settings or defaults in your file. -
Snapping ignored with Point transform tool - Corner tool
Sean P replied to Rondem's topic in V1 Bugs found on Windows
Hi Rondem, I've passed this on to development to look into. In the meantime the only way to do it is to bake the corners on the object (which is unfortunately destructive). -
Thanks for that, regarding issue 1 you say it is fine using a brush size of 1px, but when bigger it goes wrong. Firstly are you using the Pixel Brush Tool, and if so is your brush size set to a decimal value or is it a whole number? If it is a decimal can you try changing it to a whole number and see if that helps, also could you check it only happens with even brush sizes (i.e 4px, 6px, 10px etc) and not odd brush sizes (3px, 5px, 11px, 13px etc)? The second issue is something that we're already aware off so I shall get that bumped. Lastly I've reproduced the third issue, which only seems to be a visual issue for the most part - your selection should be fine if you just ignore what looks like extra pixels in the pasteboard. I have passed this one on to development however.
-
Please use the 'PNG' preset and not the PNG-8 (dithered) preset. That will give you a slightly lower quality file that is much smaller in size, however for your situation you will want to use the regular 'PNG' preset.
-
Hi arnofaure, What export settings are you using for PNG? Could you attach a screenshot showing all the settings found under 'More' please? Also ensure your 'Resample' option is set to Bilinear and not Nearest Neighbour, otherwise this will cause the hard edges you are seeing. I exported your document using the default 'PNG' preset and it exported fine for me!
-
It is being caused by the Artboard's poisition being slightly off pixel (its Y position starts at 377.7px). This is causing the extra pixel to be added in the Export Persona. If you change the Y Position on that object to 378px and then select the Slice in the export persona and click 'Revert to Auto-Sized' it will create a 95x95px object with the Slice starting at 0x0. You will probably need to just modify the X and Y positions of the other artboards to ensure they are on whole pixels (and revert any slices to auto-sized if they'd been modified). You may find having 'Force Pixel Alignment' and 'Move By Whole Pixels' on when making icons as it will help to ensure your artboards and slices are on forced pixel boundaries. Hope that helps!


.png.9111533a59c6d4e03ec021d1542a71d8.png)