Sharkey
-
Posts
353 -
Joined
-
Last visited
Everything posted by Sharkey
-
This is ALL COMPLETE RUBBISH - Please Ignore!!
-
Using the Export Persona? Is the preset not saving my settings for a reason? I make adjustments with a Preset name of my choice (no save preset - I can find). When opening another RAW file some of the settings are no longer apparent. How many of the settings are saveable as presets? Using latest 1.5 beta. Thanks in advance
-
It is in the title really. Exporting finished image back to its original folder of images does not seem possible (export failed) but exporting to 'desktop' and then dragging to the original folder is OK? It's obviously a simple operator muckup - so whats the correct method please. Thank you.
-
I know it is of no interest or affect BUT when I first decided to move to Affinity Photo one of the first confusions was its use of DPI! Just Saying. (oh, only thirty years plus as a photographer and printer with a fair few years in digital art) Worked it out for myself----
-

Finishing off
Sharkey replied to Sharkey's topic in Pre-V2 Archive of Affinity on Desktop Questions (macOS and Windows)
You thought right. The image I sent you was for a test print and the AP file is still being worked on So if I get this right - Saving As is for work that you will go to again and Save is the same if you want a second/third visit. Naming each filed save seems hyper important here to distinguish between the AP logos. When you want to print or publish you use export. OK. Having the 'export' button only on the slices panel seems unusual - I would have thought a more obvious Export This permanently visible in the Persona panel more intuitive? Anyway thanks again. The Beta seems to work for me so far so I will keep on with that. -
Finishing off
Sharkey replied to Sharkey's topic in Pre-V2 Archive of Affinity on Desktop Questions (macOS and Windows)
All working OK in 'beta'. Thank you all. Sharkey -
Finishing off
Sharkey replied to Sharkey's topic in Pre-V2 Archive of Affinity on Desktop Questions (macOS and Windows)
I am uploading the exported tiff.. Have just noticed you said'.afphoto file'. Not sure what that means. Yes you are dealing with a dunce here! Regards Sharkey -
Finishing off
Sharkey replied to Sharkey's topic in Pre-V2 Archive of Affinity on Desktop Questions (macOS and Windows)
Rt.Click on desktop. New menu. Show icon info & icon preview - both ticked. The folder cmd+j thing shows all boxes ticked. All icons are functioning from other Apps. My get info comment was to indicate that the blank icon had substance in that if you open it in AP the image is there. Trying to view the image in Bridge or Preview however does not show an image and crashes Preview within seconds. Regards Sharkey -
Finishing off
Sharkey replied to Sharkey's topic in Pre-V2 Archive of Affinity on Desktop Questions (macOS and Windows)
Hello again. That setting is ticked and when I save the icon is the picture concerned. When I 'export' using the basic or prison method from video instructions I get the blank page icon in post 1. The 'Get Info' of the blank image gives the right file size for the image exported. Has it something to do with layers. I copied and pasted the image onto a new blank image (as per video) but I do not yet understand howAP 'flattens' these layers permanently - perhaps that is the problem?? Regards Sharkey -
Finishing off
Sharkey replied to Sharkey's topic in Pre-V2 Archive of Affinity on Desktop Questions (macOS and Windows)
If I save to desktop I get a thumbnail and the browser can see it. -
Using the export persona I exported to my desktop a TIFF. All seemed well; but no thumbnail, just a white image and my browser will not show a thumbnail and I am only able to open the tiff in AP. What am I doing wrong (again)? Regards Sharkey

-
Performance?
Sharkey replied to Sharkey's topic in Pre-V2 Archive of Affinity on Desktop Questions (macOS and Windows)
Understood. It is not unusual for me to be wordy and I have been criticised for it before. Suppose I try to be accurate and in doing so become more confusing to the reader. My apologies. Will try harder next time :D Regards Sharkey -
Performance?
Sharkey replied to Sharkey's topic in Pre-V2 Archive of Affinity on Desktop Questions (macOS and Windows)
Definitive answer. Thank you. Perhaps if I had put a definitive question?? Regards Sharkey -
Performance?
Sharkey replied to Sharkey's topic in Pre-V2 Archive of Affinity on Desktop Questions (macOS and Windows)
Thank you. My only other question then is should Open GL be ticked on my machine? Two GPUs. Regards Sharkey -
Performance?
Sharkey replied to Sharkey's topic in Pre-V2 Archive of Affinity on Desktop Questions (macOS and Windows)
OK. I have received a number of responses for which I am grateful. I have some idea what 'dithering gradients' and 'precise clipping' are but as to the performance affects of 'Undo Limit', 'Use hardware Open GL' or 'File Recovery Interval' I am in the dark. Having already mucked about with these settings. Is there a way of returning to the default setup? Many apologies for going on about this. I have no other Apps running other than FRV for browsing my images when I work. My machine is in good condition. So only performance settings (unless there are other settings that can affect this) are my concern. Any clarity would be appreciated. Regards Sharkey -
Performance?
Sharkey replied to Sharkey's topic in Pre-V2 Archive of Affinity on Desktop Questions (macOS and Windows)
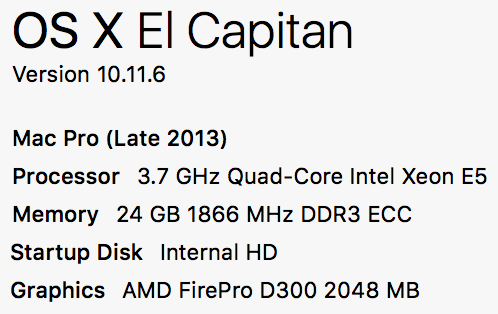
My computer details are the attached image on my first post. As for knowing what all the preference settings mean. I am sorry to say that I am smiling. If I knew what all of that meant would I be asking the question. NB: Using a MAC for the last million years or so the thought of drivers etc. do not enter the equation or my head I am pleased to say. I plug anything I want to use into my machine and it works! The only things that fails in this respect are the odd bit of third party software that fails to update itself.. I am retired and do not need to know the ins and outs of all my kit anymore; I simply capture an image I like, work on it and print into please my eye and my wife of course. Really am just looking for a bit of guidance from experienced AP users as to how best to use the preference settings take advantage of my hardwares capabilities. Regards Sharkey -
Performance?
Sharkey replied to Sharkey's topic in Pre-V2 Archive of Affinity on Desktop Questions (macOS and Windows)
I appreciate your point of view and recognise your experience in your field. The views you express make absolute sense if I was asking about how to handle large publishing/printing files for commercial use. I am not blaming my hardware; indeed I am extremely happy with it. My question is one of optimisation. Again, in PS I would open my raw files at 600ppi/16bit and edit that image with ease on this machine. Whatever the workflow, user input or output required it is the setup of my computer that was and is the root of my question; it is after all a tool that I am using in a way that may seem wrong to others but it is my way and I want my tool(s) to be as appropriate to the task in hand as possible. What are the appropriate preference settings to allow my machine to work as efficiently as possible? My inadequacies can be sorted another time :D Regards Sharkey -
Performance?
Sharkey replied to Sharkey's topic in Pre-V2 Archive of Affinity on Desktop Questions (macOS and Windows)
It is not so much technique or methods that concern me; more the setup to achieve the target result as efficiently as possible with the equipment at my disposal. Image size, be it pixel density or canvas size are at your pleasure but how the computer handles that size/bulk is really the subject of my inquiry. Regards Sharkey -
Performance?
Sharkey replied to Sharkey's topic in Pre-V2 Archive of Affinity on Desktop Questions (macOS and Windows)
My Internal SSD has plenty of room (>300GB) and 24GB of RAM to play with so I imagine I should be running better; from your mention of 10GB images being when the brolly appears. The GPU situation is of interest also as there are settings for them but once again my knowledge is meagre in this respect. Perhaps there is an AP. tech who can put his/her 'two pence' worth for all of us?? Thank you , so far. Regards Sharkey -
Hello all. Recently I have been working on a new pano from raw files created in 2008. In doing so I was surprised by the first combination coming directly from the raw file - brilliant! The final result was very pleasing - so good good so far. Right my question comes from this piece of work. Once the file size edged over 500mb the revolving umbrella appeared; expected really BUT from my PS years I know that my preferences can/do affect performance. What are the preference settings that bring the best out of Affinity on my machine? Screen Shot Attached. I mucked about with them when first installing but have no real idea what the best 0?) settings are. Assuming there are some ;) :wacko: . Thanks in advance. Regards Sharkey
-
How did I do This?
Sharkey replied to Sharkey's topic in Pre-V2 Archive of Affinity on Desktop Questions (macOS and Windows)
Got it James - from your video. Many many thanks!!! -
How did I do This?
Sharkey replied to Sharkey's topic in Pre-V2 Archive of Affinity on Desktop Questions (macOS and Windows)
I am using selected image copy and then edit-paste on new doc. there does not seem to be a dragging option. Jesse I must be thick. -
How did I do This?
Sharkey replied to Sharkey's topic in Pre-V2 Archive of Affinity on Desktop Questions (macOS and Windows)
Just tried the copy and paste with magnet turned on? Where are the guides it is supposed to line up on? What settings need to be in place to make the paste appear in the centre of the new document? -
How did I do This?
Sharkey replied to Sharkey's topic in Pre-V2 Archive of Affinity on Desktop Questions (macOS and Windows)
Thank you James and MEB both/all suggestions copied and filed. It is still a curiosity that I was able to do this without consciously using layers (bit wary of them from PS usage). As I said it came as bait of a shock for it not to work the second time. The canvas resize seemed to work just as I remember from PS5 workflow! Putting a white area around the image. Is it possible that I untucked the 'translucent' background on the completed pano before cropping and that meant the canvas increase had only white to increase it with?? I have been working on this image for some time and do not want to start all over again without being sure of the workflow that will give me the required result. I would really like Affinity to produce a printing Persona - possibly working with the connected printers drivers to produce a more 'rip' like capability. I know 3880 was once sold with a free 'rip' but I missed it. I seem to remember the 'rip' did work as I describe but finally settled at the enormous price level. Anyway, thank you again and if you do see how I actually did this I would much appreciate a heads up - never know it may make an instruction video :D :D -
A week ago I created a Pano from RAW files, edited for quality and cropped for printing. I then added more canvas to it so that it would print centrally on the papers it looked as the image attached (obviously bigger-approx 1.25GB). Today I tried to repeat this highly successful process and failed miserably :angry: I could not add the white surround (Thought I had achieved this before with resize canvas). I either got a bigger image or a translucent extension with the cropped area replaced in it. :huh: :huh: Anyway. May I please trouble someone for a process that will enable me to repeat my lucky start before I go nuts?! Kind Regards Sharkey