gdenby
-
Posts
1,887 -
Joined
Everything posted by gdenby
-
 Yes, certainly. A screen grab of the gradient dialogue showing the color of the end of the gradient is a grey.
-
Hi, Petar, However it happened, the end color was a grey. Also, the gradient did not stop at the edge of the letters, it extended beyond, do the grey could be seen befor the transparency became 100%. Setting the end color to the same yellow works. For me, setting it to white, like the back ground also works.
-
Hi, shaqmunak, What I think you need to do. Go to the layers panel, and find the curves that are pale blue. Delete those. Select the dark blue object(s). Switch to the node tool, and start deleting the ones that make bumps. Adjust the remaining nodes so you have a smooth curve. It will help if you can get the original image before vectorization into the Designer file as a bitmap. Perhaps you might just do a screen grab of the original. Bring that in as an image pixel layer and place it under the vectors. That way you should be able to adjust the node positions and tensions to get a better fit to the original.
-
Likewise. I would have sworn I had control clicked on nodes of similar paths and just got all, not the portion. Just spent about an hour playing w. grabbing parts of Curves objects.
-
I suppose there has to be a listing of all the nodes on a distinct vector shape. At this point, there isn't a routine/tool that allows all nodes in that contiguous series by just touching one of the series. Maybe add a request to the feature list.
-
Hi, Joschi, Procreate does not do vectors as far as I know. I don't use GIMP much for painting, but from what little I've done, I haven't seen any vector tools in it. Vectors don't work like that. The curve defines the space that can have a fill. So 2 shapes are needed if you want different color areas. Its easy to nest vectors in vectors, and avoid doing booleans. See attached. Layering.afdesign
-
Hi, Ahmed Yasir, The easiest thing to do is buy both. Designer by itself does a decent job making images that look like traditional media and methods. And there are a few tools, such as the vector brush, that are unavailable in Photo. But the work done in Designer can be transferred to Photo, and benefit from the layering effects, and modifying tools like the smudge brush.
-
Monochrome dither for iPad?
gdenby replied to gdenby's topic in Pre-V2 Archive of Affinity on iPad Questions
Ooops, realized I posted to the wrong forum section. -
Hi, all, Quick question, does the iPad version of Photo have an equivalent to the desktop filter ‘color/monochrome dither?” Closest I can find is half tone set to a small value, not quite the same.
-
For the O, do a self divide. Grab whichever set 7 manipulate. Then subtract the inner from the outer.
-
Both have the same ‘dab’ making capabilities. Designer has a “vector” brush, which allows stretching a stroke along a vector curve,which can then be moved or reshaped as desired. Photo has retouching brushes to sharpen,darken, etc what has already been laid down. Photo is a bit more painterly to me, but all the photo specific operations are sort of excess baggage to me. Neither at core are made to replicate traditional media, unlike some apps that are dedicated to watercolor, for instance.
-
If the curves are grouped, option clicking drills down thru the layers. Sometimes it helps to marqee select a bunch, and hide those to thin the forest out. Once the curve9s0 is chosen, switch to node tool. Then, command click a for all.
-
How to...?
gdenby replied to baal_uriel's topic in Pre-V2 Archive of Affinity on Desktop Questions (macOS and Windows)
Hi, baal_uriel, From what I can see of the image, the cupcakes appear to have started as traditional watercolors painted mostly inside friskets. While both Designer and Photo can create watercolor like images, Photo is a little better. But neither are specifically for emulating traditional watercolors. In Designer, one would mask the watercolors w. vectors. In Photo, either vectors of other bitmaps could be used. this is something I don't do much, so will suggest you down load the trial versions and see if they satisfy your needs. -
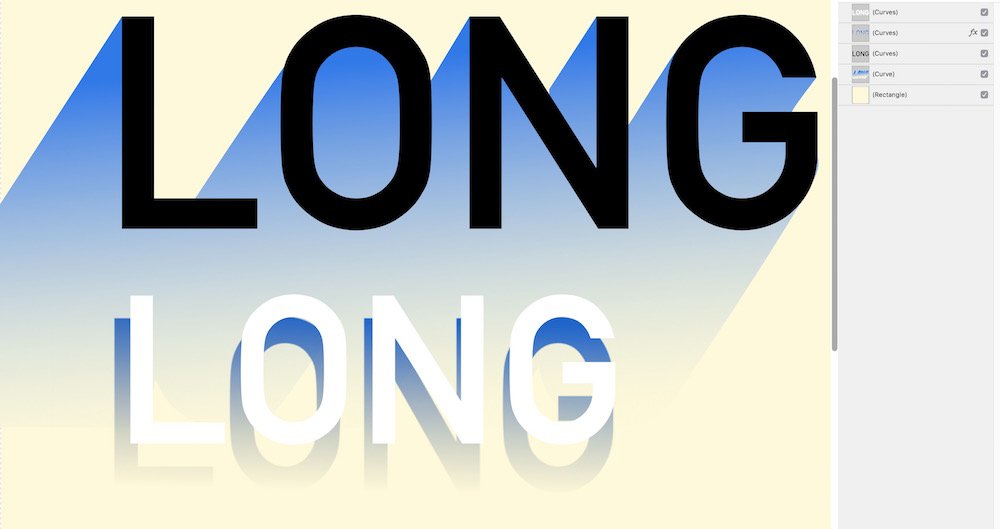
Long shadows
gdenby replied to D3R's topic in Pre-V2 Archive of Affinity on Desktop Questions (macOS and Windows)
A 1.6 file. w. a couple of samples. (My d-load speed is so pitiful that the new version will take at least 7 hours. Tried updating my iOS version, and it failed. Haven't wanted to tie up my connection, needed to do other things.) LongShadow2.afdesign -
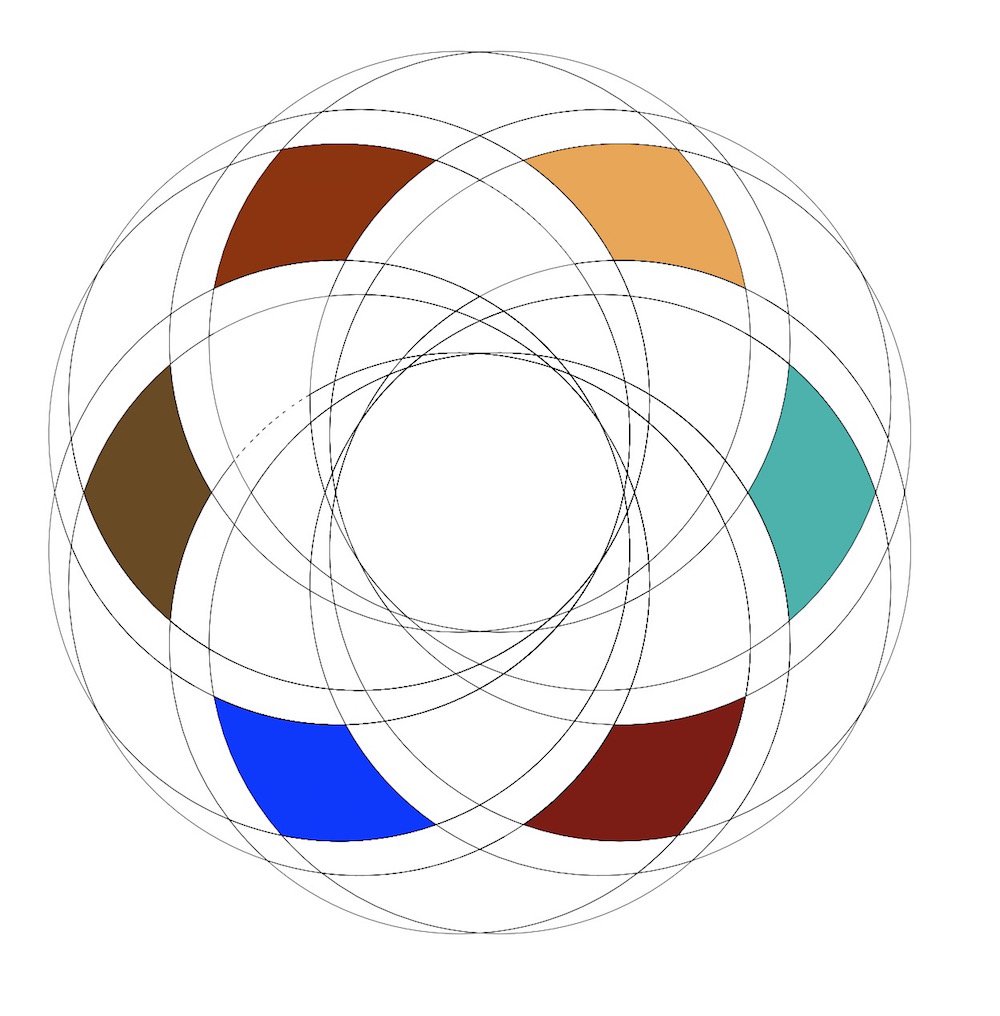
Considering that people, some of whom have been hopping up and down about it, have been asking for a mesh warp tool for a few years, I suspect the dev team might be more likely to devote time to that. Or maybe a blend tool. Both the infill on the ring design, and the form from the intersecting lines can be done already w. a bit of effort. In the case of the simple quadrangle, almost w/o effort. Its not my decision, but I'd have to put something like that well down on the list of really good to have. Attached, a sloppy figure, but the sections were colored in just about 1 min, 15 sec. Most of that time was just opening the swatch group, and assigning a color for each shape.
-
Hi, sharpart, As Ballyshannon posted last year, there are only rather cumbersome methods that may not be sufficiently precise. One can make a protractor, and save it as an asset, and then position it over any set of points.
-
Universal Shape Edits
gdenby replied to mannyburke's topic in Pre-V2 Archive of Affinity on iPad Questions
you're welcome -
Long shadows
gdenby replied to D3R's topic in Pre-V2 Archive of Affinity on Desktop Questions (macOS and Windows)
Is this possible... A few samples
-
Universal Shape Edits
gdenby replied to mannyburke's topic in Pre-V2 Archive of Affinity on iPad Questions
Make each ray a wedge shape that will be a ray from the center of the star to the ray tip. Make that a symbol. Duplicate the symbol, and rotate around to make the star. Then, if you edit the curve within the symbol, all the duplicate curves will be changed together. -
Pen loosing opacity
gdenby replied to uneh's topic in Pre-V2 Archive of Affinity on Desktop Questions (macOS and Windows)
Hi, uneh, From the screen shot, I see you were in the Pixel Personna, All the tools there are for making bit-map images. There is no "pen," only a brush. If you work in the Draw Personna, the pen and pencil there will make sharp and clear strokes. But, at this point, Designer does not have a vector erase tool. If you want to edit a vector line, and "erase" a portion, and then use the node tool to split up the line, and delete the unwanted portions. -
Outline tool?
gdenby replied to Cop9885's topic in Pre-V2 Archive of Affinity on Desktop Questions (macOS and Windows)
command "Layer/expand stroke" The new "curves" layer may need to be self-divided if you need to work on each of the 2 new inner and outer circles. -
affinity designer Josephine Baker Plush Design : Designer
gdenby replied to segts's topic in Share your work
As I've mentioned before, your artwork is both skilled and delightful. I've never thought about making fabric surfaces for dolls, so what you've done is a bit of a revelation to me. To be business-like, how many plushies do you suppose you need to sell to re-coup expenses? -
A few other things. The 1.7 version allows irregular "lasso" selection while holding down the option/alt key. For small adjustments, I usually use the arrow keys to nudge the point(s). If you want precise positioning, ince the points are selected, use the transform panel, and type in the exact value. Typically, I position the transform control point at the center.
- 8 replies
-
- 1
-

-
- designer 1.7
- node points
- (and 1 more)