
frankstallone
-
Posts
25 -
Joined
-
Last visited
Posts posted by frankstallone
-
-
From everything I am reading, I should be able to modify the width of a stroke, from a curve layer with the Pressure property in the Stroke panel. I haven't seen anyone ask this question before searching on this forum, and internet. In the example attached here, this curve was made manually. I have a curver I made with my tablet, and that's not working either. Oddly, I use the pen tool and create a new curve, the pressure property does properly work on it.
Why doesn't it work on these? What is it about these vectors that is causing the Pressure property to not adjust the width?
Software
- macOS latest Sonoma
- AF Designer v2.3.0

-
Sad to see this is still not possible, and the roadmap link MEB mentioned above is broken.
-
:: cough cough :: Happy New Year! 1.8 didn't include a shape builder tool, did it? 😇
-
Nope. I never figured it out and had to resort back to Photoshop. That has happened a handful of times since this post but I am still using AD as my primary software if I can. Falling back to Photoshop when AD does something wonky. Sometimes I cannot post screenshots or files due to the nature of my work but I try to articulate as best I can as posts so that if others have the issue and search they can find my threads. That being said I think there are still a few quirks in AD that I have not been able to work around yet. Good luck working them out but if this one has been around since December of 2014 that's saying something.
-
23 minutes ago, firstdefence said:
Why would you turn off Sync, alter an instance of a symbol and expect that altered symbol to sync back to the parent symbol in its entirety when syncing is turned back on?
By turning sync off while you edit an instance of a given symbol you are effectively creating a new "Child" symbol, so, the child symbol still retains some of the Parent symbol's characteristics but it also has its own characteristics.
I think what should happen is if you alter an instance and effectively make a child symbol, that symbol should automatically be created in the Symbol Panel with an indication that it is a child symbol of another parent symbol, possibly in the same way layers and child layers work?
Great question! In my situations I am not turning off syncing. I am creating symbols with text that is already unsynced. Let's say font size is 12px and I want to move it to 13px. I cannot do that, consistently.
-
1 hour ago, owenr said:
The line is the same orange when dashed or solid.
R C-R's called it red, I am just trying to be consistent. I don't care what color it is I am concerned by when something is solid, dashed and what they mean.
1 hour ago, GabrielM said:Dash - Some elements are not synced ( hover the mouse over the layer name, it will tell what's not synced)
Solid - Element fully synced
Yeah, I know what the docs say. There seems to be some inconsistencies here that R C-R is outlining well.
-
Quote
the dashed red line for Art text doesn't actually indicate that the text is not synced
Maybe I am missing a core principal here. What is the point of the dashed
orangered line vs the solidorangered line? -
So can I get NEW text to replace the old text in a symbol that stays synced? I swear I am running into instances where immediately after I hit the Create Symbol button on a group of layers that include text, everything is solid orange but the text.
-
It seems like any type form in a group that I create a symbol out of, the type automatically has the orange dashed line.
-
Thanks guys. I am seriously tired of watching that video at this point though lol. I think I have seen in 10 times since it was made.
On the contrary it's pretty easy to see what is synced and what isn't synced IMHO. Type happens to be what ends up with the dashed lines. Almost every time. I know it's not synced because it's always got a dashed line. I cannot get it to be a solid line. That's my gripe here.
-
What do you do when you have a symbol that is a solid red line everywhere and no matter what you do with the sync button none of you changes start syncing with the symbol again? This has been a weird pain point for me for some time now. It seems like a bug but if at, what seems like, any point in time I try to add something to a symbol, with or without the sync button checked, it has a broken red line on the new layer and does not sync with the rest of the artboards where I am using that symbol.
This causes me incredible frustration because as much as I read about how to use symbols in Affinity Designer it should just work. It's not that difficult. Yet I find myself accidentally removing things from a symbol when I thought it was unsynced, and I can't seem to add things to a symbol when they are synced.
OSX, latest version. No I cannot share the file. #venting
-
On 4/10/2018 at 6:06 PM, firstdefence said:
I don't know whether this will help but take a look at this: https://www.paintcodeapp.com/news/ultimate-guide-to-iphone-resolutions
Thanks but no, that did not help. =)
I am trying to clarify how I can work with point's but translate those appropriately to pixels for web mock ups. If my mock ups have a 20 point margin on both sides, can I safely tell a developer that will be 20 pixels of margin? I don't want final product to look like my mock ups.
EDIT: Furthermore confusing is The Ultimate Guide To iPhone Resolutions has the iPhone X as 375 x 812, while Affinity Design's document dimensions for Devices > iPhone X is 950 x 812.
-
I am creating a web app in React, but designed for iPhone X (to be implemented with Cordova). The mock ups I create will be distilled into (mostly) CSS. The Affinity Designer iPhone X device presets points instead of pixels. I think I got this right, finally, but want to ensure. Searching on the forums here I haven't seen anything that seems to make heads or tails of this definitively for me.
Depending on what your DPI is 1pt is 1pt. Whether its 72DPI (web) or 216DPI (iPhone X). So, if that's true, does that mean that if I want to create a rectangle 10px from the left edge, I would make it 10pt from that edge? If I have this right that means if I export @1x then it will come out at 10px distance from the edge but @3x it would be 30px.
Basically I want my designs to translate easily from Retina on my MacBook Pro when presenting to something I can annotate for CSS. Maybe there is a better way to do this than to use the default iPhone X? Thanks in advanced for you 2 cents.
-
Researched this, this morning. Apparently this is no longer on the roadmap.
-
Fully aware this is an old thread but wanted to express that I encountered this issue, searched and found this thread. March 17, 2017 and subtraction still causes weird artifacts. Rotating something 45 degrees caused the same issue. Rotating at a random degree worked.
-
This is breaking my heart; due to deadlines I am forced to throw this portion of my design in Photoshop. Not ideal but not a deal breaker as I do genuinely love the workflow in Affinity Designer.
-
Yes I am on a new MacBook Pro Retina screen and I am hoping it is 'me' and not the software as odd as that sounds I have no problem being wrong.
-
Not happening MEB. I started with a new document, the left part of the pill which already existed, and the end part with already existed. Rasterized after making sure Pixels were set at the Snap to units. Attached is the outcome button new-archive-search-buttom.png and the two pieces I am using to make the button. I am using 1px width from the button_right.gif as I am sure you will see when you open all of these up. I don't want to open Photoshop MEB!! LOL
Thank you for your time and patience,
Frank
-
Yes I am using the Rectangle Marquee Tool in the Pixel Persona with Enable Snapping -- checked -- in Snapping Manager, but Snap to units was set to Centimeters (I never saw that 'option' before so thank you for that!) but I am still getting a paste that looks like 2px and stretching shows that it's not working. I have messed with this enough for one day. I will come back tomorrow with fresh eyes, start from scratch and see if I can get it to work.
Thank you for your time and patience,
Frank
-
Stupid question: What does "make sure it is pixel-perfect aligned" mean exactly?
EDIT: Because I am doing exactly what you are saying and it's not working. It looks like after I paste the 1px wide select it pastes as 2px wide instead so I am missing something. =)
-
This is a fantastic achievement, I agree and congratulations to the entire Affinity Designer team and community. I work for a large organization (read: 50,000+ employees) and a large UX team. I have switched to Affinity Designer for the most recent lo-fi mockups and look forward to doing more high fidelity work as well. I will say that as far as buzz goes I think I am the only one trying Affinity Designer, many are still stuck in the world of Adobe (which there is nothing wrong with =).
I am an early adopter. I liked Sketch when it came out but did not seem robust enough for my workflow. Affinity Designer feels better to me overall, has amazing performance, and a robust feature list. We had someone on our team ask if we had Sketch licenses the other day and I broadcasted out my use of Affinity Designer to the entire team, we'll see if anyone else gives it a whirl. I love that apps like these exist and fully support the teams that bust their butts to take on larger companies that 'could' be doing it better, or differently.
This is obviously just my take.
Cheers,
Frank
-
Attached is just the button layers. You will see an "Extender" that is the 1px wide area that I use to stretch as I mentioned above. I tried it again taking another 1px wide area of the original button and get the same results (that layer is in there too). All the other layers work fine because the rest are not stretched.
Thank you for your time and patience,
Frank
-
This may be relevant: I did take the original screenshot via Apple's standard screenshot which would take everything at 2x. I downloaded RetinaCapture today to take screenshots at 1x and I am wondering if this has something to do with this ghosting issue I am seeing.
-
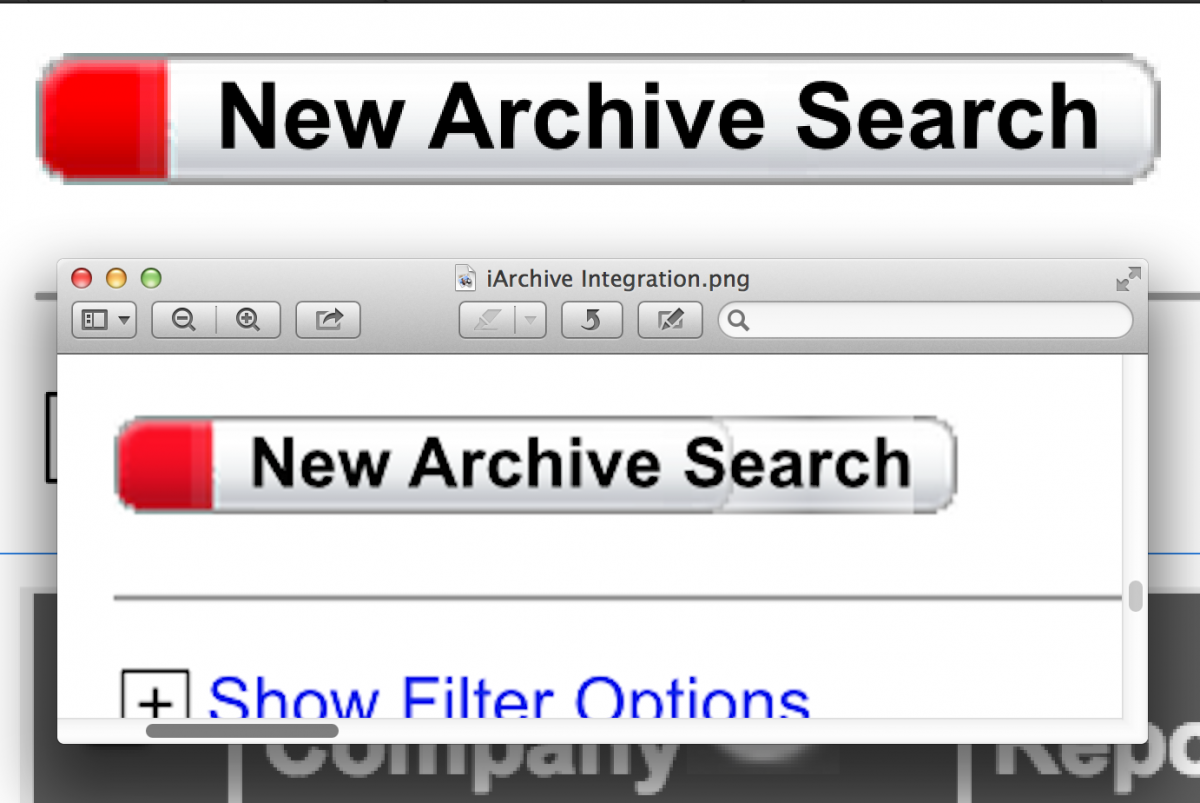
It 'appears' that the opacity of a pixel element in Affinity Designer is not set to 100% opaque when exported. I have a very old web UI I am working with that is pixel based. I am using an old technique that worked in the past in Photoshop, and while I am in Affinity Designer it looks great. When I export though, the area I am looking to be opaque appears to have a lower opacity and one can see the elements behind it.
Let me elaborate
I have a pill button. This button has a left edge, and a right edge. The center area could be 1px width and Xpx wide. In other words the 'texture' of this pill button can be easily repeated by stretching a 1px wide element. In Photoshop one would marquee the 1px wide Xpx height area, copy and paste that into a new layer Command + T to Transform and drag out the other end to effectively duplicate that 1px to Xpx depending on the distance you go. Easily done similarly in Affinity Designer. Attached though is the results as it appears in Affinity Designer and then the results after it has been exported in PNG format.
The attached image shows Affinity Designer's view in the background in pixel view mode and below (Apple Preview) the actually Exported PNG view. Can you see the pill's extension? See how it is not opaque? What am I doing wrong? =)


Cannot modify stroke width with pressure
in Affinity on Desktop Questions (macOS and Windows)
Posted
Thanks for your response loukash! I do understand that concept that it depends on the brush I used, and I think they are set to None and need to be Pressure. Posting a screenshot for future me to remember. 🤣