Tupaia
-
Posts
174 -
Joined
-
Last visited
Everything posted by Tupaia
-
[AD] Isolation Mode
Tupaia replied to luispedrofonseca's topic in Feedback for Affinity Designer V1 on Desktop
Hello! Any news on this one? A "True" isolate mode? (not the ALT-click-a-layer-thing which falls out of isolation the moment you click anywhere) I concur with pier, this is much more than a 'nice to have' feature! I do a lot of CAD and 3D work, too, and you wouldn't get along without an isolate feature there. Same here, in complex drawings. Thanks! -
Hi! Thanks, but my question ist: how do I select one of the component curves in the simplest possible way, without messing with the object? So, not a workaround - which there are several - but a direct selection. See screenshot - how would you select those inner curves? I used lasso selection, carefully. There could be a simpler way, like double clicking on a node, or CTRL-clicking the componet curve etc. Not possible, right? Thanks!

-
Thanks! That's not what I mean, though. I'm not talking about grouped curves, but 'merged curves', to use the correct term. As a quick example, create the letter O, then convert it to curves. Or, create two or more curves > select all of them > context menu Geometry > Merge Curves. Now those curves are part of one and the same object=layer (which is important if you want the inner curves to produce holes in the fill - groups cannot do this). How would you select one of those 'component' curves then? In a simple way, since the curves can be close together or overlap.
-
Hello! Let's say there's a vector shape consisting of multiple disconnected curves (subcurves, component curves, ... whatever they are called here), like in the letter O. Is it possible to select one of these curves with one click? Looks like it's not possible with the Move Tool, tried all combinations of modifier keys. So, with the Node Tool, I could of course select all nodes of the one curve I want to edit, but that is sometimes not easily possible. Is there a trick to select ALL nodes of a curve at once, except with lasso/rectangle/ etc.? Thanks!
-
Am I missing it? Numeric Scale?..
Tupaia replied to WillBellJr's topic in Older Feedback & Suggestion Posts
You're right! Awesome, thanks!! -
Am I missing it? Numeric Scale?..
Tupaia replied to WillBellJr's topic in Older Feedback & Suggestion Posts
Thanks, I know. When there's no other way, we have to fall back to workarounds - but we want to work, not work around, right? @Oval: you seem to have earned your respect around here with that many posts. However, since you repeatedly point me to the help about input field expression, which do NOT offer a solution for what I mean, I'm under the impression that you don't understand what it's about. Also, you are no Affinity representative, are you. This is a simple wish that makes sense. So I suggest to leave feature decisions to them, and to stop worrying if it comes your way or not. Trying to make myself clearer, again: True, when you enter a % value in the W or H field (thanks to expressions), it already does scale the object(s). However, this scale value is NOT remembered in the object's transform matrix (the little data package that stores pos, rot, scl, shr). The new size is 'baked' into the object's geometry, so to speak (in a 3D program, this would be an "automatic scale freeze" or something analogous - in e.g. Cinema 4D, this is a dedicated UI button). To restore an object's original size then, you would need to remember all the scales you did in the meantime, and enter the reciproke - too much hassle, although expressions would allow for it. Or use helper lines/objects. Not so nice, either. What I propose is simply that the scale value is also remembered & exposed, just like position, rotation, shear. First, because it's consistent, second, because then you can reset objects to their original scale by simply entering 100% or 1.0. (I have to correct myself here. In my post from 21.11.2016 I thought InDesign does remember the %-value - it does not.) Tried. I can't see where. Aside from that scale thing, additionally, next to this box icon in the transform panel , there should be also the choice "Transform Origin". One should be able to numerically rotate/shear/scale around that freely positionable origin, too, not only interactively.
-
Am I missing it? Numeric Scale?..
Tupaia replied to WillBellJr's topic in Older Feedback & Suggestion Posts
Hello! Any update on that numeric 'Scale' input field (both width & height)? It's still missing. One example case: for my architectural layout work, I often need a way to display plans in their original scale, or fractions/multiples of it. Once a plan has been scaled, how would I go back to the original size? -> see the mockup of how the transform panel could look like. And please also think about adding a switch for the Transform Origin - if it is turned on, numeric rotation/scale/shearing would take place around the Origin (not only center/corners). Thanks a lot!
-
Linked files, Reveal in Finder
Tupaia replied to JDW's topic in Feedback for Affinity Publisher V1 on Desktop
+1 A "reveal in explorer" would be very nice! Thanks! -
Hello! Any particular reason why the Resource Manager is not a regular, dockable Panel? Like in InDesign. It's non-modal, ok, but it would be handy if it would not occlude viewport space, needlessly. Thanks!
-
Hello! AP 1.7.1.404 crashed (fast exit) when I tried to print 2 pages from a 40 page document. First page worked, second made it crash (contained text and a PNG). Reopeing and reprinting worked.
-
Wow Studiolink!
Tupaia replied to Friksel's topic in Pre-V2 Archive of Affinity on Desktop Questions (macOS and Windows)
Just installed all three... BRAVO for that studio link thingy!! Damn, I sound like a fanboy... =D 'cause I guess I am...! -
Hello! As the title says. The rotation icon respects it, so should scale. Thanks! Best regards
-
Hello! There seems to be some inconsistent or even buggy behavior with Picture Frames. 1 - The 'regular' way to embed a picture into a frame is this: drag&drop the picture ONTO the Frame's name in the Layers panel, OR drag&drop the picture from the Exploder into the Frame in the canvas, OR select the Frame and use File > 'Place' The Picture icon then gets this tiny frame icon in the bottom left corner in the Layers panel, and when selecting the Frame on the canvas, it shows those neat transform handles for the picture content. 2 - The second way is this: Cut the picture > turn on 'Insert inside the Selection' > Paste, OR drag&drop the Picture UNDERNEATH the Frame icon (as a child) in the Layers panel. In that case the Picture does not get this tiny frame icon in the Layers panel, and there are no extra content transform handles on the canvas. Both cases have more or less the same effect - you crop a Picture with a Frame. Bit strange, but ok so far. Bug: It is possible to 'convert' method 2 into method 1 - when you drag&drop the Picture child onto the Frame name. However, I recently got a crash in doing so. I could not reproduce it, but it happened. Shouldn't, with such a central feature. Also, once method 1 was used to insert the Picture, and you 'unparent' it in the Layer panel (drag the picture back out), then use method 2 to put it back in, it always shows the tiny frame icon in the Layers panel and the Frame the extra content transform handles on the canvas. Hope it's clear what I mean. Best to fiddle around with it for testing. Thanks! Best regards
-
Node Tool - Transform Mode Center
Tupaia replied to Tupaia's topic in [ARCHIVE] Designer beta on Windows threads
Thanks for implementing this in V 1.7! =) Best regards -
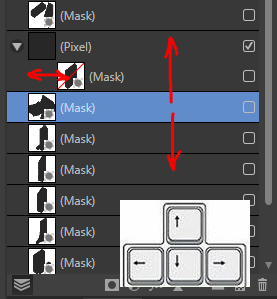
Hello! The arrow keys and page up/down could be put to better use in the Layer Studio (or am I missing something?). 1 - When you hover the cursor over the layer studio, arrows and page up/down could select the next/previous item in the list. Left/right arrow keys could move up/down a hierarchy. 2 - Holding some modifier key (SHIFT etc.) while pressing up/down arrows could MOVE the selected element(s) in the list (as opposed to SELECTING next/previous). For both, it should not be necessary to click-set focus on the layer studio. Just hovering should do. Thanks! Best regards
-
Python, please! Done my share of scripting in JScript (for Softimage back then), and lately Python (Cinema 4D, Rhino Grasshopper). It's readability and clutter-free syntax (among other things) make it much more convenient. It's also the de facto standard in practically all DCC applications. Forget about Apple Script... we need to think outside of our box! (Windows user here) Thanks!
-
bug in transform each
Tupaia replied to grapher's topic in [ARCHIVE] Designer beta on Windows threads
I vote for a resizing in absolute values for each selected object, too. Just makes sense, and would be consistent. -
Thank you very much!
-
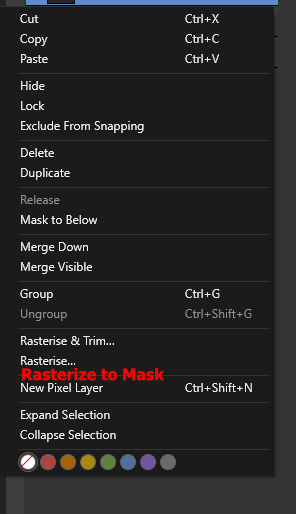
Hi! Simple one, as the title says. It's strange enough (for long-time Photoshop users) that masks are obviously not simply greyscale images. For convenience, please at least don't 'hide' that conversion feature in the Layer menu, but put it also in the RMB context menu of the layer panel. Thanks!!
-
Node Tool - Delete Nodes variations
Tupaia replied to Tupaia's topic in Feedback for Affinity Designer V1 on Desktop
FYI, here's a screenshot of how sub-objects of a spline/curve in 3ds Max are selected. As one of only a few applications, it knows the sub-objects Points, Segments (the curve pieces between points), and Splines (everything connected, e.g. letters in a word). It's super handy being able to select segments, too. They can be transformed, deleted, whatnot. Since this ain't possible in AD, at least a simple way of deleting points by breaking the curve would be super nice! Thanks!
-
Yep, I'm in a similar position, working in an architectural office. I already heavily advertised the Affinity suite to my boss, but missing features like this prevent it from gaining foothold in that business.
-
Isolate mode improvements
Tupaia replied to Tupaia's topic in Feedback for Affinity Designer V1 on Desktop
Well well well... any news on this one? -
Node Tool - Delete Nodes variations
Tupaia replied to Tupaia's topic in Feedback for Affinity Designer V1 on Desktop
Hello! Right, thanks! However, this needs re-selecting the (end-)nodes after breaking the curve, before deleting. Can we agree that this is a too-many-clicks-operation, and that there could be a simpler way, like CTRL-DEL, or something? -
Node Tool - Delete Nodes variations
Tupaia replied to Tupaia's topic in Feedback for Affinity Designer V1 on Desktop
Anyway... does anyone have an answer to my question number 3: is it possible to delete nodes so that the curve gets split? Thanks!