Brian_G
-
Posts
38 -
Joined
-
Last visited
Everything posted by Brian_G
-
OK. Thanks very much, for the responses. I'm up and running again.
-
I've just had to reinstall Affinty Photo, but I cannot find the email containing my product key. Is my product key stored somewhere on the website, and if so, where is it?
-
The plug-ins that appear on the list appear to work OK.
-
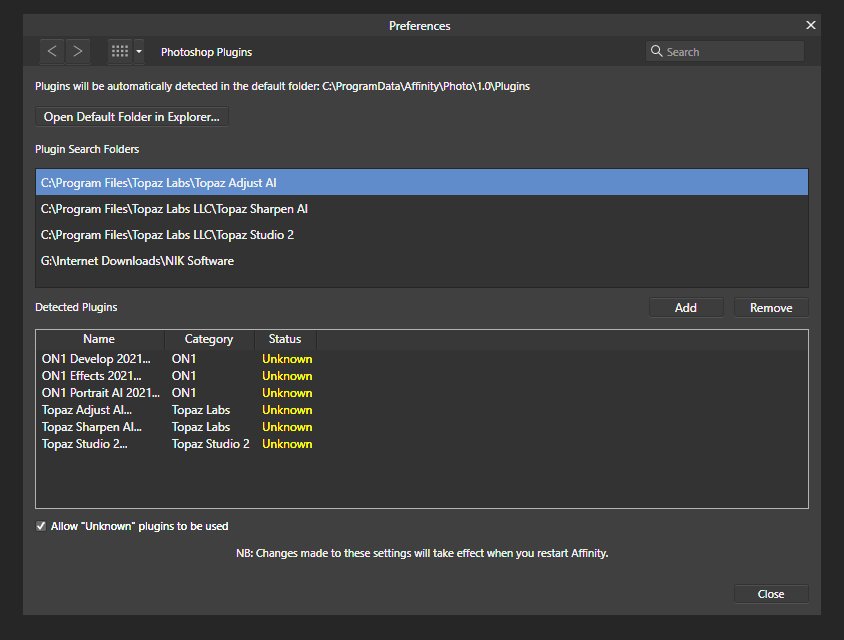
Yes - the NIK plug-ins do appear on the list as "working" and the last time I used them they worked fine. However, I have recently been trying to get an unsupported plug-in working ("Flaming Pear" which appears on the list as "Unknown") and it looks like I may have messed things up. I just checked my "preferences" and they now look like this: I'm pretty confused by all of this and I don't know what to do to get my NIK plug-ins back, after all they were working.

-
I was occasionally using plug-ins from the NIK collection, these were the earlier (free) pre DxO edition. They installed without problems using the "Preferences" in AP, under Windows 10. I went to use them yesterday (for the first time in a while) and I found they had disappeared. Possibly the last time they were used was pre the v1.9 upgrade to Affinity Photo. I still have the original downloaded NIK files, but I don't seem to be able to get them to install. Anyone else having trouble using the NIK collection as a plug-in? Here is a screenshot of my install instruction page.
-
Well I tried copying the "Flaming Pear" file into another folder and it now works - sort of. "Flaming Pear" and "Flood" now appear on the Filter menu But when I call the plug-in I get a screen full of garbage and I cannot make any sense of the adjustments. https://www.flickr.com/photos/184508212@N07/51251327003/in/dateposted-public/
-
Thanks very much for the reply. I was aware that Affinity was strictly 64 bit, so I assumed it would ignore any 32 bit add ons. I'll try your suggestion.
-
We recently had a talk at our club from someone who used "Flood" by Flaming Pear Software. This advertised as a PS plug in but knowing that Affinity Photo can use PS plugins I tried downloading a trial. I created a new folder called "Flaming Pear" and downloaded and unzipped the program to there. When I look at the "Flaming Pear" folder I can see the files: Flood 208 32-Bit.jbf & Flood 208 64-Bit.jbf I assume these .jbf files are the ones I need to install, but when I browse "Plugins" with Affinity, although I see the "Flaming Pear" folder and "Allow Unknown Plug ins" is ticked, I don't see the "Flood" plug in. On the Flaming Pear website they allude to calling the plug in from within Photoshop, but I don't have any Adobe software on my system. Can anybody please suggest what I'm doing wrong? Regards, Brian
-
Plug-Ins not showing up under "Filters"
Brian_G replied to Brian_G's topic in V1 Bugs found on Windows
Yes, but in your previous post you said when Topaz updated their software I'd have to re copy the plug-in files. Just recently there seems to be a Topaz update every time I launch the program, so I'd rather not have the hassle. As I said It's not a big deal and I can live with it the way it is. Thank you very much for your input. -
Plug-Ins not showing up under "Filters"
Brian_G replied to Brian_G's topic in V1 Bugs found on Windows
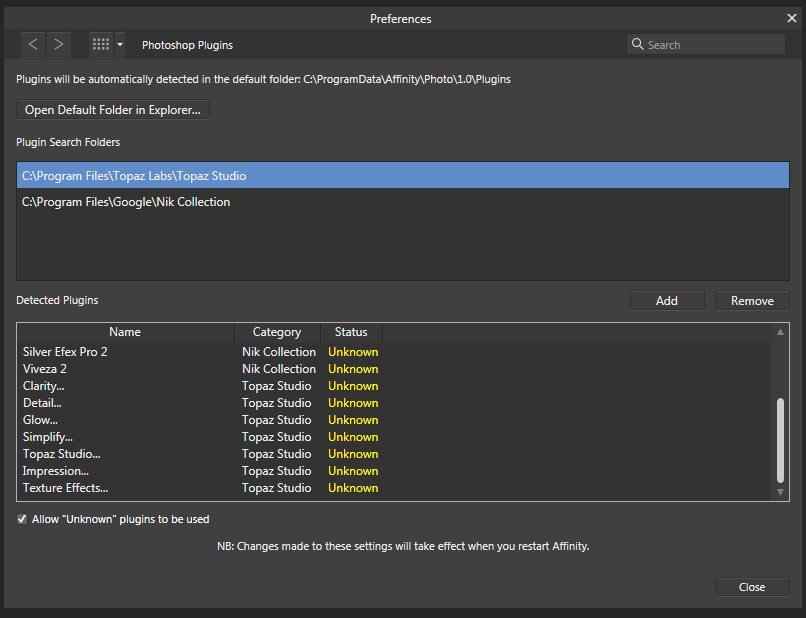
Thank you very much for the suggestions. Since Topaz seem to frequently update their software, I'm not sure I want to keep recopying the files. I've now taken some screen grabs of the plug-ins setup page to illustrate what I'm saying about the folders. None of my plug-ins are in my Program Files(x86) folder since they are all 64-bit files. I'm no expert, but I thought 64-bit files always went into the "Program Files" folder and 32-bit files were in the "Program Files(x86)" folder. I don't understand how you can install 64-bit files into the x86 program folder. This is what I see on my system: The only option I really need for Topaz is Topaz Studio, since whichever Topaz plug-in I select it launches Studio. I simply wanted to tidy things up so that Studio was the only Topaz option. It's not a big deal and I can live with it the way it is, so it's a case of "If it ain't broke, don't fix it"
-
Plug-Ins not showing up under "Filters"
Brian_G replied to Brian_G's topic in V1 Bugs found on Windows
Strange. All my plug-ins are in the 64-bit programs folder. There are no Topaz plug-ins in the Programs(x86) folder. Sudden thought: I'm using Win7, are there differences with Win10? As I said, the view I have is the same as your screenshot. The only difference is I do not have a "Programs (x86)" folder, since all of my plug-ins are in the "Programs" folder. I'm not at my desktop machine at the moment so I cannot post a screenshot. All this discussion is irrelevant and does not answer my question of how I can remove the un-needed Topaz plug-ins from the plug-ins list? -
Plug-Ins not showing up under "Filters"
Brian_G replied to Brian_G's topic in V1 Bugs found on Windows
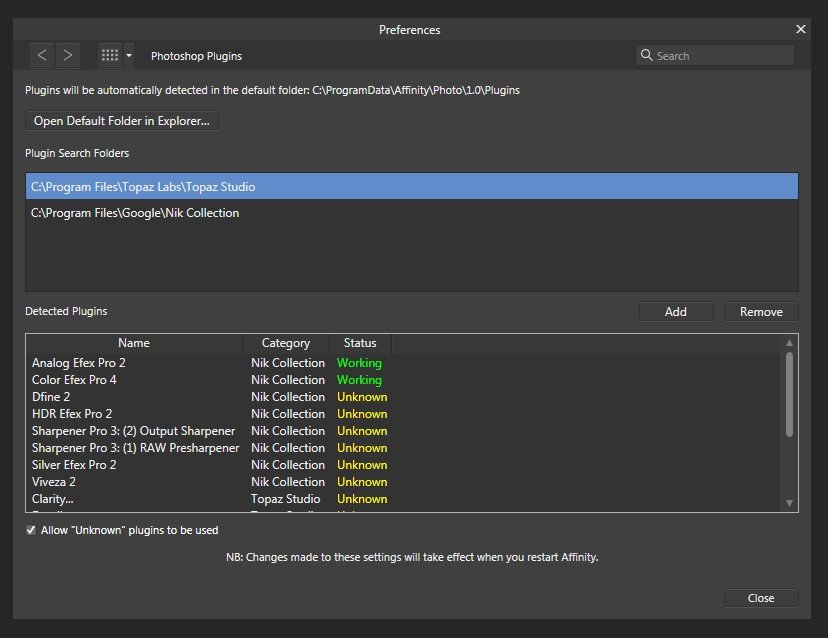
Thanks. That's exactly the same as I see. AFX Pro2 and CFX Pro4 are the only NIK programs that are highlighted as "Working", although all the others appear to work as well. TBH the only NIK program I ever use is Silver Efex Pro2 and that works OK, although I'm finding some of the other recent B&W conversion programs are producing results just as good as the ones I can get with Silver Efex, so I'm probably going to be using that less in future. The slightly annoying thing is, whatever Topaz program I select (like "Adjust" or "Detail") it actually opens "Topaz Studio", which also appears on the list as a separate program. I can then select the plug-in from within "Studio" and use it that way. I only use the 64-bit versions so my plug-in programs are in the "Program Files" directory and I don't need any "Program Files (X86) I thought Affinity was a 64-bit program, so why are you using 32-bit (x86) plug-ins? I wanted to edit the list so that ONLY "Topaz Studio" appears, but apparently this doesn't seem possible. As I said, it's not a problem, just an irritation, so I'll learn to live with it. -
Plug-Ins not showing up under "Filters"
Brian_G replied to Brian_G's topic in V1 Bugs found on Windows
I have now got both my NIK and Topaz plug-ins working by using the Edit>Preferences>Photoshop Plugins menu. However, I'd like to streamline the interface if I can. I originally had several Topaz programs as plug-ins, but recently Topaz have unified all their software packages under the banner of Topaz Studio. When I select the Plug-ins under the "Filters" drop down in Affinity I see all my Topaz programs, including Studio. However, whichever plug-in I select it always launches Studio. What I'd like to do is delete everything that isn't "Topaz Studio" so that I can just select that one item. When I'm in the "Photoshop Plugins" setup menu, I can see all the Topaz programs listed but I don't seem to be able to edit or delete them. I have "Allow unknown plug ins to be used" checked. It's not a major problem and everything works fine as it is, but I'd just like to tidy things up. -
Yes, the "Allow unknown plugins" checkbox is ticked. I can see all my Topaz filters, but I don't seem to be able to install NIK. I have the original Google versions of NIK, and none of them will show up in Affinity. Thanks for the link to the other thread. I will study it to see if it is helpful when I have some more time.
-
I went to the photoshop>plugins page and there was nothing listed. I've managed to add Topaz to the drop down list, but although I've been to my NIK folder, I cannot open the sub-folders in Affinity, although I can open them with Windows file viewer. So I cannot add NIK to the "Filters" drop down. I'm not sure what's going on.
-
I only just found this Forum section so please forgive the duplicate post. I used to have NIK and Topaz available as plug-ins under the "Filters" drop down menu. I'm currently running v1.7.1.404 under Windows 7 and when I went to use Topaz, neither Topaz nor NIK now appear under the "Filters" drop down. I can still run Topaz Studio as a stand alone but I'd like it, and NIK, to appear in the Filters drop down menu. Has this been "broken" as a result of the 1.7.1 update?
-
I previously had NIK and Topaz available as plug-ins under the "Filters" drop down menu. I just went to use Topaz and when I invoked the drop down menu, neither Topaz nor NIK were there. I can still run Topaz Studio as a stand alone program but how do I get it, and NIK, to appear under my "Filters" drop down menu? I presume this has happened following the recent 1.7 update? (I'm on Windows v1.7.1)
-
I think not being able to see the border on all four sides is a display anomally. As I said, if I zoom in, the border is there, and it displays correctly when the image is projected, which is the main objective. Are you adding the border to the "Inside" or "Outside" (the default) of your image? If I leave it on "Outside" I don't see a border at all, so presumably I would need to increase the document size in order to make it visible? which seems a bit counter-intuitive. If I add an outside border I'd expect it to become part of my image and the size should adjust automatically. I've never tried adding the border "Outside" the image. I always choose to add the border "Inside" and then it doesn't affect the overall image size, which must meet the contest requirements. A thin (1 pixel) "Keyline" helps most images stand out from their background.
-
I want to add a 1 pixel border to my image and I find the "enlarge the canvas" or two rectangle technique rather cumbersome, espcially if you want a very narrow border. At our club, projected images must conform to a certain size, a maximum of 1400 pixels horizontally or 1050 pixels vertically. For a dark image it is often good to add a narrow (1 pixel) white border to frame the image and help it stand out. Here's how I go about it using the "Effects > Outline" command. Import jpg image into Affinity Photo. Resize to the prescribed dimensions (as above). [Resizing often results in one of the sides being a fraction of a pixel (for example 927.4 pixels) In this case I resize again with the "padlock" symbol unlocked to a whole number of pixels.] Flatten the image Select "Effects" > "Outline" > "Blend Mode - Normal" "Opacity" > 100% "Radius" > 1 pixel "Alignment" > "Inside" "Fill style" > "Solid Color" Set color to taste. This will result in a 1 pixel coloured brder around your entire frame. The only issue I have with this technique is that, viewing the full image, even at 100% I don't see the entire border, often only on two or three sides but not all four sides. If I zoom in to say 150%, the border is there, and it also shows OK when the image is projected, it's only when I view the complete image on screen I can't see it on every side. This may be the problem the OP is having, but can anyone offer an explanation for this?
-
Thanks very much for the lengthy reply. I think one of the reasons I'm a little confused is because AP offers many more options than I'm used to seeing, so I'm unsure exactly which to choose. This is exacerbated by me having experimented with different settings and become even more confused. I recently created a file to use in a club projected image competition, and when shown it was very desaturated, so I think I must have left it in ProPhoto color space instead of converting it to sRGB, which is what our club projector requires. The printing company ask that the print files are submitted to them with their printer profile attached, which is what I've done in the past and received excellent results. As I've said previously, I've never "Soft Proofed" and always thought it was a process for those who print their own images. With all the advice and suggestions, I think I'm now ready to send off some files for printing, so thank you every one for the help information.
-
Thanks Walt, that answers one of my questions. I was uncertain if I needed to convert to sRGB and THEN apply the printer profile, or just to apply the printer profile. In Lightroom part of the file export command looks like this: So in the same menu you have the image type and the Color Space options, so under Image Format I enter JPEG and under Color Space, I enter the Printer profile (which appears on the drop down list.) This has always worked fine. I've never "Soft proofed" and the prints come back matching what I see on my monitor screen. What I want to do is produce the same result using Affinity, but I'm presented with a list of options that I'm not familiar with, and I want to be certain I am choosing the right settings.
-
It's all very well taking my comment out of context, but you are ignoring the part above it which says: "I have prepared print files many times in the past using Lightroom, which seems to be much more straightforward than Affinity. I simply export the file as sRGB with the supplied printer profile. My prints have always come back matching my screen image and I have been very happy with the results." I'm merely trying to achieve the same result using Affinity, which offers a lot more options than I'm used to seeing. Put simply, my question is: What settings do I use in Affinity Photo to convert a 16-bit TIFF file to an 8-bit sRGB file with a supplied printer profile?
-
Thank you for the comprehensive reply, but I think you have misunderstood my problem. I have prepared print files many times in the past using Lightroom, which seems to be much more straightforward than Affinity. I simply export the file as sRGB with the supplied printer profile. My prints have always come back matching my screen image and I have been very happy with the results. I've never done any of this "Soft proofing" malarkey, and as far as I'm concerned it's not necessary. As I said, I'm attempting to give up using Adobe, and I want to carry out the same process using AP, which seems to be somewhat more complicated, due to the number of options offered. Here's my workflow: Open the edited (16-bit TIFF) file in Affinity. At the top of the screen it says this file is "RGBA/16 ProPhoto RGB" I have no idea what this means, but I take it to be a 16-bit RGB file in ProPhoto Color space. I next need to convert to sRGB and export using the printer profile supplied by the printing company. In the "Export" dialog (still in the "Photo Persona") I am presented with options to "Use document format" and "Use document profile" and I'm not used to seeing these options. Do I select "Use document format" or change to RGB 8-bit, or does the fact that I'm converting to jpeg take care of those options? Do I, at this stage, select sRGB as my color profile, or select the supplied printer profile? The other option I have is to convert the image to sRGB (using "Convert ICC profile" under the "Document" drop down) and then export it. My main problem is that I'm confused by the number of options that Affinity is offering, many of which I've never seen before.
-
Thanks for the reply, but I'm still a little uncertain regarding Color Space. I currently do my raw development in Lightroom and then pass the result to Affinity Photo if I need any fine tuning. Lightroom operates in ProPhoto Color space, which is maintained when I start working in Affinity. When I've finished editing the ProPhoto TIFF file in Affinity, if I then save the file, it appears in the Lightroom catalog alongside the original raw file. In order to prepare the file for printing, I assume I must then convert it to sRGB before applying the printer profile? I cannot just apply the printer profile to the ProPhoto 16-bit TIFF file, since the printing company say they want an sRGB file with their printer profile, or does applying the printer profile also convert from TIFF to sRGB? I previously used to do this within Lightroom, but I'm trying to break with using Adobe so I really need to understand how to create the correct print file from Affinity. I'm also confused by the Affinity options to "Convert ICC Profile" and "Assign ICC Profile" Should I use either of these commands, or simply apply the sRGB profile when I Export the (jpg) file? As it is, if I "Convert ICC Profile" (to sRGB 61966) the image seems to remain the same, but if I "Assign ICC Profile" my ProPhoto image becomes washed out and desaturated. When should one "Convert" and when should one "Assign" the ICC profile. One final question. In the list of available ICC profiles, I see all my monitor calibration profiles, which are obviously not required in this context. How do I go about deleting my monitor calibration files from the list of ICC profiles? And, more to the point, why are they appearing in the list in the first place?
-
I'm sure many other people also have a problem understanding color space. I am preparing a batch of photos to be printed commercially. The printing company I am using (DSCL) ask that the files be submitted in sRGB color space. When reviewing the files I note that most of them are in sRGB IEC61966-2.1 color space, which is how they were saved. However, I have one file whose color profile is called "sRGB built-in" What is the difference between these two sRGB profiles, and should I re-export the file with the "sRGB built-in" profile using the sRGB IEC61966-2.1 profile? The printing company also provide a printer profile, which they ask be applied to the prints. I can see this profile in the drop down list of profiles in the Export dialog. Do I apply this profile by simply opening the file and then Exporting it with the printer profile I need? If this is the case, then presumably I don't need to bother about the sRGB built-in/sRGB IEC61966-2.1 question above, since applying the printer profile will override any previous profiles, or do I need to assign the correct sRGB profile first and then assign the printer profile? There are 12 files involved and I want to get them right first time, since if I have to have them reprinted it starts getting expensive.