GrahamMYC
-
Posts
220 -
Joined
-
Last visited
Posts posted by GrahamMYC
-
-
A thought.
When constructing the faulty document, I switched one image into photo to add the captions and arrows. The procedure for doing this is not completely clear, and I wonder if this is where the fault lay?
(I have to say, however, that I carried out the same exercise in the workaround, and it completed without problems)
I hope this does not confuse the issue, but thought it may be elpful to let you know the process I adopted.Regards
-
Ok making progress. Hope these are what you need.
(I did a workaround with the s\me images and they worked, But still getting the crash on the original fime)Regards
Graham
-
Would love to help. I cannot find %AppData%\Roaming\Affinity\Publisher\1.0 (Beta)\CrashReports\reports. I have looked in C: Users\Graham, and searched the C drive
Any advice welcome!
33 minutes ago, Jon P said:Hi Graham,
Interesting, I can't reproduce that crash with your file here.
Can you do a couple of things for me, navigate to %AppData%\Roaming\Affinity\Publisher\1.0 (Beta)\CrashReports\reports and attach the most recent .dmp files in this folder.
Can you also, with the document open, go do Document > Resource Manager, embed the resources and then re attach the file? I wonder if the crash is related to the linked images on page 3 that I don't have access to.
Thanks
-
I have a 3 page document (attached)
When I open it, all looks fine. It opens at page 1. If I select or scroll to page 2,all is well
However, if I try to go to page 3, either by selecting page or by scrolling, the app crashes. (see screen capture video)
-
Photomur 3 Plugin worked in earlier versions, but not in the new beta.
When you select filters->plug ins->skylum software, then photlemur 3 is greyed out and cannot be selected/
-
I have been using skylum photolemur 3 as a plugin. It still works in my mainstream Photo (1.6.5.135,
It no longer works in my current Beta (1.7.0.333)
-
For information.
I ran these photos in a batch using AP 1.6.5.135 without problems
-
Thanks for the idea. Unfortunately it crashed after processing only 1 image with parallel processing unchecked.
-
I took 21 .afphoto files into the batch processing section of the new beta. The object was to resize and output jpegs to a subfolder.
After 3 attempts, it was still crashing after processing the first few (the number varied between 1 and 6)
System is windows 10 pro 64 bit, 16 gb ram
It may be significant that the .afphoto files were created from raw on an ipad and transferred to the windows desktop via icloud. The files were copied from icloud to a temp folder before processing
some of the files attached. you are welcome to the rest if it will help
-
No problem now. Must have been finger trouble. Sincere apologies
-
On 2/10/2019 at 6:44 PM, Gnobelix said:
Hello @GrahamMYC,
the option you miss (repeat sphere) is only active if the sphere filter has been applied previously,
the same applies to all other filters. (repeat.........)
I think you did not apply the filter.
Cheers
I am s I did apply the sphere filter in both the stable and beta versions. The repeat option appeared in the stable version., but not in the beta/
-
Following an interesting tutrorial I applied filters->distort->sphere successfully. Next step was to select Filters->re[peat sphere
This command not available in 1.7.0.231. Checked it is available in 1.6.5.135.
-
I hesitate to post in this august place, but I think one of my selection techniques has not been explicitly described before.. This video is aimed at real world outdoor photography which is often taken under less than ideal conditions; and where we need to cheat because there was not a camera there when we wanted one..
This image is a composite. It was constructed in Affinity Photo.
The video is a workflow demonstration - it is not good enough to be called a tutorial.
Outdoor activities can often be difficult to photograph. My pastime is sailing, and I now have a motorboat. It is surprisingly difficult to get images of your own boat at sea. So you have to use what you can beg, borrow, or steal.
The video is about using a photo taken by a friend, taken from a moving platform(another boat) under less than ideal weather conditions. We take the image and transform it so it can be used in an entirely different context.
I have used three techniques described in official Serif Affinity videos by James Ritson. They are
"Bringing Out Water Detail" <a href="https://vimeo.com/202899215" rel="noreferrer nofollow">vimeo.com/202899215</a>
"HDR from one exposure" <a href="https://www.youtube.com/watch?v=Ar6CZvfyFvk&feature=youtu.be" rel="noreferrer nofollow">www.youtube.com/watch?v=Ar6CZvfyFvk&feature=youtu.be</a>
"Making Images Pop" <a href="https://vimeo.com/178575803" rel="noreferrer nofollow">vimeo.com/178575803</a>The first part of the video deals with enhancing the basic image, including two different applications of tone mapping.
The second part deals with four different approaches to selection, to deal with different aspects of the image and how to combine them.I have not seen the use of the pen tool to create fine detail precise selections before, but maybe I did not look far enough. So far as I know, it is a first.
The same problems apply to a lot of outdoor activities including windsurfing, climbing, motocross, horse riding. Wherever there is equipment, wild background, fine details (such as reins or ropes) then complex selection may be needed so you can blag an exciting picture.
Please view
-
Sorry GrantCee. I am unable to help. What I do know is that the Serif team do respond to a post if it describes a reproduceable situation.. Why not try startin a new post to sprcifically address your issues?
And good luck! -
3 hours ago, Nana said:
Thanks Graham.
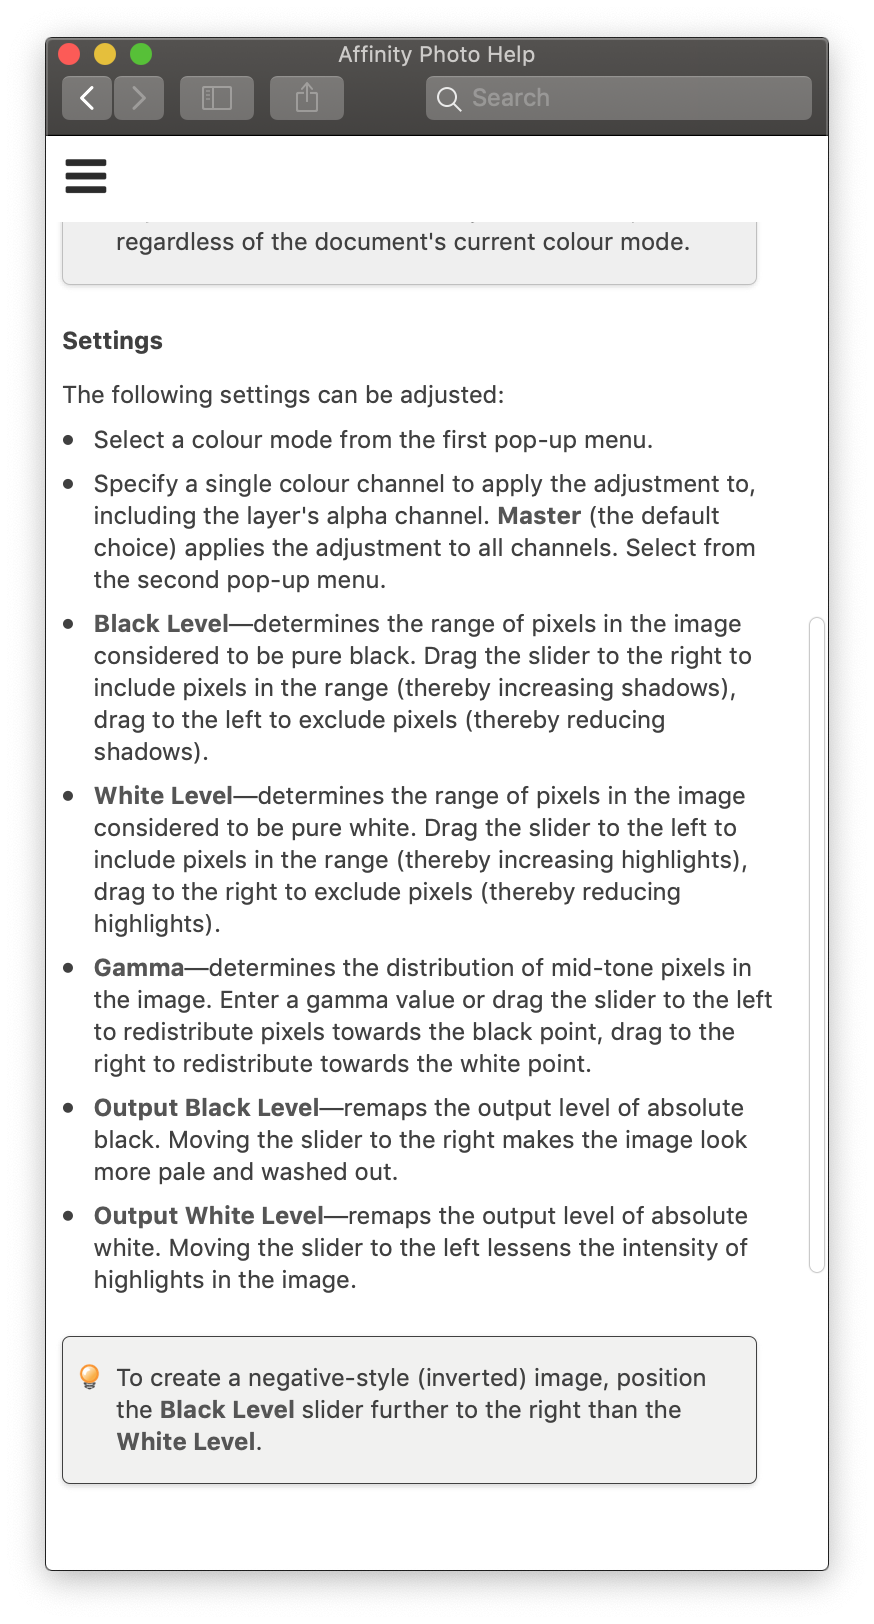
The built-in help document in version 1.7 has been updated to provide information about the two extra sliders you are talking about that.
THanks Nana
My version is 1.7.0..209. It does not yet include the updated help file. But that changed help file addresses 90% of my query and will be included at some stage. For professionals it will be 100% clear, but for hobbyiists like me, we are guessing as to whys and wherefores of remapping. No doubt a little practice will solve that.
Many thanks for your time and trouble. -
1 hour ago, Nana said:
You can start by viewing the Serif Affinity official Levels Adjustment Tutorial. There is also Affinity Photo Help document. You can search for "Levels Adjustment". The help file is very comprehensive.
Thanks Nana, but the video is for the old levels adjustment with only 2 sliders. The new leveks adjustment in the AP 1.7 beta has 4 sliders. The help file has been updated with bald statements of what they do. No explanation there as to why they have been added and what to do with the extra 2 sliders. Hopefully there will be another excellent tutorial video on this soon.
-
As a simple hobbyist user, I am not clear about why the levels adjustment has 4 sliders and how to use them.. Help please!
-
build 1.7.0.221 (windows) seems to go some way toward solving the problem..
I placed a picture frame on the master page
Then I went to one of the spread pages. The picture frame was visible. I selected it, and placed a picture. This immediately became an unlinked instance of the frame. With the move tool selected, double clicking opened a control so the image could be zoomed or moved. The image does not change the master. However, the image does not appear in the Resource manager. Therefore it seems difficult to edit the image or even delete it. It can be overwritten by another place. So, as things stand, the only way to edit it is externally and then do another place operation. Not very transparent.
Nearly there!
The release notes are hereSee the forum posting at
-
10 minutes ago, Old Bruce said:
If by old money you mean £/s/p then no due to being a Canuck, I did chance across a farthing in change once here in Canada. I do remember Dominion Day and the Red Ensign, I also slip up once in while and refer to Armistice Day.
Feet & Inches sure but Gallons through to Fluid Ounces are tricky living next the US.
It is nice to relax and have a bit of fun in the midst of all this serious stuff. Thankyou. As an 'oldie'I feel a bit exposed when I raise issues like this. On the other hand I have been a loyal user of Serif software since 2002. I admire what they have attempted, and I consider it a duty to raise issues that I think will help them develop a scintillatingly good product range
-
1 hour ago, Old Bruce said:
I still do this on occasion.
I suspect we both still use old money and ft and inches!
-
I can try- it is 85 MB. (Do not worry about copyright - I have published this freely on the internet anyway. I am not trying to make money out of these Logs)
Try to find the word Teal, and italicise it
I have uploaded the apub file where I was able to reproduce the fault. When I went through the pdf, the fualt did not reappear..If you want it I can upload the pdf tooo
-
22 minutes ago, Wosven said:
Nice idea, but don't forget to post it here too, we aren't all on Facebook
I am a bit diffident about posting here. You guys are all so competent, it would probably seem trivial.. In the light of your comment I will think about it seriously. Thanks for the encouragement. If you have not picked it up, I am 77, and in envy of all you young guys who seem to take all the technology i your stride!
-
2 hours ago, Wosven said:
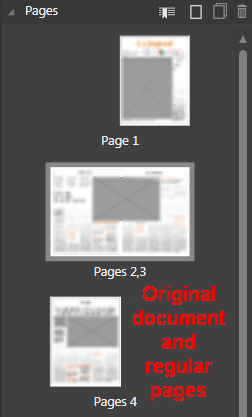
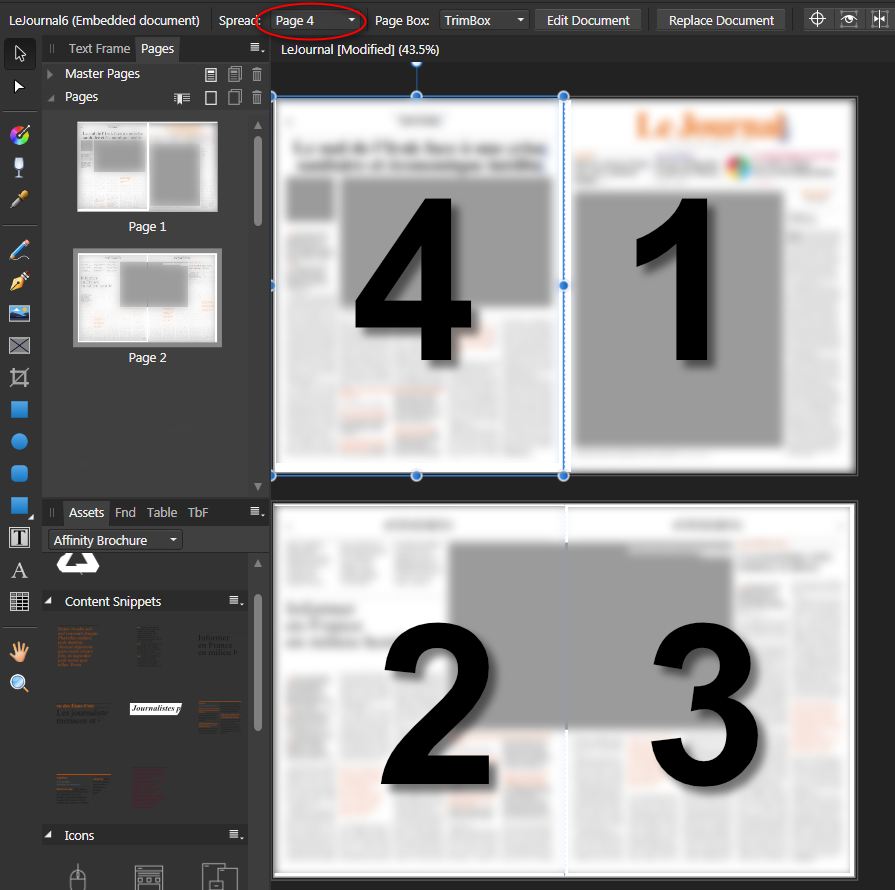
Did you search to do this PDF without APub because it seems we can't export pages in different order?
(I tested to export 4,1,2-3 pages, but the PDF was pages 1,2,3,4)
Using another application or some other drivers to produce a PDF can be a problem if it doesn't manage all the needed setting.
When testing with my current PDF driver (Foxit PDF's one), it was able to manage fonts (include them) and PPI (resolution needed for print, resampling, etc.), but nothing about colors profiles, spot colors, etc.
And the resulting PDF had faded colors, certainly not what I would expect for print. And the file's size is a lot smaller than a PDF for print produce by APub, certainly missing the color profiles and other informations.
(I don't have tool here to check for this, but I'd rather check those PDFs first before sending them for print).Another solution, if you know in which order the pages need to be, is to export a 1st and regular PDF (from 1 to n page) with the print setting from APub.
Second, you create a new document with single pages of A3 format (ordouble size from your original pages).
You put a guid to divide this page in 2 egal parts in the Master pages, to easily place your pages.
And you place the PDF pages on this document as needed depending of the order you want.
You can place the first 2 pages on the first large spread, and duplicate the spread.
Next thing to do: select each frame containing a page and using the dropdown menu to select the PDF's page needed.First document that I export as PDF for print.
Second document where I place my PDF's pages in the order I need, before exporting for print again.
Yes, ordering the pages is an issue. My printer friend, who is not particularly computer literate, offered me a simple practical solution. He makes up a simple physical booklet of the right size, then numbers the page pairs. It is difficult to explain, so I am planning to make a video of how it is done and post it on the Fans of Serif Software on Facebook. But I need the finished result to make it believable! My project is a 36 page booklet.
-
Here is my summary of where this discussion has got to. Here is one workflow....
Create the document (as an A4 facing page spread)
Select the Microsoft “print to pdf” as suggested by fd101
Set page size to A3
Set mode to booklet
When asked, specify file location
This produces a file that will produce double sided printing of an A4 booklet on A3 paper.
In this case it is not necessary to hit the big print to file button, as suggested by Wosven (because the “print to pdf” printer will do that anyway). This is the method I am now using. However, the printer properties of the generic Microsoft "print to pdf" printer do not have options to manage thw workflow, the pdf printer used by Wosven may be more efficient.
It seems to me that it is against the philosophy of Affinity to adopt an Adobe solution , as suggested by Thomaso, though that route looks feasible.(in my view pdf, although an Adobe creation is now an industry standard)
In short, I think we should see the issue as a 2 stage problem.
Stage 1, producing a file in a format suitable to pass to a Printer (or your own printer). PDF seems a practical option. [ My initial problem was that I did not see how to produce a pdf file when using the booklet output option. Pointing out that there is a pdf printer built into (most?) Windows 10 computers solves that problem. ]
Stage 2 getting compatibility between the output from stage 1 and the printer. That is, as several people have pointed out, a matter of printer settings. However, the issue can be eased by knowing whether to order the pages for printing the “outer” pages first, then the “inners”; or printing each page 2 sided one at a time. Some printers will do either given the basic output from any of the pdf-to-file-printers mentioned in this discussion. It sometimes needs a little bit of experiment to sort out which sequence works. [I am now content that I understand the issues]
In summary, I would suggest to Affinity that they produce some clear video tutorials on how to carry out this workflow. They should also look at the wording on their print page. “Print to File” on the big button means something different to the little print to file tick box.
I think the time has come to close this discussion. I have learned a lot, and can only thank the contributors


crash on selecting page
in [ARCHIVE] Publisher beta on Windows threads
Posted
Basically it went like this
1: Placed image in the document
2: Selected edit in Photo
3: Added text boxes and arrows
4: I may have cropped the image a bit - not sure of this.
5: hit save
6: Could not work out how to go back to APub
7: Closed file
8: restarted APub,, opened file and found the edited image was OK
Hope this helps!
Graham