
Sara72
-
Posts
322 -
Joined
Reputation Activity
-

 Sara72 reacted to Sabor in How to convert photo to one color and transparency
Thank you so much summersara
-
 Sara72 got a reaction from Alfred in How to convert photo to one color and transparency
Hi,
I'm not sure? But the steps where very easy:
1) Bring in your photo, go to Adjustments and click on the Threshold filter, pull the slider in the settings to suit or use one of the presets, this turns the image black and white, i then right click on the threshold adjustment in the layers and 'Merge down'.
2) Go to Filters on the Toolbar and then: Colours>Erase White Paper, this removes the white background.
3) Back to Adjustments and find the Gradient map filter, in the settings that pop up, i just clicked on the far left node, click on 'Colour' in the settings which brings up a colour Wheel and choose your colour and shade you want.
-
Sara72 reacted to jimmyplaysdrums in Deck of playing cards I've been working on
Hey all,
I've been working on a deck of cards. Still trying to flesh out the main theme I want to go for but right now its sort of based on Tarot cards. Spades, Clubs, Hearts, and Diamonds are also Swords, Wands, Cups, and Pentagrams respectively like in a tarot deck. There's also 4 colors instead of 2. The idea is for this deck to also be the minor arcana of a tarot deck and later I can design a "major arcana expansion" deck that when combined with this deck would make it into a full tarot deck. The major arcana card in a tarot deck are the ones with names like "The Magician", "The Fool", "Death", "Justice", etc. The minor arcana are the 4 suits with the Ace, 2-10, and the court cards so that would be this deck. Maybe even will include a couple Major arcana as the Joker cards. Like "The Fool" and "Death" cards since most playing card decks have 2 jokers anyways.
I'm also playing around with a duality idea of each of the court cards having slightly different sides. One being normal and the other side being a bit rough or unkempt. This would make them not perfectly symmetrical which would also be good for using them as Tarot cards since a card being upside down means something different than if it is turned right side up. Most number cards can show upside down except for the diamonds so I still need to figure out that for the 2-10 of diamonds cards.
Anyways, I'm rambling on now. So what do you think? Any critiques or suggestions on the design?
TL;DR - I'm designing a deck of cards. What do you think?
-
Sara72 reacted to StuartRc in Inktober 2018 (Raster)
Inktober 2018
So it begins again....All AD this year....hopefully! (except for initial sketching)...
Links
Day 01 [Prompt:Poisonous] | Day 02 [Tranquil] | Day 03 [Roasted] | Day 04 [Spell] | Day 05 [Chicken]
Day 06 [Drooling] | Day 07 [Exhausted] | Day 08 [Star] | Day 09 [Precious] | Day 10 [Flowing]
Day 11 [Cruel] | Day 12 [Whale] | Day 13 [Guarded] | Day 14 [Clock] | Day 15 [Weak]
Day 16 [Angular] | Day 17 [Swollen] | Day 18 [Bottle] | Day 19 [Scorched] | Day 20 [Breakable]
Day 21 [Drain] Day 22 [Expensive] | Day 23 [Muddy] | Day 24 [Chop] | Day 25 [Prickly]
Day 26 [Stretch] | Day 27 [Thunder] | Day 28 [Gift] | Day 29 [Double] | Day 30 [Jolt]
Day 31 [Slice] (This one is the only vector!)
Project Brushes INK
Working on a new Inking 'toolkit' consisting of Vector, Raster Brushes and vector assets. Samples as shown below:
Vector Brushes
A. inkBrush - Vector - Inking
B. inkBrush - Vector - Paint
C. inkBrush - Vector - Texture
D. inkBrush - Vector - Effects
E. inkBrush - Vector - Granular
F. inkBrush - Vector - Render
G. inkBrush - Vector - Linear
Raster Brushes
A. inkBrush - Raster - Pattern (Geometric)
B. inkBrush - Raster - Pattern (Organic)
C. inkBrush - Raster - Sketch
D. inkBrush - Raster - Draw
E. inkBrush - Raster -Paint
F. inkBrush - Raster - Bristle
G. inkBrush - Raster - Hatch
H. inkBrush - Raster - Vegetation 'Stamps'
I. inkBrush - Raster - Splatter
J. inkBrush - Raster - Grunge
K. inkBrush - Raster - Texture
L. inkBrush - Raster - Stipple
M. inkBrush - Raster - Effects
Vector Assets
A. vectorAssets - Grunge
B. vectorAssets - Texture
C. vectorAssets - Geometric Patterns
D. vectorAssets - Organic Patterns
Tutorials
A. Creating Vector Brushes
Experiments
Vector Brush Experiments
Inktober Prompts
Day 01 [Prompt:Poisonous]
AD only
Original Size: AD 400 x 400mm 300dpi (Uploaded Size:1417x1741px/300dpi/hq jpeg)
-
Sara72 got a reaction from Alfred in How to convert photo to one color and transparency
Hi Sabor,
Probably easiest to do in AP, you can used the Threshold filter to turn the image into that one colour print look and then use the Gradient map adjustment to change the colour, using the 'Erase White Paper' Filter to remove the background:
-
 Sara72 got a reaction from firstdefence in How to Achieve the Two-Toned Face Effect
Hi,
This is how i created the effect, although i think nice lighting and a studio setting might of created the images you posted.
I just added 2 new layers above the image with a colour fill (red and blue) and an Overlay blend mode, attached a mask layer to both.
Using a big soft, black brush on the mask to remover parts of the fill on the face, you can change the size and opacity to get a better effect:
-
Sara72 got a reaction from Alfred in How to Achieve the Two-Toned Face Effect
Hi,
This is how i created the effect, although i think nice lighting and a studio setting might of created the images you posted.
I just added 2 new layers above the image with a colour fill (red and blue) and an Overlay blend mode, attached a mask layer to both.
Using a big soft, black brush on the mask to remover parts of the fill on the face, you can change the size and opacity to get a better effect:
-

 Sara72 got a reaction from Hot Cheetos in How to Achieve the Two-Toned Face Effect
Hi,
This is how i created the effect, although i think nice lighting and a studio setting might of created the images you posted.
I just added 2 new layers above the image with a colour fill (red and blue) and an Overlay blend mode, attached a mask layer to both.
Using a big soft, black brush on the mask to remover parts of the fill on the face, you can change the size and opacity to get a better effect:
-
 Sara72 got a reaction from Aammppaa in How to Achieve the Two-Toned Face Effect
Hi,
This is how i created the effect, although i think nice lighting and a studio setting might of created the images you posted.
I just added 2 new layers above the image with a colour fill (red and blue) and an Overlay blend mode, attached a mask layer to both.
Using a big soft, black brush on the mask to remover parts of the fill on the face, you can change the size and opacity to get a better effect:
-
 Sara72 got a reaction from Karina in how to create watercolor on paper effect in Affinity Photo?
Hi,
You can always take photos of some of your watercolour paper and use them as overlays to add to work you've already done, basically bring them into the project and add to the top of the stack and use a blend mode like Multiply or overlay.
I really like the Daub watercolour brushes and you can always use the smudge brush tool with different brushes to get some cool effects.
Sara :)
-
Sara72 reacted to gdenby in Brushes aren't working...anyone else?
No gestures that I know about. You can get finger strokes alone to respond to velocity and inverse velocity. And a curious one, direction. Both w. a finger are fairly clumsy. One reason I bought an iPencil.
Attached, 2 red strokes done by finger tip. The blue are w. size variability set to velocity, inverse velocity and direction.
-
Sara72 got a reaction from Alfred in Digital scrapbooking in Designer or Publisher...?
Hi,
I know a few people who are using Affinity Designer for scrapbooking, you can export a whole 12"x12" page full of elements as PDF from CraftArtist to use in Affinity, these are the PDF instructions i was given from a lady online, i've edited some of it :
'I use Acrobat 6 for compatibility, select the first option 'Publish Profile' ...Best Quality with Transparency' and make sure that you uncheck the box beside 'Render entire page as Bitmap' (Advanced Tab) Just have to remember to 'Convert to Picture' 300dpi each element before Exporting as PDF. If not Converted to Picture, elements stick to everything that is stacked below (at least I think that is what happened) so shows as one element on the page when opened in AD.'
Once the elements are in Affinity Designer you can then save them to your own Assets category by adding from selection, basically creating an Assets kit.
Sara
-
Sara72 reacted to iMac1943 in how to do this in black and white
Picture 1 is what I received, picture 2 is what I made with the help of this community (I'm very thankful)
-
 Sara72 got a reaction from lepr in how to do this in black and white
Hi,
You could try a crosshatch effect, if you got the free Frankentoon's Texture brushes, there is a nice crosshatch brush in set C, brush FT pencil cross-hatching 02.
Bring in your original png image and create a new pixel layer above, then just paint all over with the hatch brush, then add blend mode Overlay, 100% on the pixel layer, merge down and then go to the Threshold adjustment, i set it to 30% but you might want to play with the settings, the 3 main steps are shown below.
Sara
-
 Sara72 got a reaction from MEB in how to do this in black and white
Hi,
You could try a crosshatch effect, if you got the free Frankentoon's Texture brushes, there is a nice crosshatch brush in set C, brush FT pencil cross-hatching 02.
Bring in your original png image and create a new pixel layer above, then just paint all over with the hatch brush, then add blend mode Overlay, 100% on the pixel layer, merge down and then go to the Threshold adjustment, i set it to 30% but you might want to play with the settings, the 3 main steps are shown below.
Sara
-
 Sara72 got a reaction from Uncle Mez in Vector maneki-neko
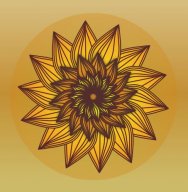
The first thing i started creating when Affinity Designer beta for Windows came out was my maneki-neko cat, inspired by a pot one i have on my desk, finally finished today! Thanks Serif for this great program :) Sara
https://www.flickr.com/photos/62448866@N03/
-
 Sara72 got a reaction from SrPx in Affinity designer stylus pen for mac
Thanks for the links SrPx, not a regular on here so wouldn't have found those posts, hopefully someone from Serif can reply and say one way or another, or if syncing with other styluses will be in future builds?
Sara
-
 Sara72 got a reaction from Sunset in Vector maneki-neko
The first thing i started creating when Affinity Designer beta for Windows came out was my maneki-neko cat, inspired by a pot one i have on my desk, finally finished today! Thanks Serif for this great program :) Sara
https://www.flickr.com/photos/62448866@N03/
-
 Sara72 got a reaction from Ken Cope in Vector maneki-neko
The first thing i started creating when Affinity Designer beta for Windows came out was my maneki-neko cat, inspired by a pot one i have on my desk, finally finished today! Thanks Serif for this great program :) Sara
https://www.flickr.com/photos/62448866@N03/
-
 Sara72 got a reaction from David in Vector maneki-neko
The first thing i started creating when Affinity Designer beta for Windows came out was my maneki-neko cat, inspired by a pot one i have on my desk, finally finished today! Thanks Serif for this great program :) Sara
https://www.flickr.com/photos/62448866@N03/
-
 Sara72 got a reaction from Madame in Vector maneki-neko
The first thing i started creating when Affinity Designer beta for Windows came out was my maneki-neko cat, inspired by a pot one i have on my desk, finally finished today! Thanks Serif for this great program :) Sara
https://www.flickr.com/photos/62448866@N03/
-
 Sara72 got a reaction from MattP in Vector maneki-neko
The first thing i started creating when Affinity Designer beta for Windows came out was my maneki-neko cat, inspired by a pot one i have on my desk, finally finished today! Thanks Serif for this great program :) Sara
https://www.flickr.com/photos/62448866@N03/
-
 Sara72 got a reaction from Chris B in Vector maneki-neko
The first thing i started creating when Affinity Designer beta for Windows came out was my maneki-neko cat, inspired by a pot one i have on my desk, finally finished today! Thanks Serif for this great program :) Sara
https://www.flickr.com/photos/62448866@N03/