BobsDaubs
-
Posts
102 -
Joined
-
Last visited
Everything posted by BobsDaubs
-
 An alternate way to achieve this: 1. Select the objects you want cropped to 2. Copy the objects (ctrl c) 3. File > New From Clipboard Now you have a document cropped to the size of your objects.
-
Check out grammarly.com It will check your spelling and your grammar at the same time right here in the forums. Best of all, it is free.
-
Is the layer locked on the layers panel?
-
Thanks for sharing. If a screenshot of the palette was included, more people would potentially download it.
-
@owenr & @JimmyJack Thanks very much. I wasn't aware of the Alpha choice. That works a treat to adjust the intensity of the mask layer.
-
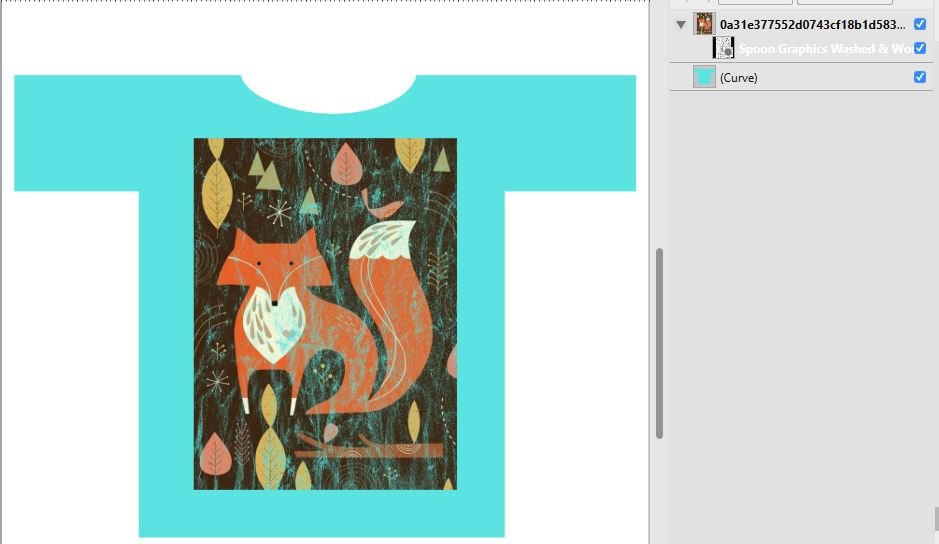
I was attempting to accomplish this by doing it the way @gdenby did it above, which is very similar to the way it would work in Photoshop. I have attached an afdesign file showing a simple t-shirt mockup I made to illustrate the technique. The purpose of the texture is to reveal the shirt color underneath the graphic to simulate the shirt being washed and worn. In PS, a levels can be applied to the mask layer to reduce the effect of the texture. I didn't see a way to do reduce the effect of the texture in SpoonGraphics' method or gdenbys' method. If I reduce the opacity of the mask layer, it just makes the graphic more transparent. Changing the blend mode of the mask does nothing as far as I can tell. I realize my method is very different than what you showed me, but I think my way is what I would do to distress a graphic on a t-shirt. I am just curious if I can affect how much the mask reveals of the shirt beneath. Thank you @firstdefence for your help. T-shirt_Mockup_test.afdesign
-
On the download page for these washed and worn textures, near the bottom of the post, he talks about how to use the textures in Photoshop. He also talks about using levels on the layer mask to decrease the effect of the texture. I can make the layer mask with texture in AD or AP, but I can't apply levels to the mask. Is there any way to apply levels to an existing mask or is there some other workaround?
-
You might want to try feathering the edge by applying a gaussian blur. Click on the fx icon at the bottom of the layers panel and tick the gaussian blur option. Adjust the slider to get the amount of feather (blur) you want. The slider only goes to 100 pixels, but you can get a higher value by typing a number in the box at the end of the slider. feathered edge.afdesign
-
Try this video tutorial and see if it clears it up for you.
-
I think the only way to be able to do that would be to use a font manager that allows tagging the font. I use 'Main Type' and it allows you to filter your fonts by whatever tags you have assigned to your fonts.
-
Are you using Mac or PC and which product? Using AD on windows, rolling the scroll wheel while hovering over the width or height in the transform panel increases/decreases in increments of 1. Holding down the control key while rolling the mouse wheel changes it in increments of .1. Holding down shift while rolling the mouse wheel changes it in increments of 10.
-
I use Trello . It is a very powerful management tool. It has a free and a paid version, but the free version works well for most cases.
-
I have snapping turned on and snap to grid selected. It snaps for me.
- 11 replies
-
- 1
-

-
- perspective
- view
- (and 3 more)
-
WOW! That is absolutely awesome. If I had 10% of your talent I would be happy as could be. Thanks for sharing.
- 11 replies
-
- 1
-
-
- painting
- raster brushes
- (and 1 more)
-
Create a 3D Moon & Nebula
BobsDaubs replied to Chris Heath's topic in Tutorials (Staff and Customer Created Tutorials)
Thanks for the links to the class. I got signed up for the free one. It looks like it will be a fun class.- 5 replies
-
- 1
-
-
- skillshare
- photo
- (and 3 more)
-
I thought clipping and nesting were the same thing. Could you please educate me on the differences between the two?
-
This is an awesome idea.
-
HSL Color Wheel In Affinity Photo
BobsDaubs replied to Aeternum's topic in Older Feedback & Suggestion Posts
You're welcome. Thanks for the feedback. -
HSL Color Wheel In Affinity Photo
BobsDaubs replied to Aeternum's topic in Older Feedback & Suggestion Posts
The option for a HSL Color Wheel is already available. You can't see it currently because you have "Sliders" selected as your color selector. If you click on the the little hamburger menu icon in the upper right corner of the color panel, you will have the option to choose HSL Color Wheel. -
Designer & Photo | Hide bounding box
BobsDaubs replied to Heres Johnny's topic in Older Feedback & Suggestion Posts
In both Designer and Photo you can temporarily hide the bounding box by holding down the spacebar. Hope this helps. -
They probably will not work. AI brush files are different than regular AI files. There are a lot of free AI brushes available on the web. I have tried some of them in the past and they wouldn't open in Affinity Designer. Why don't you download some of the free ones and give them a try and find out for yourself?
-
1. Open the svg 2. Copy the svg 3. Go to the document you want the svg embedded in 4. Paste the svg
-
I agree. In the official videos on fonts, the font drop down always shows much longer than it does on my screen. Therefore, I don't know if this is a bug or a feature request.
-
I just downloaded these and tried them out. They are awesome texture brushes. Thank you so much!