retrograde
-
Posts
1,868 -
Joined
Everything posted by retrograde
-

affinity designer True Detective Compositing (Pixel Persona)
retrograde replied to ronniemcbride's topic in Share your work
Great time-lapse Ronnie. That kind of work can be very tricky to get right as you allude to in the video commentary. Lots and lots of small decisions before it emerges from some "mysterious" place... if you're lucky... and stick with it. ;)- 12 replies
-
- 1
-

-
- compositing
- non vector art
- (and 1 more)
-
Cheers denironaut!
-
affinity designer True Detective Compositing (Pixel Persona)
retrograde replied to ronniemcbride's topic in Share your work
Looking good Ronnie, go for it! Crazy show that first season was... I agree with your statement regarding Photo's upcoming capabilities. I also feel Designer's pixel persona is already close or equal to some of Photoshop's "painting" technique and workflow. It will be very interesting to see where Photo differs in respect to Designer and Photoshop. -
Thanks Matt, your team has made an excellent product that's clever and creative and really is a joy to work in...
-
Thanks Hanzz, I look forward to that. I think you'll find the pixel brush selection surprisingly robust for a "vector" app. No true mixing but still pretty amazing.
-
Thanks Hanzz, I see Mischief was acquired by The Foundry recently. Hopefully that means it'll get some more options/features. I tried Mischief and Manga Studio a while back, MS has a nice natural media feel to it as well. Was that caricature above done in Designer? I'm thinking of trying something similar with an all painting workflow, any chance of us getting a closer view? Cheers!
-
Thanks Peter, George and MEB. I'm looking forward to doing some more logo work in Designer!
-
Welcome Hanzz. I'm familiar with your Artrage work. Another great application.
-
Thanks guys, yeah it was a little daunting not having it but I was surprised how smoothly it went. Fortunately it wasn't too difficult of a shape to conform to. The font didn't originally have all of those little horizontal lines either so I had to put them in manually as well... all's well that ends well. ;) Blend tool please?! Having said all that I can't wait to see how the team is going to implement the warping and distort options.
-
Cheers Heinrich!
-
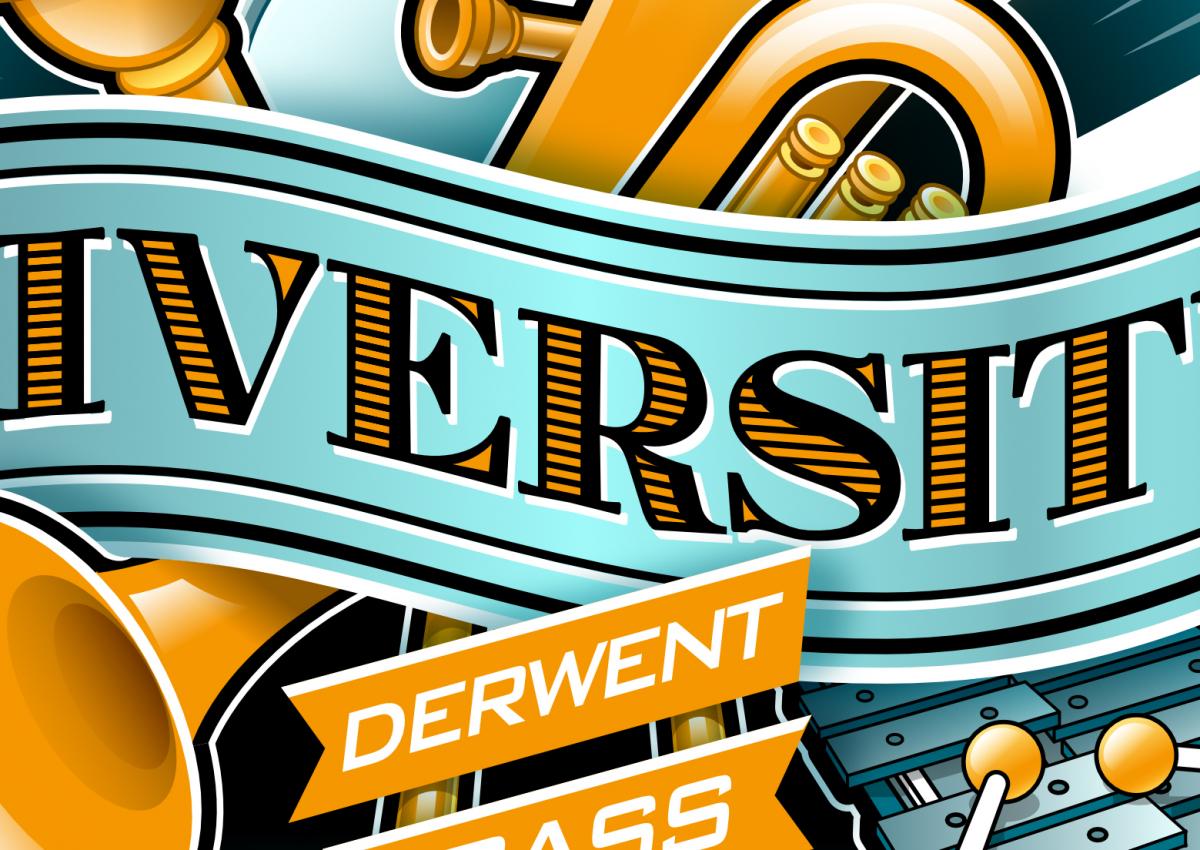
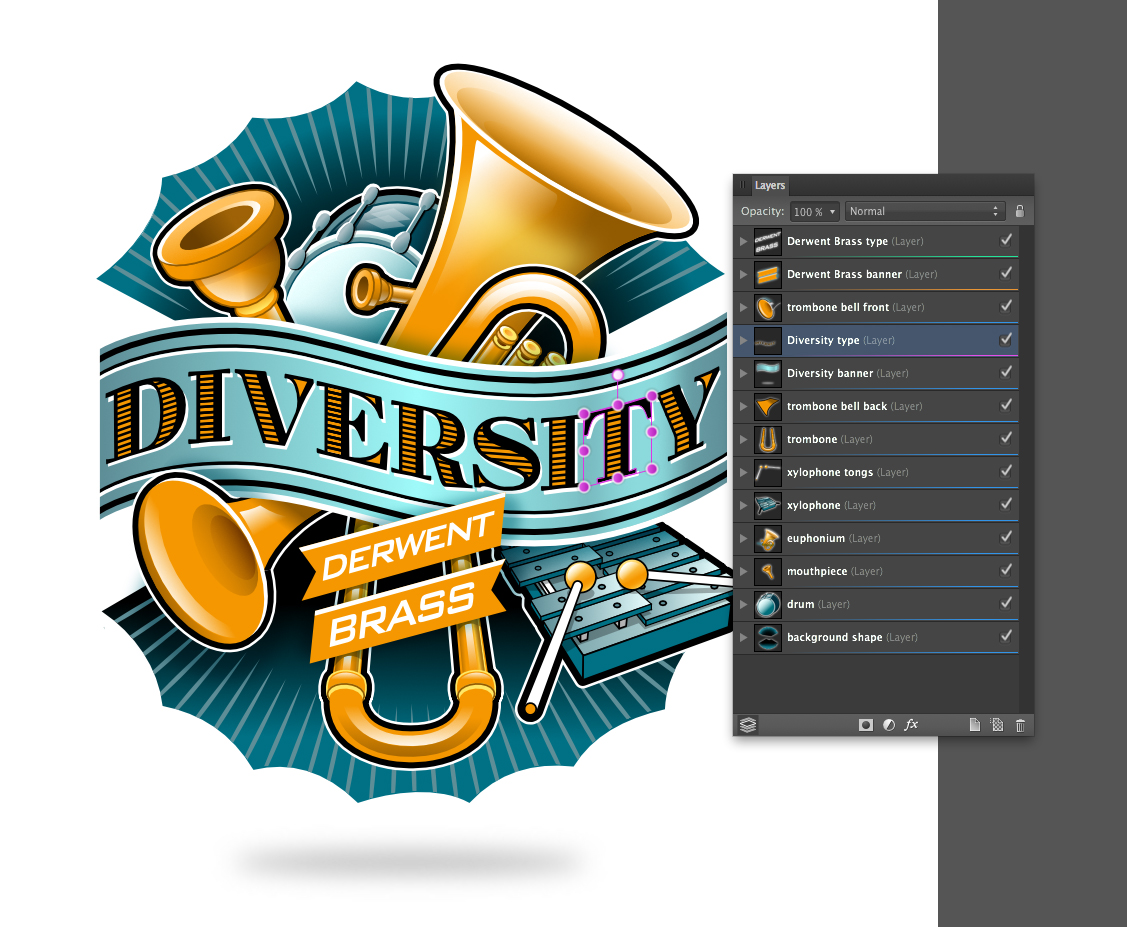
Hi all, here is a recent client project and my first logo/illustration piece done in Designer. It's for the CD cover of the Derwent Brass, a brass band in the UK. The title of the disc is "Diversity" The idea here was to try to suggest or display some of the many instruments in a stylistic way that are included in the band as a grouping that forms the backdrop for the CD's title banner. My usual process was adhered to here, approved sketch followed by vector buildup of elements on separated layers. See below for screenshots. I made use of the "erase" blend mode to hide certain areas which worked perfectly. Each letter was "skewed" individually, to conform to the contours of the banner. Colour palette was kept to a minimum of blues and golds and a heavy black outline style was used to delineate and visually connect each element. As usual, it was a delight to create in Designer. I am looking forward to the up-coming distort and warp tools mentioned in the "road map" to be able to do more of this kind of work with type in Designer. :)

- 24 replies
-
- 12
-
-
Adjust brush size like Photoshop
retrograde replied to Jakerlund's topic in Older Feedback & Suggestion Posts
Hi Jakerlund, I agree and I brought this up a while back and I think it was well received by the Affinity crew, so fingers crossed. Welcome to the forum! -
Oh I see... gotcha. In the revised version I can see where it doesn't have that paper look so much without the shadow, but I do like it. For the paper look, a suggestion might be to try the shadow a little "closer" maybe not as blurry or dark and adding a paper edge might help to create a thickness to the paper... in the original the tone in some of the darker trees is almost the same as the shadow and almost looks like the shadow might be on top of the trees...
-
Good luck with this venture Ronnie! You seem to be a natural at spreading the good news... :)
-
Nice work FB! Love the lighting and style of the buildings and natural elements. I was wondering what it might look like without the profile shadow... maybe just a subtle blue gradient for the sky...? Unfortunately when we were in Istanbul we didn't make it to Topkapi Palace. Great job! :)
-
Great first issue! My kudos on a really nicely designed presentation and informative explanation of how all of this came about and where it's going. It's refreshing to see a software team sharing a bit more of the personal side of things and a little of the journey of what it takes to bring something like this to market. Keep it up and keep these "Reviews" coming... :)
-
affinity designer First time AD, really like it.
retrograde replied to Heinrich's topic in Share your work
Ka-pow! Hehe, yep that is "HARD CORE" Nice job Heinrich :) -
Cheers Ronnie, nice tut and great to see you offering courses for Designer. Like the Batman logo too. I'll have to explore some more of the textured side of things in a piece soon. I'm usually the smooth gradient sort myself. ;)
-
The "D" works. :)
-
Sounds like you're on the right track with your choice of symbol. I hear things are slowly turning around in the "motor city". I hope so, it's had it's share of bad luck... Do they still call it that?
-
Hi jgrayillustrate. I like the line style of these, what would the pod/webcast be about?
-
Your favourite tip?
retrograde replied to Dale's topic in Tutorials (Staff and Customer Created Tutorials)
Oh yeah? ...Well how about shift command Z - "redo" AHA! :P -
Hi Ronnie, thanks for these, although I too see a greyed out file when trying to import. I did notice an earlier set of brushes from another source that has a .afbrushes file extension and not the usual .afdesign extension... any chance you could look into that? Cheers M8
-
Hi Kathrin, thanks. :-) Here's loosely a combination of techniques in a sort of start to finish workflow: (sorry for the long post) - the first and most important step is to have a finished (client approved) pencil sketch to work from, I work out the design, composition and overall direction of the piece first in pencil so that when I get to the mac I'm just concentrating on bringing it to life, very rarely do I make big sweeping concept changes after starting to build it. - unless a client requests it ;-) - once approved, I put the sketch on the top layer, lock it and set it to multiply and usually 35-50% opacity for reference. This way as I draw the paths (on layers below) I can still see the sketch and I can hide it at any time. - I think about each element "group" and create their own named layers (eyes, ears, background etc...) for easier hiding, locking and selecting (see screenshot of layer stack above) also this is how I place groups of elements easily in front or behind of one another... - I draw each shape by using the pen tool or combination of tools/shapes from Designer's tool set, depending on what's needed. No fill yet, just line only to start until it's all drawn out and I'm happy with it. - I figure out a colour scheme and create a custom palette of starter colours (this can be added to later). - I fill in each grouping with colour, at this point everything is flat, no shading. I make any overall colour adjustments now before shading starts. - using gradients, effects or pixel painting inside of shapes I set about shading to bring out the dimensional qualities of the piece, adding highlights, shadows, blurs etc... as I go forward until I get to a pleasing finish. - finally, usually I will add a layer on top of everything and make any colour correction and/or contrast adjustments needed to the whole piece globally and present a proof to the client. If approved I will export it out to the desired format. ___ This is generally how I create my illustration work. By basically following each step I'm able to concentrate on one aspect at a time. It may seem like a very rigid and not so spontaneous way to create but it actually frees me up to not worry about everything as I work. Of course with any creative process, you're going to bend or break the rules once in a while to achieve your goals, but this basic process has worked for me consistently over the years. For some further exploration, open up Designer, go to the help > welcome screen and open up the two files under the "KC" button. I created these for the Serif team for everyone to explore and dissect... both of these pieces were made using the above process. Let me know if you have any questions.
-
Fixed swatches do not work
retrograde replied to Gear maker's topic in [ARCHIVE] Designer beta on macOS threads
Seems to be working here for me with the same beta version... separated and non-separated modes.