- S -
-
Posts
814 -
Joined
Everything posted by - S -
-
That's a bit odd. It was 50% off (£23.99) across all the stores – as I saw it myself, but for some reason it's now showing as normal price (£48.49) only on the Microsoft Store. Perhaps it's just an error – like it was initially only set to 20 May – as I think the offer is until 20 June.
-
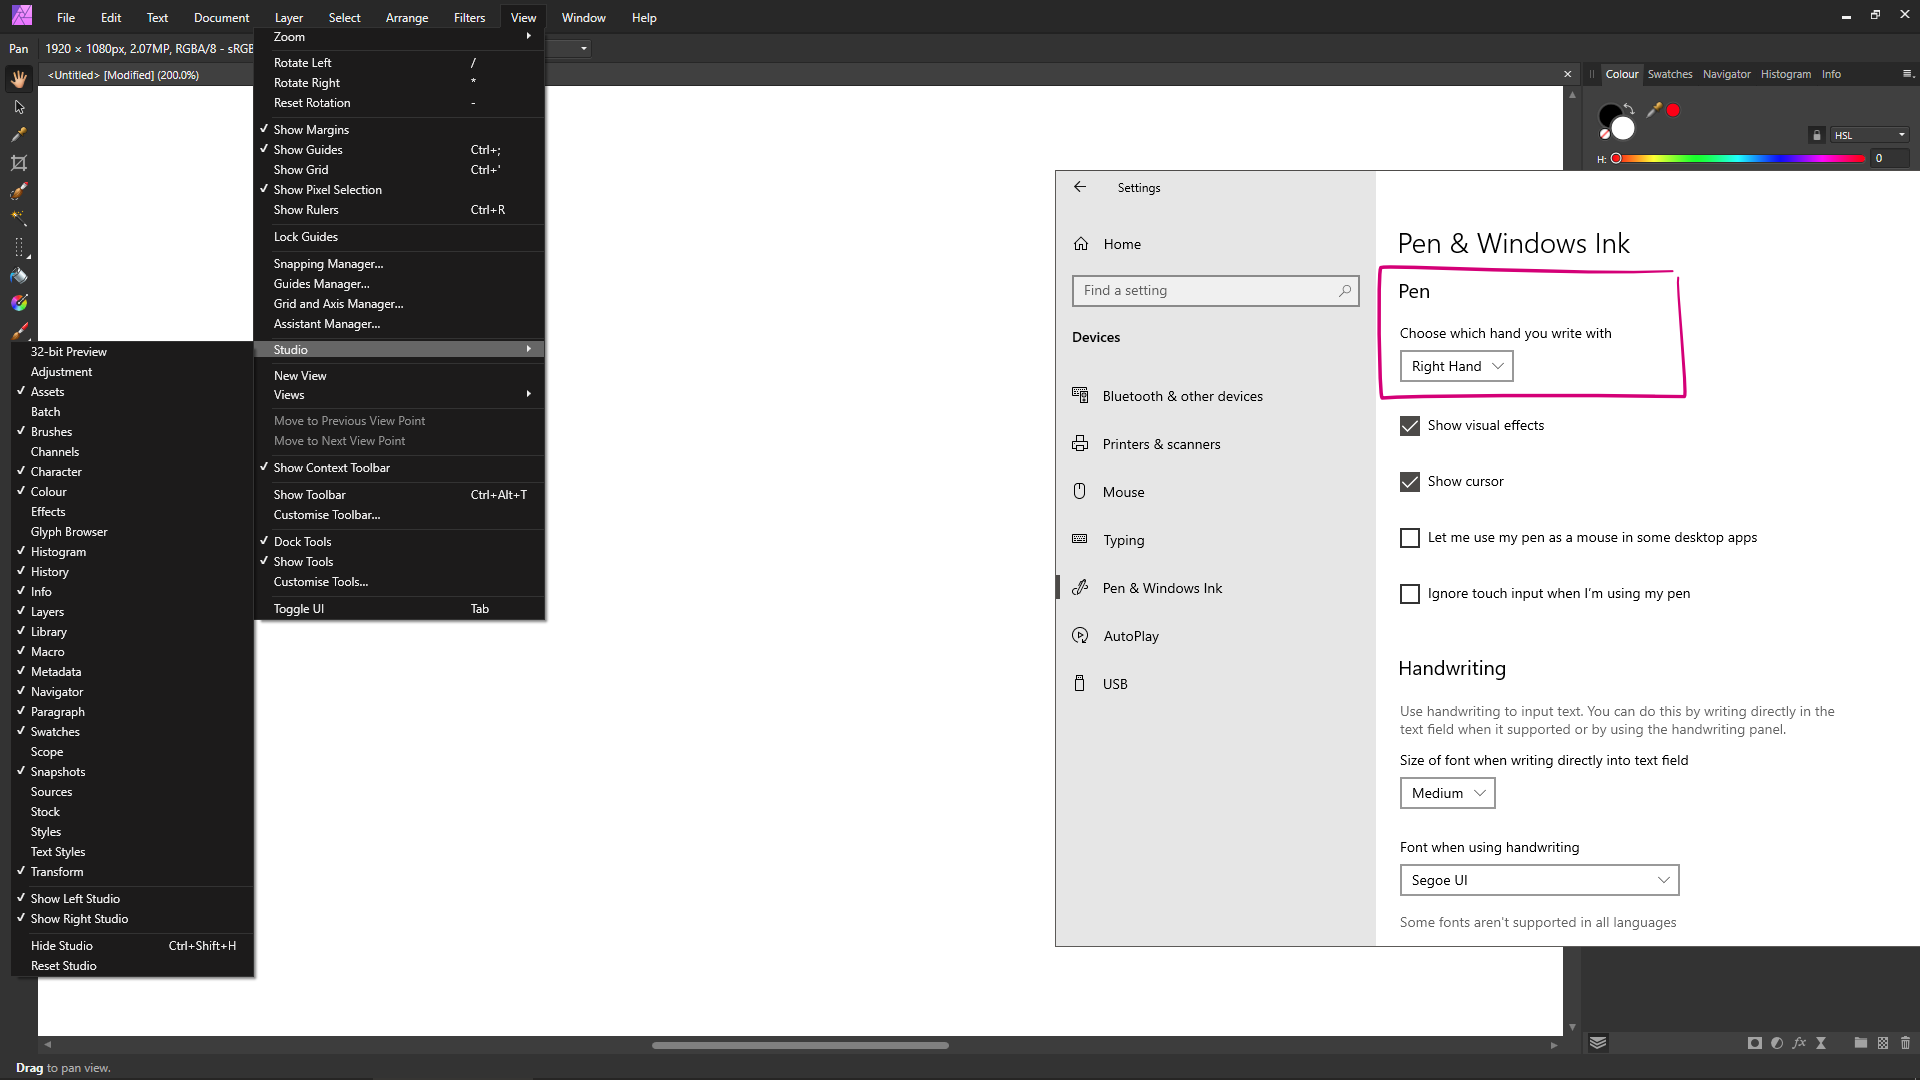
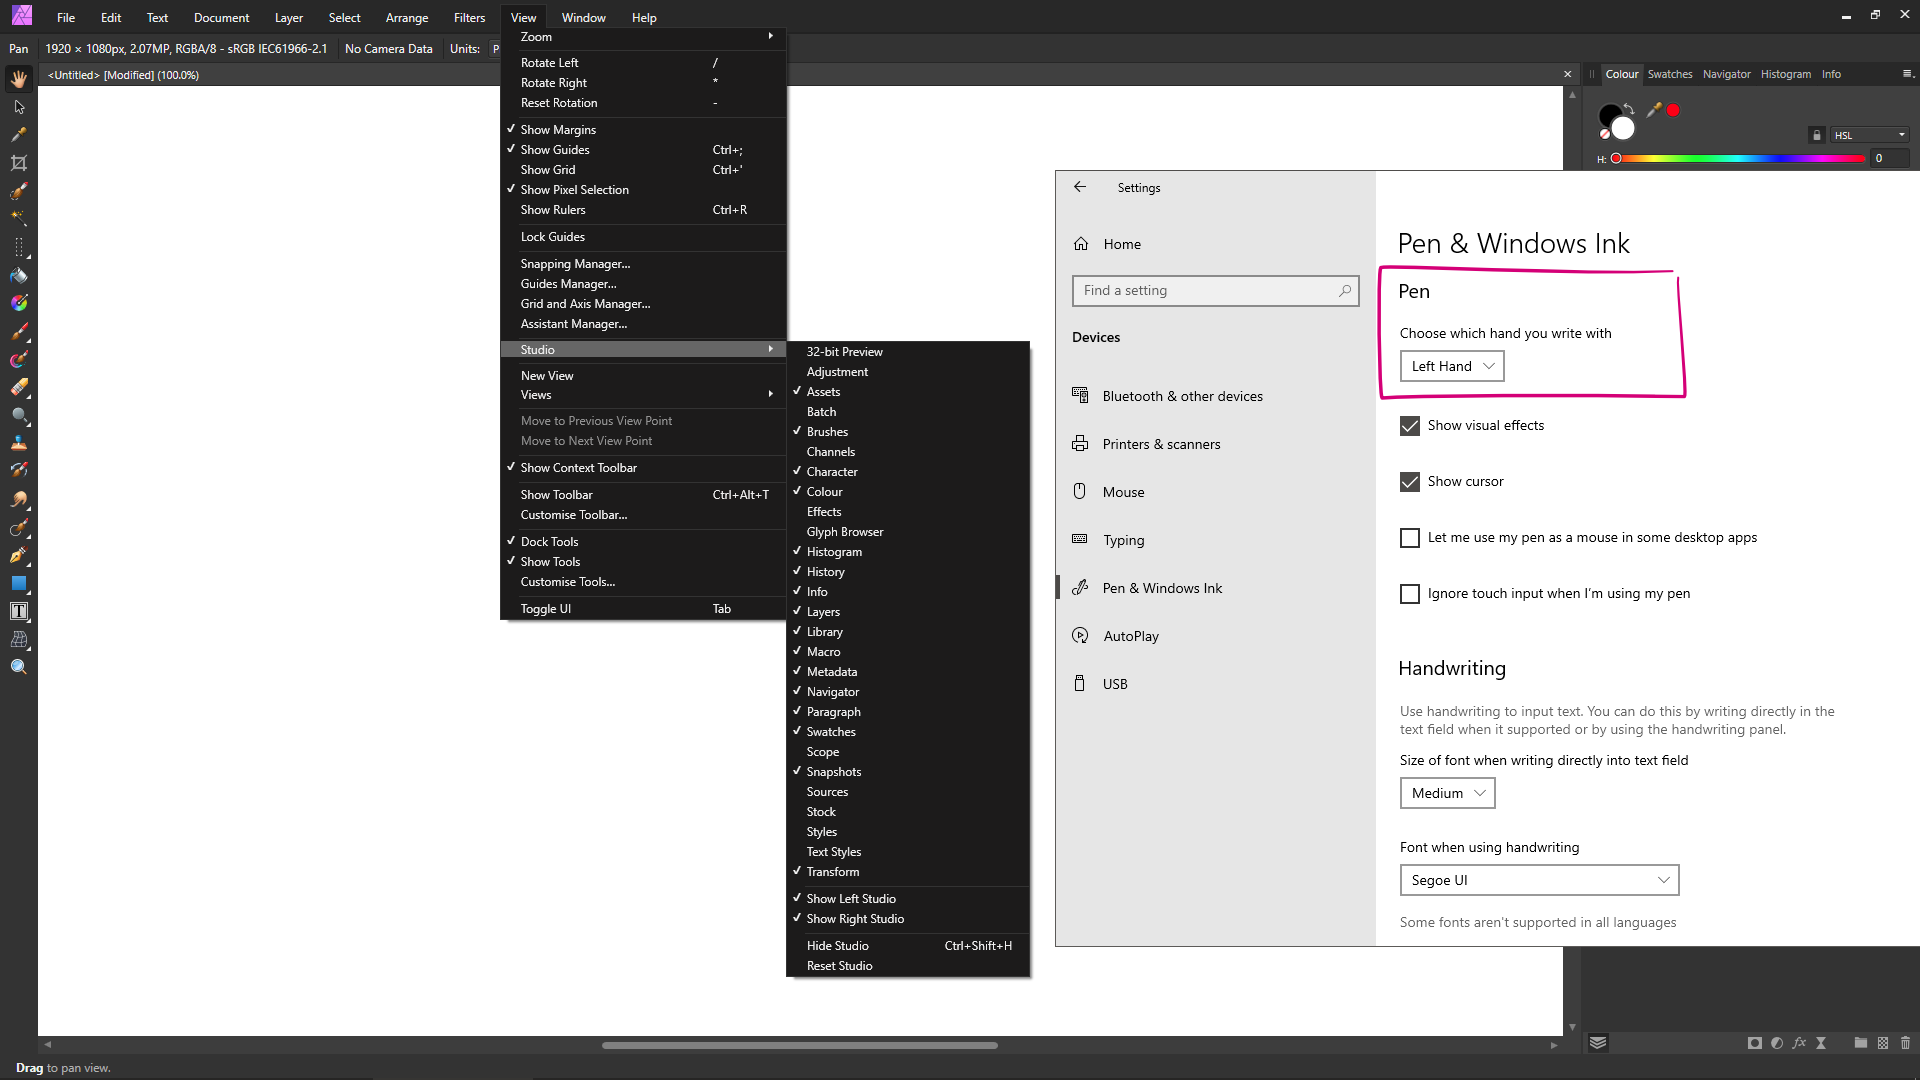
 It's because you have a graphics tablet or touch screen, which activates 'Pen & Windows Ink' settings. This means the menus in Windows are shifted according to which hand is set in the settings; it's so the menus appear in front of the pen tip where possible, rather than under your hand. If you're using a conventional tablet – rather than a touch screen – you could change the handedness in the settings to 'Left Hand'. However, if you're using a touch screen I would leave it set to the correct hand that you draw with, as this setting also affects palm rejection on a touch screen.
- 2 replies
-
- 1
-

-
- affinity photo
- affinity publisher
- (and 3 more)
-
Cannot save Affinity Photo files to hard drive
- S - replied to Dave M56's topic in V1 Bugs found on Windows
It sounds like you have enabled "Controlled Folder Access" in Windows Security, but haven't added Affinity Photo to the list of applications allowed to write to your user folders. See my posts in the thread below. They are a couple of years old, but it you scroll down to the bottom of the second post where it says "Edit (added after Windows 10 1809 released)", the screenshots should still be relevant. https://forum.affinity.serif.com/index.php?/topic/62259-cannot-save-files/&do=findComment&comment=323174 -
It looks like some sort of custom brush. If you go to the Brushes panel and select a basic round brush, does it draw OK then? Another thing you could try is to export any custom brushes you have (so you can import them again later), then reset all the brushes back to default by going to [Edit > Preferences > Miscellaneous > Reset Brushes].
-
I've changed the 'before' image to make it a bit clearer. You're looking for recurring patterns, which are the bright spots. If you look at the 'before' image, you can see on this image they form a sort of diamond shape around the centre. You then use the built-in brush to paint dots over the bright spots to mask them. Adjust the brush size so that it's just large enough to cover the main part of the bright spot – if it's too big or too small you may not get the best results. Never paint over the centre spot. Each image will be different. You need to be careful about filling in too many bright spots, as sometimes you can end up removing a pattern that's supposed to be in the image – like a striped object. Also be careful painting over the bright spots further away from the centre (like those faint ones around the edges), as that can start to have a negative impact on the image. It can be a bit trial and error and the results can vary from image to image.
-
On this particular image, the FFT Denoise filter is going to look something like this. Before: After:
-
If a macro is recorded to resize the document canvas and then turn off transparency, when the image is exported by going to [File > Export] the image is correctly exported as a 24-bit image without transparency. If the same macro is used with [File > New Batch Job], the image is incorrectly exported as a 32-bit image with transparency. Images: To reproduce: - Go to [File > New Batch Job] - Add the test image (attached below) as a source - Unselect 'Save as AFPhoto' - Select 'Save as TIFF' - Select the test macro (attached below) and click the 'Apply' button to add it to the applied macros - Click OK - The image is exported as a 32-bit image with transparency, despite the macro being set to turn transparency off It's possible to go into the TIFF settings in the 'New Batch Job' dialogue every time and change the Matte setting to pure white; however this setting should work the same way as the normal file export dialogue setting does, where if it's set to a white background with a red line through it, then it uses the settings that are set in the document itself – in this case, what's set by the macro. Test image and macro: Test image and macro.zip Macro steps: 1) Start recording macro 2) [Document > Resize Canvas] Click padlock to unconstrain Enter 3508 px X 2480 px Click centre anchor point Click resize button 3) [Document > Transparent Background] Untick 4) Stop recording macro 5) Save macro to library ------ Affinity Photo 1.8.3.641 Windows 10 1909 (18363.778)
-
Affinity Publisher for Windows - 1.8.3
- S - replied to Patrick Connor's topic in News and Information
If you go to [Windows Settings > Apps > Apps & Features] there should be a drop-down menu in the "Choose where to get apps" section. This should be set to "Anywhere" by default, but it sounds like it may have been changed to one of the other settings. If you choose "Anywhere", you shouldn't see the Microsoft Store prompts.
-
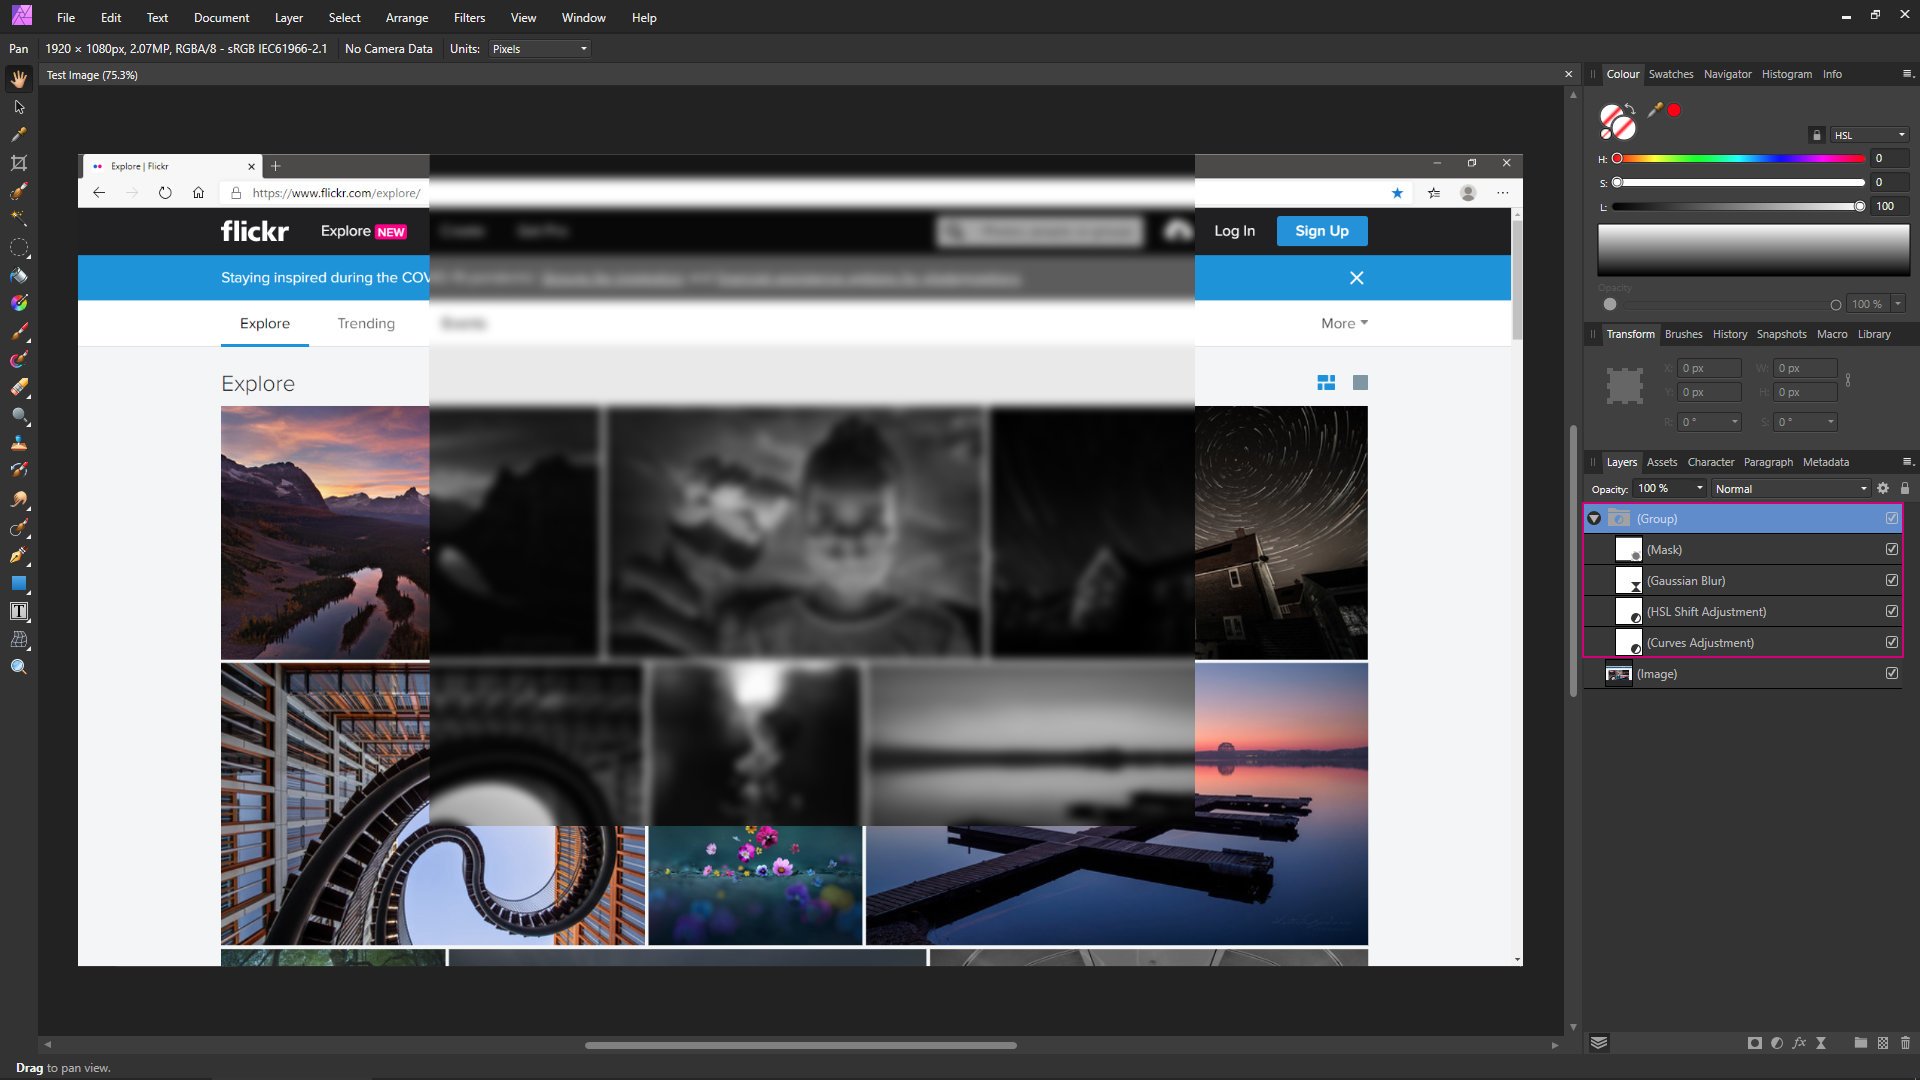
With the above image, you should be able to put the adjustment layers in a group and mask the group.
-
Affinity Photo is automatically writing the filename directly into the 'Title' field in the file metadata – which is a PITA. To reproduce: 1) Scan an image to a *.tif file 2) Open with Affinity Photo 3) Save as an Affinity Photo file 4) Export to TIF and JPG The filename of the original scan is added to the 'Title' field in the file metadata for all three files (AFPHOTO, TIFF, JPEG). A filename is a filename, not a title – the 'Title' field should be for the user to choose to fill in. Affinity Photo automatically adding the filename to the title metadata field means that the original filename is now stuck as the title in the metadata, even if the file is later renamed. It also makes little sense for most users: if the title is the same as the filename, then it's just duplicate information; if it's different due to the file having being renamed afterwards, then it's old information. If some people want the title field in the metadata to be automatically populated with the filename, this should be an option – not forced on everyone. The same can also be observed with Affinity Photo template files; the Affinity Photo template filename is added as the title field in the file metadata. That means unless a user consciously removes the title from the template file, there's going to be a load of images all with the same title – the name of the template file. So now, not only do I have to fight Affinity Photo and use PowerShell to change hundreds of file extensions at a time from .tiff to .tif, I also have to use ExifTool to remove the title metadata field for hundreds of files at a time as well. It's tiring having to keep fighting the software due to odd design decisions that have no settings to change the default behaviour.
- 1 reply
-
- 3
-

-
Adjusting masks
- S - replied to Dodgyb2001's topic in Pre-V2 Archive of Affinity on Desktop Questions (macOS and Windows)
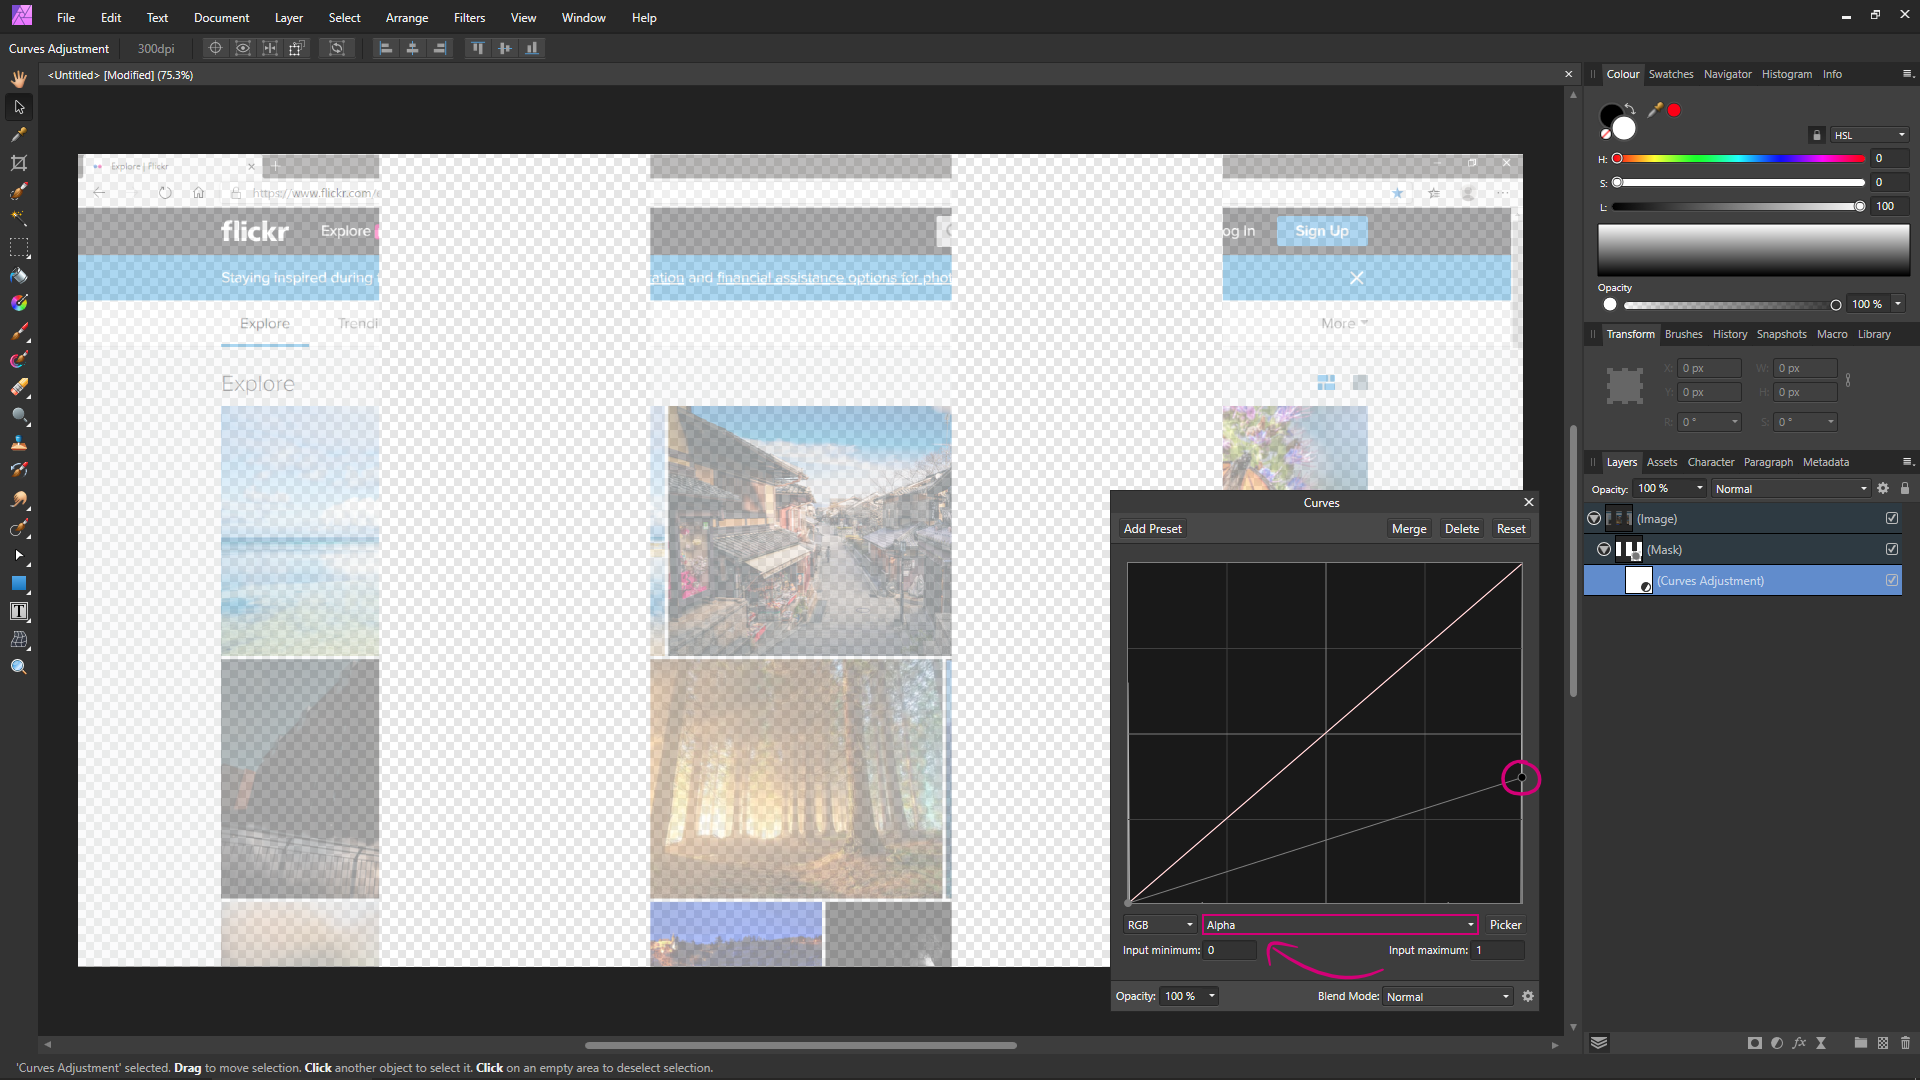
To use a Levels or Curves adjustment layer on a layer mask, you need to select the Alpha channel in the adjustment layer settings.
-
Blurring a mask with a Gaussian Blur live filter is a bit clunky for a few reasons. 1) The mask needs to be added as a nested clipping layer (horizontal blue bar) – rather than a mask layer (vertical blue bar) – which means you may need to un-nest the mask and then re-add it as a nested clipping layer (horizontal blue bar) instead. 2) Even then, when you add the Gaussian Blur live filter to it, it will also add blur to the edge of the canvas – meaning the edge of the canvas will also bleed through. To avoid that, you're probably better off going to [Layer > New Empty Mask Layer] which will create a black mask, then make your selection, and then filling the mask selection with white. 3) When using a Gaussian Blur live filter, if you press ALT (or Option) and click on the mask layer thumbnail, the black and white mask preview doesn't show the effects of the Gaussian Blur live filter like it does when you apply a destructive Gaussian Blur directly to the mask. Unfortunately there's nothing you can do about that. Video: Sandbox 2020-04-22 16-50-18.mp4
-
Driver V12.4.2 is the latest driver for that tablet. The later driver versions are for 8192 pressure levels. https://www.huion.com/index.php?m=content&c=index&a=lists&catid=16&myform=1&down_title=1060
-
One of the issues is that the document is being viewed at 116%, which won't help. However, go to [Affinity Photo > Edit > Preferences > Performance] and if the 'View Quality' is set to 'Nearest Neighbour', change it to 'Bilinear (Best Quality)'.
-
paint brush tool
- S - replied to benrymnd's topic in Pre-V2 Archive of Affinity on Desktop Questions (macOS and Windows)
In addition to the above reply, depending on what you're doing you could possibly paint on a new layer and set the layer opacity, rather than brush opacity. -
Most of my work is in Affinity Photo. One example is that it's not possible to stroke a path with a brush like you can in Adobe Photoshop, which means I would need to use the Pencil tool or Vector Brush tool and for that I would need to use Affinity Designer. The problem is that I then need to maintain another completely separate application, just to use two tools. If I modify swatches in Affinity Designer, the changes don't reflect in Affinity Photo and vice versa. The brushes I create in Affinity Photo, don't appear in the Affinity Designer. The new document presets/templates that I already have setup in Affinity Photo, don't appear in Affinity Designer. The Assets I use in Affinity Photo don't appear in Affinity Designer. Etc. Etc. — you get the point. It's not the cost that's the issue, it's that the experience is too jarring. By having one base/core Affinity application with different personas, it wouldn't be necessary to set things up multiple times for each application and then try and keep them all in sync. The common items would all be shared between personas. In the above scenario, I would just switch to the Vector persona from a 'Persona' drop-down menu and then use the Pencil tool or Vector Brush tool. The document stays exactly how it was and the interface just changes around it. All my swatches/brushes/assets/settings would already be how I had them set up and be in sync between personas. Brushes could also be in sync across all personas, there's no reason why Photo brushes couldn't be vector brushes too – like they are in Clip Studio Paint. File sizes would also be reduced as it wouldn't be necessary for example to include common parts such as the Export persona in each application, it would be part of the base application and activated when a Photo or Designer persona is added to it. Different people have different workflows and ideas, so obviously people will push back against this idea – it's to be expected; however for me personally, one application with different personas would work better for how I use it, as I would be in the Photo personas 90% of the time anyway.
-
I've toyed with this concept in my head before. The base Affinity application could be an Adobe Bridge type application – a gateway application – which is given away for free (and the cost absorbed by the other applications). This would also allow anyone to view proprietary Affinity files even if they don't have Designer/Photo/Publisher. Then, personas could be purchased and added to the base Affinity application either individually, or the whole suite could be purchased in one go. I can't remember any other software companies doing this before though, so I'm guessing there must be reasons why separate dedicated applications are preferred.
-
Export
- S - replied to Denis Gauthier's topic in Pre-V2 Archive of Affinity on Desktop Questions (macOS and Windows)
It's because Affinity Photo uses ZIP compression by default and quite a few programs don't support ZIP compression – only Uncompressed and LZW compression. ZIP shouldn't really be the default compression setting for compatibility reasons. In the Affinity Photo export dialogue box, you can create your own TIF presets by clicking on the 'More…' button. For compatibility, set the compression to LZW for 8-bit TIF files, and Uncompressed for 16-bit TIF files.
-
Affinity Photo doesn't have the Pencil tool or Vector Brush tool. Therefore, in Affinity Photo you can only do that with the Pen tool, using a plain brush. Although there's an option for 'Textured Line Style' in the dialogue under 'Style', it doesn't do anything in Affinity Photo – meaning it won't allow you to 'stroke' the Pen tool path with a different brush. It only works in Affinity Designer. Technically, you can also use brush velocity to control brush size, but I've never found that to be effective in practice.
-
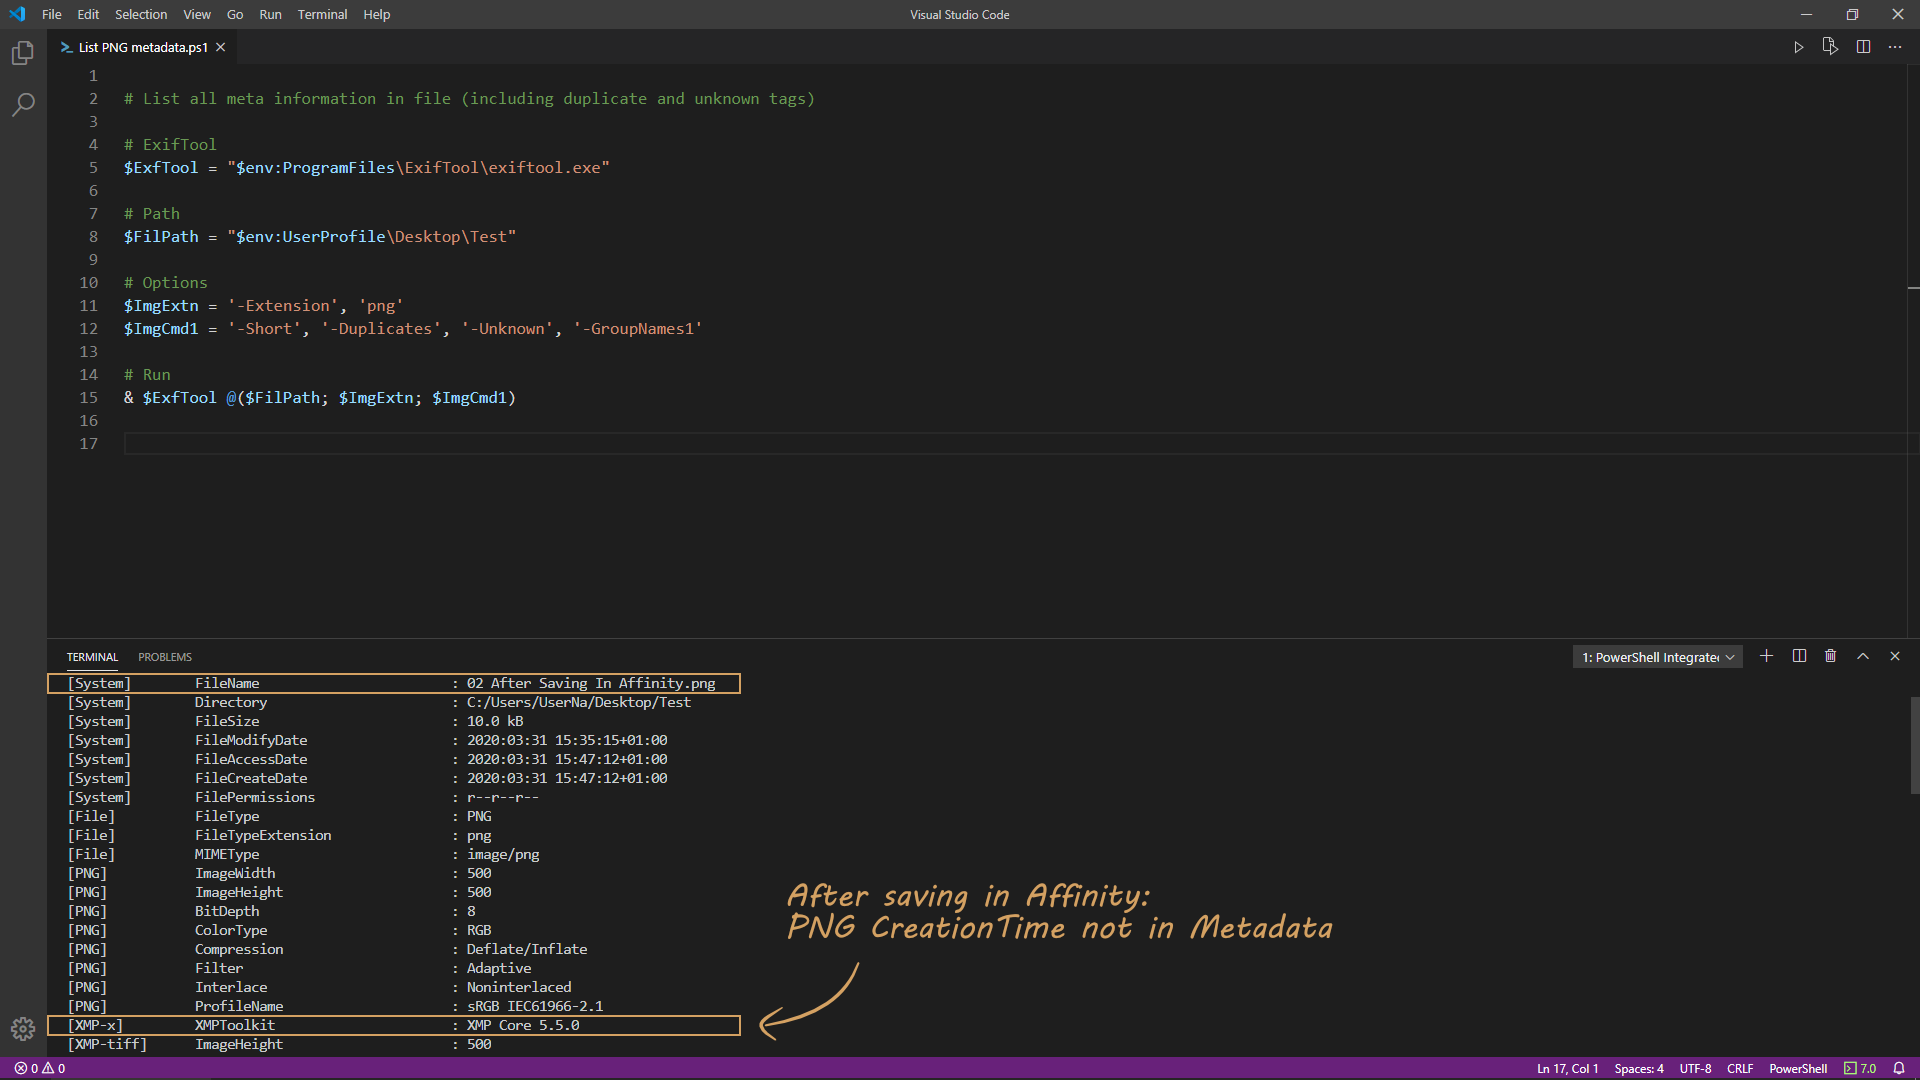
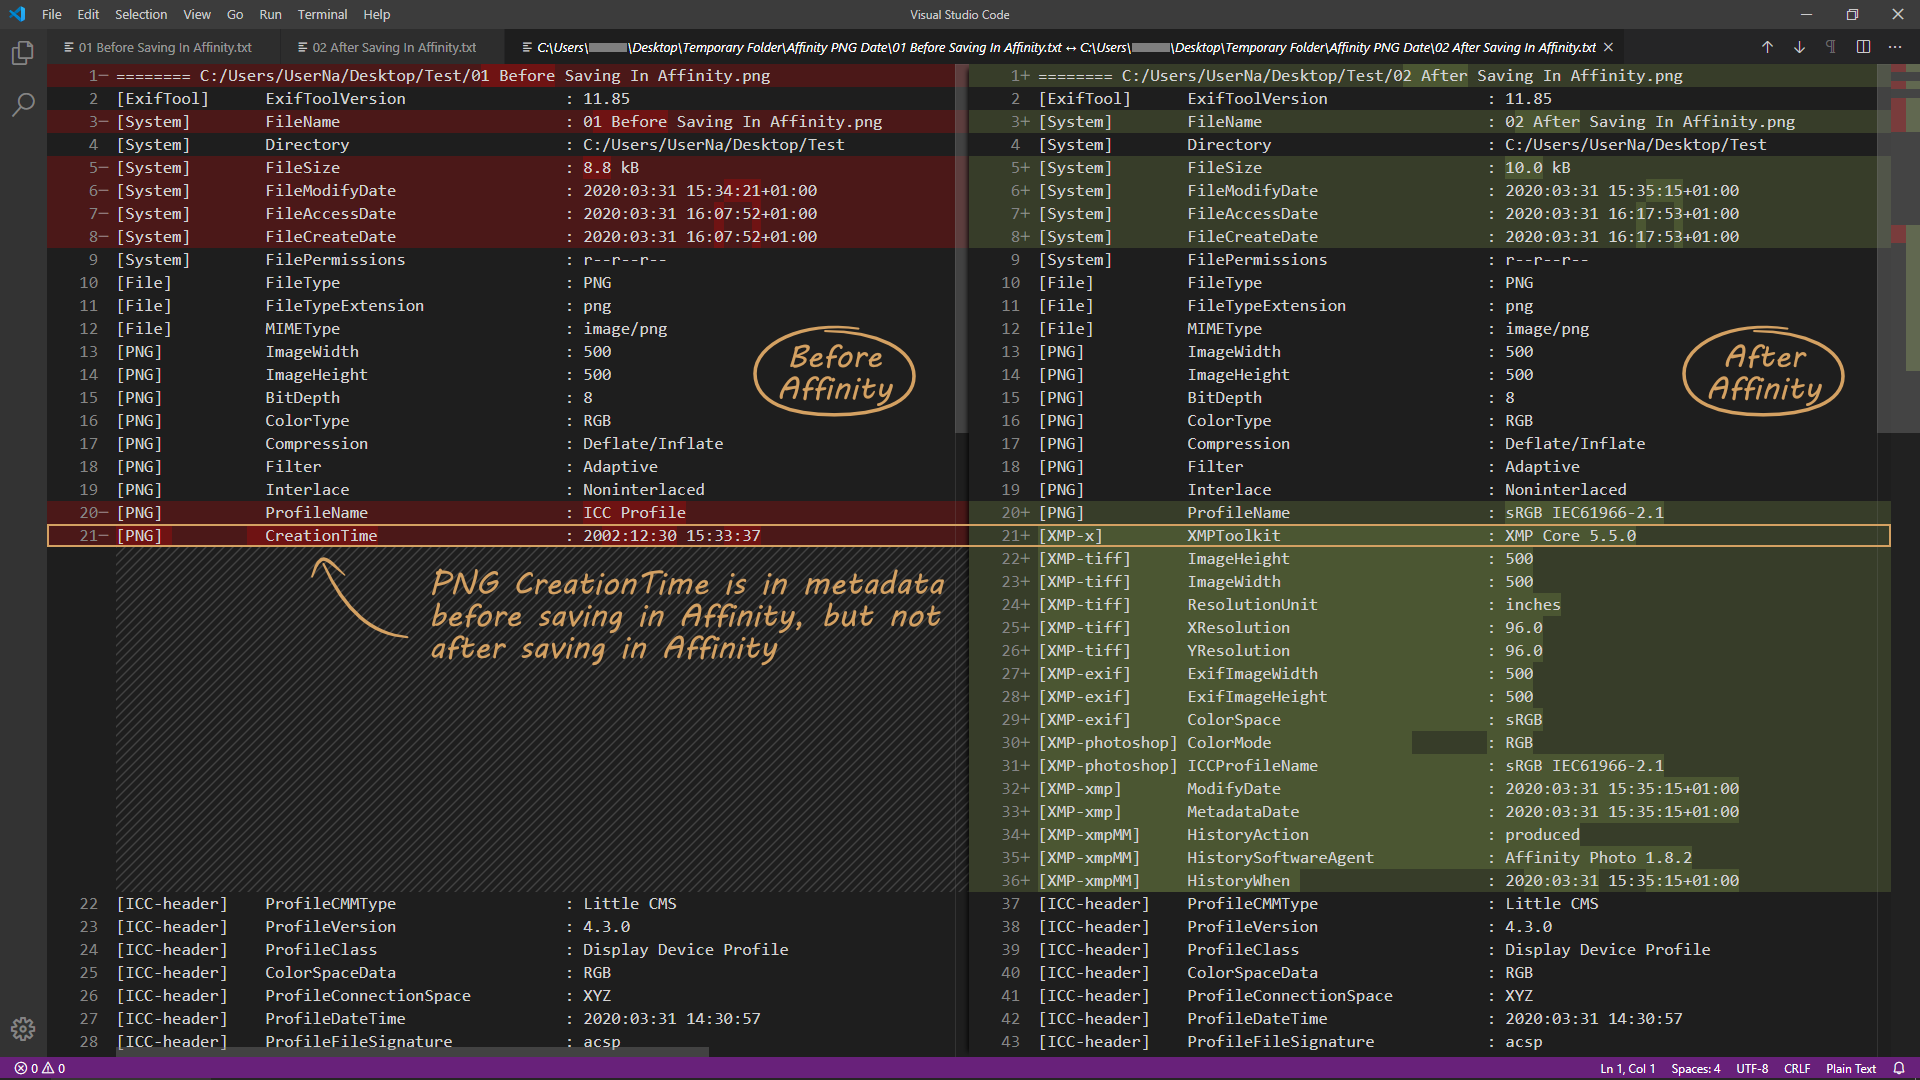
If a PNG file is opened in Affinity Photo and it contains a 'Date Taken' (PNG CreationTime) in the file metadata, when it is saved Affinity Photo deletes this date field from the file metadata. Screenshot showing Windows File Explorer dialogue before and after saving in Affinity Photo: Screenshot showing PNG CreationTime in file metadata before saving in Affinity Photo: Screenshot showing PNG CreationTime not in file metadata after saving in Affinity Photo: Screenshot showing metadata comparison before and after saving in Affinity Photo: Sample files attached: Sample Files.zip ----- Windows 10 - 18363.720 Affinity Photo - 1.8.2.620
-
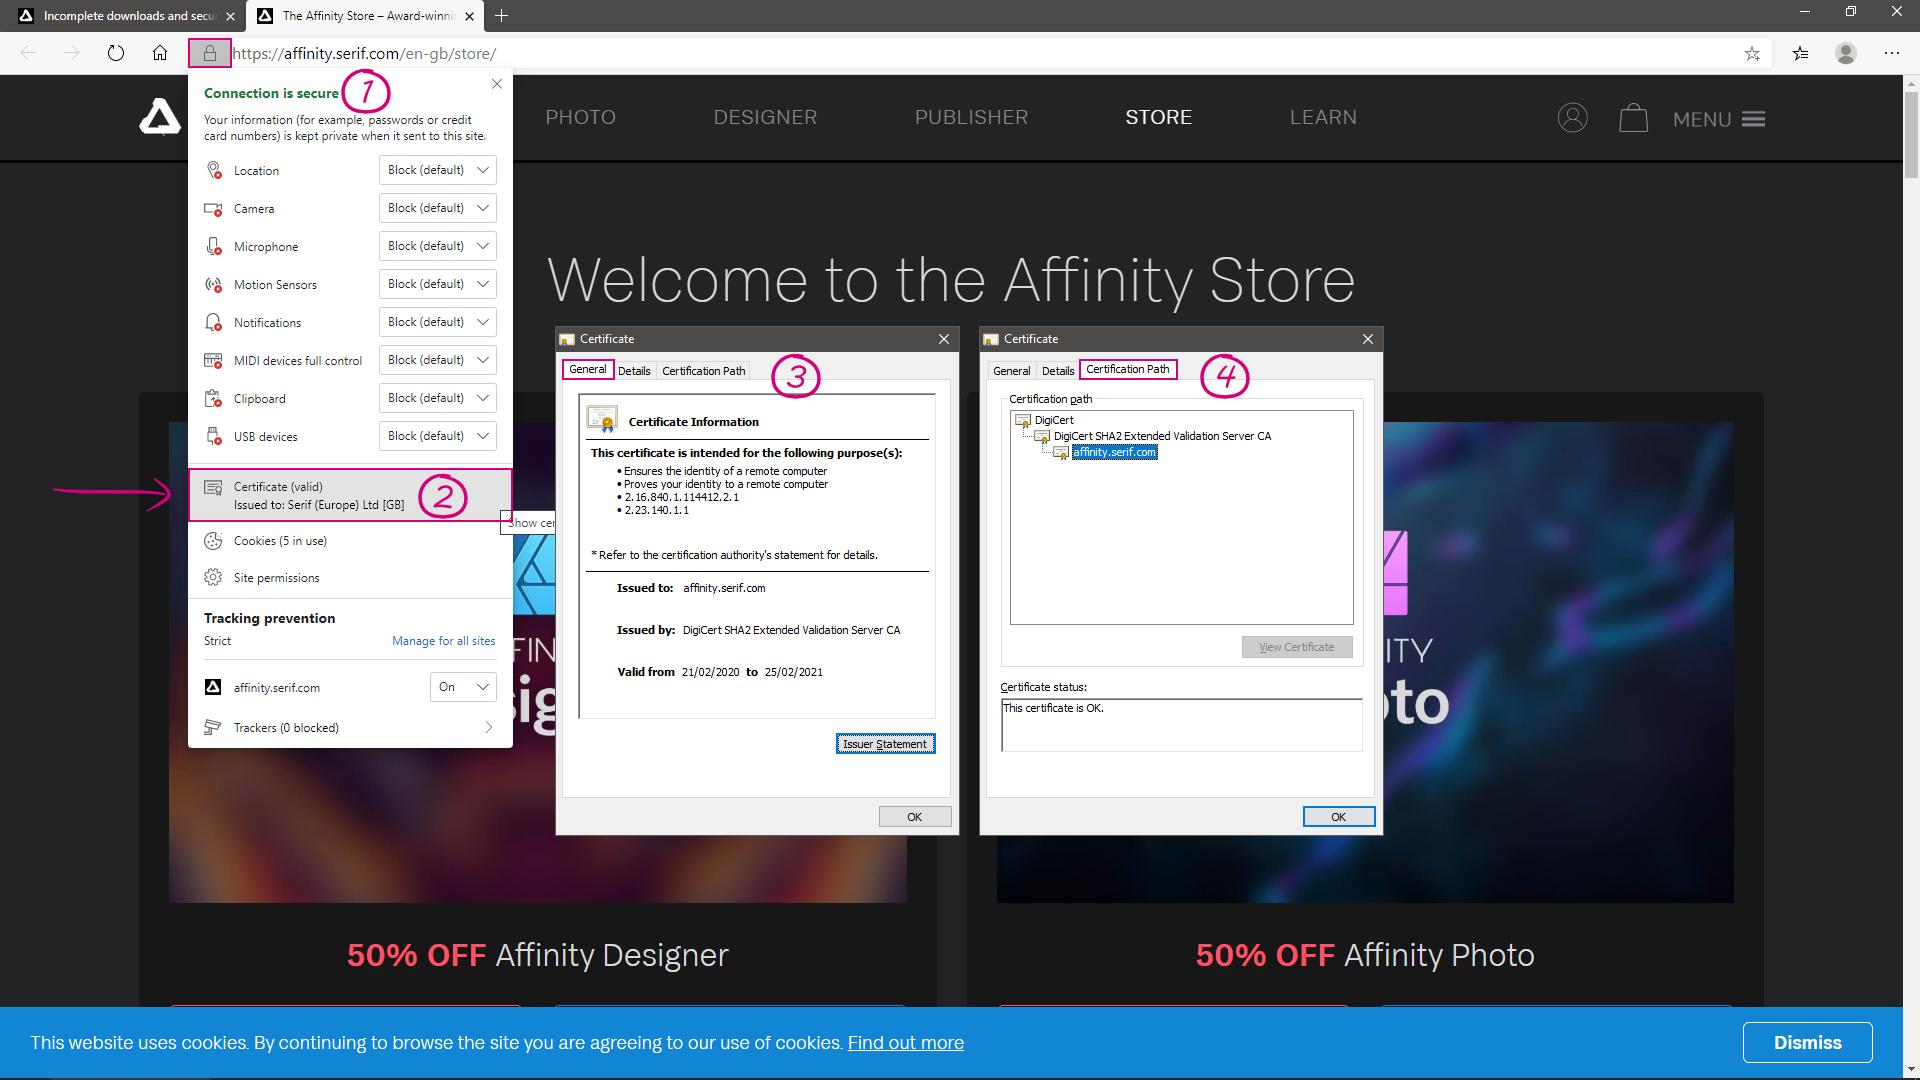
@Kachilero If you click on the padlock in the browser address bar (or error icon, as you have cert errors) and then go into the actual certificate, what do the details on the certificate say when you go to https://affinity.serif.com/store/ ? If may be worth posting screenshots of the certificate details if you are able to view them. In Chromium-based Edge: In Legacy Edge:
-
On the Metadata panel you can click on the 'Hamburger' menu and it will give options to export/import 'File, IPTC & Rights' to an XMP file. You can also use macros (see the example macro below). Either record a macro directly or record a macro that imports 'File, IPTC & Rights' from an XMP file you have previously exported (it will store the metadata from the XMP file inside the actual macro—meaning it won't be reliant on the XMP file needing to be present at a later date). If using [File > New Batch Job], you can use one of the macros you've recorded. Example Macro: Metadata.afmacros Screenshot:
-
The Statement field is stored under both XMP and IPTC tags. While I don't think there is a limit on the XMP tags, there is a limit on the IPTC 'CopyrightNotice' field, which is limited by the IIM (Information Interchange Model) format to 128 characters. See the below link: https://www.iptc.org/std/photometadata/documentation/userguide/#_copyright_notice It's not saying that you have given the image Creative Commons rights in the 'CC' (License) field, what it's displaying is the name of the metadata section where that particular data is stored. The data in the below fields is stored under XMP-cc (XMP Creative Commons) metadata; therefore if you fill any of these fields in, they will appear under the Creative Commons section in the 'Detail' tab: – CC (License) – More Perms URL (MorePermissions) – Attribution URL (AttributionURL) – Attribution Name (AttributionName) In the below link, you will see the exact same tags listed under 'Specifying License Information', which is what these fields refer to: https://wiki.creativecommons.org/wiki/XMP Is sounds like you may have exported to PNG file format. Does the information show OK if you export to JPG or TIF? PNG is a bit of a headache when it comes to metadata; EXIF for example wasn't even part of the official PNG specification until 2017. I'm guessing that those metadata tags aren't (or weren't historically) registered as part of the PNG specification, which is why they don't show in Windows. Although Affinity Photo adds the metadata to XMP in PNG files, there's no guarantee that it will be read by other software. In your case, Windows File Explorer doesn't read this XMP metadata for PNG files and is why it will only show 'Date Taken' in the dialogue box—but this is out of Serif's control.
-
Although that appears to have resolved the issue, I think that's just masking the root cause. From the description, it sounds like you're now using a monitor profile. I would leave that set to 'sRGB IEC61966-2.1 (Linear)'. On the screenshot where the 32-bit preview is greyed out in the Develop persona, the title bar (where it shows the colour profile) is showing the raw image isn't opening as 'RGBA/32 (HDR) - RAW'. I would ensure you're on the latest version of Affinity Photo (1.8.0.585) and then try resetting Affinity Photo back to the default settings and seeing if the raw images still appear too dark in the Affinity Photo Develop persona (and what the title bar shows). Before doing so, ensure you export any custom settings so that you can re-import them again afterwards—as they will all be reset (for example, assets, brushes, macros, shortcuts, styles, swatches, etc.). To reset Affinity Photo, close Affinity Photo, press and hold the CTRL key on the keyboard, then launch Affinity Photo whilst keeping the CTRL key pressed. When the 'Clear User Data' dialogue box appears, click the 'Select All' button at the bottom and then the 'Clear' button to clear all the user data.
-
Colour profile
- S - replied to Margaret's topic in Pre-V2 Archive of Affinity on Desktop Questions (macOS and Windows)
I thought this issue was supposed to be resolved in 1.8, but it's possible I'm misremembering. You could try resetting Affinity Photo back to the default settings and seeing if this resolves the issue. Before doing so, ensure you export any custom settings so that you can re-import them again afterwards—as they will all be reset (for example, assets, brushes, macros, shortcuts, styles, swatches, etc.). To reset Affinity Photo, close Affinity Photo, press and hold the CTRL key on the keyboard, then launch Affinity Photo whilst keeping the CTRL key pressed. When the 'Clear User Data' dialogue box appears, click the 'Select All' button at the bottom and then the 'Clear' button to clear all the user data.