lenmerkel
-
Posts
35 -
Joined
-
Last visited
Everything posted by lenmerkel
-

Google Nik Collection is now free for everyone.
lenmerkel replied to MEB's topic in News and Information
You didn't get it for free before because you paid for AP or AD. It has nothing to do with Affinity. You got it for free because the new owner of the software (DxO) was offering it for free. They paid Google (the previous owner) for the rights to it (paid money for it), have upgraded it, and are now offering the upgraded version to buy. That's all. -
Hide Panels in AP??
lenmerkel replied to Russ2's topic in Pre-V2 Archive of Affinity on Desktop Questions (macOS and Windows)
Hi, I'm just about to retire after 43 years in the software industry, and I'm still dealing with TLAs (as per Alfred)! Many years ago, in a bar somewhere in London, and after some serious lubrication, I remember a competition with some IBM engineers to come up with the true meaning of the acronym. I believe the top 4 answers were: 4. I've Been Moved (flexible office assignments). 3. It'll Be Monday (we're there for you, but not on weekends) 2. It's Broke Mate (definitive summary of problem analysis). 1. International Brotherhood of Magicians (my personal favorite). -
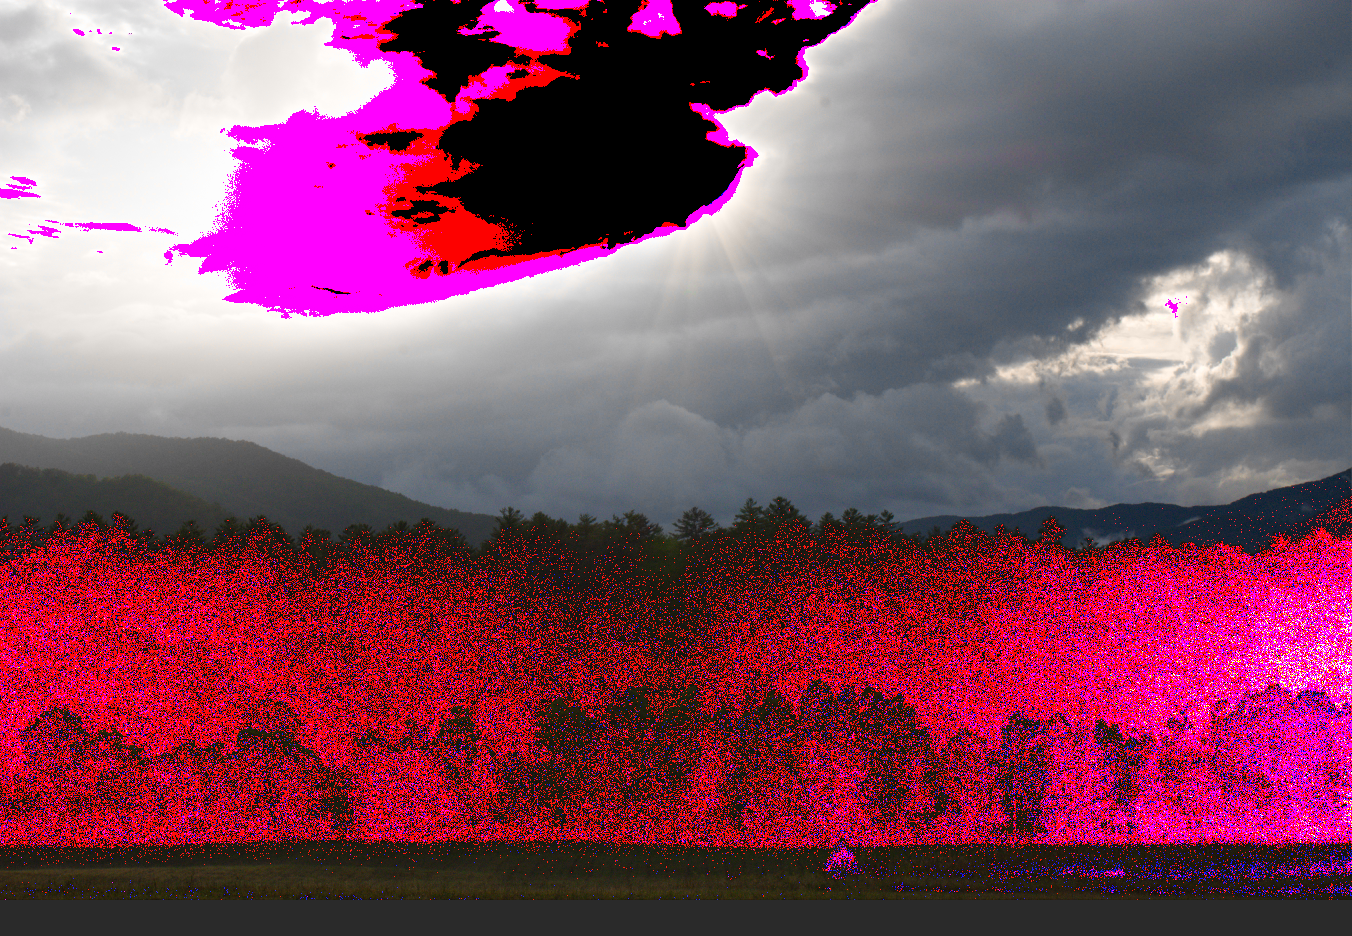
As one or two others have said, this image has large areas of heavily underexposed and overexposed pixels. Particularly, in the heavily overexposed areas there is no information to recover. Essentially, the dynamic range of the original scene is significantly wider than your camera's sensor is capable of recording accurately. It's a great example of a situation where you'd take bracketed exposures, then run through the HDR tools in Affinity Photo to combine them. I took the liberty of opening your raw file in my copy of FastRawViewer. I use this software for initial examination & culling of my raw files, as all of its analysis and displays are based on the actual raw data, and not any rendering (e.g. an embedded jpg preview). The first image shows the overexposed and underexposed areas. The black parts of the sky have no usable data, meaning that all 3 channels are "blown out". It's not possible for any highlight recovery tool to recover data that isn't there. The next image shows the raw histogram (i.e. the distribution of sensor channel values as captured by the camera sensor). EV0 corresponds to middle grey, and is typically 3 stops below a camera's saturation level. Note that you have several sensor points between EV0 and +3 stops. These are sensor points where some recovery might be possible. You then have a bunch of sensor points above +3 stops - the saturation level. These are basically blown out for good - there's nothing to recover. The final image shows the number and percentage of sensor points considered under or over exposed. The last column shows overexposure data if positive exposure compensation were to be applied (simulating the "hidden" exposure compensation applied by Adobe's Camera Raw). As you can see, there are a lot of overexposed sensor points, particularly in the green channel, which is where most image detail is derived from.

-
Blurry Jpegs
lenmerkel replied to a topic in Pre-V2 Archive of Affinity on Desktop Questions (macOS and Windows)
As Alfred has said, your "300" and "72" numbers are DPI, and that is irrelevant for the web. It is only a hint to printing software that you want to physically print that number of pixels per linear inch of medium (e.g. paper). Changing an image's DPI does not change the number of pixels in an image - it only changes that hint. It is essentially just metadata (which applications can choose to honor or ignore), and is one of the most widely misused and misunderstood terms in digital imaging. As R C-R has said, it is the actual pixel dimensions that defines the resolution of your image. A 1500px by 1000px has exactly the same resolution, regardless of what you set the DPI inside it. I understand you don't want to upload a sample image. What would be helpful is if you could let us know the pixel dimensions of your original image, and the new dimensions you want to create in your downsampled image. For example, original is 6000px by 4000px, desired new image is 600px by 400px. -
Blurry Jpegs
lenmerkel replied to a topic in Pre-V2 Archive of Affinity on Desktop Questions (macOS and Windows)
Well, if it were just a matter of exporting a jpeg, it would be simpler. However, as you are resampling, then as R C-R says, it does get complicated. With resampling, you are either removing pixels (downsampling) or artificially adding pixels (upsampling). Each process requires different algorithms for best results, and while the details "might" be boring, understanding them will help you get better results. Go ahead and read the articles first, then come back for more help if you need it. BTW, would it be possible for you to reply and attach a sample "before" image, and briefly describe what you're trying to do? E.g. "I want to downsample the image to exactly xxx pixels by yyy pixels, and save as JPEG with 95% quality (compression)". -
Blurry Jpegs
lenmerkel replied to a topic in Pre-V2 Archive of Affinity on Desktop Questions (macOS and Windows)
Honestly, the "best" option is the one that gives you the results you like. I recommend trying each option for one particular image and see which works best for you. Sometimes it needs a little trial & error. Here are some resources that explain the differences between the various re-sampling methods. They all refer to Photoshop, but the principles are the same. https://support.esri.com/en/technical-article/000005606 http://www.dummies.com/software/adobe/photoshop/how-to-resample-images-in-photoshop-cs6/ https://www.photoshopessentials.com/essentials/resizing-vs-resampling/ http://www.graphics.com/article-old/fundamentals-resampling-photoshop -
Wonderful news, ordered today!
-
I sense an early Christmas gift coming my way. Nice!
-
Google Nik Collection is now free for everyone.
lenmerkel replied to MEB's topic in News and Information
All 8 plugins are working for me on version 1.6.0.89 (Win 7 SP1). -
So here's Adobe's published specification for its proprietary PSD & PSB file formats: https://www.adobe.com/devnet-apps/photoshop/fileformatashtml/ To fully support exporting to these formats (including editable layers), the Affinity products would need to map their own internal document structures / data to those represented by the formats, or develop complex structure / data translations where such mapping isn't one-to-one. In some cases, this may not even be possible. I imagine such an undertaking would be none of quick, easy nor inexpensive.
-
I think the last comment from MEB in this post explains it. "Currently it's not possible to export text as native PSD text when exporting to PSD. We do intend to implement this in a future version but it may still take a little since it's not something easy to achieve."
-
You're welcome!
-
That's very observant. B) Base on some tests (monitoring Windows processes), it appears that Photo starts a new ExifTool process each time it reads metadata from an image, then kills the process when it's done. If that's the case, there's a significant performance hit. ExifTool is written in Perl, and a new instance of ExifTool needs to start a new Perl runtime environment - this is a little expensive. ExifTool has a "server" mode which allows a single ExifTool process to be started and remain resident, processing piped commands. This limits the Perl startup overhead to a one-time hit and significantly improves performance. I can personally attest to this, as I have developed my own utility software that "wraps" around ExifTool, utilizing this mode. It's much faster. Maybe the Photo development team could look at implementing this? It's documented under the -stay_open FLAG section here: http://www.sno.phy.queensu.ca/~phil/exiftool/exiftool_pod.html
-
"afphoto"-Files get HUGE
lenmerkel replied to feuerfloh's topic in [ARCHIVE] Photo beta on Windows threads
Hi Pete, I think you've rather answered your own question. Photo is a pixel editor, while LR is a parametric editor (as are most raw converters, like DxO Optics Pro, which I use). The advantage of parametric editing, as you pointed out, is that the software only stores editing instructions. The disadvantage, to many, is that you have no control over the sequence in which those instructions are executed in order to render an output image. The instruction processing pipeline is baked into the software. The sequence in which you actually apply your edits is ignored. Plus, you simply can't achieve the same fine level of control you can with a pixel editor. If the sequence of edits is important to you, or you want to change them (e.g. repositioning layers), it's hard to see how a parametric editor could enable you to do that. That's when you need a layer based pixel editor. It boils down to what kind of editing you need to do, and how much control you need, or are prepared to sacrifice. -
"afphoto"-Files get HUGE
lenmerkel replied to feuerfloh's topic in [ARCHIVE] Photo beta on Windows threads
To put this into perspective, let's first remember that the .afphoto file isn't an image file (or an image format). It's a project file, that contains everything you do in a Photo editing session for a specific image file. Its whole purpose is to allow you to save your editing work when you exit Photo and return to where you left off when you restart it. It contains your edits in a non-destructive form, so you can go back in time and change your mind about individual edits, etc. That potentially adds up to a lot of information to save. Let's revisit some numbers from your specific example. Your image is approx. 8,700 x 5,800 pixels. This gives us a total of 50,460,00 (about 50 megapixels). When you develop this in Photo, you automatically get a background pixel layer. This layer will be 16 bits/channel (unless you chose the 32 bits/channel HDR option in the develop assistant). 16 bits is of course 2 bytes. Your pixel layer is RGB, so there are 3 channels (Red, Green, Blue). Therefore, your pixel layer will be approx. 50 (megapixels) x 3 (channels) x 2 (bytes) = 300 megabytes. You added a pixel layer. Not knowing the inner workings of Photo (or the .afphoto format), I'm guessing this pixel layer is also 300 megabytes by the same logic as above. In fact, it's probably more, as the "transparent" pixels you refer to are likely still there in the pixel layer, just marked as transparent in some way, and this marking would also take up some memory. After all, you can always come back and change this layer to broaden or narrow the transparent selection, so the pxiels would still need to be there in the pixel layer for you to be able to do that. So, now we have 600+ megabytes. Now we add in information recorded about the other non-desctructive edits you've made, like sharpening (recorded so you can later manipulate them again, view them in history, etc). Some more megabytes. Finally, it's possible that Photo also records some information from your original raw file and/or the Develop process (though that's just a wild guess). If so, still more megabytes. Note that some of the calculations above are estimates, and there are some assumptions about how Photo stores info in your .afphoto project file. Nonetheless, it's probably a fairly reasonable guess as to how in your case you could end up with a 700 megabyte project file. Not sure there's much that can be done to get around this if you want to maintain project files. ;) -
Hi, just wondering if the thumbnail support for .afphoto documents in Windows Explorer is implemented via an installed WIC codec? I'm currently using IMatch for my DAM tool, and in its browser it displays thumbnails for various file types, but not .afphoto. The thumbnails do of course display in WIndows Explorer. I've been using the FastPictureViewer Codec Pack for years, It installs many useful codecs, with both thumbnail and metadata extraction support, but obviously not for .afphoto documents. If Affinity Photo doesn't currently install a WIC codec, are there any plans to do so in the future? It would be very handy to see .afphoto thumbnails in the IMatch viewer, and other WIC-enabled applications.
-
Is there a media browser anywhere?
lenmerkel replied to Gasman's topic in [ARCHIVE] Photo beta on Windows threads
The vast majority of Windows applications (including File Explorer in Win10 and Windows Explorer in Win7) don't actually retrieve image file thumbnails for display by themselves. They rely on codecs installed in Windows. Windows has built-in codecs for common image file types, including JPG, PNG, TIFF, etc. However, for raw files from various camera manufacturers, codecs are typically installed by that camera manufacturer's raw processing software if/when you install it in Windows. I believe Affinity Photo installs a codec for AFPHOTO files. Sometimes the raw codecs are poor quality and/or slow, and sometimes not available at all. An alternative is to install a 3rd-party codec pack, such as the Fast Picture Viewer Codec Pack. It isn't free, but it isn't expensive either. (Note: I have no association with the company - I'm just a very happy user who's had it installed for several years.) Attached is a capture of the Affinity Photo File>Open dialog in a folder containing several image types (JPG, TIFF, DNG raw), as well as an AFPHOTO document. All display thumbnails as expected. Incidentally, the same thumbnail (and metadata viewing) support works directly in File explorer / Windows Explorer, which is essentially what's being displayed in the File>Open dialog.
-
"afphoto"-Files get HUGE
lenmerkel replied to feuerfloh's topic in [ARCHIVE] Photo beta on Windows threads
1.5.0.39(Beta). There still seems to be a problem in this beta. If I open a Pentax 10 MPix raw file (camera-created DNG) in Develop Persona, hit develop, make no adjustments at all, then save as .afphoto, the resulting .afphoto file is 85 MB, If instead I first convert the raw file in DxO Optics Pro and export as 16-bit/channel Tiff, I get a 49 MB Tiff file. If I then open that Tiff file in Photo, make no adjustments, then save as .afphoto, the resulting .afPhoto file is 55 MB. I would have expected the 2 .afphoto files to be somewhat similar in size. It looks like the "big" .afphoto files result when developing raw files in Photo, not necessarily when editing non-raw files. I also noticed that when opening the raw file in Develop Persona, but before hitting the Develop button, Photo appears to be treating the file as a 32-bit/channel HDR image. Not sure if that's by design, or what?
-
Any chance of publishing a hash (MD5, SHA1, SHA256) with the download Link? It's handy to be able to verify largish downloads like these.
-
cr2 RAW files and .xmp files
lenmerkel replied to graphicbreeze's topic in [ARCHIVE] Photo beta on Windows threads
Ah, I see. I also noticed from your later post you're a Pentax user. Me too! Still shooting with a K10D (and saving to DNG). I personally prefer to save sidecar files rather than write to the DNG (faster saving of changes, as Ablichter pointed out, is one reason). The main rationale though is that I use DxO Optics Pro for raw development, and it writes out its own sidecar files with raw development settings, in DxO's proprietary format. There's no easy way to embed that in a DNG, so sidecars are the only option. My DAM tool takes care of syncing other metadata with the DNG (i.e. XMP, EXIF, IPTC) when I choose to do so, but not raw development settings. It also takes care of managing my raw files with their sidecars as "units". Be aware that the raw development data that Adobe Camera Raw writes to your DNGs is written as embedded XMP data, in a namespace specific to Camera Raw, not surprisingly called the "Camera Raw Namespace". What this means is that the raw development data is proprietary to Adobe, and is completely specific to Adobe products (Camera RAW, Photoshop, and possibly Lightroom). It has no meaning to other raw processing software, because every raw processing software applies its own unique algorithms, settings, etc. The data are not transposable between softwares. Consequently, for Affinity Photo (or any other raw processing software, like DxO Optics Pro, AfterShot Pro, Capture 1, etc) to write its raw development settings to your DNGs, the Adobe Camera Raw namespace is useless, and the developers would need to define their own custom XMP namespace to hold values that make sense to their software. I can't imagine it would be worth their while to do so. There is no "universal" way to describe raw development settings, as their is no "universal" raw processing software. Thank heavens, or we'd all be stuck with a choice of 1 raw workflow. :o Your workflow of requiring to store raw development data in your DNGs limits you to using Camera Raw for raw development, I'm afraid. Len -
cr2 RAW files and .xmp files
lenmerkel replied to graphicbreeze's topic in [ARCHIVE] Photo beta on Windows threads
Why? Just curious. Len -
"Sluggish" response of AP/Windows Beta
lenmerkel replied to dougkerr's topic in [ARCHIVE] Photo beta on Windows threads
I think that to get the best out of a processor/memory-intensive program like AP, you might want to treat yourself to some hardware upgrades. The Intel Core Duo, while it has a reasonably fast 2.66 GHz clock, only has 2 physical cores. Most modern photo editing apps thrive on having multiple cores available. Upgrading to a 4-core processor with hyper-threading would help. Undoubtedly though, your system performance is mostly constrained by RAM. 4 GB just doesn't cut it I'm afraid. I would think that 8 GB would be the absolute minimum for memory-intensive apps like AP. I would personally recommend 16 GB for more "wiggle-room" - AP would certainly benefit from that. I'm not familiar with your graphics card, but be aware that AP will pefrom best when it can take advantage of the processor and RAM in the card. The faster the GPU in the card, and the more card memory, the better your overall experience will be. Just my 2 cents. Len -
I find Affinity Photo to be way more "intuitive" than Photoshop. Probably because I've never used Photoshop. :o Seriously though, evaluate Affinity Photo on its own merits. Don't compare it with Photoshop, or whatever software you've used before. Of course it won't work exactly the same. Of course it will have some learning curve. Treat that as an excuse to re-evaluate the way YOU do things - don't limit yourself to the way your existing software does. Who knows, you might learn something new, discover new opportunities, and enjoy yourself along the way. Len
-
1.5.0.37 (Beta) Notwithstanding the above comments, I can agree that the Develop persona does exhibit siginificant memory leaks. In my case, opening 3 x DNG raw files simultaneously, developing, closing, and repeating a few times demonstrated this very clearly. It was easy to get Photo to consume close to 4-5GB of RAM (after all files developed and closed). The DNG files are straight from camera (Pentax), 16MB, 10 Megapixel. Len
-
Yep, that could certainly be one option. The other would be to hide the divider altogether. It's fairly obvious in the Mirror View that you have an after and a before image side-by-side, and where the split is. ;) Len