MaryLou
-
Posts
249 -
Joined
-
Last visited
Everything posted by MaryLou
-

CTRL + Y removes my colors
MaryLou replied to MaryLou's topic in [ARCHIVE] Designer beta on Windows threads
Ahhh,, that makes sense! I tried it and yes, that works. This is good to know if case I ever decided to make my own shortcuts. I just figured out what I was doing wrong! You have to use the Ctrl+Z before you can use CTRL+Y! DUH!!! I was looking at it in the wrong way and I bet Mike is too. Now I understand! I'm glad I'm not the only one who was having this problem. While I feel pretty dumb at the moment, I would have felt even dumber if I had been the only one. Thanks for all the help. I learned a LOT from this experience. As they say, you learn from your mistakes and in this case, I did! I will explain it to those in my group who are having the same problem. :) -
CTRL + Y removes my colors
MaryLou replied to MaryLou's topic in [ARCHIVE] Designer beta on Windows threads
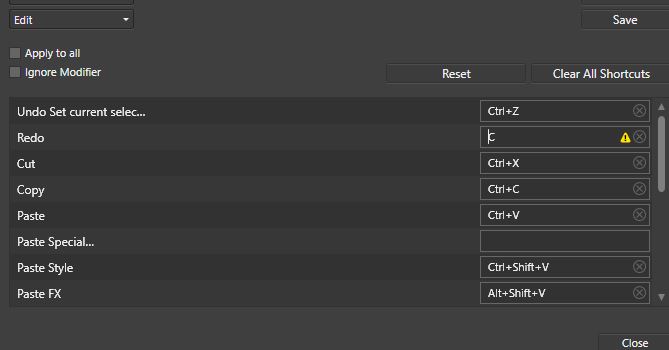
I think that made it worse. I followed your instructions. On the screen where the key strokes are, the Redo window had a CTRL+Shift+something else... (II didn't make note of it). I clicked in the box next to it and started to type the word Ctrl. As soon as I type the letter C, I got a yellow triangle with an explanation point in the box and it won't let me type anymore. Next, , I clicked the Reset button and it auto filled in Ctrl+Y. I then saved the settings and closed the window. Closed AD, then re-opened it. Opened a new document and drew a rectangle. Filled the rectangle with green. Didn't like that so filled it with blue. Didn't want that either so I filled it again with red. Decided to go back to the blue so tried CTRL+Y and nothing happens. Absolutely nothing. I"m attaching the screen where I tried to type in the key stroke. Even though this didn't work, all was not lost. Now I know where and how to change a key stroke! Thanks for that!
-
CTRL + Y removes my colors
MaryLou replied to MaryLou's topic in [ARCHIVE] Designer beta on Windows threads
I and one other person in my forum are having the same problem. We both have the latest version, and CTRL+Y toggles the Outline mode off and on. -
CTRL + Y removes my colors
MaryLou replied to MaryLou's topic in [ARCHIVE] Designer beta on Windows threads
I just downloaded and installed beta #36 and still get the same results. Ctrl+Y toggles between the line view and regular view. I did reset the tools but as I said, I didn't change any of them to start with. I'm a "mouser" and seldom use a key other than the Undo, Copy and Paste. I will make sure my users have downloaded the latest version and will have them try this again. At least you solved what was happening for me. Instead of CTRL+Y causing an Undo, it toggles off and on between line mode and regular. I will get more details on their problems. Some are reluctant to post a problem on a strange forum but will on mine as we've been on-line since the last century almost. -
CTRL + Y removes my colors
MaryLou replied to MaryLou's topic in [ARCHIVE] Designer beta on Windows threads
Mark, I have not modified any of the keys. I don't even know how to do that. I am not a "key" person. The only reason I tried this is because two other people on my forum are having problems with this. I told them they needed to report it but not sure they have done so yet. -
CTRL + Y removes my colors
MaryLou replied to MaryLou's topic in [ARCHIVE] Designer beta on Windows threads
Hmmm... didn't they say that in the latest beta that CTRL+Y was the new Undo key? -
I made a yellow rectangle, then duplicated it 3 times. I then pressed CTRL+Y . That caused the color to disappear from all my rectangles. The colors show in the layers, but not on the objects. Then I drew a drew an ellipse and again, no color on the workspace but the blue shows in the Layers. Same with the red. So, how do I get my colors back on the images?
-
Ronny, thanks for the explanation. I didn't know programmers still did that! I was a business apps programmer back in the 60's and did that most of my life. Always loved those hidden goodies! Microsoft was good about hiding a lot of them. Somehow, I had forgotten about that. The thing is, when I was using the customize tools options, I dragged the cat to the toolbar. Then, when selecting a preset from the flyout, the icon on the flyout changed to the cat. That should not happen because now I have two cats on the toolbar. All is well if I remove the cat from the toolbar. Just a FYI, on the PC, one needs to hold down the Shift key when clicking on the flyout to get the cat to come out of hiding. I am a cat lover too so I don't mind having some cats running around in my AD! :)
-
I didn't use colors in PP as a rule because the publications I created were in black and white only but I did like the DrawPlus colors. I liked being able to create my own palettes. I can live with the one in AD but I do wish the palette wouldn't disappear like it does on the first use of the Pantone colors. I hope they fix it.
-
Yeaaaah!! I found the Easter Egg!! It was quite unintentional though! It's a beautiful cat, especially with a black fill. Perfect for Friday the 13th!! There's still a problem with it though - it shouldn't appear twice on the tools bar like it is. But, I"m happy to know my "dumb question alert" wasn't all that dumb! I do tend to question things but now and then, it's simply because I'm not understanding how to use a given tool. Hope we find more of these little goodies hidden in AD!
-
I like the cat but.... I don't like seeing it twice on the tool bar. If I click on the triangle, the icon changes to a triangle. If I click on an ellipse, the icon changes to an ellipse. If I click on the cat that is on the tool bar, it changes whatever icon is being displayed on the fly-out to the cat. That should not happen.
-
I can agree with that! After having used DrawPlus for just over a year, it really spoiled me and my group for anything less. However, we have all switched over to AD and are liking it but it still is lacking in a number of things. Hopefully, they will come as future updates.
-
My panels are always docked. I seldom ever undock them. Maybe they threw the cat in to see if we were paying attention?
-
I just now re-set my tools, then dragged the cat back to the tools bar and as soon as I clicked on it to use it, the icon on the fly-out changed to the cat. It should not do that since the cat is not in those tools. To me, that is a little bug. Still don't know what the cat tool is for but it's cute!
-
You won't, unless you put it there. Go to View\Customize Tools. Both the cat and the bar are the last two icons on the last row. You can drag and drop them on the Tools bar. This was the reason for my post. Why aren't ALL the presets on the Tools bar and why does the cat show up double when I do put it on the Tool bar.
-
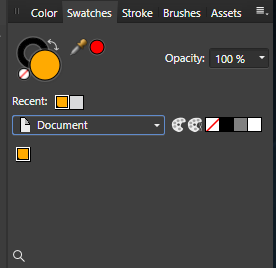
One thing that is VERY annoying and could be a bug, is this. When I start a new document, and I select a color from one of the Pantone swatches, the swatches disappear and the word Document appears as the name of the swatch. This is a problem in that I don't always remember which Pantone swatches I selected so if I want to pick a second color, I don't know which Pantone swatch to choose. Once I've re-selected a Pantone swatch, then the name appears above the swatches so I know which one it is. This only happens when opening a new document, then selecting a color from any of the Pantone colors. It does not show the plaette name, it shows only the one color and Document at the top of the swatches. You can see this in the attached image.
-
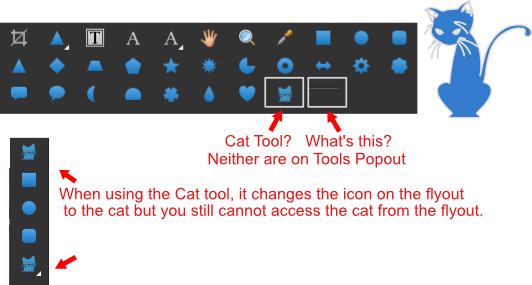
I'm going to start with a "dumb question alert" here, but I am curious about this Cat tool. While exploring the Tool Customize options, I found a CAT tool among the blue presets. Not sure what one would do with it, but it's cool. Also found a horizontal bar. Neither of these are on the flyout with the other presets. So, I dragged them to the Tools bar Apparently, the horizontal bar is to separate something (just a guess here) but what about the cat? It is on my tool bar as you can see in the image below. However, when I select it, it causes the icon for the presets to change to the cat. That shouldn't happen, should it? Now, I have two cat icons on the toolbar. If I click on the icon showing on the flyout, I cannot access the cat .. it can only be used by adding it to the toolbar. Doesn't all of this seem a bit awkward? If the cat in not in the presets, why does the preset icon change to the cat when I use the cat that I added to the toolbar? I did warn you that this was a dumb question alert so... don't beat me up here. :)
-
Floating Text?
MaryLou replied to MaryLou's topic in Pre-V2 Archive of Affinity on Desktop Questions (macOS and Windows)
This is a little bit advanced for me. I just want to save my images without having to make a bunch of decisions each and every time I save something.Other things "stick" when I don't want them to. For example, I floated the Transform panel (or is it called studio?) yesterday and didn't re-dock it. When I opened the program, it was just as I left it - the Transform panel was still floating instead of reverting back to its original place. The Defaults that we save doesn't seem to mean anything? It's the lilttle things that are so frustrating. -
Floating Text?
MaryLou replied to MaryLou's topic in Pre-V2 Archive of Affinity on Desktop Questions (macOS and Windows)
Mike is correct. I create mostly objects and logos rather than a full page image. I always save the selected object without a background. That means, I export it as a .png. Any other program I've ever used, once I set it to my preferences, those preferences "stick" until I change them. DrawPlus was that way. I never had to re-export because I accidentally saved the entire document. For example, let's say I opened a new image and I created a bat, a ghost, and a pumpkin. I want to export each object separately as PNG files. I select the bat and PNG on the menu, then I need to select the Area. The default is Whole Document. So, I click the drop-down menu and choose Selection Without Background. All works fine. Next I want to export the ghost. The PNG option stays selected, but not the Area. I have to go to the drop-down window again and choose Selection Without Background. To save the pumpkin, I have to go through these steps all over again. When I have my settings the way I use the program, they should stay that way. I shouldn't have to keep on going back to the Area menu to make a selection. Is very frustrating. Hope this explains the problem better. -
The images I take with my camera are often much larger than I want and need to be resized for various reasons. I open AD, then open a photo and I don't see any way to resize it. There are little X's on the corners and middle of each side where normally there would be little handles. If I open a new document first, then insert an image via the Place Image Tool, then I can resize it but I should not have to open a new image first. So, my question is, how can I resize an image without having to create a new document?
-
Floating Text?
MaryLou replied to MaryLou's topic in Pre-V2 Archive of Affinity on Desktop Questions (macOS and Windows)
Mike, I have to agree with you. When you are resizing a group like that, everything within the group should resize. It's a normal reaction to expect that to happen, which is what I did. Along with that goes that "scale with object" check box. That should be checked by default. I forgot to check that so had to re-do. I don't even have the option of having it "stick" and have to go check it each time I want to resize. I really like AD but I can see a few very awkward things that make me want to just give up. The worse is saving images. I shouldn't have to check how I want to save it (whole document, etc.) each and every time. It should remember my last selection. I can't count how many times I've forgotten to change that. After closing the program and checking the image I saved, it's usually the whole document when all I wanted was the selection. So, I have to re-open AD, load in the file again, then resave with different options. -
Floating Text?
MaryLou replied to MaryLou's topic in Pre-V2 Archive of Affinity on Desktop Questions (macOS and Windows)
Well, I guess that makes you special then! :) In case you're wondering, Recovery Room is the name of my daughter and her partner's yacht. The one that they had prior to this one caught fire out in the middle of the river and they were both badly burned. When they got this new one, they "recovered" from their injuries there, thus the name. Someone else thought maybe he was a male nurse and worked in the recovery room. Now you know! :) -
Floating Text?
MaryLou replied to MaryLou's topic in Pre-V2 Archive of Affinity on Desktop Questions (macOS and Windows)
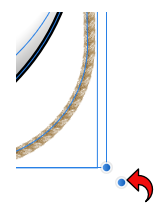
Mike, I agree with you! This is very obscure. I had no clue what it was for. Normally, when resizing an image, you use one of the four corners which is why I did it that way. Had no clue what that other "dot" was for. How does one learn these things when they are not documented? Or how does one even know what to look for when they don't know what to search for? This is one I won't be forgetting! So, as I see it, if you want to resize something that has text in it, you need to use the bottom dot, otherwise you can use one of the four corners. -
Floating Text?
MaryLou replied to MaryLou's topic in Pre-V2 Archive of Affinity on Desktop Questions (macOS and Windows)
Ahhh, I see what I did wrong!!! After re-reading the various conversations. I can see where I went wrong. Converting to curves worked perfectly but I didn't need to do that. I was using the wrong little "dot" to resize. There are four blue "dots" (probably called nodes) on each corner. I was using the one on the lower right corner to resize. This time, I used the other little dot and it worked. There's nothing to explain what those dots are for! I did check the box to resize the stroke with the image but forgot it the first time. I wish that box would stay checked by default. So, now we have two solutions to the problem! Mike, thanks for your nice comments. I like making personalized gifts like that. They are always appreciated by the recipient.
-
Floating Text?
MaryLou replied to MaryLou's topic in Pre-V2 Archive of Affinity on Desktop Questions (macOS and Windows)
That was the magic method, Mike!! Once I converted the text to curves, it worked perfectly!! Thanks!!! Thanks to everyone else who tried to help. Love the "belay"! This is being printed on a black t-shirt and will also be put on a coffee mug. It would seem that if you started dragging the text, you'd get a popup asking if you wanted to convert it to curves? Thanks again!!!!