MaryLou
-
Posts
249 -
Joined
-
Last visited
Everything posted by MaryLou
-

Insert Targert tools?
MaryLou replied to MaryLou's topic in Tutorials (Staff and Customer Created Tutorials)
I have attached an image showing what I did. How is this different than the Paste inside under the Edit menu? -
Insert Targert tools?
MaryLou replied to MaryLou's topic in Tutorials (Staff and Customer Created Tutorials)
Thanks, MEB. I followed your instructions and did fine with drawing a shape, pressed Insert Inside Selection, then drew another shape half-way over the first shape and it worked perfectly. Tried it again using the Pen tool... again, was successful. However, I can't seem to get the paste work. I copied a shape first, then drew a second shape. Activated the Insert Inside Selection, then pasted but what happens is, it pastes over the original shape instead of inside the shape. What did I do wrong? -
The help files aren't very helpful. They don't show you HOW to do something, they just tell you that you can. So, my question is, HOW do you use the Insert Target tools? I know how to Paste inside but not understanding how to use these tools. Can anyone help?
-
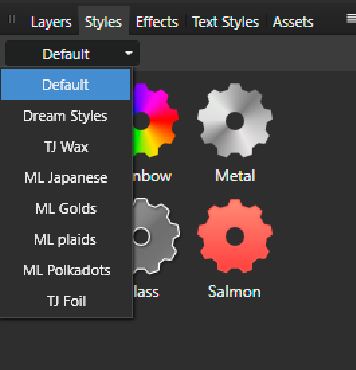
I would like to see the drop-down menu in the Styles tab sorted by name and left aligned. It's pretty messy looking the way it is now. See my example below. The Assets panel drop-down is left aligned but not sorted alphabetically. It should be.

-
View & Move Tool Switching
MaryLou replied to MaryLou's topic in [ARCHIVE] Photo beta on Windows threads
Alfred, there IS a difference. Follow these steps exactly.. 1 Open Designer, then open two images. 2. The Move tool is automatically selected on the active image 3. Right-click and select Copy to copy the whole image. 4. Click the second image to make it active. 5. The Move tool is still active - right-click and paste the copied image. If you click back and forth from one image to the other, the Move tool stays active no matter how many times you switch back and forth. 1. Open Photo, then open two images. 2. The View tool is active so you have to switch to the Move tool. 3. Right-click and select Copy to copy the whole image. 4. Click the second image to make it active. The tool switches back to the View tool. This means, I have to re-select the View tool to paste the copy. Bottom line is, Designer has the Move tool as the default when changing from one image to another whereas Photo has the View tool as the default when doing the exact same action. In Photo, it's extra steps to keep switching back to the Move tool, especially when you are processing multiple images. You can't do anything with the View tool but drag the image around the screen. It would seem to me that the tools in a pair of professional programs would act in the same manner. By having the View tool active, you still have to click the Move tool if you want to do anything other than just move it. There are no options associated with the View tool so it makes much more sense to have the Move tool as the active tool. Hope that made sense. There is a definite difference. -
View & Move Tool Switching
MaryLou replied to MaryLou's topic in [ARCHIVE] Photo beta on Windows threads
No apology needed. I just didn't want the thread to change from the original post. I really find this a problem and there are others on my forum who have also complained about it which is why I posted. It only makes sense that if I copy something, doesn't matter what it is, that I'm most likely going to paste it. Therefore, the Paste option should be available on the right-click menu just as the copy was. In AP, it is not. The instant you click on another photo, the tool changes from the one with the right-click menu (the move tool) to the View tool which has no right-click menu. If I select a tool, I expect it to stay selected until I select another one. I don't want the program changing my choices for me. I find this to be very inconsistent with all the rest of the program and of course, with Affinity Designer which DOES work this way. -
View & Move Tool Switching
MaryLou replied to MaryLou's topic in [ARCHIVE] Photo beta on Windows threads
This isn't about AP placing images as an object, it's about the tools changing when attempting to paste. The move tool is active when you make a copy but when you want to paste the copy on another image, the tool switches back to the View tool. I am happy that it does paste as an object, that's how it should be. The problem is in the tools. It works great in Affinity Designer, but not in Photo. -
View & Move Tool Switching
MaryLou replied to MaryLou's topic in [ARCHIVE] Photo beta on Windows threads
Why would you want to rasterize a photo? Isn't it already in pixel format? In AD, if I open 2 photos, and I want to copy one photo and paste it into another photo, it works perfectly when using the right-click menu to copy and paste. When doing the exact same thing in AP, the right-click menu does not work because it has switched back to the View tool when I want to paste into the second photo. I know you say that's by design, but why? Why doesn't it work the same way in both programs? I've used a lot of programs but never one that does this. It's awkward and makes the learning curve more difficult and frustrating. -
When opening a new document and/or several photos, the View tool is the active tool. When I want to copy from the active image, I select the Move tool, then right-click to open the menu, and select the Copy option. Then, I select one of my other images so you can paste what I just copied, Now, I have to re-select the Move tool to get the menu with the Paste option because the tool reverts back to the View tool. This is VERY annoying when copying from one image and pasting into another. It's also a lot of extra work. It would seem to me that the Move tool should stay active until you change it yourself. And yes, I am aware that one can Ctrl+C and Ctrl+V if you're a key pusher, but I am not. I use the mouse exclusively. Is this the way it's supposed to be? I hope not.
-
Preview
MaryLou replied to MaryLou's topic in Pre-V2 Archive of Affinity on Desktop Questions (macOS and Windows)
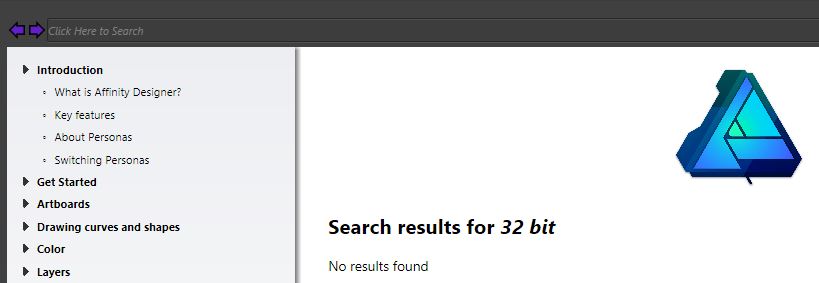
Well, I tried searching for "32 bit", 32 bit, Studio, 32-bit preview and each time I got the exact same results as in my attachment. The search seems to leave a bit to be desired. I got absolutely nothing from any of my attempts. I don't seem to have a lot of luck with the Help search which is why I hop over here to see. I hate being a pest so this is usually my last resort. Will check out the info you posted though. Thanks!!!! OOps.. forgot to add. I had a photo open when I tried using this and none of the sliders worked. So, I used an image I created.. same results. Nothing on the panel worked.
-
On the current version of Affinity Designer, something new has been added to the Studios. The first one is 32 Bit Preview. What is that for? I was not able to find any information in the help files so don't know what to do with it. Can anyone help, please? Oh, and in layman's terms, please.
-
Thank you!!! That was it!! I don't recall checking it but obviously, I did. I've never used masks before when working on a photo so I don't quite understand it all but I really want to learn. I love the Affinity line and the great support! Thanks again!!!
-
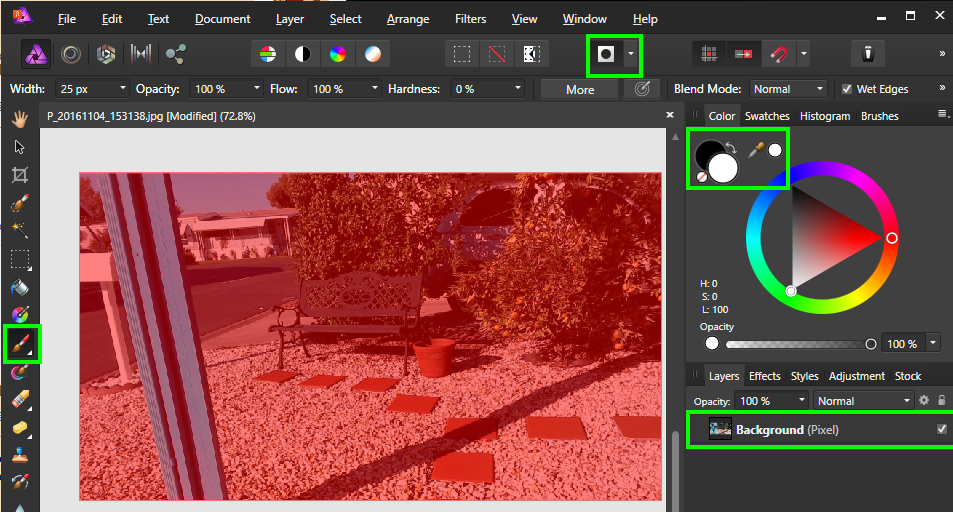
I was following a tutorial for using a Quick Mask to change the eye color on an owl. I followed the exact steps as given below.: 1. Open the big eyed owl photo 2. Toggle the mask on (mask overlay selected on dropdown menu) 3. Set the Hardness to zero 4. Select the Paint Brush tool from the toolbar Next I attempt to "paint" over the eyes on the red overlay but nothing happens. I do not get the "preview" that the tutorial mentions either. I get a cursor that's a round circle with a cross in the middle. The strange thing is, it worked the first time I tried it. Went back to do the tutorial again to reinforce what I learned but I was never able to get it to work again. I have tried at least 20+ times and nothing I do will let me paint over the mask. Some said the fill color must be white so I tried that. I tried black, and I tried other colors. I am attaching a screen capture to show my settings. I'm sure it's something I've clicked on but I don't know what.
-
You are no way a loud-mouthed idiot!! :) This is how problems are solved. When it takes a little time to reach a successful conclusion, it tends to stick in the mine. rest assured, I will never forgot how to set up for doing pixel work!! I call this a very good experience. It's also people helping people. Just imagine how it would be if no one tried! Sometimes, it takes a little longer for the lights to go on for me, but once it happens, it sticks! On my forum, we all help one another. When we can't find a solution, we come here because we know there's going to be someone who is willing to help. For that, I thank ALL of you!! You're making AD a fun experience!
-
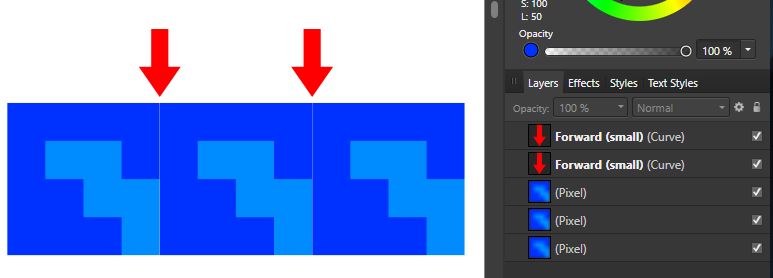
I think that's the secret! I turned on "Force Pixel Alignment" and that seemed to have fixed all the problems. The pixels all align without the gap and the colors do not change when I move a square of pixels around the screen. I did not see any difference when "Move By Whole Pixels" was turned on. I've always had that turned off and did turn it o to see what happens and nothing changed. So, it seems when doing pixel drawings one needs to make sure Pixel View is on, which prevents the gap and Force Pixel Alignment must be turned on so one can move the object without the colors changing. Problem solved!!! Thanks to everyone who helped with this! We all learned something new!
-
San, did you have the Pixel View button selected? I was sure I did but the last time I tried this, as you can see, no line. However, while in Pixel View mode, if I moved my squares, the pixels changed colors.
-
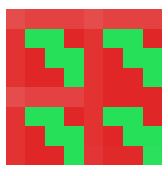
Okay, I understand what you are saying. I tried it again and mae sure to stay in Pixel View. I managed to eliminate the lines, but now I have another problem. My pixels change colors when I move the squares. What can I do to prevent that? You can see in my attachment that some of the red pixels are not red.
-
The problem arises when you paint pixels on a different layer. I created my first square with 12 pixels in it. That all went well. Then I duplicated it. That action automatically put the duplicated square on a different layer. That's when the gap happens. I use the Pixel tool only. Using the Paint Brush tool causes the anti-aliasing which is showing in your image. As I said, I can do this exact same in Affinity Photo and do NOT get the gap. I use the pixel brush set to 1, make my 12 pixel square, then duplicate that square. Why would it work in one program and not the other?
-
Bevel effect generates instant error
MaryLou replied to thisldo's topic in [ARCHIVE] Designer beta on Windows threads
I just tried this in Affinity Photo and got the exact same results. The program aborts and throws up an error message. When I re-opened Affinity Photo, I got the message to send in the crash report. -
Bevel effect generates instant error
MaryLou replied to thisldo's topic in [ARCHIVE] Designer beta on Windows threads
I get the exact same results although it happens with other shapes than just the donut. All goes well until you attempt to edit the profile. The program goes "poof" and you get that error message. Again, when you re-open the program, it lets you know it sent a Crash report. This has happened to several people on our forum so it's not an isolated case.
-
CTRL + Y removes my colors
MaryLou replied to MaryLou's topic in [ARCHIVE] Designer beta on Windows threads
LOL!! It was a learning experience if nothing else! Thanks again! -
How can you use the Pixel tool and a solid brush at the same time? Maybe I'm reading that wrong? I understand anti-aliasing as I've been doing pixel images for years but have never had this kind of problem. I am not using vectors of any kind, I paint one pixel at a time using the pixel tool. I am working in the Pixel persona only so there's no reason for there to be any anti-aliasing. The person who pointed this out to me did the exact same image in Affinity Photo and she did NOT have the thin line. Therefore, either we are doing something wrong or there is something wrong in the program. This really isn't acceptable as pixel art. As I said, I work with one pixel at a time as in the image attached. It was made in another graphic program.
-
That doesn't solve the problem. I was working in pixel view but I still get the gaps. I'm glad I"m not the only one though, now that makes 3 of us who get them. Switching to the Retina view only shows you the anti-aliasing pixels which I don't want. Pixel view is fine except for the gap and the fact that it does not keep the recent colors. The ball in your image looks like Retina mode... which isn't a true pixel image. I hope someone has a solution for this.
-
When I click that Pixel View Mode, at least half of my pixels change color! . I have my width set to 1, Opacity: 100%, Flow:100%, Hardness: 100%, The lines do disappear but something else is wrong here. It shouldn't be this difficult to use pixels. If I click the middle box, I get my colors back but the lines are still there. I also noticed that the Recent colors do not show up in the Swatches tab. When making my little demo, I forgot which color I selected from the swatches and had to re-sample it to get the same color again. I love pixel art but so far, I'm not loving AD for doing it.
-
Why am I getting a gap in my pixels? In the image below, I set my pixel tool to 1. I created a 12 pixel square. I then duplicated that square 3 times which put each square on a different layer. I attempted to put them together to make one image. However, as you can see, there is a tiny gap between each square. Why is this happening? Another person had the same problem. However, when she did this in Affinity Photo, there were no gaps. What are we doing wrong?