MaryLou
-
Posts
249 -
Joined
-
Last visited
Everything posted by MaryLou
-
That's the problem with the tabs, they do blend together which makes it hard to see what you're doing. A nice edge around each tab would be a huge help. Put a black line around them if you're using the light interface and just the opposite if using the dark one.
-
I did download the beta and loved the color. I'm used to working on the lighter color interface. I really dislike the black. It's so hard on the eyes. Looking forward to the new release so I can dig in and enjoy the program! Would be nice if they did something with the tabs - maybe an outline around each one. That would help a LOT!
-
The only option I can find in the preference is the dark interface. The lighter one is in the beta and I'm not using the beta.
-
I would like to see some kind of a contrasting color on the tabs so you can actually see them. The dark interface and the tab colors are so much alike that it's hard to see. One shouldn't have to work so hard just to see which tab is which. Maybe make the tabs all white with black text?

-
Why can't you just select both pieces and use the Add Operation?
-

Pencil tool in using Stabilizer
MaryLou replied to MaryLou's topic in [ARCHIVE] Designer beta on Windows threads
Thanks! Wasn't sure if it was reported or not. I did find another bug but don't know how to explain it or if it has already been reported. If this is the wrong place, please move or delete this. When using the Move tool to move an object, I get a "ghost" of the object left momentarily on the workspace. I've attached an image. I drew the rectangle, then when I moved it, the lines above it appear but quickly disappear. This happens with any object.
-
Pencil tool in using Stabilizer
MaryLou posted a topic in [ARCHIVE] Designer beta on Windows threads
When using the Pencil tool and the Stabilizer (which I LOVE), I cannot use any other tool. For example, I drew a line, then decided I wanted it wider but I could not change the stroke. The cursor disappears. I also get a lot of flicker when trying to access other options, etc when using that feature. -
No checkmarks on Studio List
MaryLou replied to MaryLou's topic in [ARCHIVE] Designer beta on Windows threads
Thanks for moving this to where it belongs, Patrick... :) Forgot to say, I LOVE The light UI!!! Can't wait to see this in the next version!! -
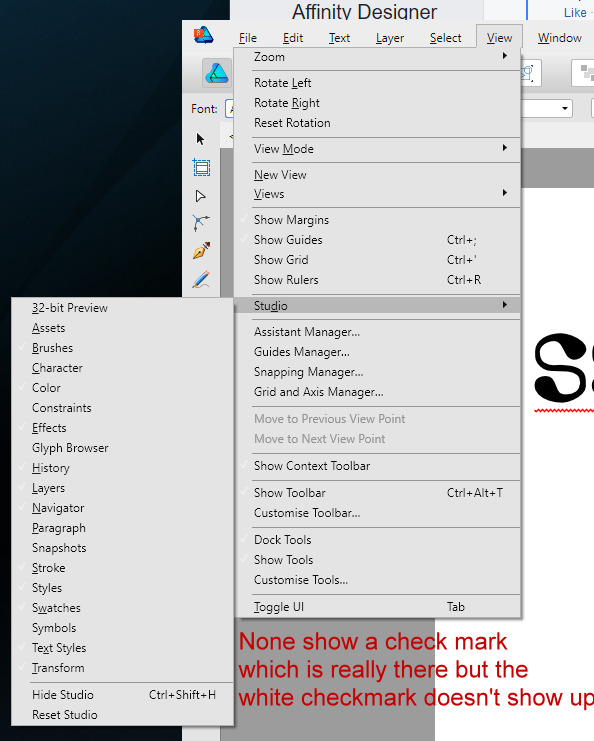
I just downloaded the latest AD beta and wanted to check out some of the studios. Went to View\Studios and on the pop-out list, there are no visible checkmarks by the studios. I think there might be some white ones that are not visible but if you can't see them, you don't know which ones are already checked and which ones are not. I was expecting to see the little blue icon with the white checkmark like the ones in the Layers tab. Attached is a screen capture so you can see what I mean - no checkmarks next to the studio names.
-
It might be good to mention that you cannot import the .afmacro files unless you have an open document. I kept trying and nothing happened but as soon as I opened a new document, the icon turned white and It all worked perfectly.
-
Remove "okay" button on Alignment Panel
MaryLou replied to MaryLou's topic in Older Feedback & Suggestion Posts
No problem, Alfred. I do know the difference in the various graphic types and if it was something worth keeping, I would have used the .png format. Using .jpg is just habit. At one time, that, and .gif were about the only formats available. Hard to teach an old dog new tricks sometimes! :) :) -
Remove "okay" button on Alignment Panel
MaryLou replied to MaryLou's topic in Older Feedback & Suggestion Posts
On the PC, the Arrange button is on the toolbar by default when you install. The OK does more than make the panel go away, it accepts what you have aligned. If you do NOT press OK, (or click on one of the objects in the selection box) your objects will revert back to their original positions. That's what we're complaining about. We shouldn't have to click OK. Pressing Enter on the PC version does nothing. -
Remove "okay" button on Alignment Panel
MaryLou replied to MaryLou's topic in Older Feedback & Suggestion Posts
I honestly don't see a difference. I can see both images very clearly and it's like 3k difference. I didn't look at how it was being saved, just wanted to get it saved. :) -
Remove "okay" button on Alignment Panel
MaryLou replied to MaryLou's topic in Older Feedback & Suggestion Posts
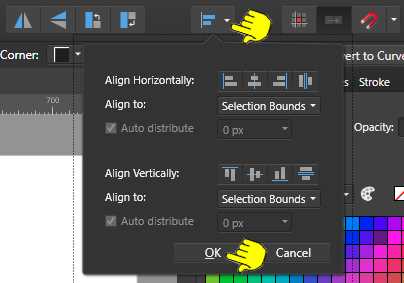
I am attaching an image showing what we have on the PC Version.
-
Remove "okay" button on Alignment Panel
MaryLou replied to MaryLou's topic in Older Feedback & Suggestion Posts
Maybe we need to clarify a few things. There are three different ways to access the alignment tools in Windows. First is from the Menu bar (Layer\Alignment). Second is a right-click on the selected objects Third, click the mis-named Arrange icon on the toolbar Using either of the first two methods, you do not have to click "OK" because you have only ONE option and that is the one you selected. When using the Arrange icon, you have multiple choices and can change them several times over until you like what you have, then hit the "OK" button. Teejay has discovered you can also click on the selection and it will have the same effect as "OK". Each of the three methods have different options on the menus. First, the Menu bar options are: Align left, Align Center, Align Right Align Top, Align Middle, Align Bottom Space Horizontally, Space Vertically Distribute Horizontally Distribute Vertically Second, the Right-click options are: Align left, Align Center, Align Right Align Top, Align Middle, Align Bottom Third, the Arrange Icon drop-down: All of the options mentioned above You can specify how many pixels apart to distribute your objects There are three options that you can align to, and a few more .. Again, with this option, you can make multiple choices before hitting the "OK" button. With the first and second methods, you have one choice only and do not have to OK it. I can kind of see the purpose of the OK now that I have a better view of all the options. I do think it's very confusing when there are so many different ways to access an action, especially when they don't have the same options. -
Remove "okay" button on Alignment Panel
MaryLou replied to MaryLou's topic in Older Feedback & Suggestion Posts
That's very possible. the Mac version has been out for well over a year before the PC version. They are supposed to be identical but I think there are some things that simply aren't! When using the alignment tools from the pop-up menu (via right click), you don't have to click anything... it's automatic but when doing the same thing via the "arrange" on the menu, you DO have to click "Done" or the changes will not stick. -
Remove "okay" button on Alignment Panel
MaryLou replied to MaryLou's topic in Older Feedback & Suggestion Posts
My Operating system is Windows 10 and my latest version of AD is 1/5/2/58. I recognize the names of others who have posted about this and I am pretty sure we are using the same version. This was a topic of discussion on my forum which encouraged me to post about it here. -
Remove "okay" button on Alignment Panel
MaryLou replied to MaryLou's topic in Older Feedback & Suggestion Posts
I just went back and tried what you said but it does not work. Try it yourself. Draw 3 circles and arrange them at different heights. Then, align them at the top and instead of clicking "Done", click elsewhere on the workspace. The 3 circles will revert to their original position. If you do NOT click Done, the effect does not "stick". That's what we're all complaining about. You can spend a bit of time playing around with your alignment, then when you get it perfect and forget to click "done", you have to start over again. I should think it would work the same way as the Effects. When you like the results, you just close the window. The alignment is about the only place where you have to "finalize' an action and being as such, it is not consistent with the other tools in the program. -
Several of us were discussing the fact that you have to click a button to accept the changes when using the Alignment panel in Affinity Designer. This is sooooo annoying! Why is that button there? Most times, I forget to click it because just about everything else is automatically applied. For example, if I apply any of the effects, I don't have to click a button to apply them. If I select a style, I don't have to click a button to apply it. Right off, I can't think of anywhere that I have to click a button to apply something other than this darn alignment panel. Any chance you could eliminate that? If one doesn't like the effect, we can always use an Undo.
-
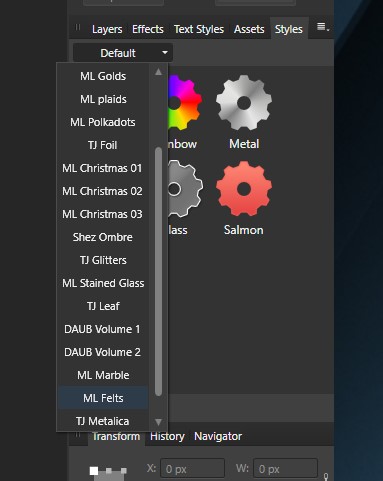
I would like to see the dropdown menus in the panels sorted and left aligned. For example, the Styles menu. It's so hard to read and you have to search for everything. Just having it left aligned instead of centered would help, but having it sorted alphabetically would help even more. I'm attaching an example of what I mean.
-
Insert Targert tools?
MaryLou replied to MaryLou's topic in Tutorials (Staff and Customer Created Tutorials)
Having a choice is always good - my problem was in realizing that it was a choice. Now I know! All is good! -
Insert Targert tools?
MaryLou replied to MaryLou's topic in Tutorials (Staff and Customer Created Tutorials)
I could see that in the Layers panel. What confused me is why would a program have 3 different tools that do the exact same thing? This made me think there had to be some sort of difference in the end result. It's so EASY to use Paste Inside whereas dragging things down in the layers panel to "nest" them is much more complicated for a beginner and so is the Insert Inside Selection. You've answered my question... and now that I know they all do the same thing, I can stop stressing over it! :) I'll stick with the Paste Inside. That makes more sense to me. Thanks a bunch for your help!! -
Insert Targert tools?
MaryLou replied to MaryLou's topic in Tutorials (Staff and Customer Created Tutorials)
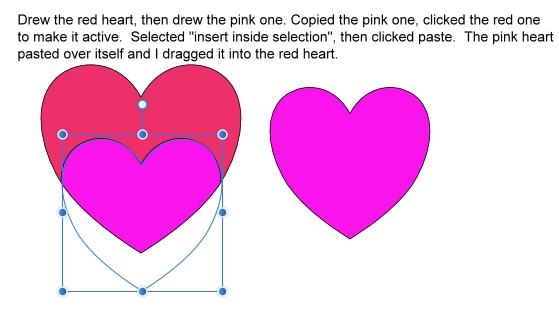
I understand that it is clipped, but how does this differ from Paste Inside? It gets complicated with clipping, paste inside, insert inside. Do they all do the same thing? -
Insert Targert tools?
MaryLou replied to MaryLou's topic in Tutorials (Staff and Customer Created Tutorials)
Oh dear.... another brain leak!!! Will try again. This is a little different than my forum in that once you select a file, you don't have to attach it separately. It's there now.