rdksl
-
Posts
19 -
Joined
-
Last visited
Everything posted by rdksl
-

B&W Image to Color
rdksl replied to OldNav's topic in Pre-V2 Archive of Affinity on Desktop Questions (macOS and Windows)
Hi @OldNav :) I've actually tried colorizing B&W photo when I first bought AP few months ago and it works great. My method was using vector (solid) objects with pixel masks applied to them (you'll really appreciate the Refine selection :D ), then the blend mode was set to Soft Light... ... and I got this! Please note this was only a test and a lot of additional work could be done to make the colored image better. I believe I watched this Photoshop tutorial since you only need to see the technique, which you can then use in whatever app :) Also, here is my source .AFPHOTO file which you can study. It's 40 MB big, so I couldn't attach it here to the message. Image credit: jura-photography @Pixabay -
Hello from the other side! :) I am just working on a project of designing the candy bar packaging and since I'm too lazy to google, I created my own lo-fi mockup myself in AFD. Then I thought it'd be pity if I leave it just to myself. So here's an exlusive Yell candy bar mockup for y'all! :D CandyBarMockup.afdesign It's not the best one, but I didn't find any other mockup made for Affinity (I was forced to google that so I didn't post anything which already exists :)), so if you want to improve this, I encourage you to do so :) Also, feel free to share your awesome designs using this to inspire other people in this amazing community :) (and to bump this post so others can actually find it) Document info: mm units A4 artboard Generic CMYK Profile Place your design inside CANDY BAR object below 3D SHADOWS layer.
-
Hmm, interesting. I import PDFs and AIs quite a lot and never ran into a problem like this. I'll keep my eye on it ;) Btw thumbs up for your hobby :)
-
Hi @edferrigan, the problem is within the Ai file. There is some kind of nonsense shape placed where your top image boundaries ends. You can't see it in APhoto, because it sets the document size to the artboard size in Ai file. However, opened in ADesigner you can clearly see the object (see the attachment). Should be fine if you just delete it from the layers panel :)

-
@JimmyJack: Sorry, I admit the thread is a bit confusing from my side. The ovals do not need to be vectors. However what you suggest isn't a viable solution. Vector brush actually only uses images as textures rather than the brush object. Being that way, it rotates and distorts the shape along curves. Here see the quick comparison. I set the spacing on pixel persona brush so it matches the look, but I really need them to overlap which can't be done with vector brush (actually it would work if as you said, I created an image with multiple ovals, but I need to prevent them from rotation and as the paths would have different directions, they would not continue flawlessly).
-
I tried making some brushes again, but still can't get what I need. Any thoughts on this? The sufficient solution would be even if I could use a vector curve as a path for generating brush stroke in pixel persona. Is anything like this possible?
-
One more picture. When you imported your 64px to 300dpi document and tried to resize to the size you had it in Sketch, you got rasterized result, because Sketch uses 72dpi (therefore consumes less pixels to draw at certain display size than 300dpi document).
-
Hi @RoelBego, can you supply the original icon file? If you designed and saved the icon file at the size of 64 x 64 px, in the print document at 300dpi you will only be able to get the size of about 0.21 x 0.21 inches. Try resizing it to this size and look at 100%, should be sharp. Sketch app is made for digital design, therefore works at the display 72dpi, which allows you to show icon at full 64px size without any artifacts at 100% display view. You should know what size in inches/milimeters you want to get in InDesign and then use simple maths to count the pixel size you need to export. For example: You want the icon to be 1 x 1 inch in InDesign. Knowing the density is 300dpi (dots per inch), you need the icon png to be 300 x 300 pixels to render nicely at 100%. Hope it helped. Correct me if I didn't understand your question properly :)
-
Affinity Photo Channels
rdksl replied to Quick's topic in Pre-V2 Archive of Affinity on Desktop Questions (macOS and Windows)
@evtonic3: Sorry, I didn't know the command in Photoshop doesn't have the same name. However it is done with a shortcut ⌘ + Click. I made a simple video in PS with the previously posted document. Just so you know what is happening: I first selected the mask, then Cmd+Clicked (notice the little square icon next to my cursor), which made active pixel selection; then applied it as a mask to another layer and zoomed in so you could see the selection was exact. photoshop_select_from_layer.mov EDIT: I've checked the PS again and it can also be done with this process: 1) Have the mask selected in the layers panel 2) Go to Select → Load Selection 3) It should've automatically fill out the document name and the mask name as Channel (in my provided document, BALLERINA SELECTION Mask should be in Channel). 4) Click OK. -
Crop Preset
rdksl replied to pjglad's topic in Pre-V2 Archive of Affinity on Desktop Questions (macOS and Windows)
@MEB: Sorry, my bad, didn't realize you can't resize that with constraining the ratio.... :unsure: -
Crop Preset
rdksl replied to pjglad's topic in Pre-V2 Archive of Affinity on Desktop Questions (macOS and Windows)
Also you can choose Mode: Absolute Dimensions, choose inch units and enter the exact 2.25 in and 3.25 in values. -
Crop Preset
rdksl replied to pjglad's topic in Pre-V2 Archive of Affinity on Desktop Questions (macOS and Windows)
@pjglad: you can simply enter 225 and 325 instead of 2.25 and 3.25. As it is ratio, it doesn't matter. I attached a short video on how to make that. croppreset.mov -
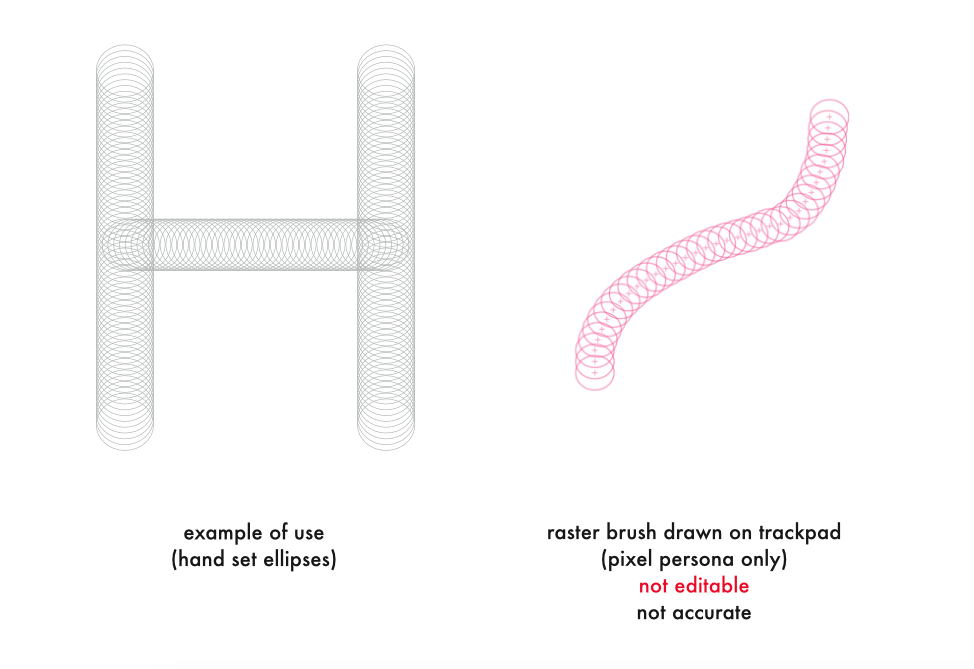
Thanks to all of you—MEB, JimmyJack and catlover and sorry for a month-long silence! @catlover: Actually I don't know why I didn't present my actual intention and chose analogy instead. I see your point with a logarithmic grid, but this isn't the issue here. However it got me thinking about that for something else, so thanks for the suggestion :) @MEB: The font made of shape is viable idea if it then was possible to keep the letters from rotation when following a path in AFD. I don't think there is an option. Or am I wrong? @JimmyJack: In fact, I don't need these shapes to be vector as they only act as some kind of guides. Didn't realize that before. So, guys, I'm still figuring it out... the ellipses should act as guides, specifically gauge balls, for the typeface stroke gauge. The image brush is actually a great idea—only with one challenge. The desired effect is only achieved in a pixel persona, but there you cannot control the path of stroke (or can you?). I need to control the path with a vector line (or anything that can be drawn with bezier curves). An image brush in vector persona is working in a bit different way, although it is vector-controled. I attached a picture of what I use these for (set manually with hand) next to the brush I made, but as I said, can only be used in pixel persona that doesn't allow the control of path. So, is there a tool or a technique to control the image brush in pixel persona or to set an image brush in vector persona to act as on the image instead of laying shapes next to each other and deforming them? Thank you so much again and if I described something poorly, please hit me with a further question :) Regards, Radek
-
Affinity Photo Channels
rdksl replied to Quick's topic in Pre-V2 Archive of Affinity on Desktop Questions (macOS and Windows)
Hi Quick! I actually had the same issue on my last project, don't know if it's the best solution, but did this. I applied the pixel selection as a mask to solid color pixel layer (actually you can use whatever pixel layer you want, only it mustn't be empty, then it won't export) and exported to PSD. Then when you open the PSD file, having the mask selected in the layers panel, you can simply "Select from layer" and you get the exact selection (even the refined one). I quickly recreated this on a random photo, you can download the PSD here. Hope it helped. Regards, Radek -
Oh my god! I feel so embarassed now, I remember turning this on :D ... Well, at least it's here for someone next. Thank you! :)
-
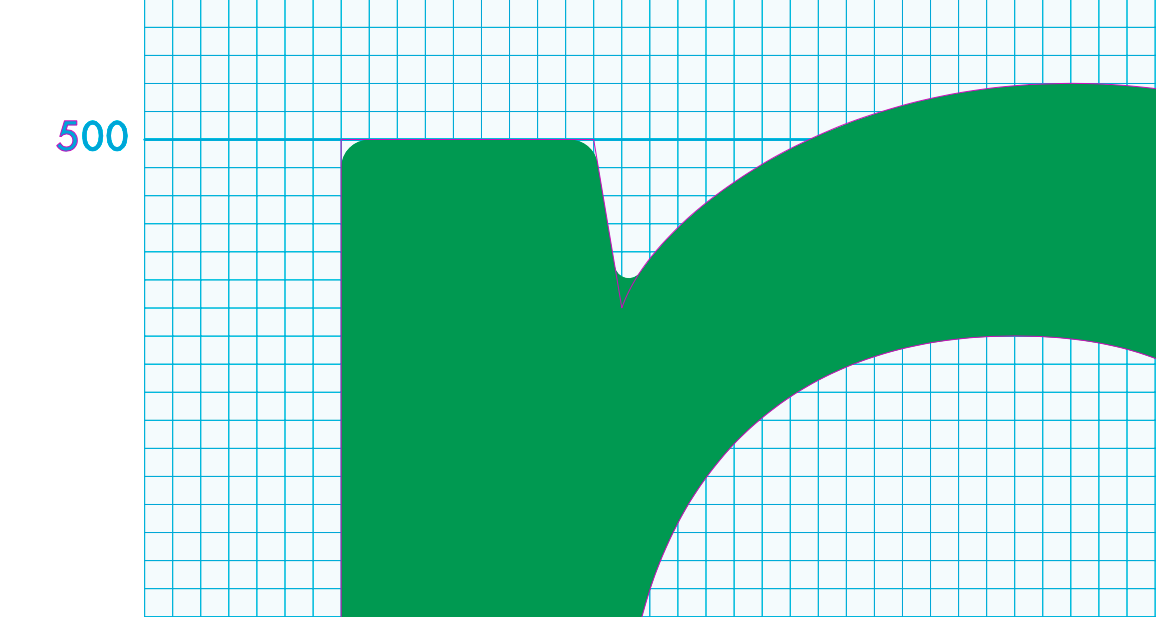
Hello there! :) I have a really strange issue with my Affinity Designer. Maybe I unconsciously pushed some wrong buttons before, but when I click any object, it gets this weird pink-ish outline coming from nowhere. See the attached file. The huge green shape actually is drawn as the pink outline shows, but the Corner Tool is applied so it doesn't match in corners. Also the odd happens to text, you can see on the left only the first letter gets the outline. I should also add that it is only a viewer issue, Designer doesn't create an actual object/shape and the outline doesn't show in exports. Plus I tested and it seems to be app-oriented stuff as it happens to all documents I open and then select an object. Thanks for any input on this. I've tried going through the View menu and Preferences, but couldn't solve it on my own. Regards, Radek
-
Hi, everyone! As I haven't found any topic on this, so the decision was made to post a new one. I have one elliptical shape, which I want to be distributed along any free line at certain density. Something like the image below, only at much higher density, but just so you can understand my needs. Maybe just a simple vector brush would do? But I haven't figured out how to make one. — the shape actually mustn't rotate; needs to stay in its default orientaiton — I would prefer the shape to have an exact dimensions (set in milimeters) — variable density would be useful, but not necessary Is there a way to do this in Affinity Designer? I need this for typeface design :) Thank you.
-
Hi, HYR :) I examined your PDF and it looks like a Designer bug. The document actually contains your bleeds, but the groups (from artboards) are set to clipping masks. Look at the picture below, I did a screenshot of your opened PDF with the masks (crops) disabled. You can also simply import your PDF back to Designer to see this. I also tried recreating your design on my own and exporting and got the same results. When exported as individual artboards, no problems, grouped, same trouble. _______ However, I don't see any point in doing any print design composed from multiple artboards. If it fits your workflow, you probably have only one solution. What I do on every print job is pre-press preparation. I create a new document with the same dimensions (in your case the dimesion of all 3 artbrds combined) and paste my design in it, including everything. Then I convert texts to curves, clean the shapes and layers, check the color formats, etc (not neccessary with your test design). Then, of course, the export is not problematic in any way. See this image, you can see I imported the design with bleeds. It seems like a lot of additional work, but I found out the pre-press prep in the new clean document is important to me, since I can do all the simplification before print without messing with my original file. Plus you basically need to do this only once before sending to printshop, so it's not that bad... :) Here is the result PDF and here the source file Hope it helped :)