Old Bruce
-
Posts
15,509 -
Joined
-
Last visited
Everything posted by Old Bruce
-

Invert layer selection
Old Bruce replied to Alex_M's topic in Feedback for the Affinity V2 Suite of Products
Once you have your selected items hit Edit > Copy. Now Edit > Select All and hit the delete button. Now Edit > Paste. Should work. -
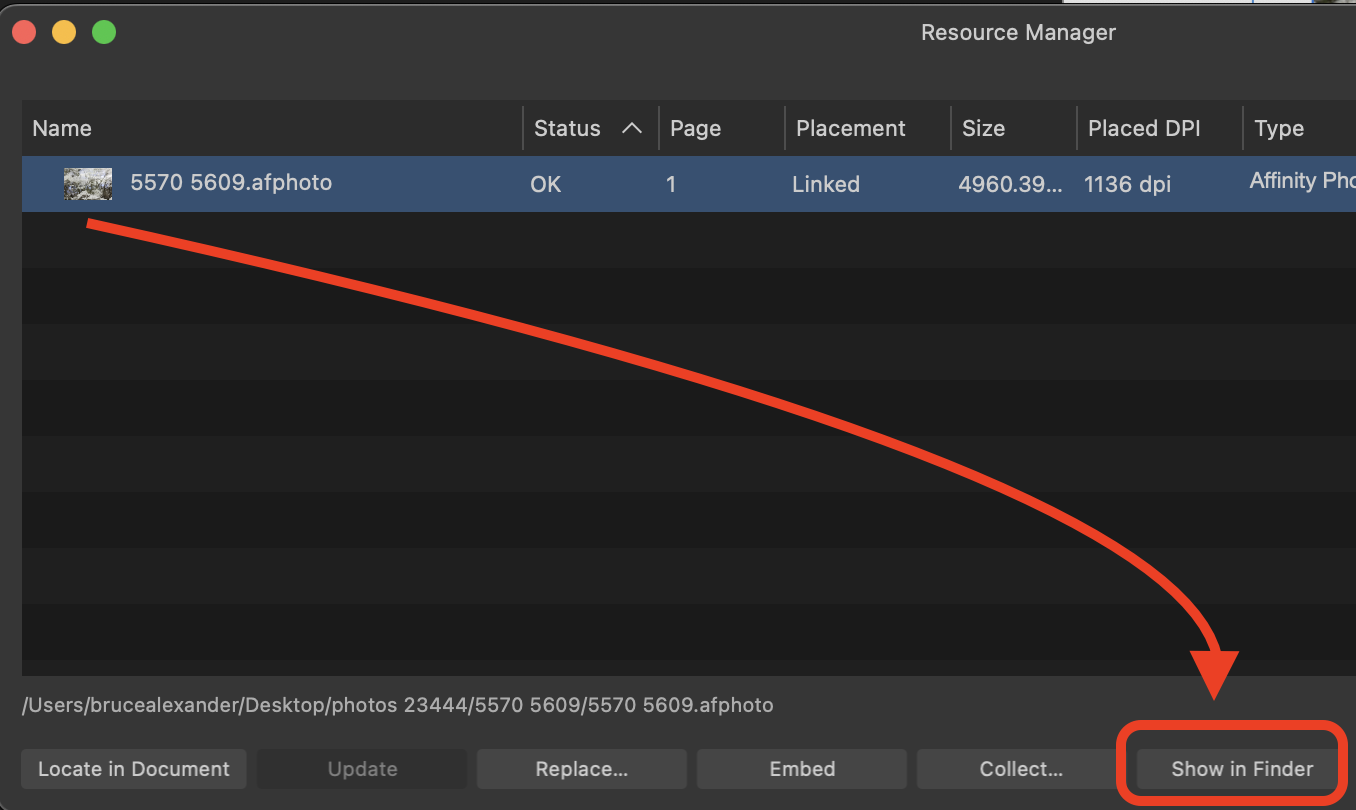
Resource Manager window
Old Bruce replied to ronnyb's topic in Other New Bugs and Issues in the Betas
The Resource Manager shows just that. In the current beta and the current release versions. For all three of the Affinity applications.
-
You could try using the Character in the other off the page text frame like so; I do agree that the extra End of Story glyph is annoying. And I cannot for the life of me figure out why the two End of Story characters are resulting in an extra line.
- 1 reply
-
- 1
-

-
B & W in beta now rendering as Sepia
Old Bruce replied to Chris Bartlett's topic in Other New Bugs and Issues in the Betas
I am assuming you are using a Black and White Adjustment Layer. The only way I can get a sepia tone is by having the Document in CMYK and the Blend mode for the Adjustment Layer set to Colour instead of Normal. -
Recovery version prompt
Old Bruce replied to MikeTO's topic in Other New Bugs and Issues in the Betas
There does seem to be a problem with Publisher 2 beta 2.5.0 not clearing the unsaved documents from the autosave. Like MikeTo I cannot definitely point to a recipe. But I see it happening a lot. I don't see this with Designer or Photo. -
There are some things like Adjustment Layers and Filters which can be recorded in a Macro then applied all at once to files.
-
Only 9 tools availible?
Old Bruce replied to Lee8181's topic in Affinity on Desktop Questions (macOS and Windows)
Welcome to the forums @Lee8181 You are most likely in the Develop Persona. You may have opened up a raw file and so Affinity Photo 2 (if that is the actual application you are using) is automatically using the Develop Persona for raw files. Hit the Develop button and you'll be in the Photo Persona with many more tools available.
-
Colour Picker don't work outside app window on M1 Mac mini
Old Bruce replied to Nexiarz's topic in V2 Bugs found on macOS
Wild stab in the dark here... Are you perhaps using Photo 2 (or even version 1)? I don't see it in the list, just Publisher 2 and Designer 2. -
I would try using Pages to Export to DOCX file format. And I would do all the formatting in Publisher, after I had done all the writing in Pages, Text Edit, Word or whatever. I would not bother with any formatting in the word processor.
-
insertion image
Old Bruce replied to Schwab's topic in Affinity on Desktop Questions (macOS and Windows)
Welcome to the forums @Schwab, Are you using Facing Pages? Are the "two pages" side by side or are they separated? I use Facing Pages and I can just place the photo on the two pages. =============== Bienvenue sur les forums @Schwab, Utilisez-vous des pages de garde ? Les "deux pages" sont-elles côte à côte ou séparées ? J'utilise Facing Pages et je peux simplement placer la photo sur les deux pages.
-
AD: Snapping of point handles
Old Bruce replied to DarkClown's topic in Affinity on Desktop Questions (macOS and Windows)
Are the handles snapping to the constraints of the Grid?
-
Typography Dialog turned into a Panel
Old Bruce replied to Ash's topic in 2.5 Beta New Features and Improvements
@Alfred and @MikeTO It does seem to be font dependant, with EB Garamond I see one problem and with Adobe Jensen Pro I see a different problem. @Patrick Connor, the problem is that the fonts (EB Garamond and Adobe Jensen Pro) do have the Alternatives/Stylistic sets it is just that the blank area occurs if everything is collapsed. Once they are both expanded I see the choices. If only one choice is expanded I don't see the choices, the blank area is the proper size to hold the information. -
Typography Dialog turned into a Panel
Old Bruce replied to Ash's topic in 2.5 Beta New Features and Improvements
I see this occasionally, the All Alternates and Stylistic Sets seem to be blank unless both are opened. Close both and then open one or the other and I'll see a blank area. Sometimes it will show properly if I click somewhere else.
-
Document keeps getting corrupted Affinity Photo V2
Old Bruce replied to SandraS's topic in V2 Bugs found on Windows
The size of the pixels are ... well, one pixel x one pixel. If your image is 14639 w X 20640 h pixels and your DPI is 1200 then the image is (14639/1200) inches wide. If your image is 14639 w X 20640 h pixels and your DPI is 300 then the image is (14639/300) inches wide. In the first case the pixel size is 1/1200 inches x 1/1200 inches, in the second case the pixel size is 1/300 inches x 1/300 inches. I leave the arithmetic as an exercise for the reader. -
Hanging indents
Old Bruce replied to philipt18's topic in Affinity on Desktop Questions (macOS and Windows)
Make a Paragraph Style for the Footnotes and choose that Paragraph Style in the appropriate Document-wide or Custom part.
- 9 replies
-
- 1
-

-
- affinity publisher
- footnote
- (and 1 more)
-
I wouldn't bother with the Line Width tool at all. I would select the ellipse with the desired pressure profile, save the profile and then apply it to the new ellipse. Or I would copy the ellipse with the desired profile and use the Edit > Paste Style to the newly drawn ellipse. Or I would temporarily use the Synchronize Defaults from Selection (the ellipse with the desired profile being the selection) to set my default to the desired profile and then draw a new ellipse.
-
De marges in Publisher zijn visuele hulplijnen. Ze oefenen nergens invloed op uit. Wat ik doe is een masterpagina gebruiken om mijn tekstkaders op te zetten en als ik dan de grootte van de "marges" wil veranderen, verander ik gewoon de grootte van de tekstkaders op de masterpagina. Het belangrijke concept om te begrijpen is dat je tekst wordt vastgehouden in de tekstkaders, je kunt de knipselkandidaten zo instellen dat ze de marges respecteren, zodat je tekstkaders precies de grootte van de marges hebben, maar als je dan de grootte van de marges verandert, moet je de grootte van de tekstkaders aanpassen. Vandaar mijn gebruik van tekstkaders op de masterpagina('s). Tip: Maak er een gewoonte van om alles op je masterpagina's unieke beschrijvende namen te geven, bijv. Linker tekstkader, Rechter tekstkader, Linker paginanummer, enz. Het zal je veel tijd besparen om dingen te herstellen. Vertaald met DeepL.com (gratis versie) ============= The Margins in Publisher are visual guides. They exert no influence on anything. What I do is use a Master Page to hold my Text Frames and then if I want to change the size of the "margins" I will simply change the size of the Text Frames on the Master Page. The important concept to understand is that your text will be held in the Text Frames, you can set the snapping candidates to honour the margins so your Text Frames will be the exact size of the margins but then if you change the size of the margins you will have to resize the Text Frames. Hence my use of Text Frames on the Master Page(s). Tip: Please get into the habit of naming everything on your Master Pages with unique descriptive names. e.g. Left Text Frame, Right Text Frame, Left Page Number, etc. It will pay off with saved time fixing things.
-
This photo is an excellent candidate for the Hue Range Mask.
- 4 replies
-
- 1
-
-
- astrophotography
- mask
- (and 1 more)
-
Curser Versatz - Falscher Ausdruck Schrift nicht komplett
Old Bruce replied to MelaNico's topic in V2 Bugs found on Windows
You have a baseline offset. Select all the text and set the offset to 0 (zero). -
Strange table cell spacing
Old Bruce replied to Stuartpool's topic in Affinity on Desktop Questions (macOS and Windows)
Then there is the posibility of a baseline shift with the Character Panel.
-
Strange table cell spacing
Old Bruce replied to Stuartpool's topic in Affinity on Desktop Questions (macOS and Windows)
Look at the Paragraph's vertical alignment. Here it is Top Aligned: And here it is Centre Aligned:
-
From the notes panel. Window > Reference > Notes.
-
Apub indent TOC?
Old Bruce replied to kat's topic in Affinity on Desktop Questions (macOS and Windows)
Each entry has a host of overrides applied. One of which is for the paragraph alignment, it is overridden to be Centred.
-
This is probably due to the font chosen for the note number in the text. I would suspect that you have a Character style applied to the Number Style.
-
How does this file open for you? tall dog.afdesign