h_d
-
Posts
1,472 -
Joined
-
Last visited
Everything posted by h_d
-
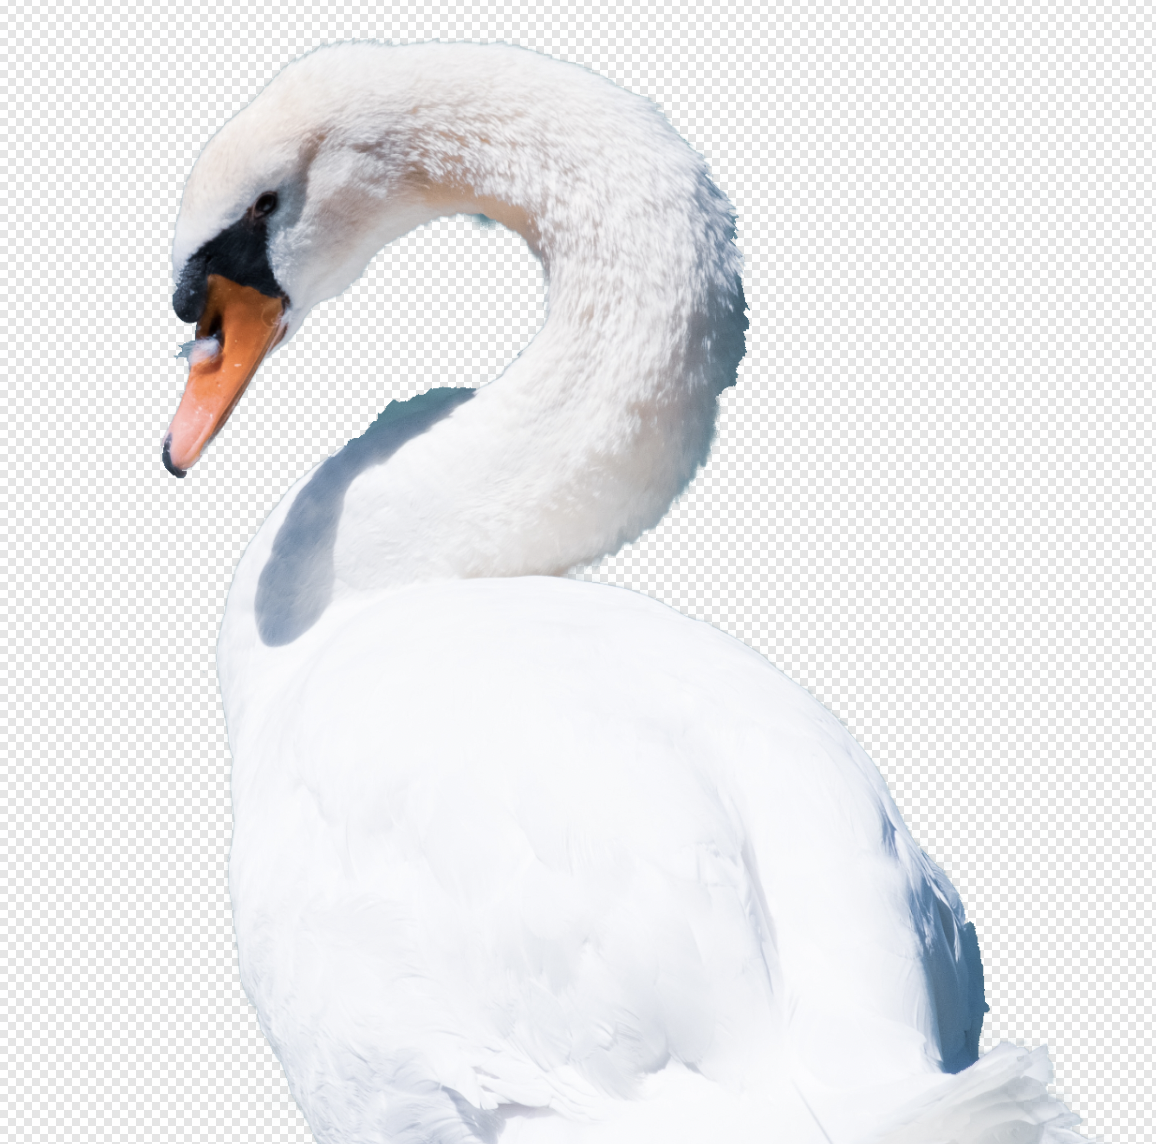
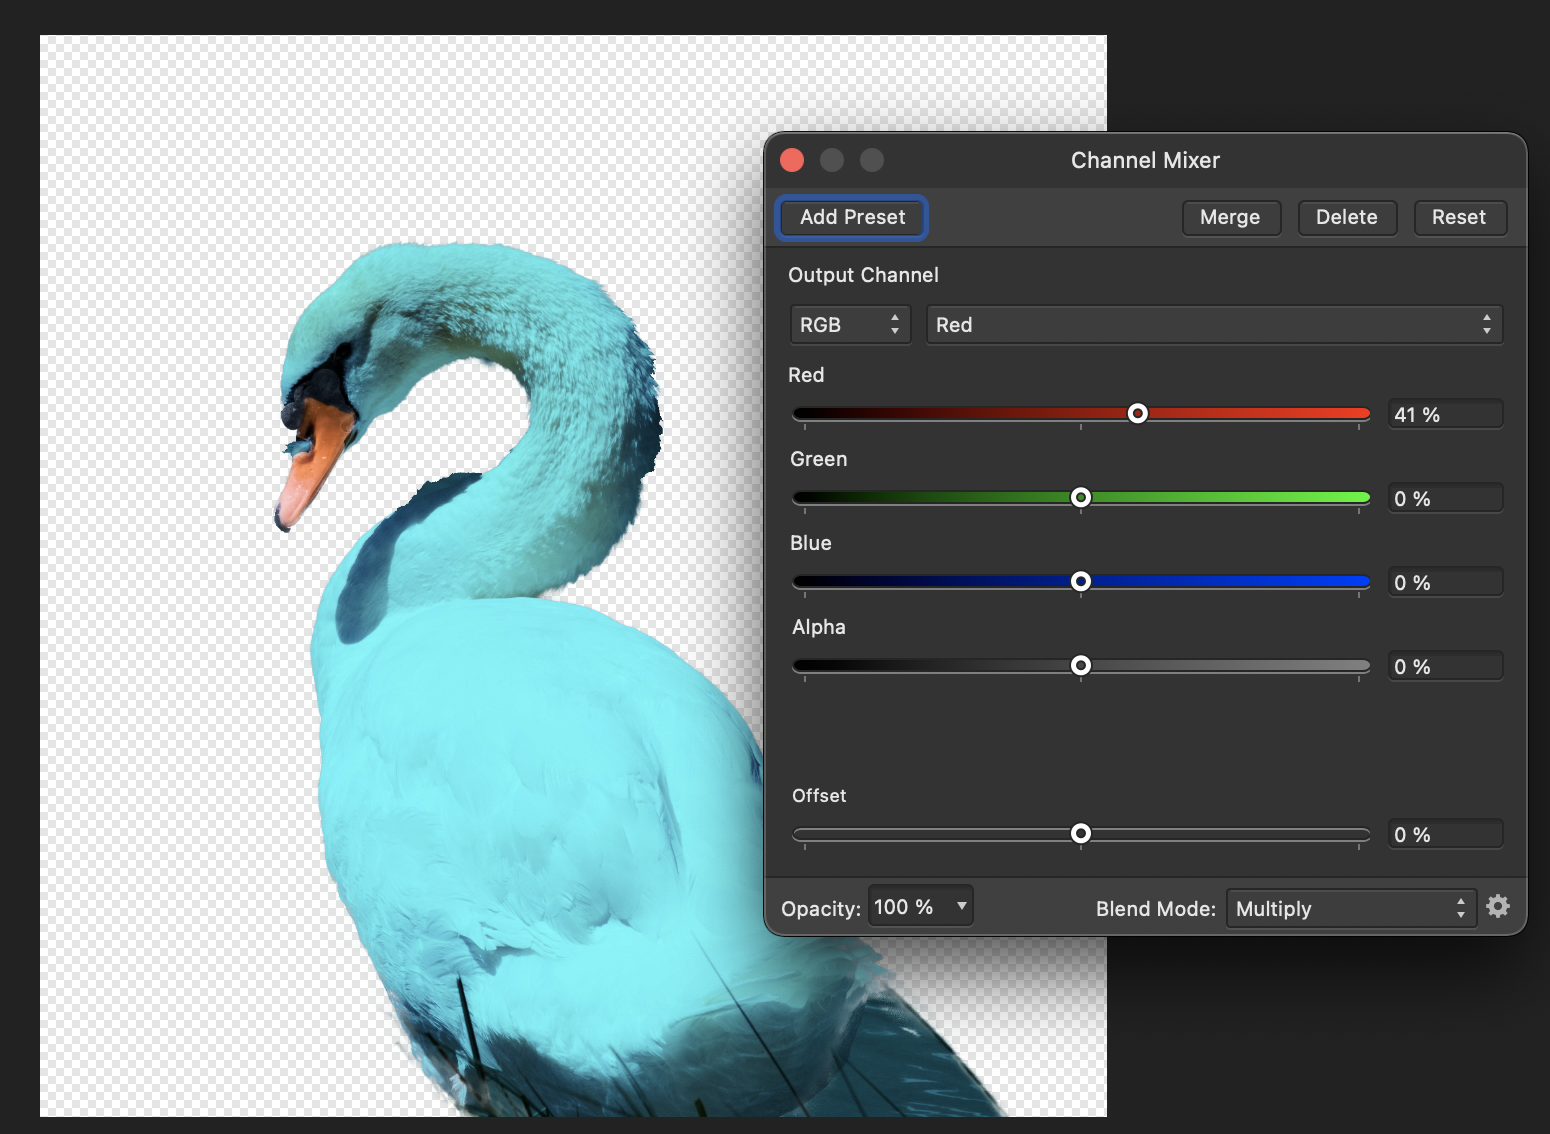
 You could select the area you want to modify, apply a Channel Mixer adjustment, and then adjust the colour values and blend mode to taste Here I dialled down the red value in the red channel from 100% to 41%, and set the blend mode to Multiply. Before: After: The orange bill is masked out and not affected by the adjustment. Play with the values in the other channels to modify the colouring. (BTW I'm pretty sure that's a swan, not a goose 😆)
-
You'll miss all the fun.
-
No user manual?
h_d replied to 4711's topic in Pre-V2 Archive of Affinity on Desktop Questions (macOS and Windows)
Indeed: https://resources.serif.com/photo/start_guide/Affinity+Photo+Start+Guide.pdf https://affinity.serif.com/en-gb/tutorials/photo/desktop/video/365012457/ https://affinity.serif.com/en-gb/tutorials/photo/desktop/video/310549897/ -
How to add links?
h_d replied to coolphoenix's topic in Pre-V2 Archive of Affinity on Desktop Questions (macOS and Windows)
Been there, done that -
Hi @BerndS59 and welcome! Affinity Designer is first and foremost a vector graphics program, not a photo-editing/raster graphics program, and what you have described is exactly how it works in its main Designer Persona. But it does have a Pixel Persona, and if you switch into that you will have access to more "painter-like" tools which will create and work with raster graphics, and won't create multiple layers unless you specifically tell it to. The different personas are explained in the help documentation. Pixel painting is described here. If you're coming from an Adobe background, Affinity Designer is more akin to Illustrator (although there are many, many differences). Affinity Photo is closer to Adobe Photoshop (but again there are plenty of differences). Cheers, H
-
Poster is cropped
h_d replied to laura98's topic in Pre-V2 Archive of Affinity on Desktop Questions (macOS and Windows)
But not on Macs unless the owner has bought/subscribed to Office, or installed the fonts independently. And not on all PCs. There's no indication from @laura98 what the 'different machine' is, or whether it's the fonts that are the issue or not. Until there's a response from her, it's all guesswork. -
After your first couple of posts it's instantaneous.
-
How to add links?
h_d replied to coolphoenix's topic in Pre-V2 Archive of Affinity on Desktop Questions (macOS and Windows)
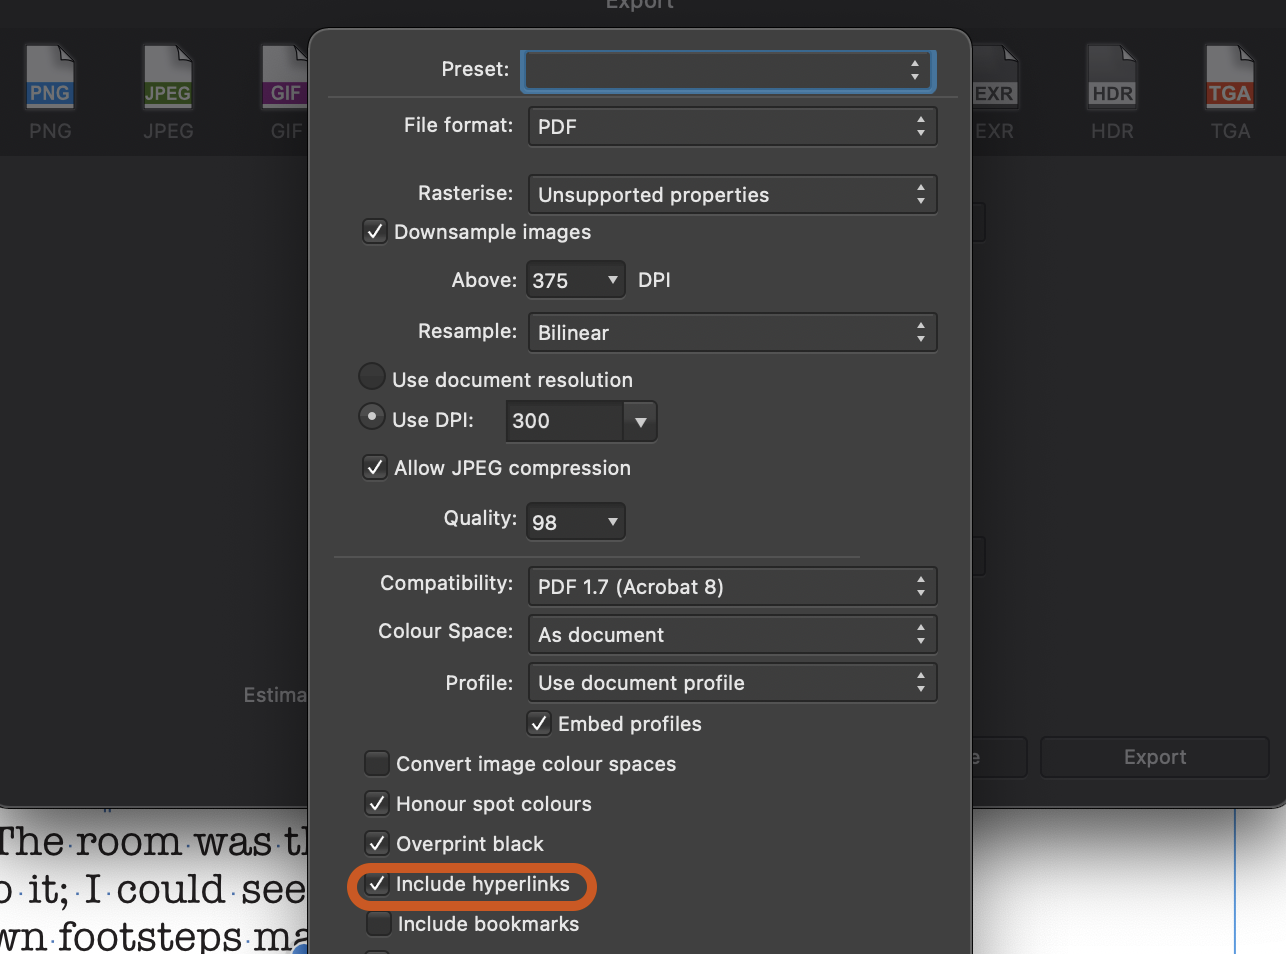
This: Click More in the Export dialog - it's not selected by default. Cheers, H
-
Eppur si muove: Screen Recording 2021-04-11 at 12.02.24.mov As @Lagarto says, you have to set a left indent, equal to or greater than the width of the numbers, to give them space to align right.
-
Or possibly... I created two coloured shapes for the upper and lower areas of the body. I then grouped them and duplicated the group. I then used Boolean Add to combine the elements of the second (upper) group, and then ungrouped the remaining single object to give me the Border layer. I set the fill on this object to none and its stroke colour to black, aligned inside. I then set the blend mode of the Border layer to Colour Burn and its opacity to 40%: The body colours can be edited to taste: And you can add extra bits without any modification of border layer: Original .afdesign doc attached. Cheers, H animal body.afdesign
-
Same happens to me with Numbers, Pages, Safari, Music, GarageBand, Photos, Script Editor, Automator, TV, Keynote, Calendar, Scrivener... It's a Mac thing.
-
Poster is cropped
h_d replied to laura98's topic in Pre-V2 Archive of Affinity on Desktop Questions (macOS and Windows)
Do you mean cropped like this: If so it's because of this: The substitute fonts are much wider than the originals - are Agency and Baskerville Old Face installed on the other machine? ADD: actually "Rootles" is quite a good name for a movie...
-
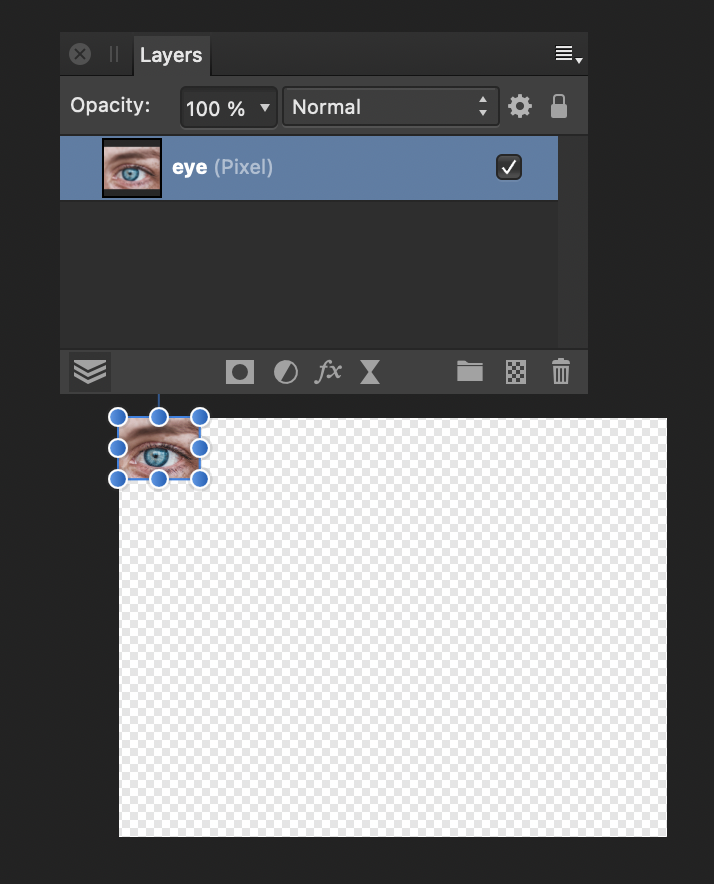
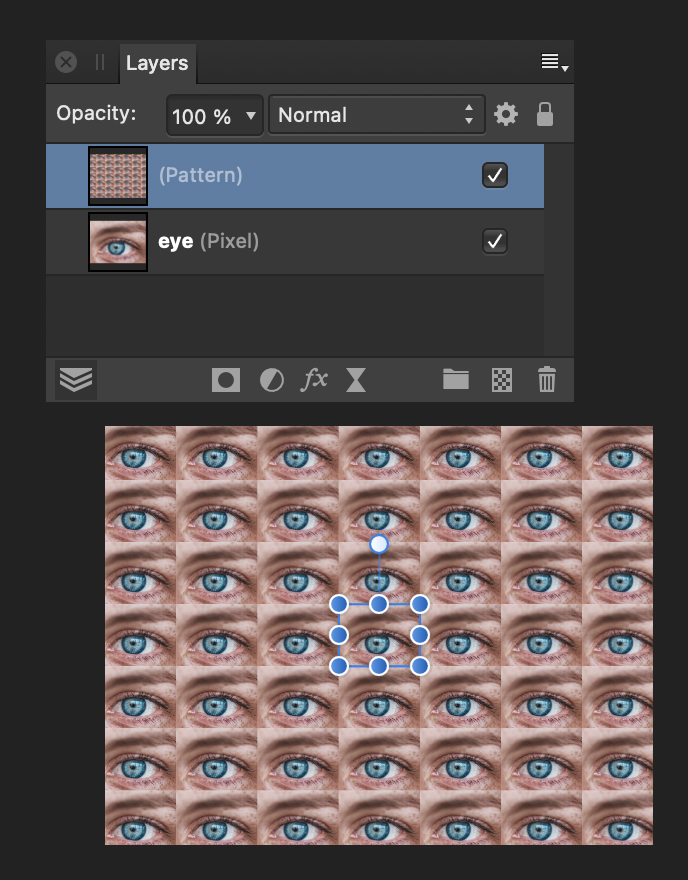
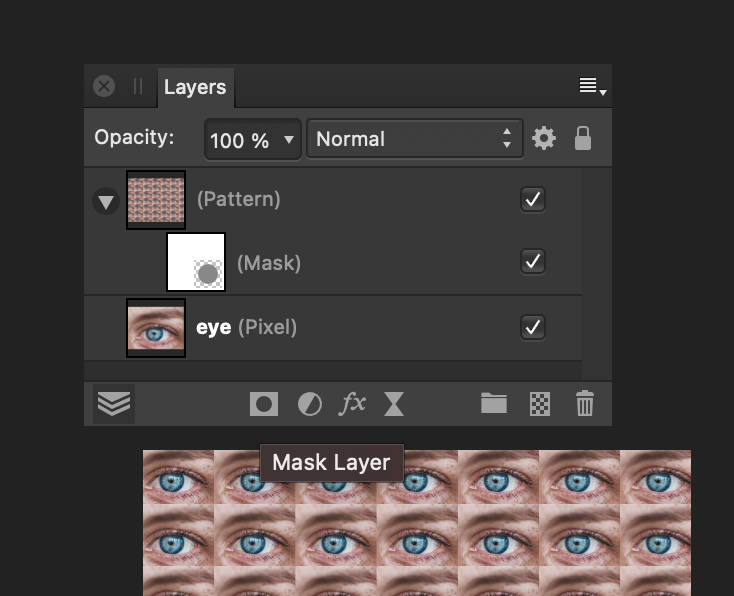
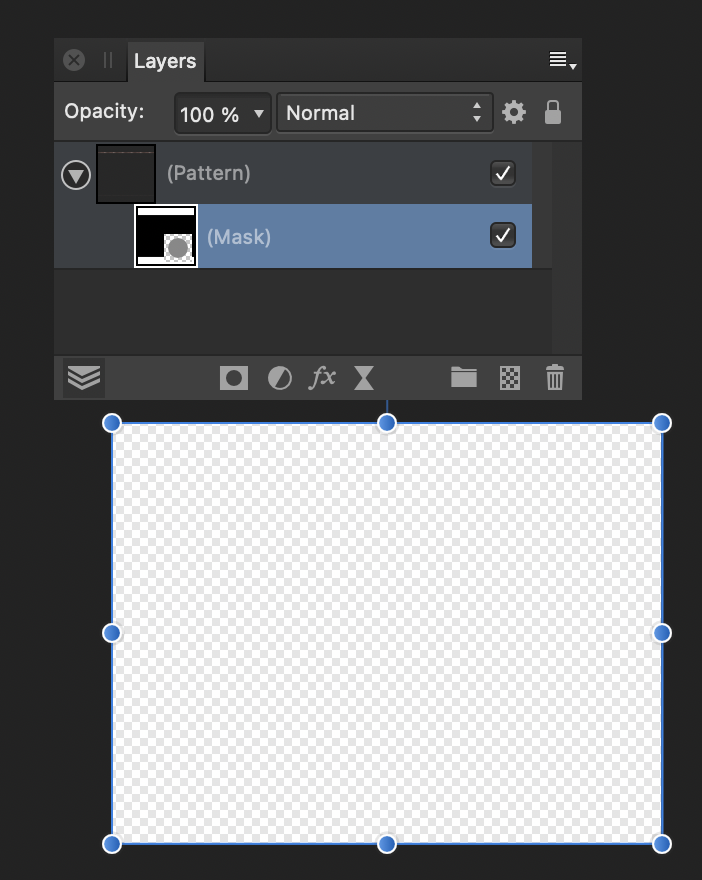
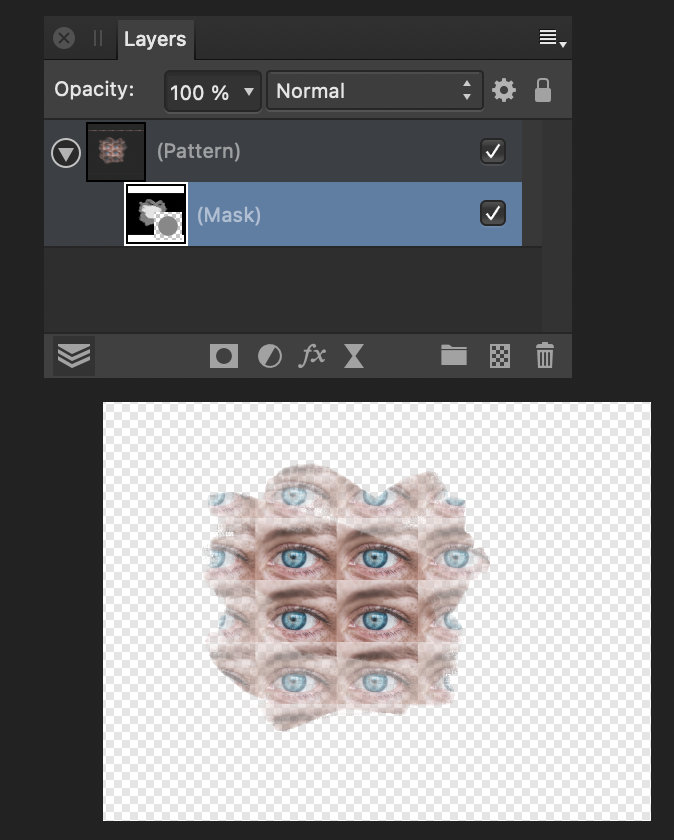
If you want the effect of 'painting' a repeating image, one way is: Place the image in your document at the size you want. From the Layer menu, choose New Pattern Layer from Selection: With the Pattern layer selected In the Layers panel, click the Mask Layer button: With the Mask layer selected, from the Layer menu, choose Invert (I've deleted the original pixel layer here): Switch to the Brush tool, set the colour to white, and paint on the Mask layer: Adjust the brush size and opacity to taste. (Original image from Unsplash.)
-
Ah yes apologies. When I shift-clicked I was in Append mode (which the OP doesn't want). In "New" mode, as @Old Bruce rightly says, only ctrl-click adds to the selection on macOS. I would expect a secondary click (two-finger click on the trackpad, presumably the equivalent of right-click on Windows), to do the same. But it doesn't. Might need a bug report from a Windows user.
-
I'm macOS, you appear to be Windows. So it may not be the same
-
Shift-click adds to my selection, as does ctrl-click. Alt-click removes from the selection. Maybe a translation issue with the tool instructions?
-
Publisher extremely slow
h_d replied to gw2020's topic in Pre-V2 Archive of Affinity on Desktop Questions (macOS and Windows)
In a totally unscientific test, I just placed a plain .txt file of the Bible (King James Version) into an Affinity Publisher 1.9.2 document (macOS 11.2, 2018 MacBook Pro with 32Gb RAM and a 2.9GHz 6-core Intel Core i9 processor). With the font set to 8.5pt American Typewriter this made 462 pages of A4, three columns per frame, one continuous flow of text. I then ran a search and replace to set the character style of the chapter and verse numbers to 'Strong'. Four seconds. Your mileage may vary...
-
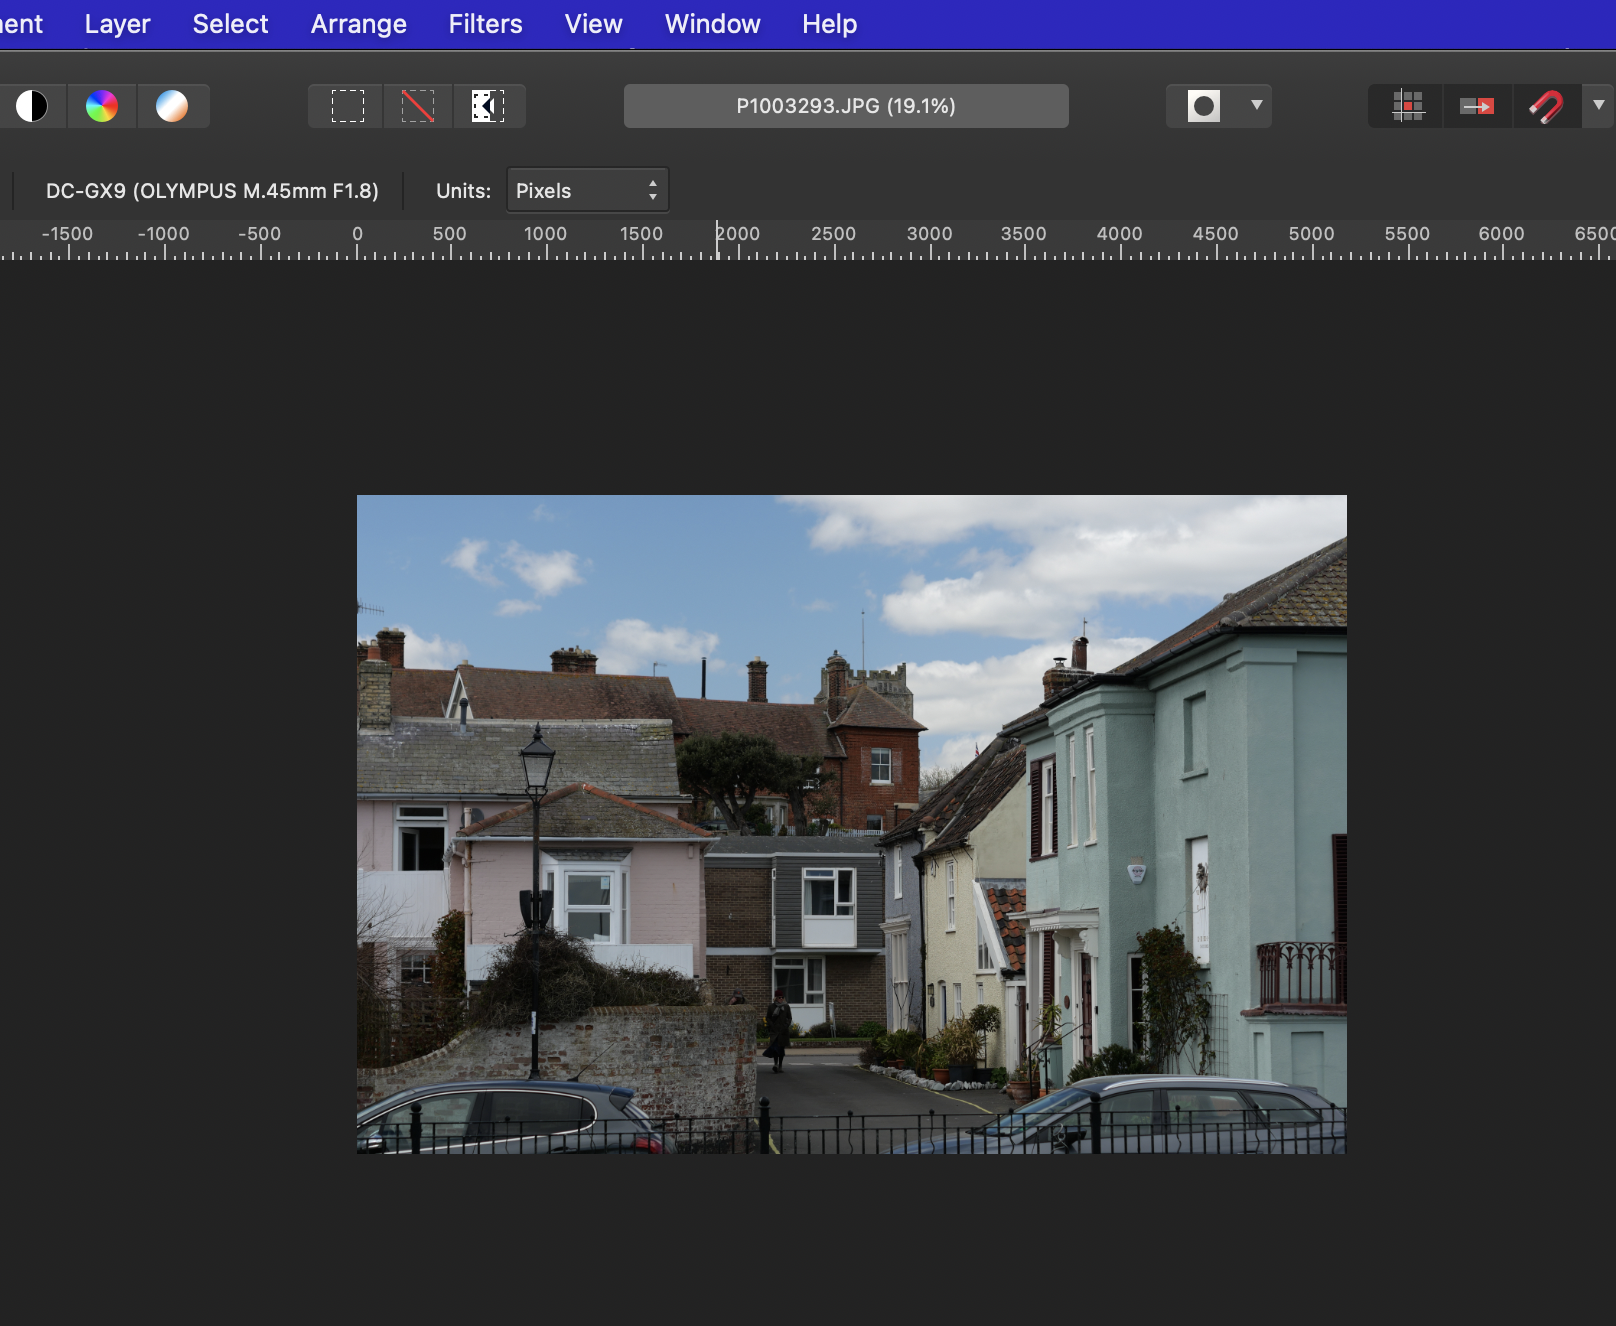
Unfortunately not on macOS in 'unseparated mode'. The only indicator that a window is open is the document title in the menu bar, which is not connected with the image: . This is compounded by the fact that on a Mac trackpad, you can pinch zoom to below 1% - here the zoom goes to 0.2% (like Spinal Tap but in reverse???) despite the Navigator reporting 1%: . In a situation like that when using Dark UI it's quite easy to lose track of where the image is on screen.
-
Link artboards?
h_d replied to Totte's topic in Pre-V2 Archive of Affinity on Desktop Questions (macOS and Windows)
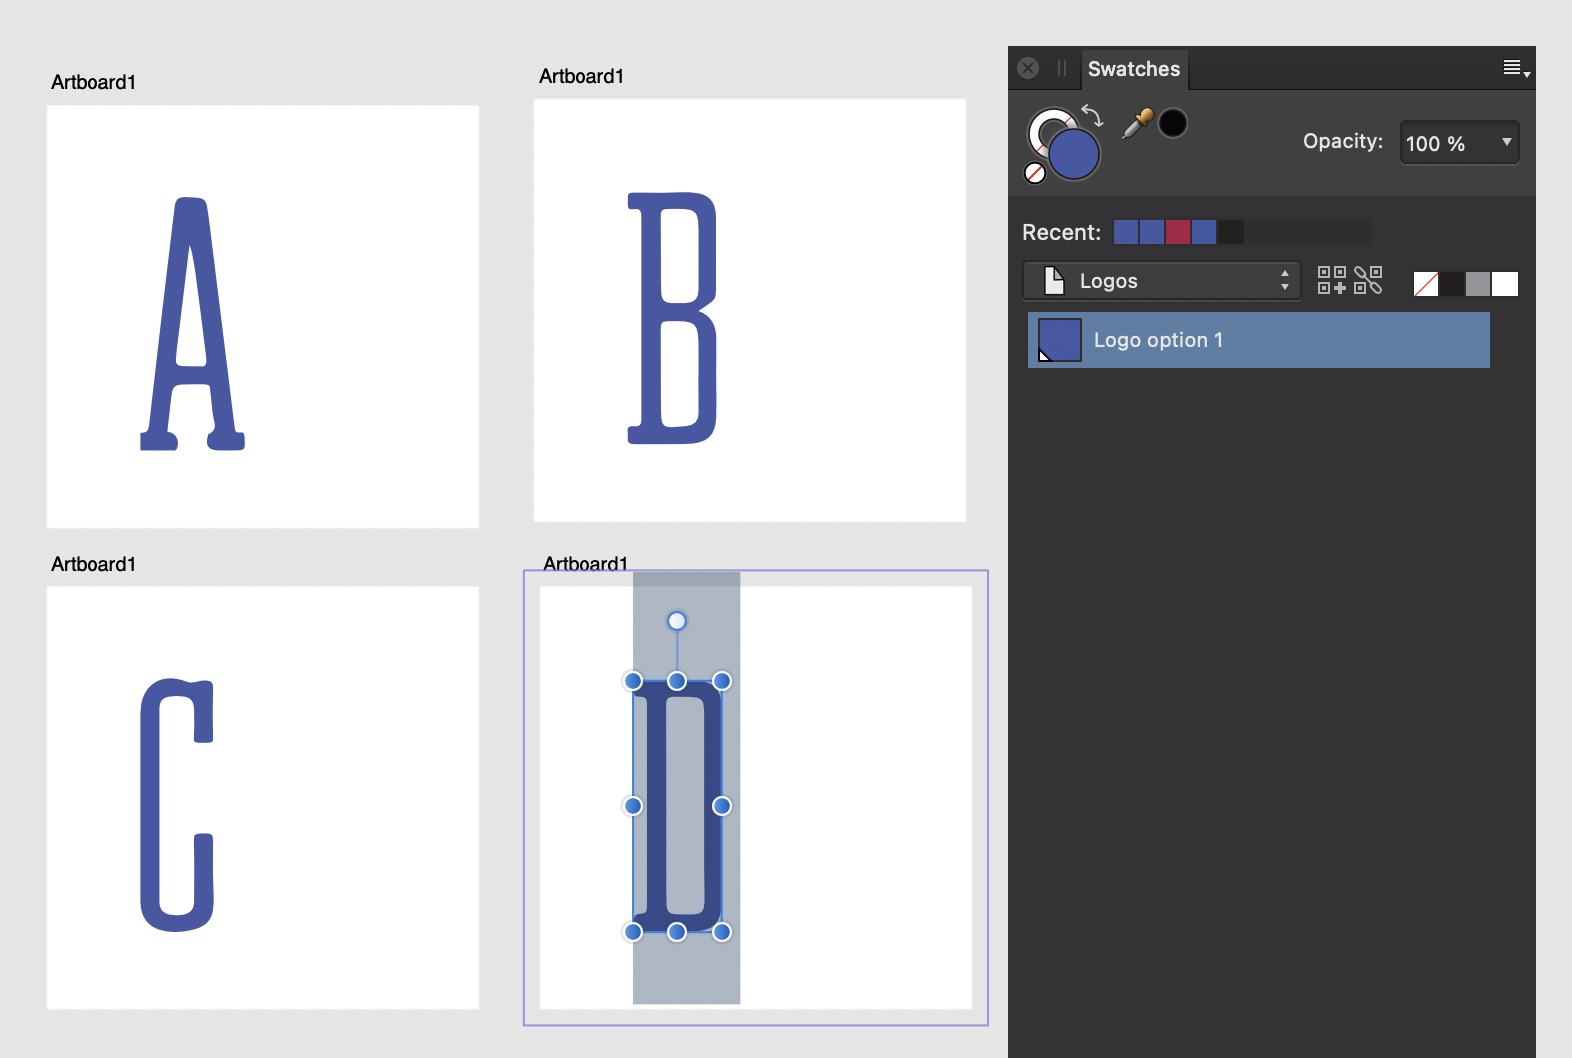
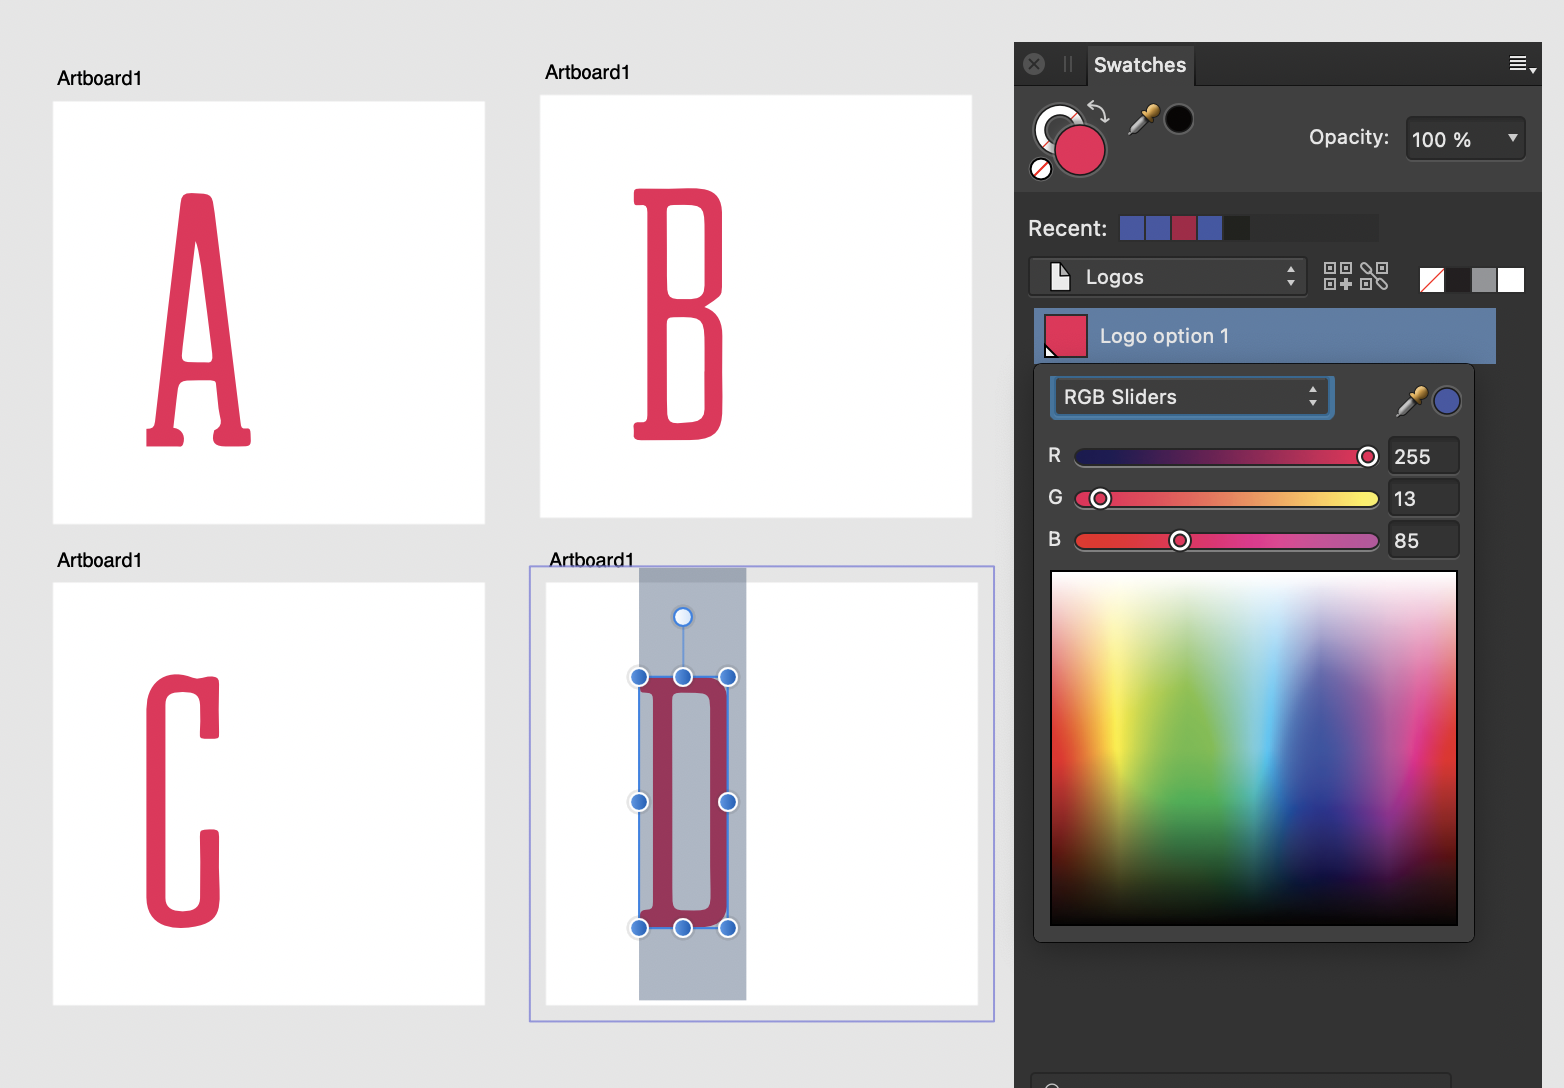
Global colours as suggested by @walt.farrell are the way to go. In the Swatches panel, Add a new palette. This can be document, application or system-wide and by default will be called Unnamed (grrrr....) Rename the palette if you want (mine is called Logos), then Add Global Colour: Again, you can rename the colour if you want. The white "dog ear" at the bottom left of the swatch indicates that it's global. Apply that colour to your icons: Right-click on the global colour in the swatches panel and Edit Fill: All instances of the global colour will be updated. (PS if you've got a different question, it's a good idea to start a new thread. Makes it easier to find )
-
Masking Effect...
h_d replied to Gort's topic in Pre-V2 Archive of Affinity on Desktop Questions (macOS and Windows)
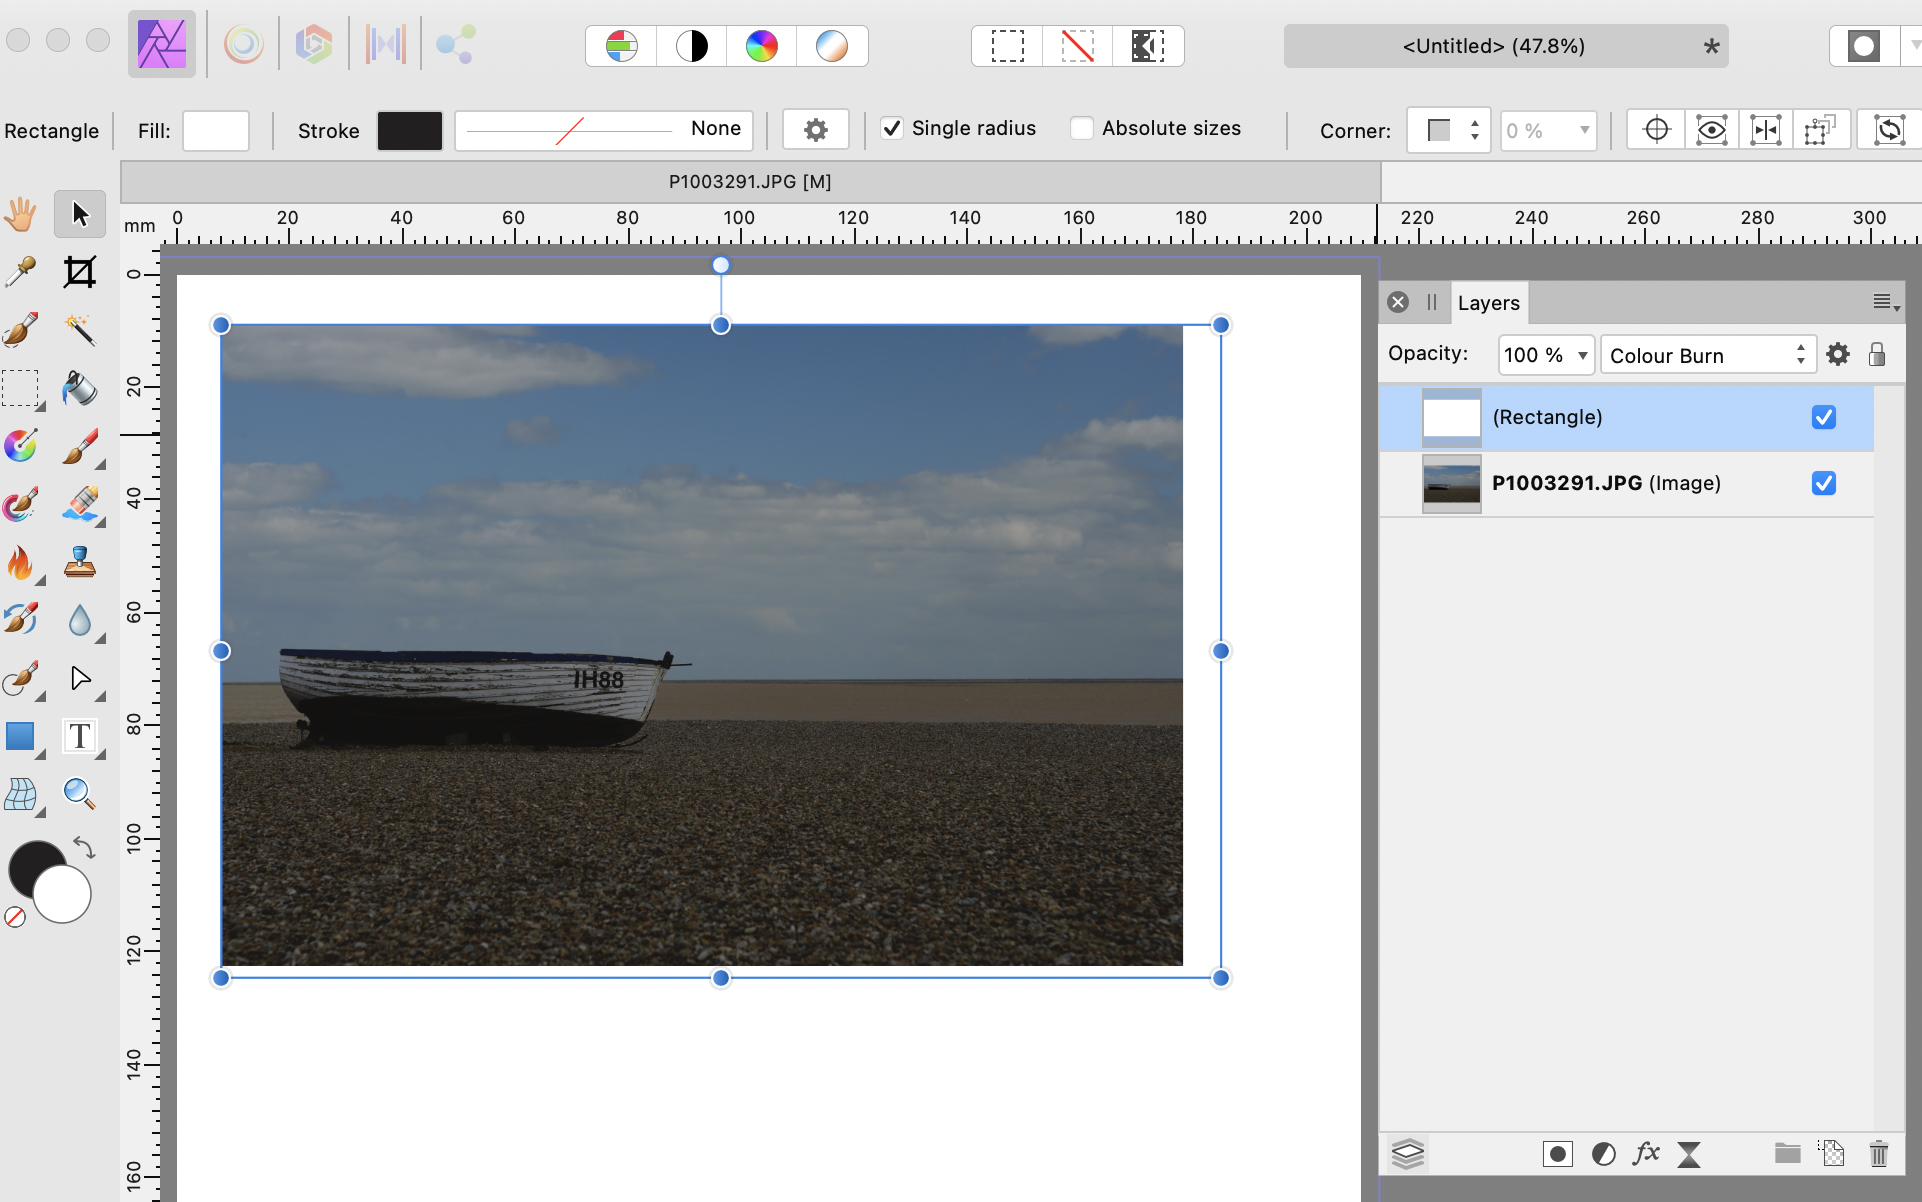
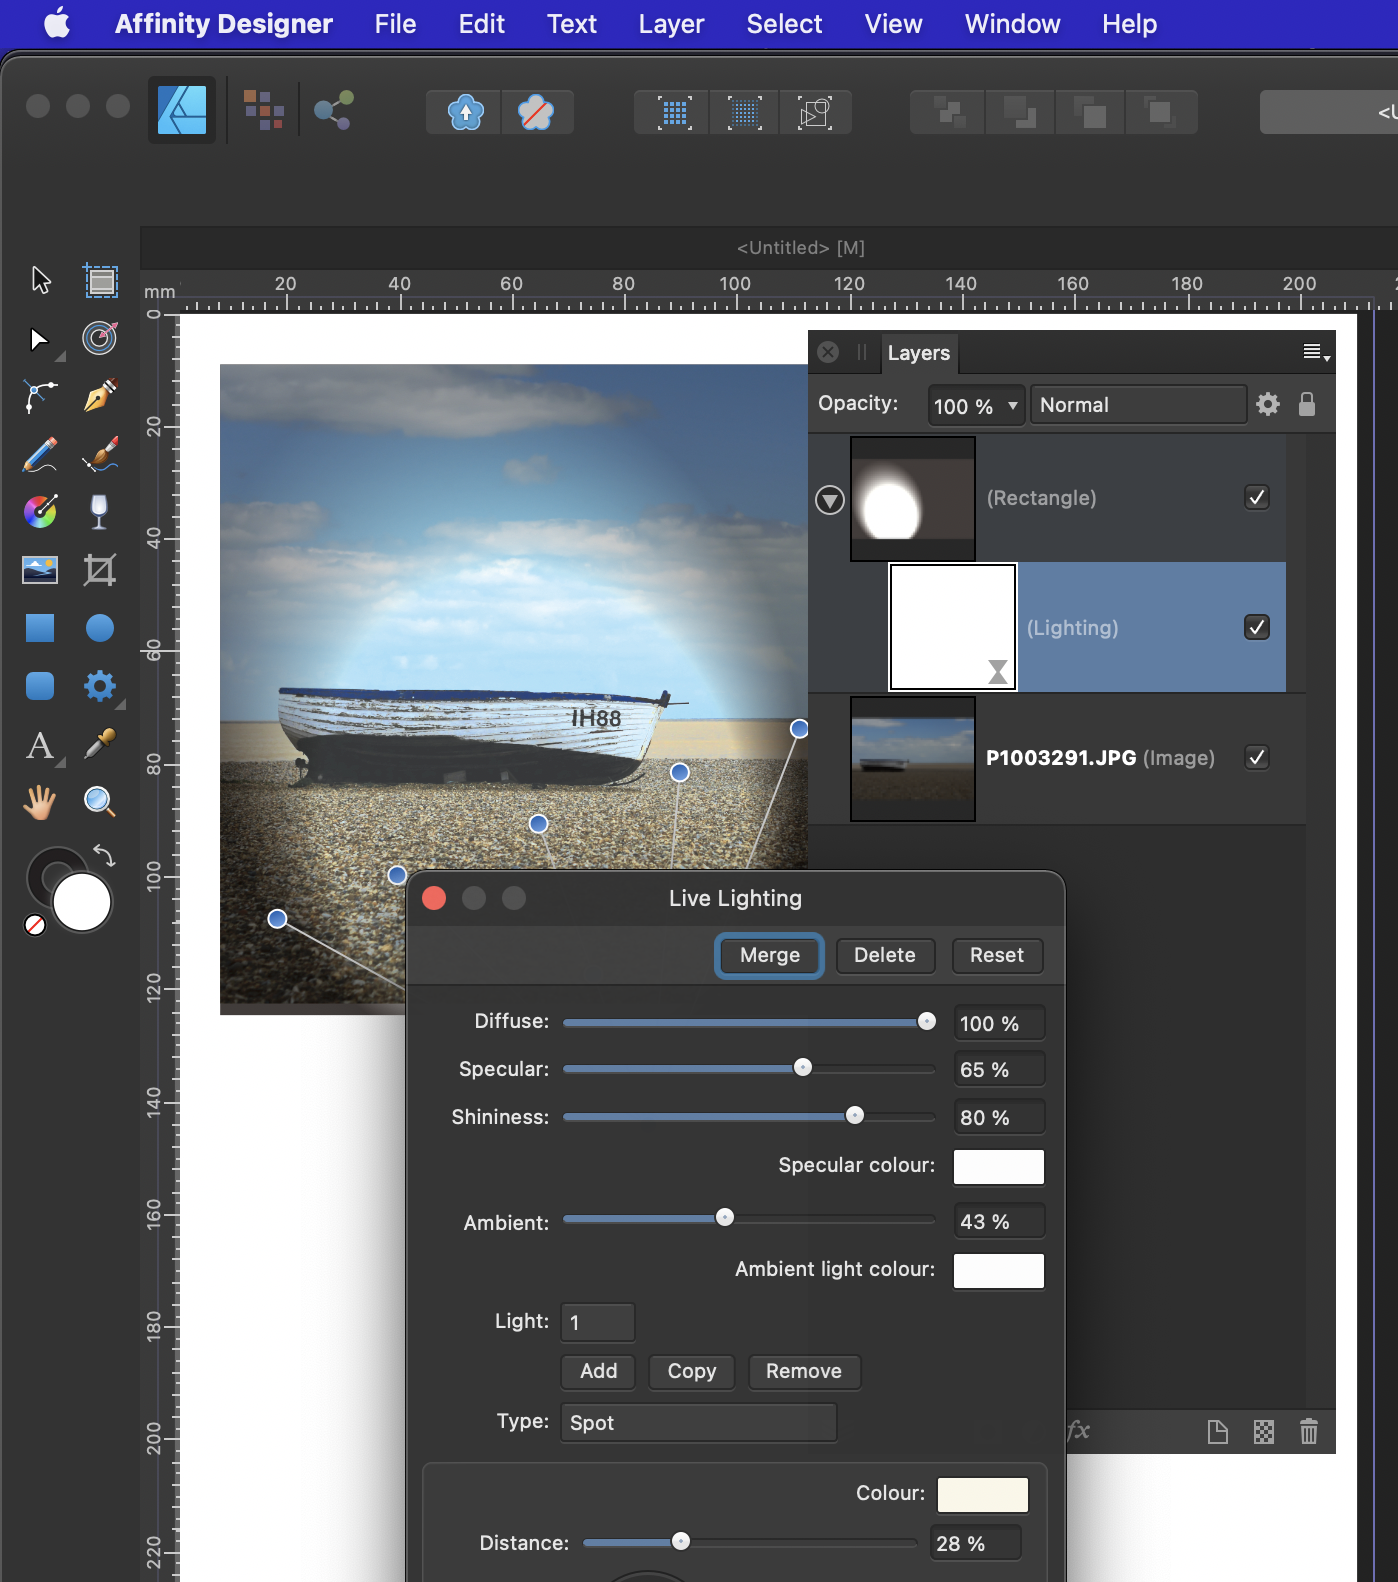
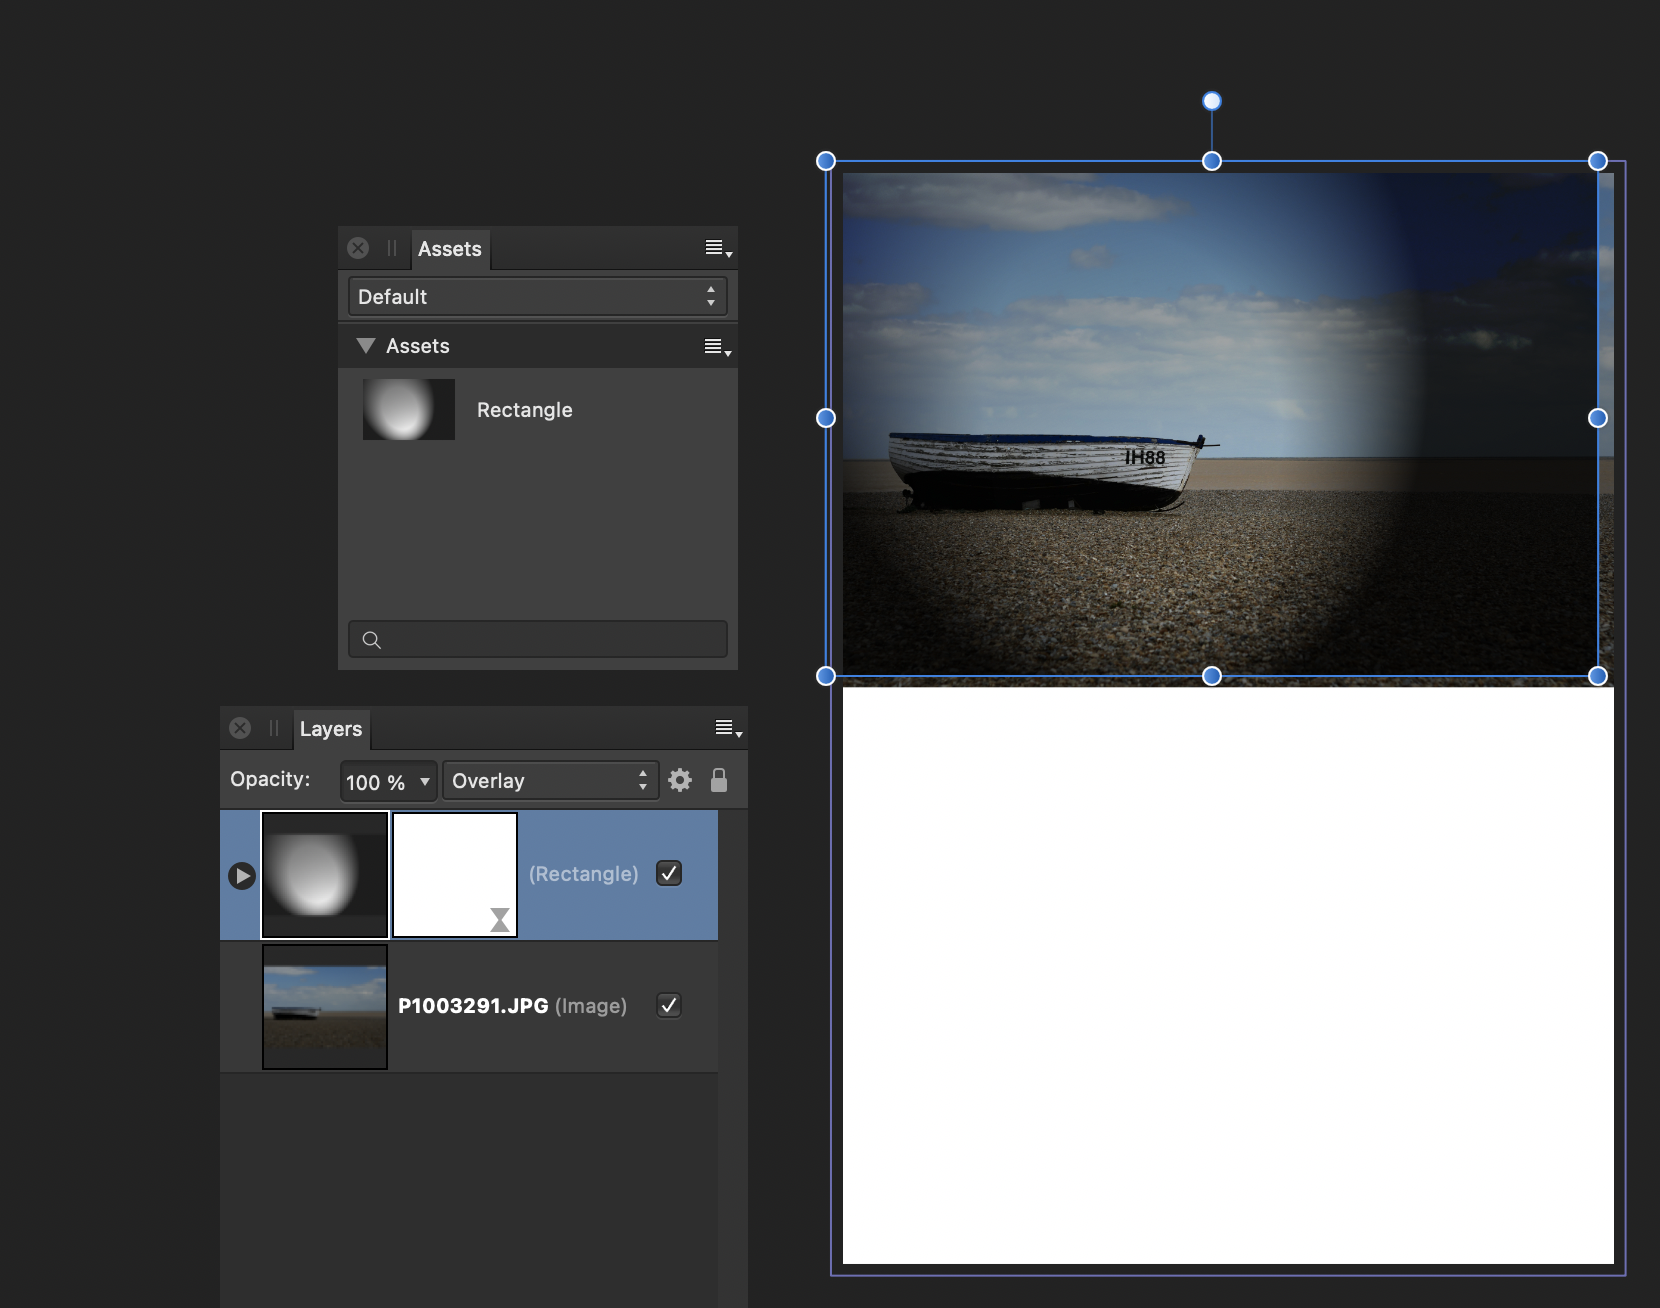
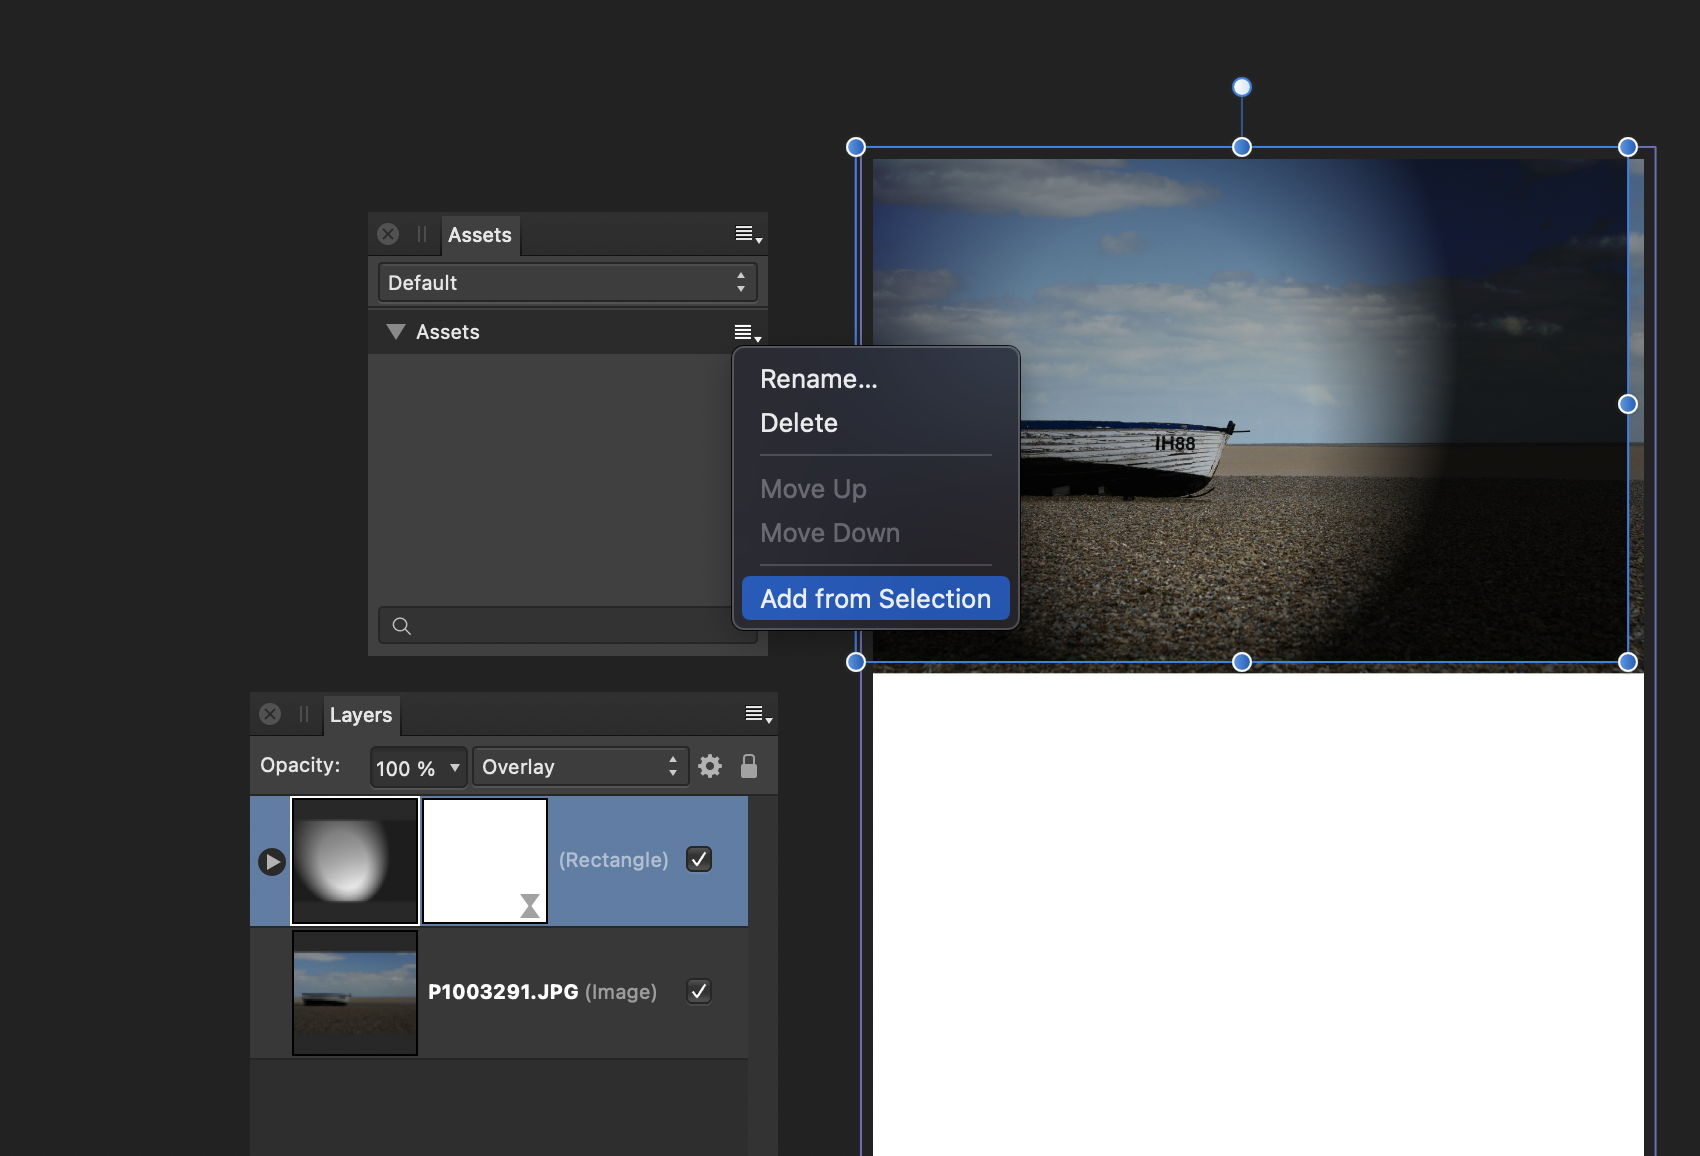
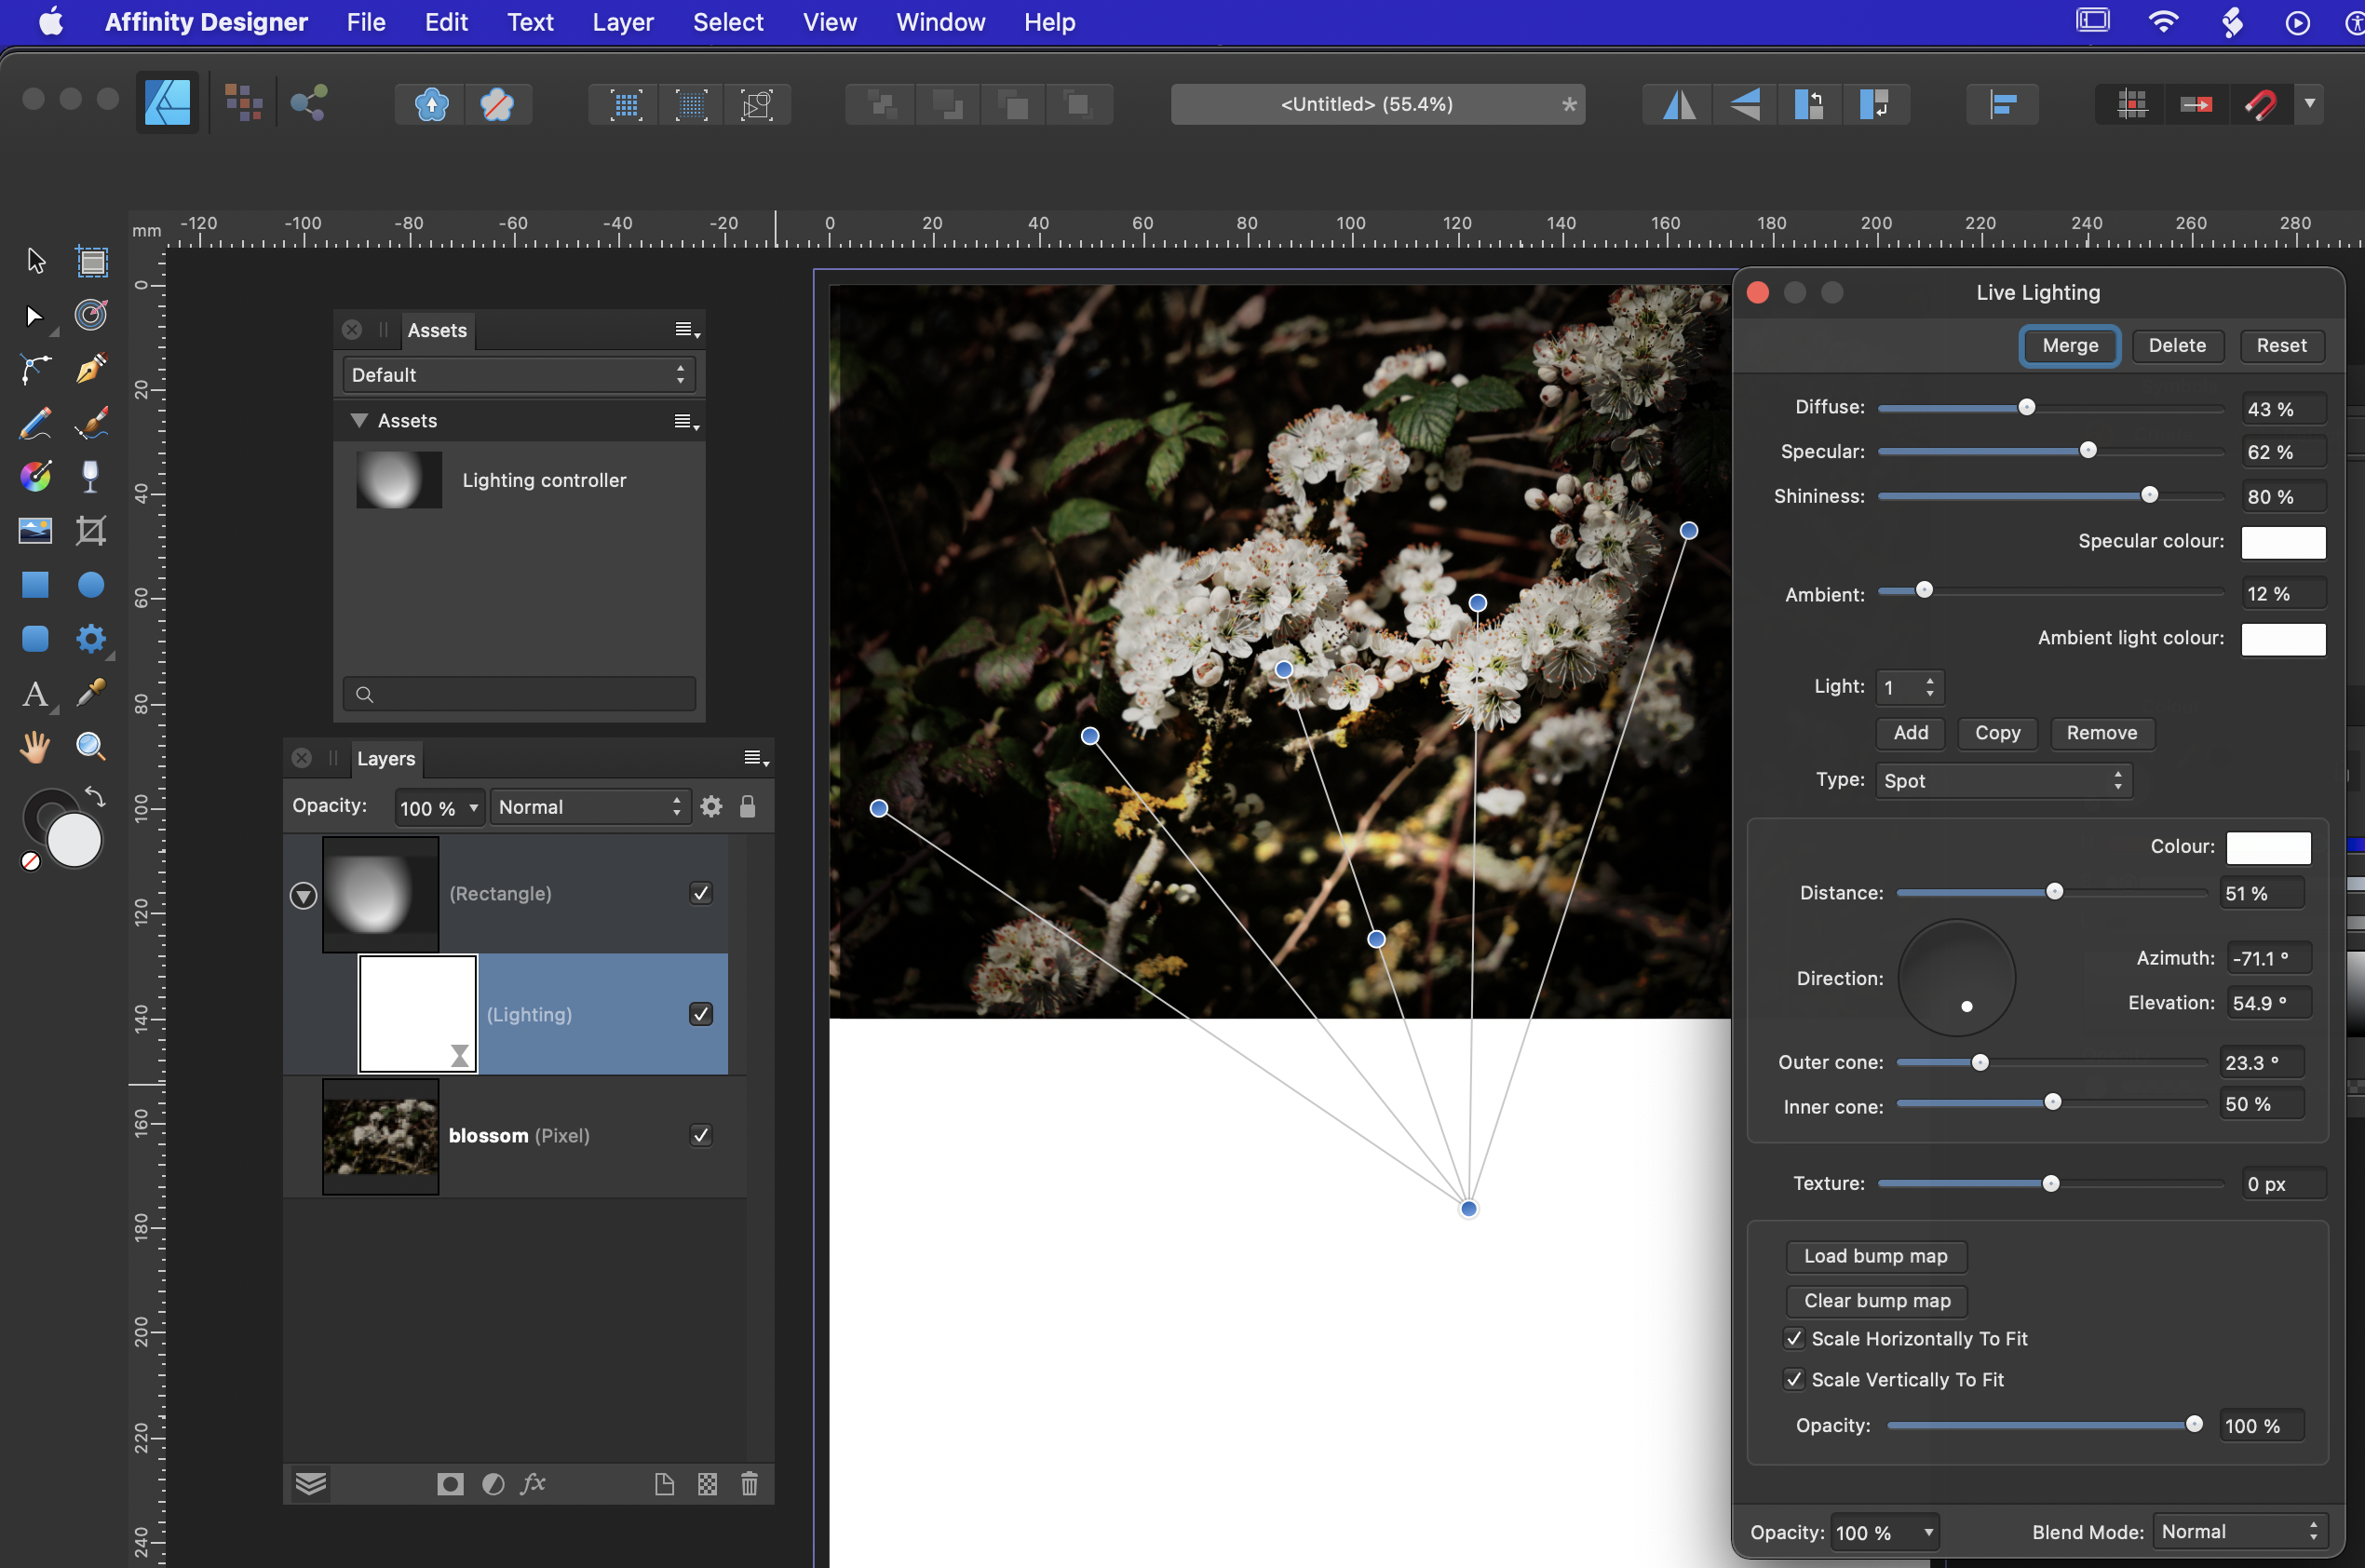
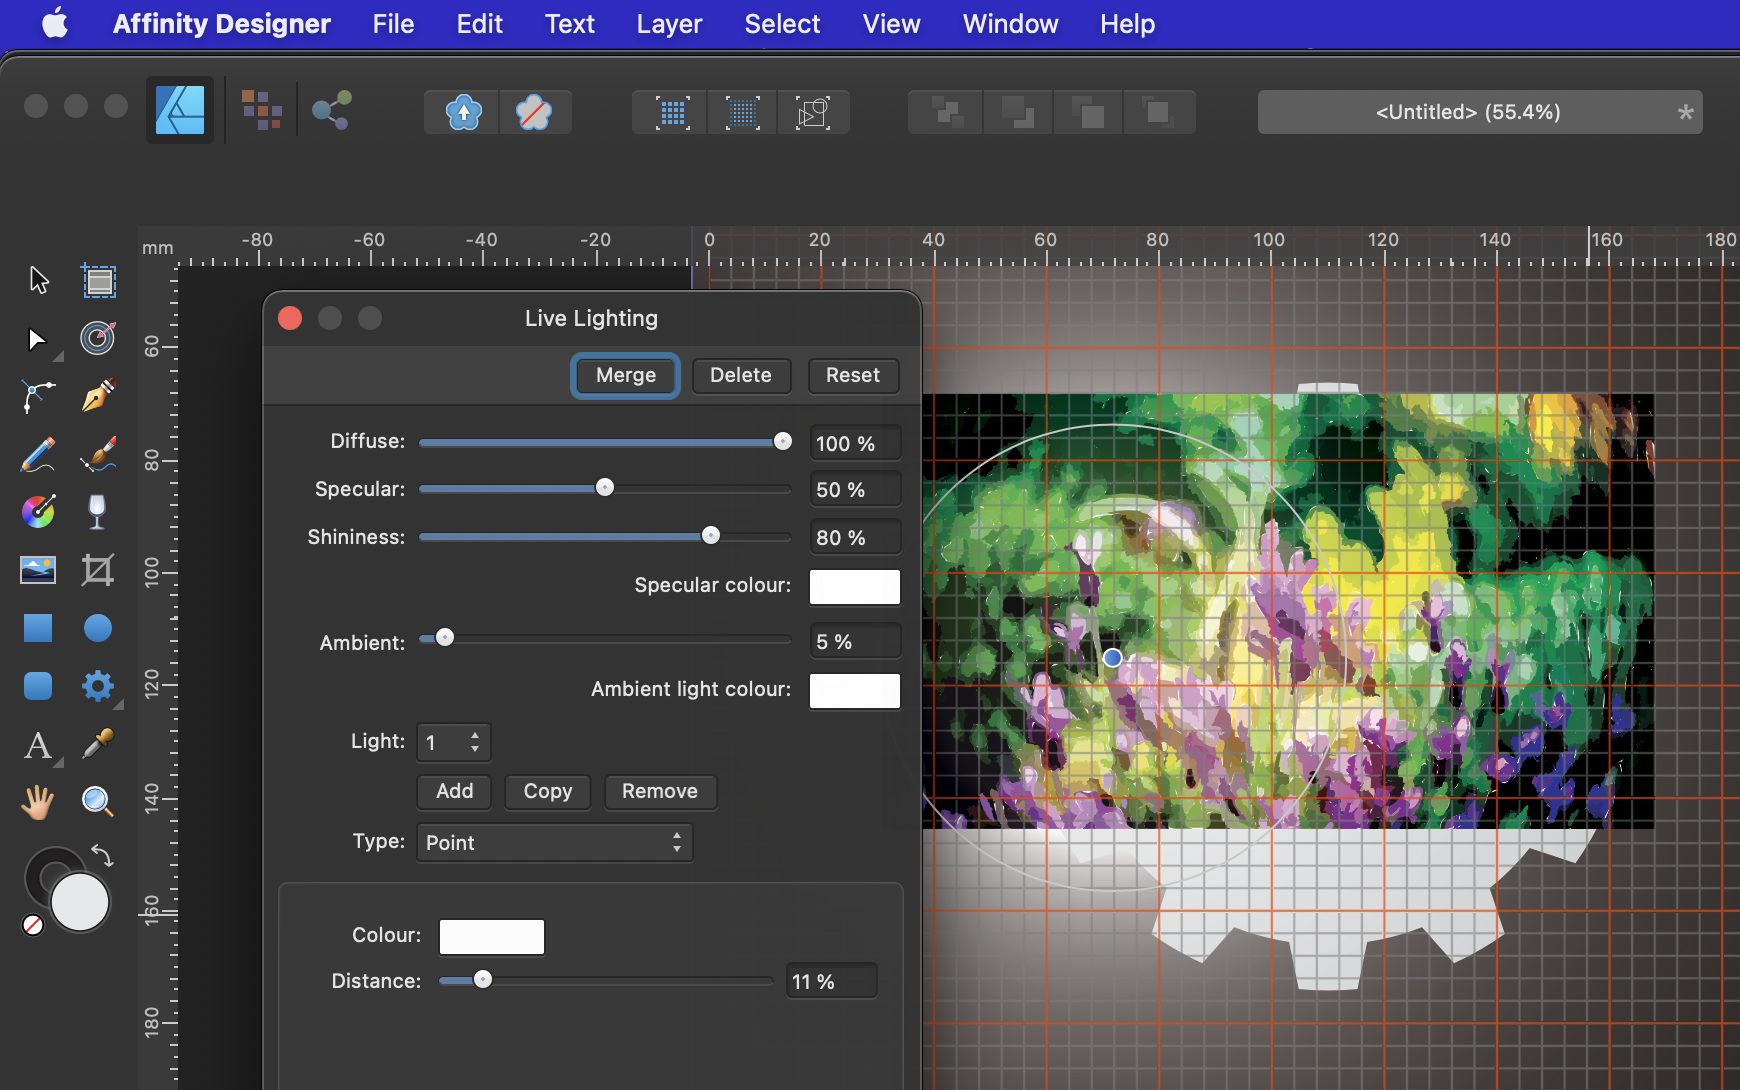
I'm on versions 1.9.2 of Photo and Designer, running macOS (but Windows should be more or less the same). I'll try to be a bit clearer... Starting in Designer, place your image. Now from the File menu choose Edit in Photo: This switches you and the Designer document into Photo (it sounds as though you have it?) Draw a white rectangle over the image and set its blend mode to Colour Burn (I actually changed mine to Overlay later, see. below): With the rectangle selected, from the Layer menu, choose New Live Filter Layer - Lighting: This will give you a new Live Lighting filter, nested under the rectangle: Close the filter settings dialog and from the File menu in Photo, choose Edit in Designer to switch you and the document back to AD, then double-click on the (still Live) Lighting filter in the Layers panel. (This is where I changed the blend mode on the rectangle from Colour Burn to Overlay): Adjust settings, colours etc as required, then close the Live Lighting settings box. Open the Assets panel, select the rectangle, pull down the so-called "Hamburger" menu in Assets and choose Add from Selection... This will give you a "lighting controller" in your Designer Assets which can be dragged over any image (and adjusted if need be): Hope this makes sense!
-
Link artboards?
h_d replied to Totte's topic in Pre-V2 Archive of Affinity on Desktop Questions (macOS and Windows)
'Unofficial' video: Screen Recording 2021-04-08 at 20.41.00.mov Basically display the Symbols panel, select your rectangle, click Create, drag the symbol to the other artboards, select one of the nested rectangles in the Layers panel, and change its colour (or shape, or position, or anything...) -
I'm not from Serif, but the x's mean that the text frame is on the master page, not on the current document page, and although it can be selected, it cannot be edited or modified unless you either (a) work on the relevant master page or (b) you choose Master Page - Edit Detached (or Edit Linked) from the Layers menu. This is a document page with a master page text frame selected, displaying the crosses (typically used for standing text like folios, repeated headers etc), nested inside Master A): This is a document page with a document page text frame selected, displaying editable control handles (typically used to contain flowing document content), not nested in the master page: Someone from Serif has explained it further in the help files, Detaching and Linking Master Pages. Cheers, H
-
macOS 11.2 here. My Move Tool cursor remains black, whatever the default OS theme (dark/light/automatic). It changes to various double-headed arrows depending on the available actions. My Node Tool cursor is white until it can be used. It turns black if it hovers over a node; it acquires a wiggly line when hovering over a path/curve between two nodes; and it acquires a small black circle when dragging node adjustment handles. My Corner Tool cursor stays white (exactly like the node tool) until hovered over a corner, when it acquires a quarter-circle segment. Screen Recording 2021-04-08 at 16.28.58.mov So there is some visual feedback when the tools are usable.
-
Masking Effect...
h_d replied to Gort's topic in Pre-V2 Archive of Affinity on Desktop Questions (macOS and Windows)
Whoops sorry. Me too. Especially as if you Edit in Photo from Designer, place my white rectangle with lighting filter, then return via Edit in Designer, the live Lighting filter is now usable in Designer: And can be added to Designer's Assets panel for repeated use.