h_d
-
Posts
1,472 -
Joined
-
Last visited
Everything posted by h_d
-
 If you scroll to the bottom of this page you can take advantage of the 30-day free trial offer. That's the link to Photos, but there are identical offers for Designer and Publisher.
 -
There's also a specific section for Photos:

-
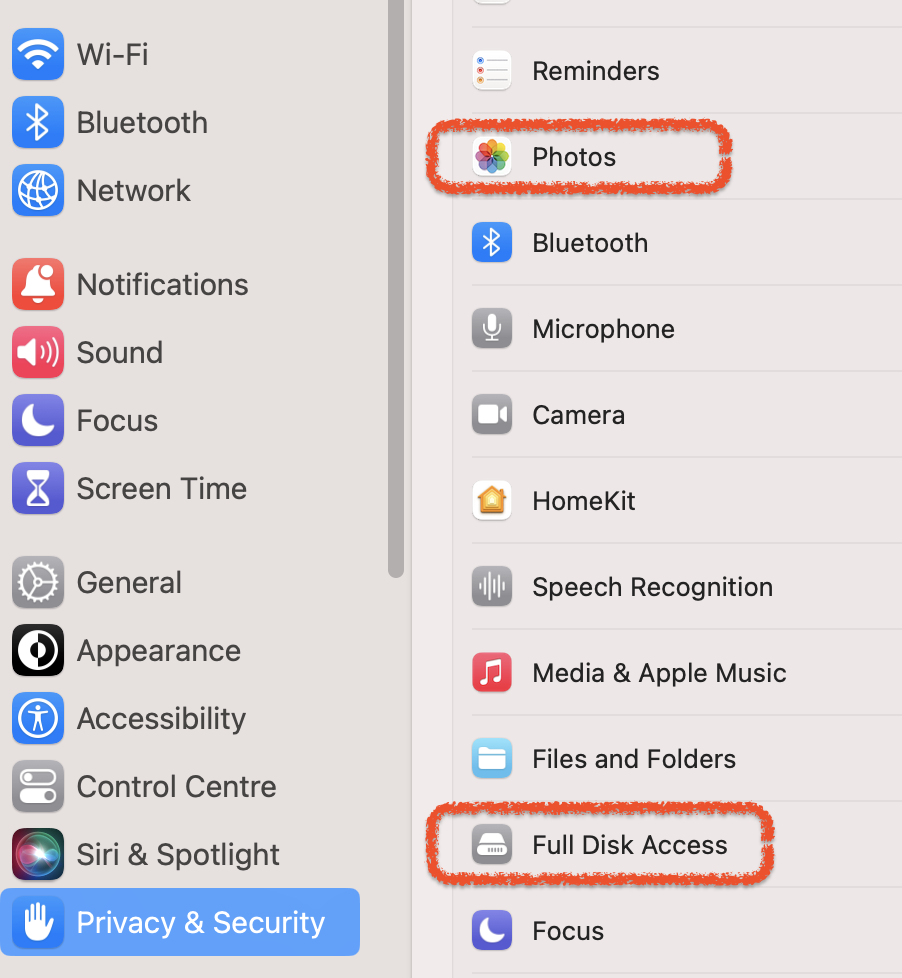
Might be worth checking in System Preferences - Privacy & Security that Affinity Photo 2 has full access to Photos. Below is from Settings in Ventura (radically different look to earlier versions of macOS, but the principle is the same):
-
What I did: Clicked Help menu in Affinity Publisher v2.0 Selected Affinity Publisher 2 Learning Portal What happened: My web browser opened What's New in Affinity Designer. What I expected to happen: Some sort of information about Affinity Publisher. ffs
-
And which Affinity application are you using? And what are you doing when it crashes? And can you upload a crash report?
-
NB if like me you still have Affinity Photo v1 installed, you'll see something similar to the following menu when you click the three dots in Apple Photos: It's just about possible to detect the difference between the icons, but the one to choose for Affinity Photo v2 is the bottom one, selected in the screen grab.
-
Start in Apple Photos, select the raw image, press return to edit, click the three dots in the top right, choose Edit in Affinity Photo. This will take you into Affinity Photo's Develop Persona. Make your modifications, click Develop. In Photo persona, make more changes if desired, save the image, close it. Confirm the edits in Apple Photos. You can always Revert to Original in Apple Photos' editing module.
-
Found it. Read the whole thing about how Apple Photos works with non-destructive image editors and extensions. Then re-read the bit about 'Don't Edit with "Edit With"'.
-
I wish I could find the link, but I remember reading a blog by a former developer of Apple Photos which basically said 'Don't use Edit With..." or cmd+Enter. Instead, switch into editing mode in Apple Photos (select the image, then press return), click the three dots in the top right and choose Edit In Affinity Photo. On my machine running Affinity Photo v2.0 this opens the raw image in Develop Mode. If I develop, then make further modifications, then save, all changes are saved back to Apple Photos. This works for me with .RW2 files (I shoot Panasonic) and with .DNG files from my iPhone. Can't comment on other raw formats.
-
Image Captions in Photo
h_d replied to J L's topic in Pre-V2 Archive of Affinity on Desktop Questions (macOS and Windows)
If it was me, I'd use Data Merge. It's not a work around, although it may be a different way of working. Create a .csv file with the captions and the file paths for the images, create your merge layout to place the fields, then Generate... But I don't believe there's any direct way of displaying an image's IPTC metadata in Publisher, which sounds like what ID does, and what you want to achieve. You'd probably need to use an external image metadata editor (basically ExifTool) to create the .csv -
Word count?
h_d replied to pomme27's topic in Pre-V2 Archive of Affinity on Desktop Questions (macOS and Windows)
Could be - I'm on Ventura. -
Word count?
h_d replied to pomme27's topic in Pre-V2 Archive of Affinity on Desktop Questions (macOS and Windows)
Title bars are different. What you're seeing is Affinity Publisher Help. What I'm seeing is Affinity Publisher 2 Help. -
Word count?
h_d replied to pomme27's topic in Pre-V2 Archive of Affinity on Desktop Questions (macOS and Windows)
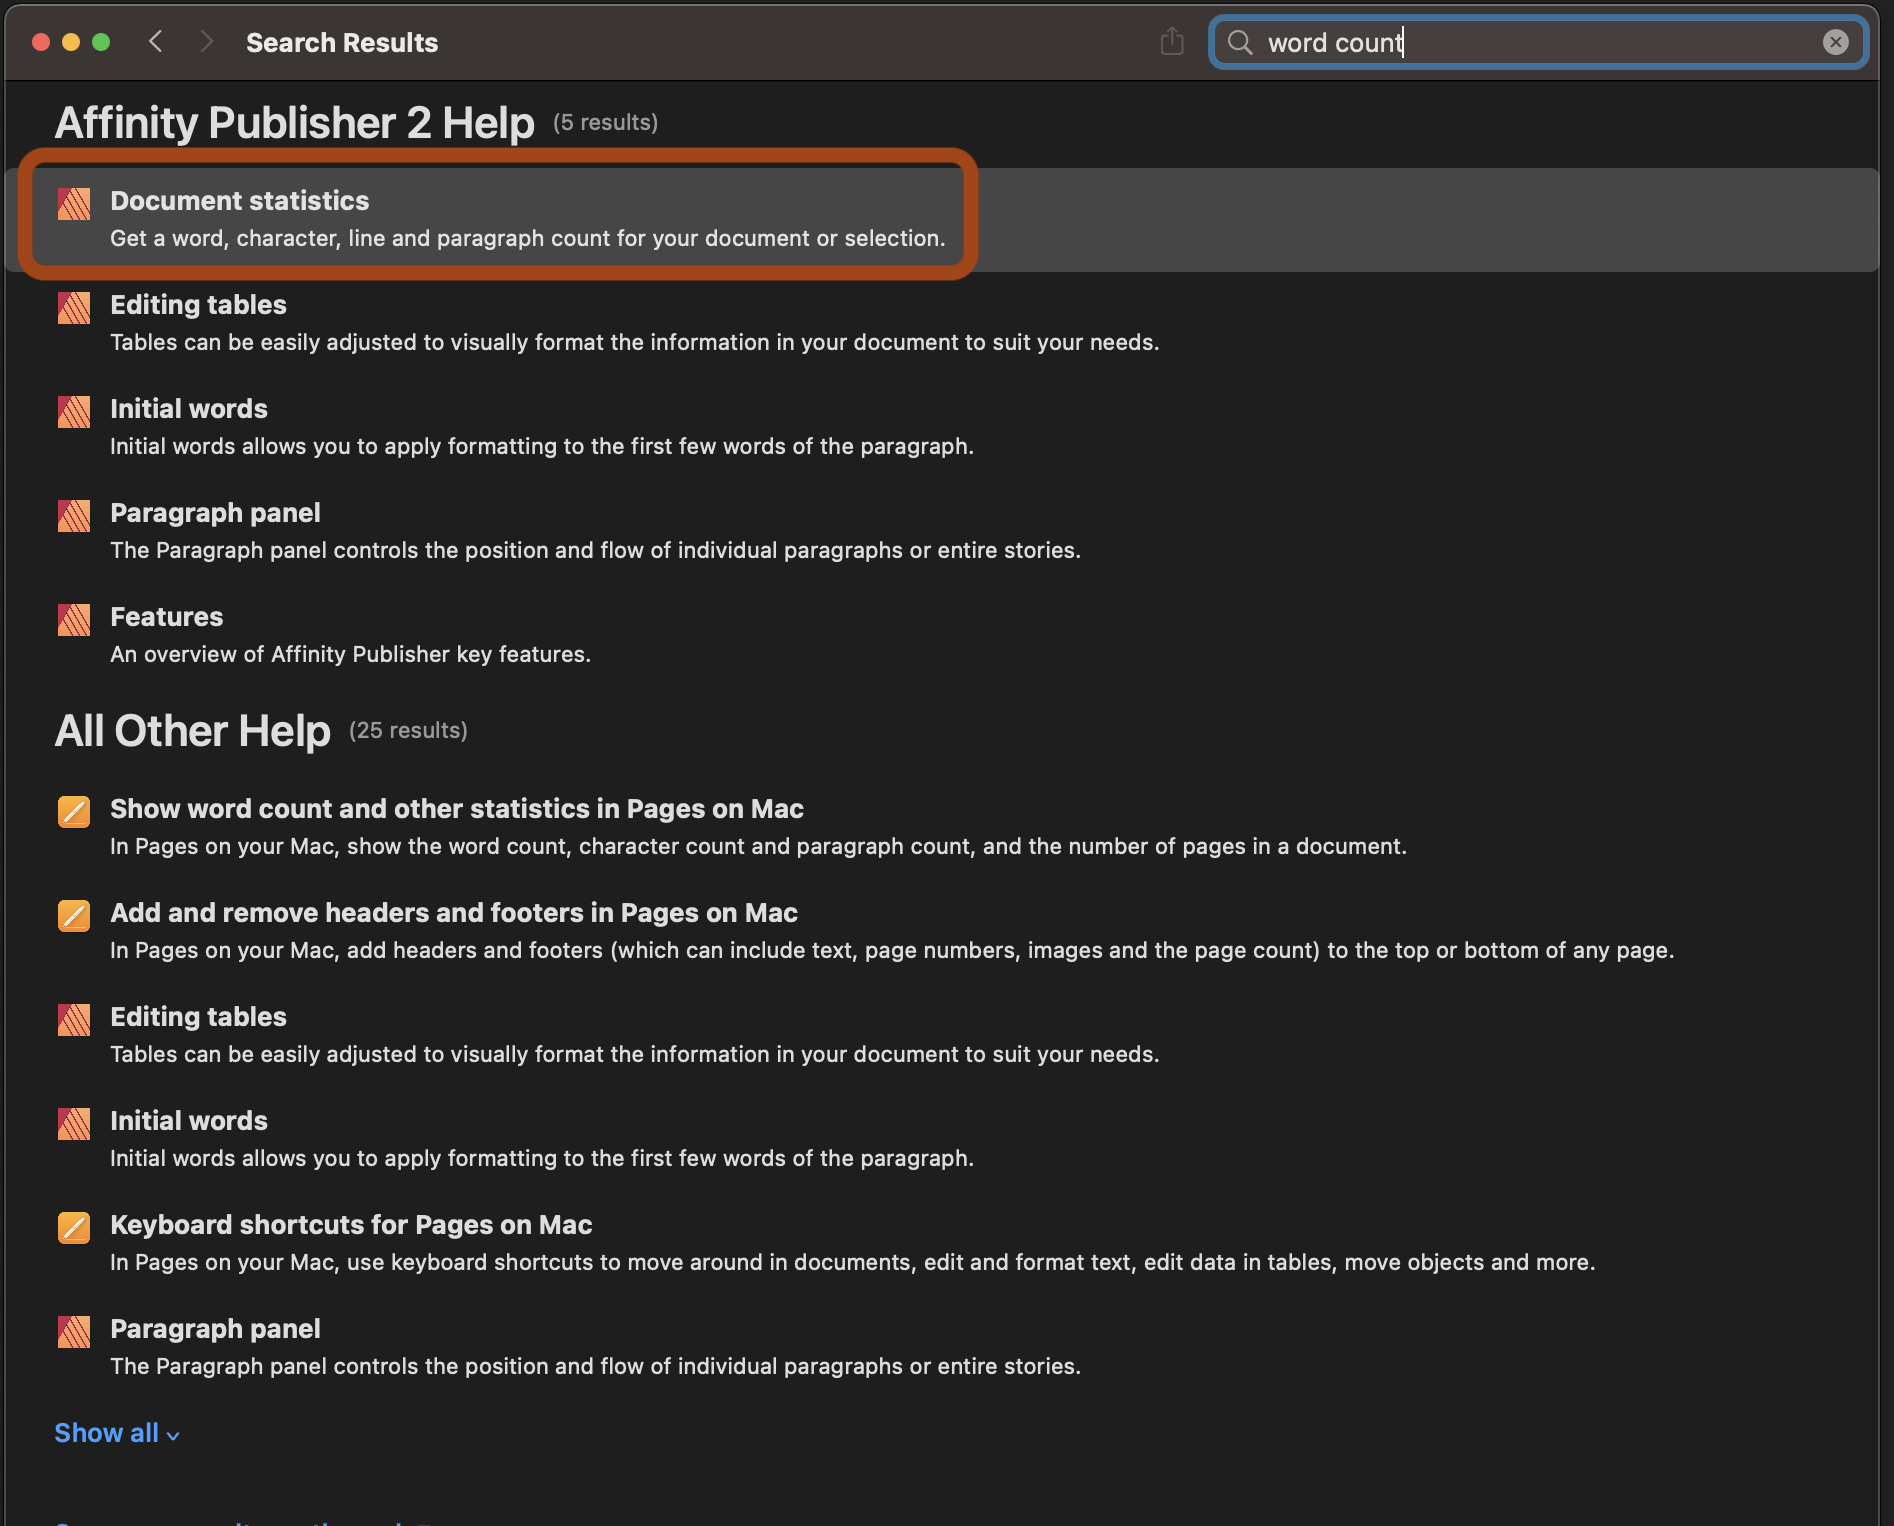
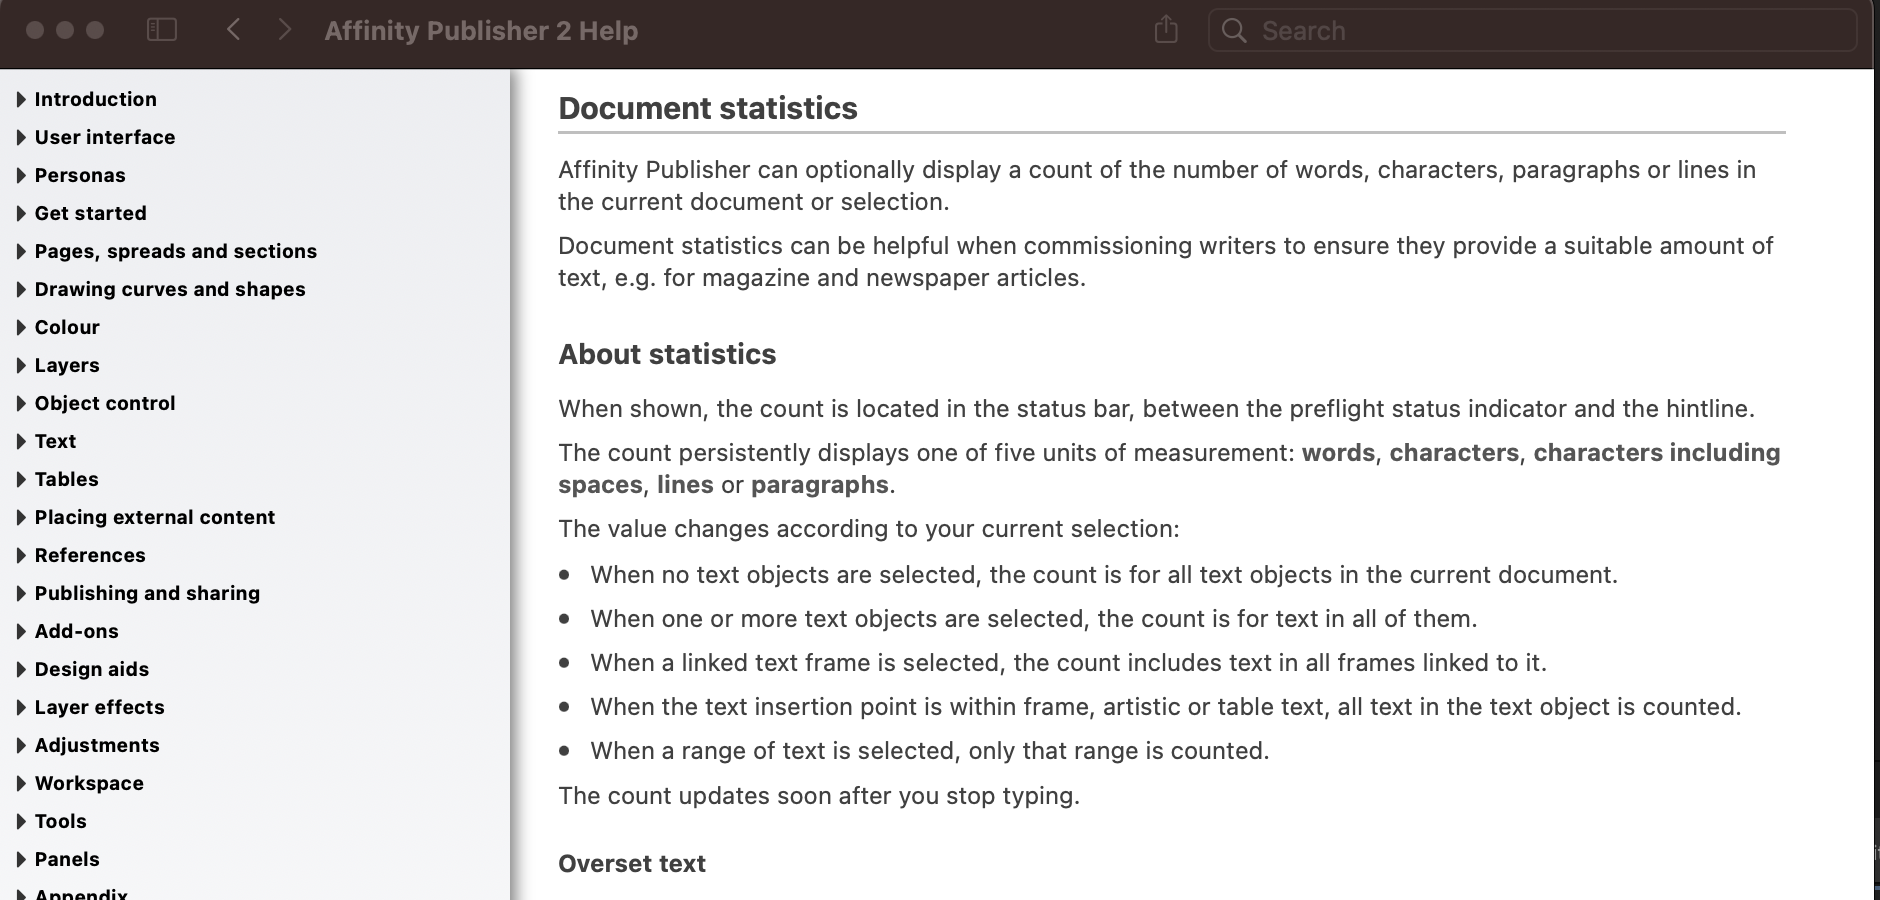
Ah sorry, I misunderstood. Like you, if I choose Learning Portal in Publisher v2 I am taken to All About Affinity Designer. This seems to me to be a bug. However... This is what I get: Fewer (2) hits, but one for 'word count'. Clicking the which takes me here:
-
Hi @Roter_Rabe and welcome. Here's one way. In Publisher, enable View - Show Grid: Then choose View - Grid and Axis and set up a grid with the Spacing set to your desired 'equal spacing' Here I've used 5mm, not subdivided: Close the dialog, then go to View - Snapping and enable Snap to Grid: Close the dialog and use the Picture Frame Rectangle Tool (F) to design your layout: The shapes will 'snap' to the gridlines to help you maintain the spacing (spot the mistake above). Once you're happy with the layout, click on each frame in turn, choose File - Place, navigate to your chosen image and select it. Hide the Grid and Margins from the View menu, and check the results: You can adjust the positioning and size of the images using the Move tool.
-
Word count?
h_d replied to pomme27's topic in Pre-V2 Archive of Affinity on Desktop Questions (macOS and Windows)
All good for me (macOS Ventura, Publisher v2.0):
-
How can I creat a screen in publisher
h_d replied to barkingdog's topic in Affinity on Desktop Questions (macOS and Windows)
I would imagine Serif sent CMYK formatted pdfs to their printer, who used their own separation software. That is pretty standard practice. You are barking up the wrong tree if you want to create colour separations with any of the Affinity apps. -
Hi @PixZero and welcome! I'm seeing the same, and I have just reported it as a bug.
-
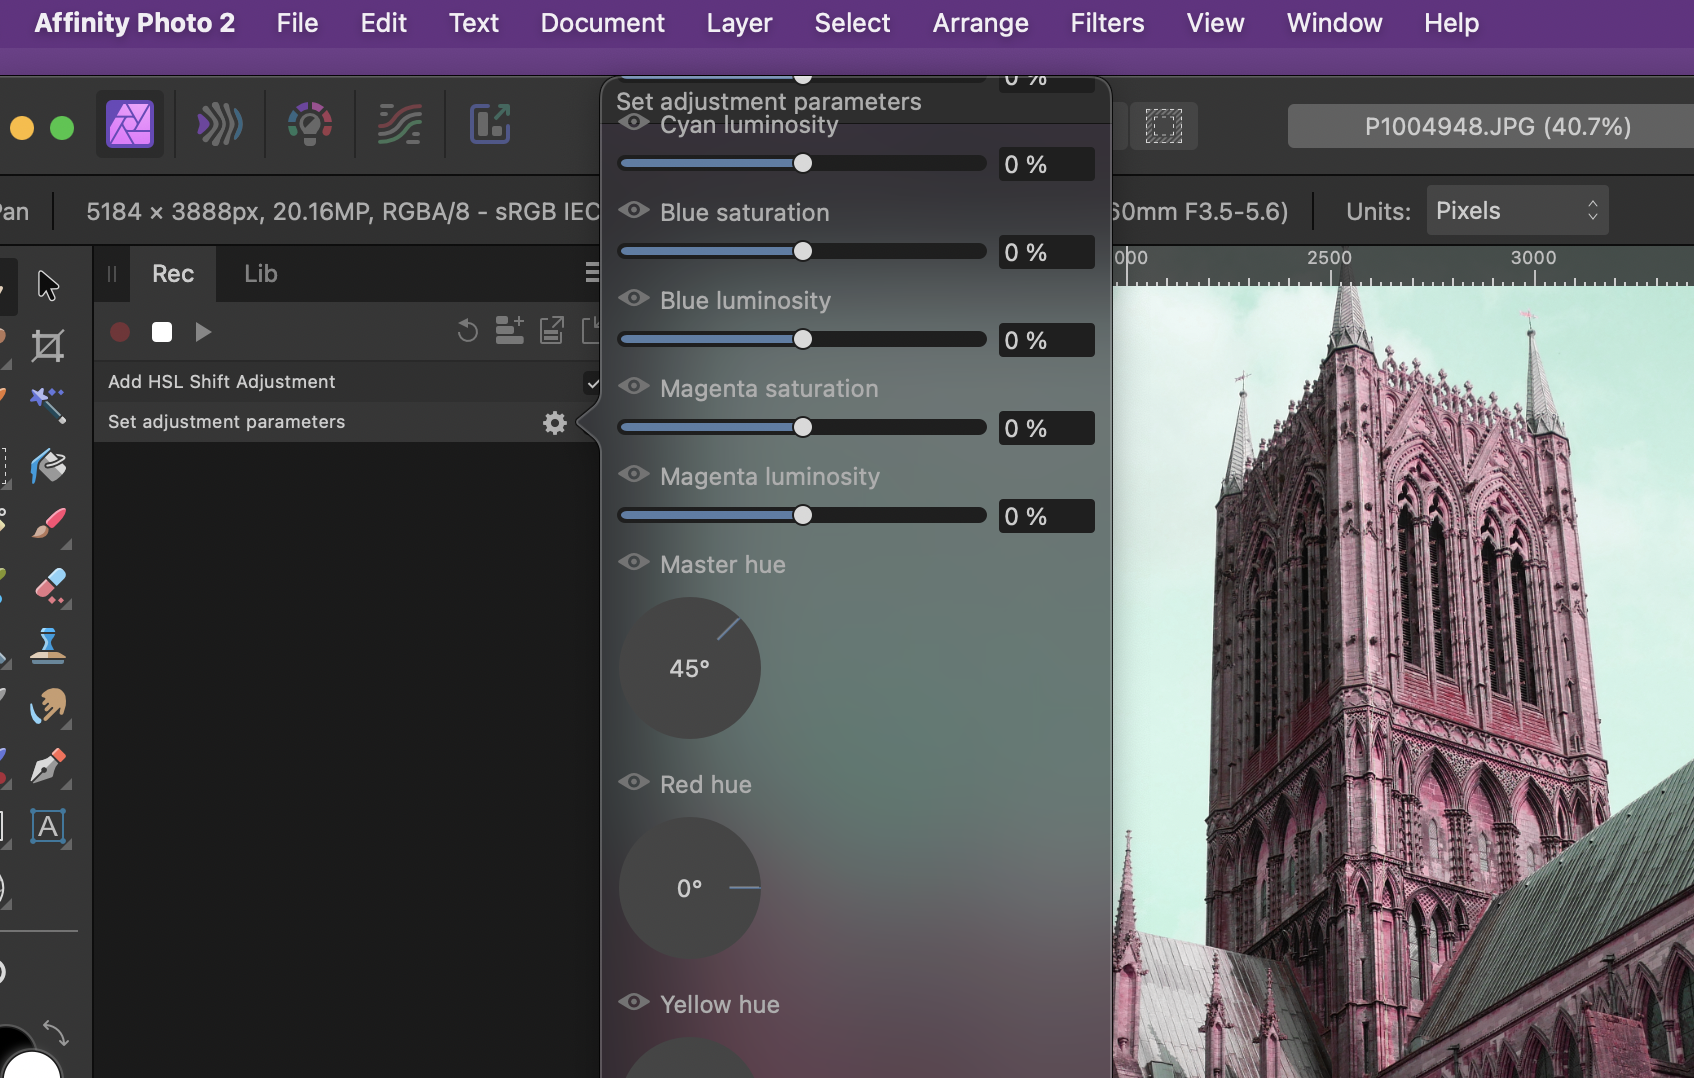
More detail in this post in the Affinity Desktop Questions forum. When accessing HSL adjustment settings in a macro, the settings that should be at the top of the panel (above Cyan luminosity) are not accessible and the panel can't be scrolled:
-
Do you mean like this: (I did this very roughly with the Inpainting Brush Tool in Photo - it's by no means a perfect job.) If you want to do it by hiding/masking different layers, then it's impossible to say without knowing how you have constructed/grouped/layered the original.
-
Hi @Martin Dvořák and welcome! There is a setting: But on my machine at least (macOS Ventura, Affinity Photo 2.0) it doesn't appear to have any effect whatsoever when opening images smaller than screen size. Even when it's selected, they are enlarged 😞
-
Hi @monsef and welcome! Unfortunately none of the Affinity programs supports right-to-left typography, although there are plenty of requests for it in these forums, not just for Arabic but for other RTL languages as well. I believe it may be possible to copy and paste text from applications that do support it, but that this introduces issues with indentation, flow etc.
-
How can I creat a screen in publisher
h_d replied to barkingdog's topic in Affinity on Desktop Questions (macOS and Windows)
As far as I'm aware, you can't output CMYK separations from Publisher, which I think is what you're asking. It doesn't have a halftone generator, so even if you laboriously use Photo to separate individual images, you can't place them as separated images on your pages, you can't separate solid areas of CMYK colour, and there is no mechanism to export full-page separations from an .afpub document. EDIT: you could print to a RIP rather than export, but there would be an additional cost. Examples: Colorburst Overdrive (starts at $795) and PrintFab Pro. (€129). -
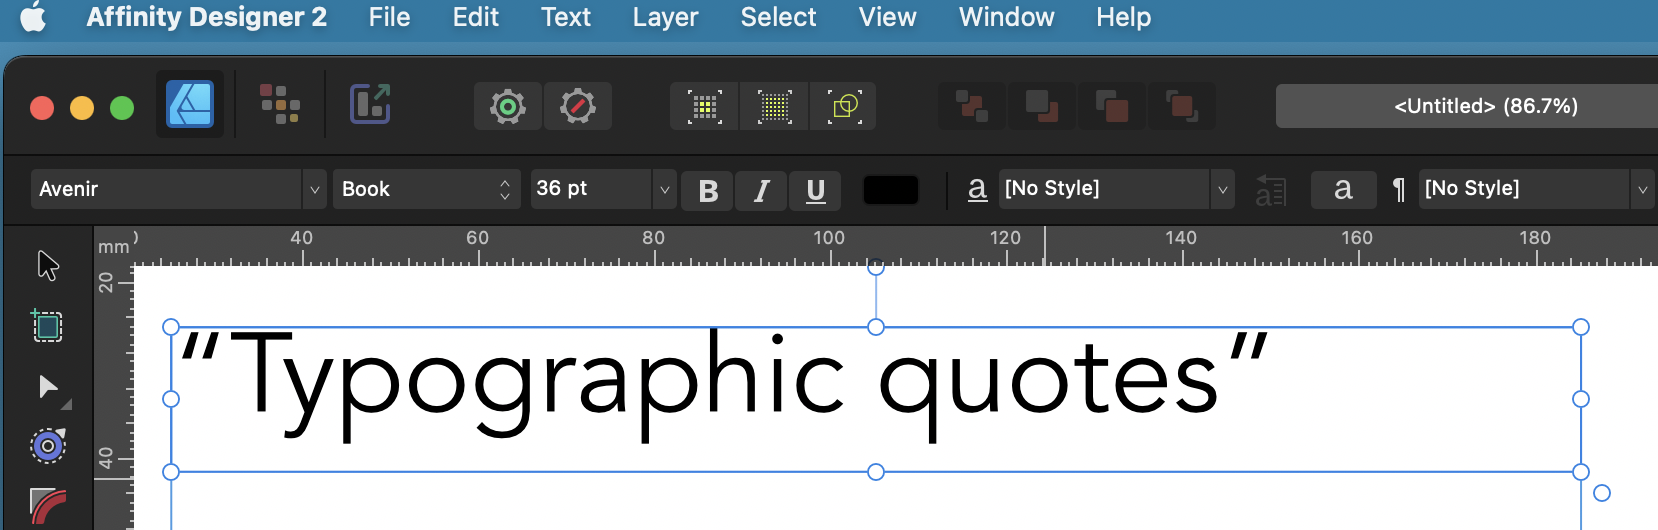
Curly Quotes and Older Text Syles in V2
h_d replied to Angelika's topic in Affinity on Desktop Questions (macOS and Windows)
As far as I can see, the only way to get correct typographic quotation marks in Designer is to use old-fashioned key combinations rather than 'smart' quotes. On macOS these are as follows: Open double quote: option (or alt) plus open square bracket; Close double quote: shift+option (or alt) plus open square bracket; Open single quote: option (or alt) plus close square bracket; Close single quote (and apostrophe): shift+option (or alt) plus close square bracket. (Back in the day I remember learning these on Aldus Freehand because it wouldn't do smart quotes either. Plus ça change...) I don't know if they're the same on Windows, hopefully someone will.
-
AF PHOTO v2 - GUIDES Technical Question
h_d replied to ButchZ's topic in Affinity on Desktop Questions (macOS and Windows)
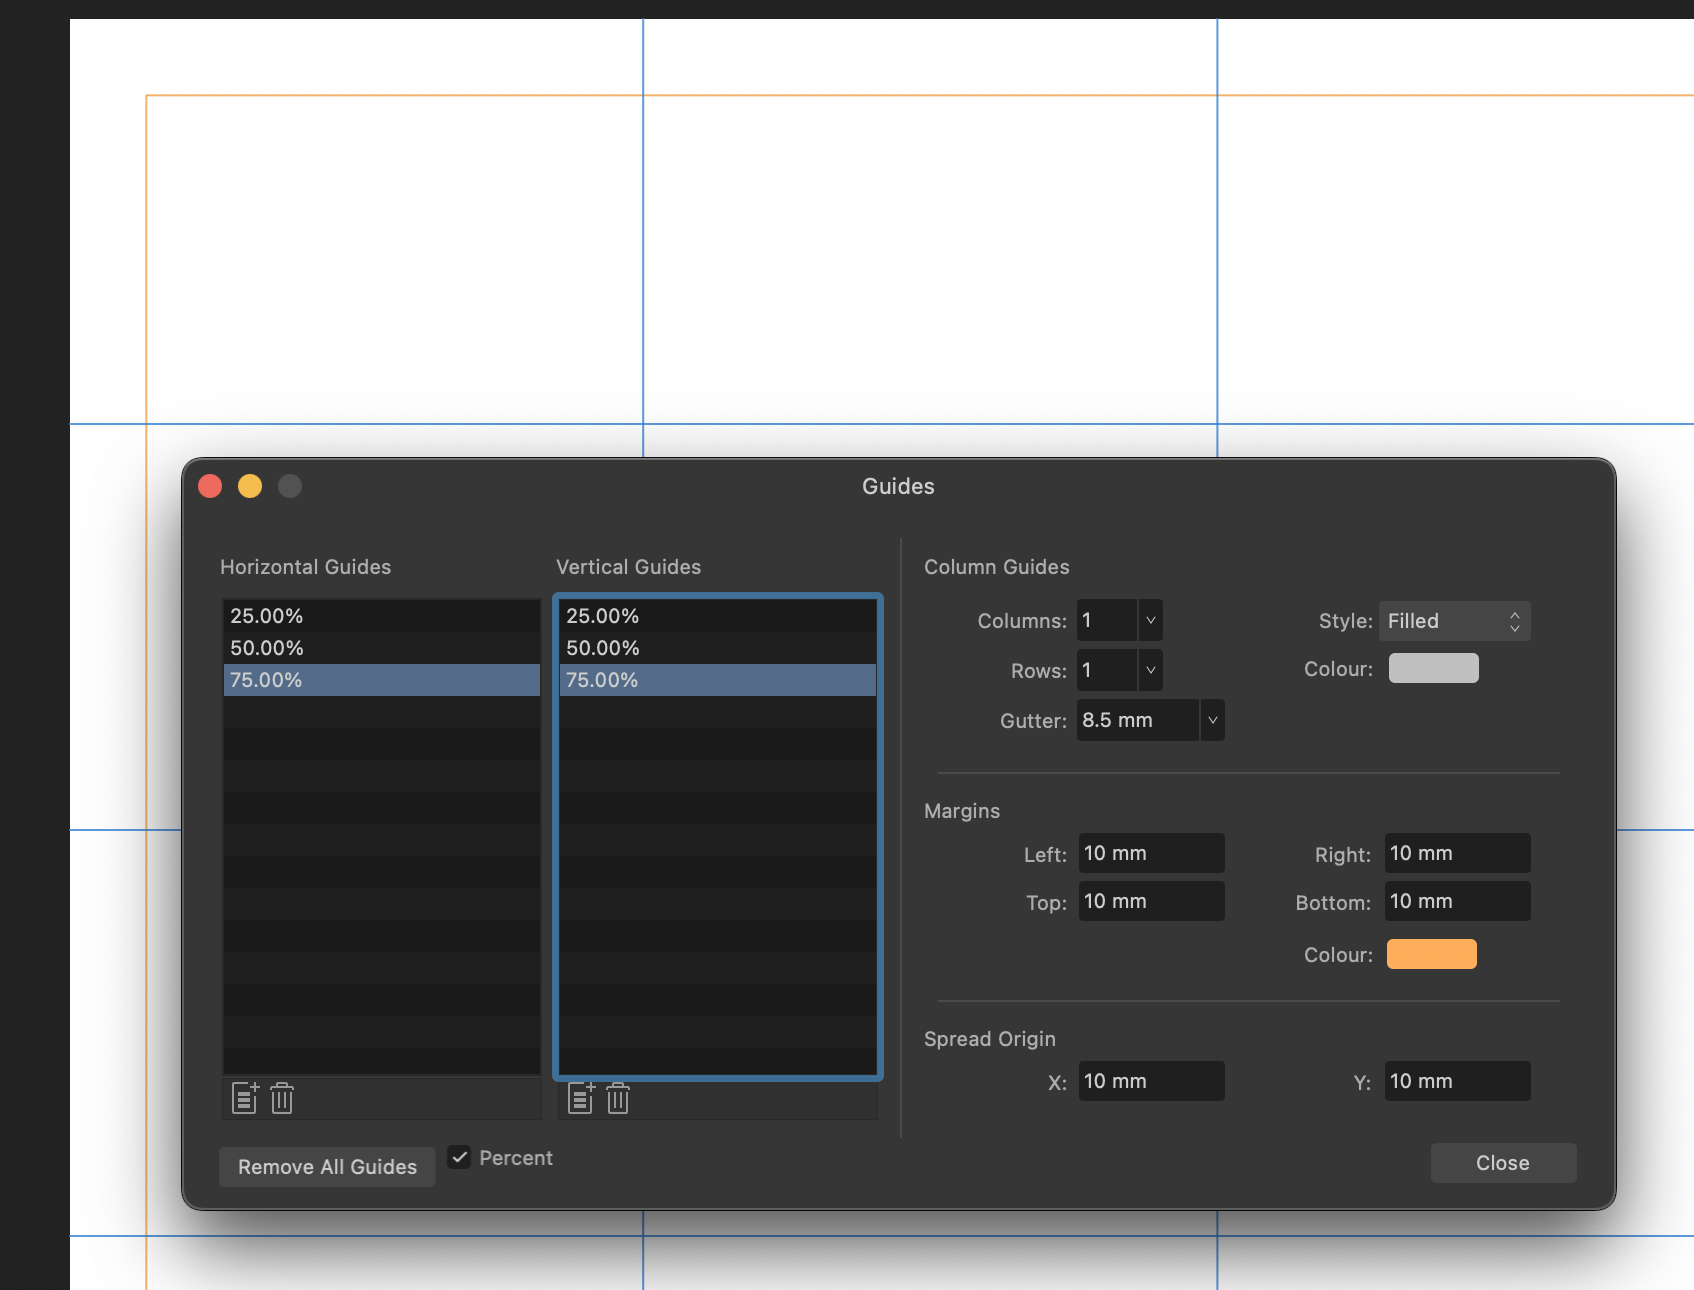
Just a thought: if you set the margins to 0 you can use Column Guides for your 4x4 grid and colour them however you want:
-
AF PHOTO v2 - GUIDES Technical Question
h_d replied to ButchZ's topic in Affinity on Desktop Questions (macOS and Windows)
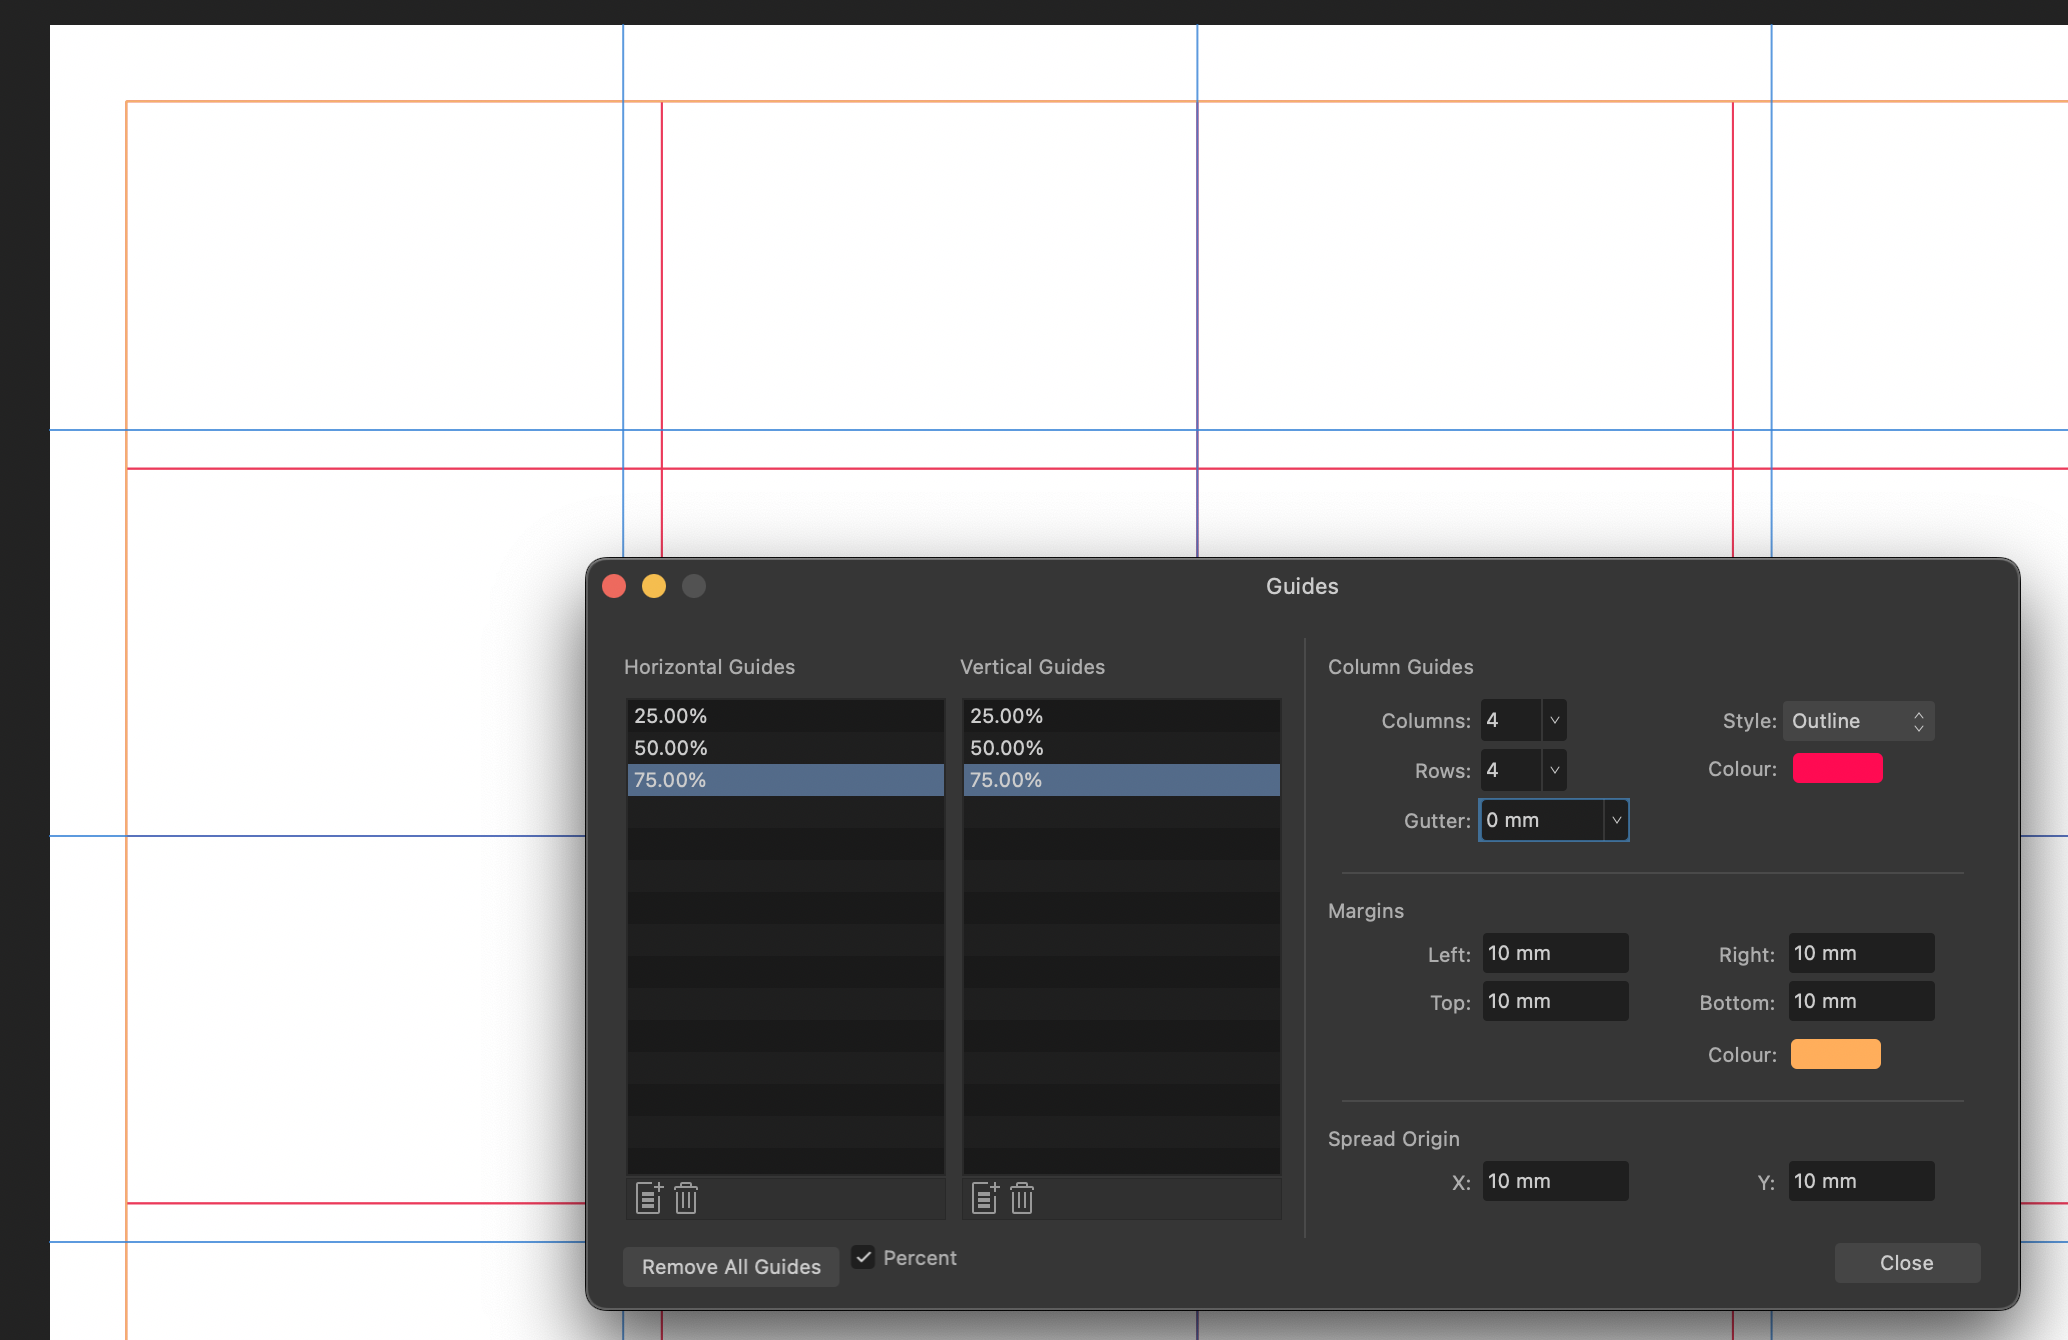
From this screen grab with slightly larger margins than yours, I think it's fairly clear that the origin of percentage-type blue guides is the edge of the paper, not the margins: You can confirm this by drawing rectangles that precisely fit one of the 16ths - they align to the edges of the document: Column guides, by contrast, (coloured red here) originate from the top-left intersection of the margins It's up to you to use the different guides and the margins how you want - there's a lot of flexibility.