MikaG
-
Posts
39 -
Joined
-
Last visited
Everything posted by MikaG
-
 I want to chime into this as well. After I have upgraded to Portrait Pro v17 Affinity Photo crashes on launching the plugin. With the recent update to AP 1.6.7 I crossed fingers, that the announced plug-in support would cover Portrait Pro too, but unfortunately the same crashes occur reproducible all the time...
 -
Fuji files
MikaG replied to Geminitiger's topic in Pre-V2 Archive of Affinity on Desktop Questions (macOS and Windows)
While Fuji's RAW-files render strangely in Adobe Camera Raw, I find Affinity Photo rather poor, where RAW-conversion is concerned. Reason being, highlight recovery and lifting shadows is rather poor compared to the rest of the bunch. I read somewhere, that one could change the conversion engine in AP, but personally I have never tried, because Capture One leaves nothing to be desired, IMO. -
New layer naming
MikaG replied to Jim Monson's topic in Pre-V2 Archive of Affinity on Desktop Questions (macOS and Windows)
I second that! By pressing and holding the Alt/Opt key and clicking on the "add new layer" icon, one can rename the layer at once in Photoshop, for instance. Please add this feature in AP/AD as well! -
To simply copy Lightroom or Adobe Camera Raw settings won't give the look of any given camera profile. Algorithms are ideed different between all applications, not to mention custom curves and some secret sauce under the hood. So, no there is no chance, as far as I know, to replicate Fuji's color profiles. But LUTs would be my best guess too.
-
Ich habe im Rahmen des 10-tägigen Probeabos die Tutorials zu Affinity Photo angesehen und finde sie sehr hilfreich. Olaf Giermann geht im Workshop die Themen lösungsorientiert an und zeigt dann, wie es mit AP umgesetzt wird. Er featured nicht die immer wieder gleichen Themen, wie sie sonst überall angeboten werden. Dabei gibt er wertvolle Tipps, die auch auf alle anderen Pixelbearbeitungsprogramme zutreffen. Das Tutorial zum schnellen Einstieg ist später mit einigen Überschneidungen zum Workshop, aber gerade bei den Grundlagen (die ich eigentlich überspringen wollte) kommen praktische Tipps am laufenden Band, die den effizienten Umgang mit AP ausbauen. Das habe ich vorher so auch noch nie gesehen. Beide Tutorials sind inhaltlich sehr wertvoll und ich kann sie nur empfehlen! Einzig, das Tutorial zu Affinity Designer musste ich abbrechen, da Monika Gause so monoton klingt, wie Angela Merkels Neujahrsansprachen. Das ist nur etwas für ganz Hartgesottene... Schade!
-
NIK Software Plugins
MikaG replied to ay11's topic in Pre-V2 Archive of Affinity on Desktop Questions (macOS and Windows)
Just make sure you have the latest Versions of the Nik Collection installed and set proper paths in AP in the Plugins preference panel, like stated in post #7. No need for Nik support. At least it works for me this way. -
The basic training just came out three days ago. I am sure, some advanced courses will follow. Maybe also some advanced realworld photo treatments from start to finish.
-
The app has only one review in the german App Store. Two stars and rather disappointing description of the trainer. He's seems to be learning the prog himself on the fly by trial and error...
-
Video2Brain has it already. So I guess it's in the pipeline at Lynda, too. :rolleyes:
-
Great to see'em coming! It was just a matter of time, actually, since Video2Brain (Lynda's german subsidiary company) already released two complete trainings for AP last year. https://www.video2brain.com/de/affinity-photo It's good to see the Affinity crowd grow!
-
I know, I'm late to the party. Anyway, a big thanks for this set of brushes! These rock!
-
Danke, Newstone! Ich habe bisher nur kurz die freien Videos angesehen und werde mir das Tutorial besorgen. Olaf ist ein klasse Tutor und die Inhalte scheinen doch mehr in die Tiefe zu gehen, als die freien Videos im Netz.
-
Hallo, hat jemand Erfahrung mit dem 'Praxis Workshop' von Olaf Giermann für AP gemacht? Ansich gibt es ja genügend freie Tutorials, aber Olaf ist genial und ich hoffe auf tiefer gehende Tipps, als das Material, das überall zu sehen ist.
-
How-to: Sharpening with edge masks
MikaG replied to MikaG's topic in Tutorials (Staff and Customer Created Tutorials)
3. Cmd + L adds a Levels adjustment layer. I applied roughly the same settings, as I did in my first tutorial. Now a really cool feature comes into play. In the Levels dialog box choose the Merge button in the upper right corner (actually rather centric, to be more precisely) and the Levels adjustment layer will be automatically merged/applied to the mask layer underneath. Another way to do this would be to make the Levels adjustment layer active in the layers palette and press Cmd + E, which also merges the adjustment layer down to the next pixel layer below, which happens to be the mask layer in this case. HINT: This method works with any adjustment layer. From this point on all the afore mentioned methods still apply to create the edge mask and I won”t repeat these here. Just look into my first tutorial and continue with number 6 from here on.
-
How-to: Sharpening with edge masks
MikaG replied to MikaG's topic in Tutorials (Staff and Customer Created Tutorials)
2. By pressing Cmd + I the grayscale layer is inverted and applying the Detect Edges filter reveals a base mask.
-
How-to: Sharpening with edge masks
MikaG replied to MikaG's topic in Tutorials (Staff and Customer Created Tutorials)
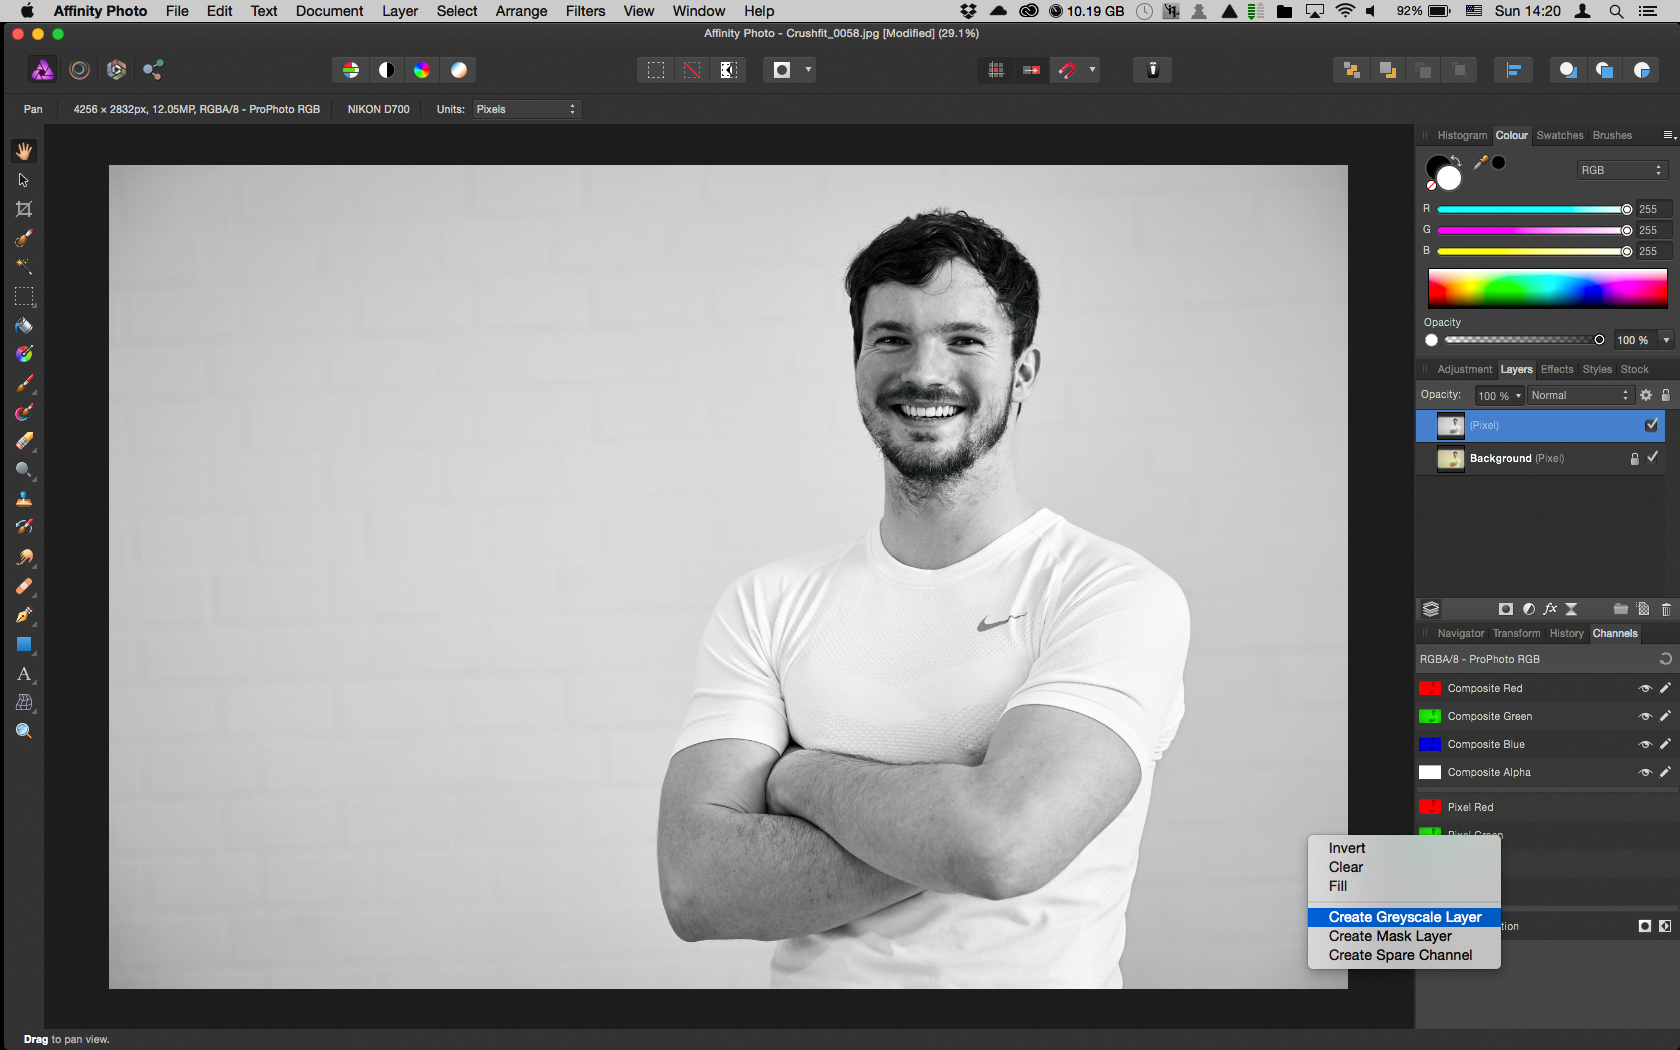
As I dug deeper into AP - well, the help file obviously really helps - I finally got a grip on the Channels panel. Using channels makes life a lot easier, where masking is concerned. So, I decided to give a little update on my workflow. I’m still learning how AP works, so tweaking methods here and there happens a lot to me at the moment. Let’s get started with edge masking 2.0. 1. I chose the green channel, which provides the most details and right clicked on Pixel Green to choose Create Grayscale Layer which adds a new black and white layer in the layers palette.
-
How-to: Sharpening with edge masks
MikaG replied to MikaG's topic in Tutorials (Staff and Customer Created Tutorials)
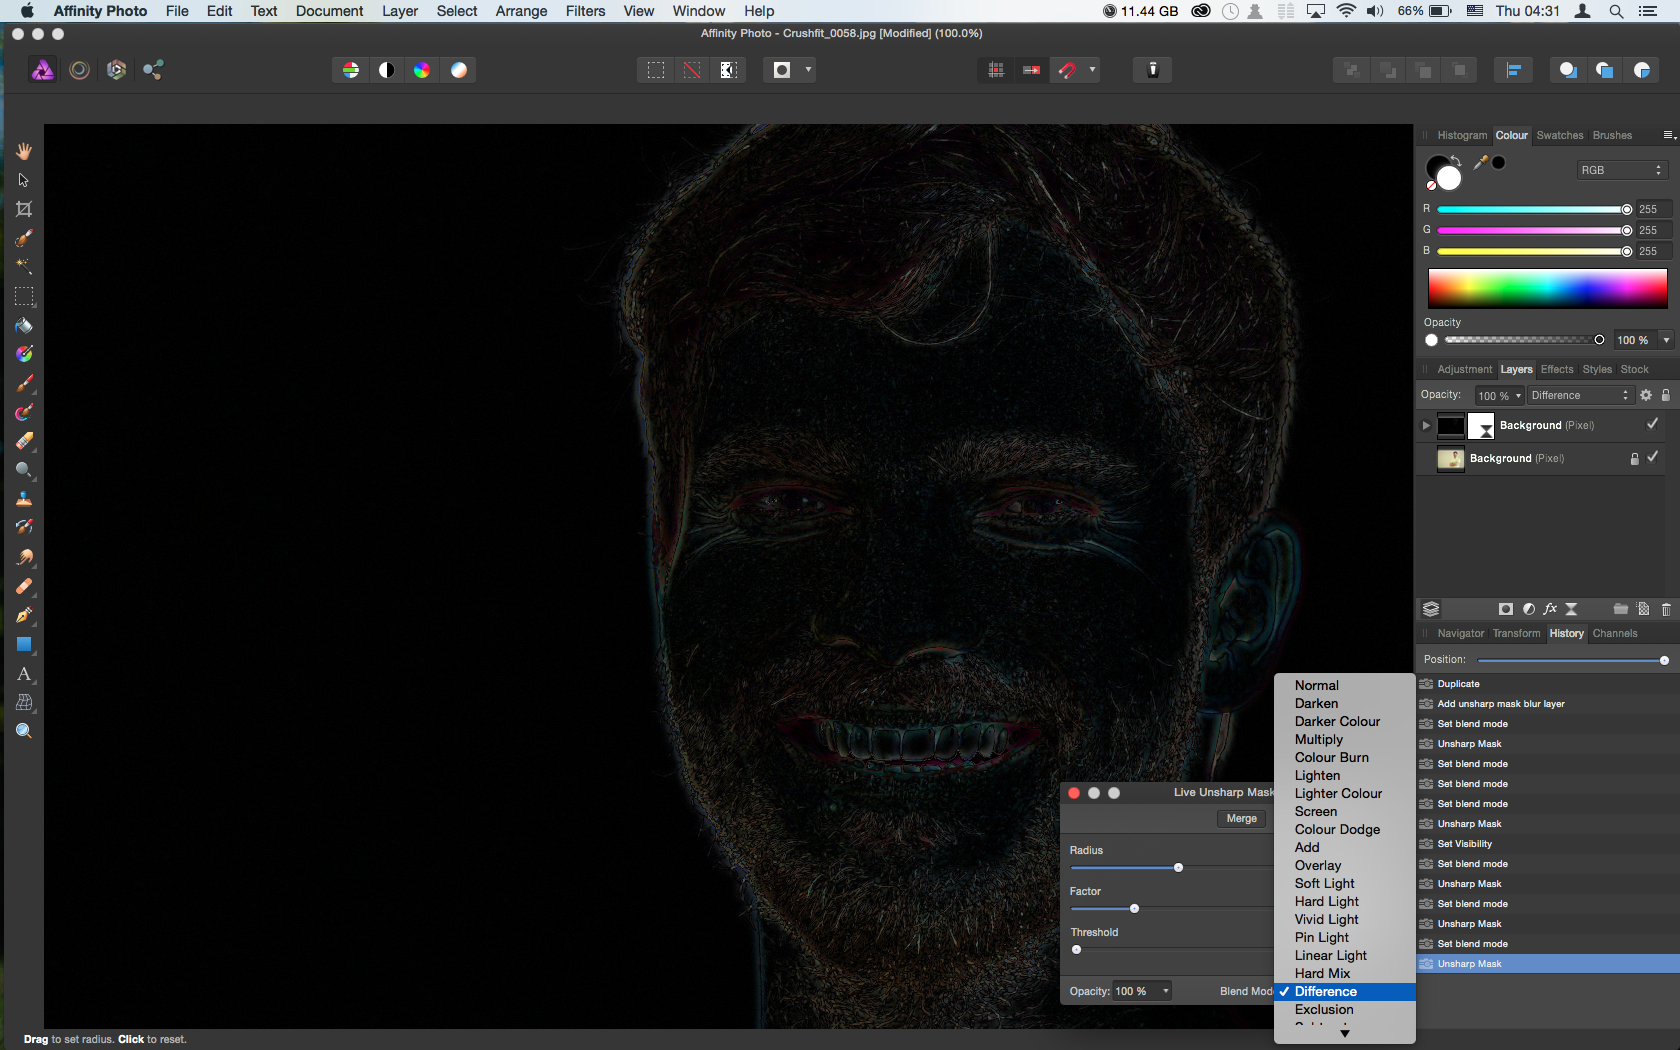
I haven't figured this out enough yet and maybe I got you wrong. But with Difference you can only estimate the radius of pixels that are affected by the threshold settings. It can't give a reliable preview of the strengh of USM. In my 12 megapixel example I can see faint changes in the Difference "preview" when I adjust the Radius value to 1% and it becomes even more obvious at the Radius of 2. Factor and Threshold I left untouched. Just make sure to view zoomed to 100% to get a representative pixel by pixel view on your display. I agree, it would be great to have a more precise preview of each of the settings just by holding the Alt key, like Adobe Camera Raw does. But at the end of the day I'm fine with this method because I use edge masks anyway to protect from unwanted sharpening. -
How-to: Sharpening with edge masks
MikaG replied to MikaG's topic in Tutorials (Staff and Customer Created Tutorials)
I know, it's a crutch. But you might get that threshold preview by changing temporarily the filter's blend mode to Difference. I duplicated the layer, applied a USM live filter and set the blend mode to Difference. Difference will show you a preview of altered pixels compared to the layer below. You get an idea of how much pixels are affected by the USM filter. Of course you have to change back to Normal blend mode, to actually see the amount of sharpening you have applied. As I said, it's a crutch, but maybe worth trying...
-
Astropad reduced to 9,99€
MikaG replied to anon1's topic in Tutorials (Staff and Customer Created Tutorials)
Ain't there other pens out there? On the Astropad website they give recommendations for pens that work with poor man's iPads. ;) -
How-to: Sharpening with edge masks
MikaG replied to MikaG's topic in Tutorials (Staff and Customer Created Tutorials)
You kind of get a threshold preview when using the high pass filter. It affects mostly the edges in an image and leaves gradient portions untouched. I prefer high pass sharpening with people portraits almost all the time. USM serves better with lots of tiny details in an image. I only chose USM in my example, because it saved some additional steps like selecting blend modes like Overlay or Soft Light with high pass sharpen. -
How-to: Sharpening with edge masks
MikaG replied to MikaG's topic in Tutorials (Staff and Customer Created Tutorials)
Voilà! Details in the image are tack sharp right now and all the skin pretty much is untouched by the sharpen filter. Check out the before and after and readjust the sharpening sliders if you wish. This procedure is applied quickly even if it has several steps. Once the function of Actions is added to Affinity Photo it will become a task even faster. To me it is absolutely worth the extra 60 seconds to get even better results with edge masking the sharpening effect. I have set custom keyboard shortcuts for most of the filters, so this speeds up its usage. This method is totally influenced by Deke McClelland, who is one of the Photoshop Gurus and all the credits belong to him. After some trial and error I was able to translate his method to Affinity Photo and I hope to help some of you to achieve better results with sharpening techniques. Same rules apply to landscape photographs, architecture, still life… you name it. Play with the radius’ values depending on your sensor size and desired ‘focus’ of the sharpening effect. Enjoy! -
How-to: Sharpening with edge masks
MikaG replied to MikaG's topic in Tutorials (Staff and Customer Created Tutorials)
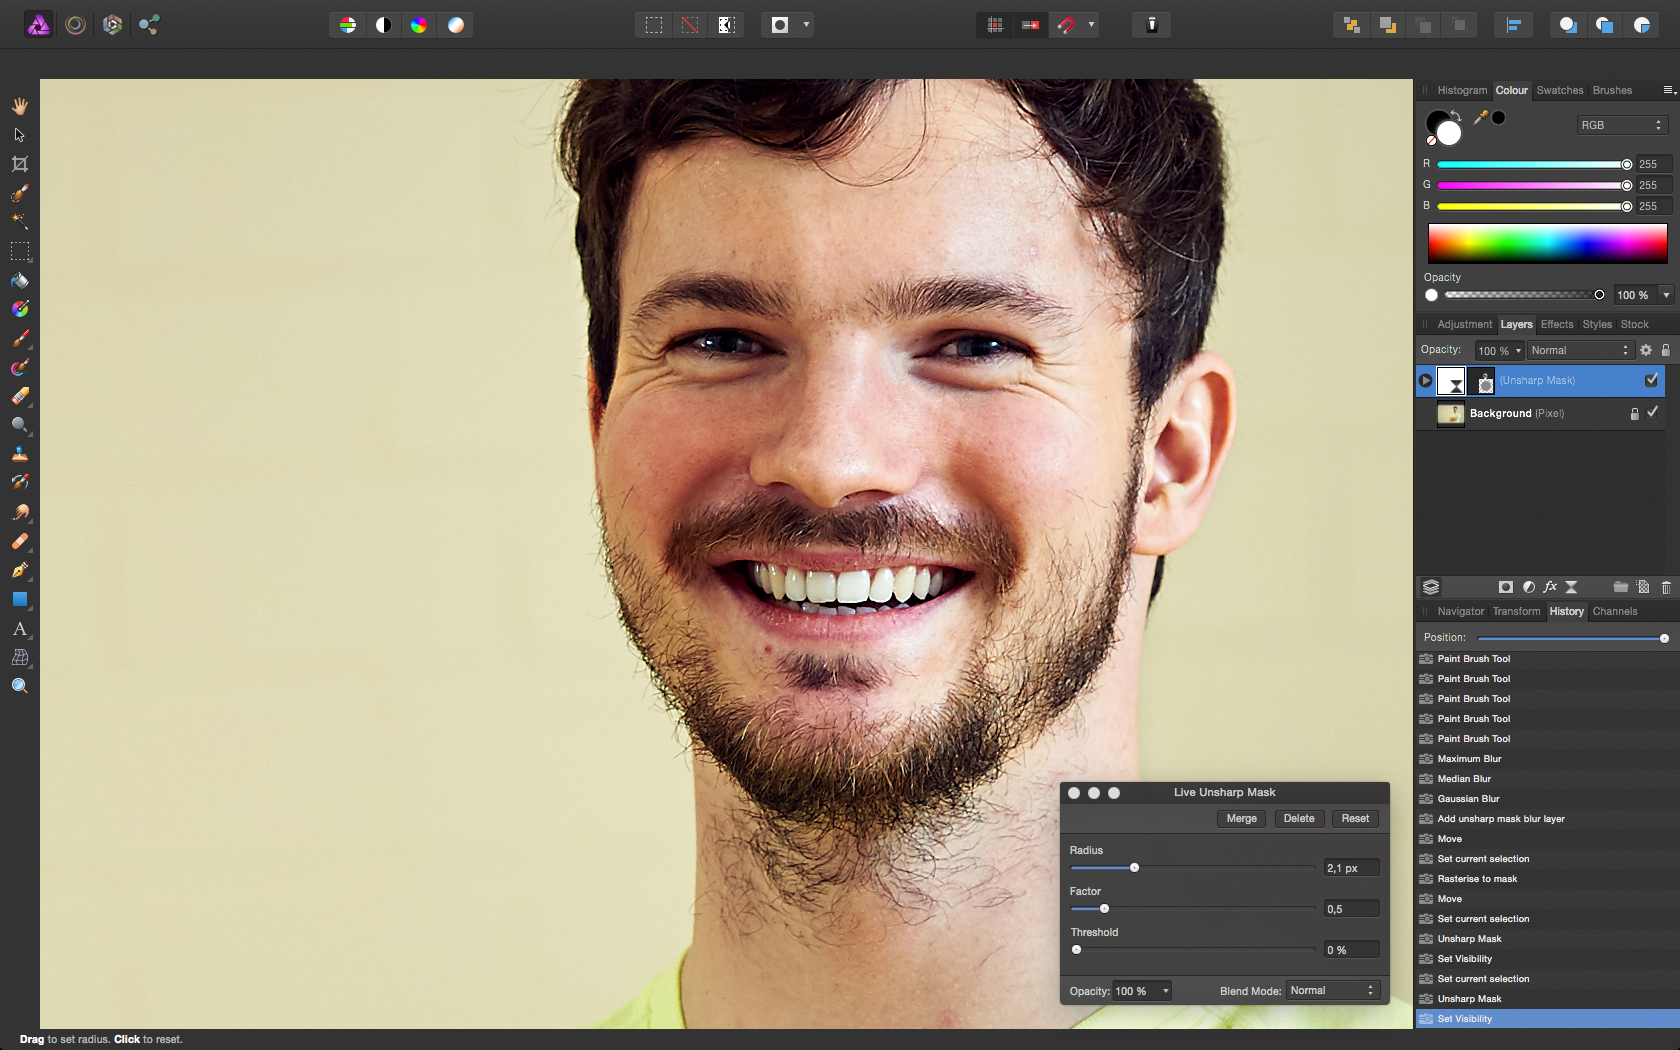
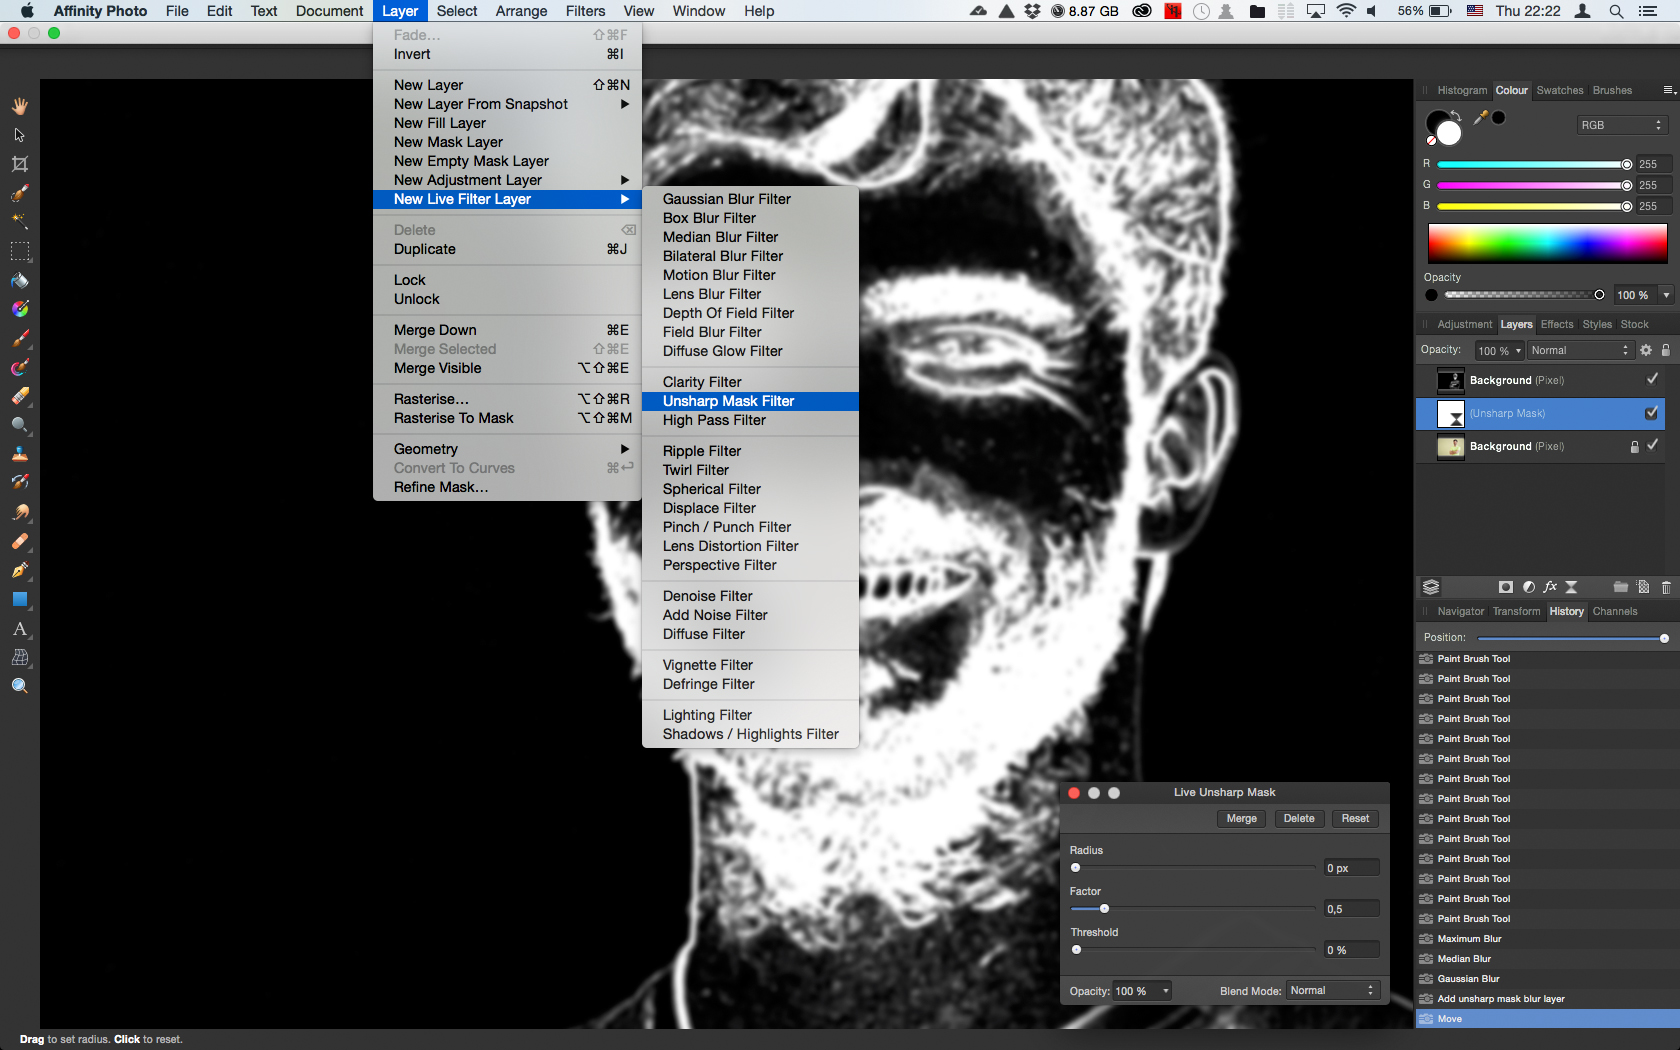
12. Pull down the mask layer onto the Unsharp Mask layer icon to put the mask in place. Now double-click on the Unsharp Mask layer icon to adjust the sharpen values. Pull up the radius to the desired amount of sharpening. I set the radius to 2,1 pixels.
-
How-to: Sharpening with edge masks
MikaG replied to MikaG's topic in Tutorials (Staff and Customer Created Tutorials)
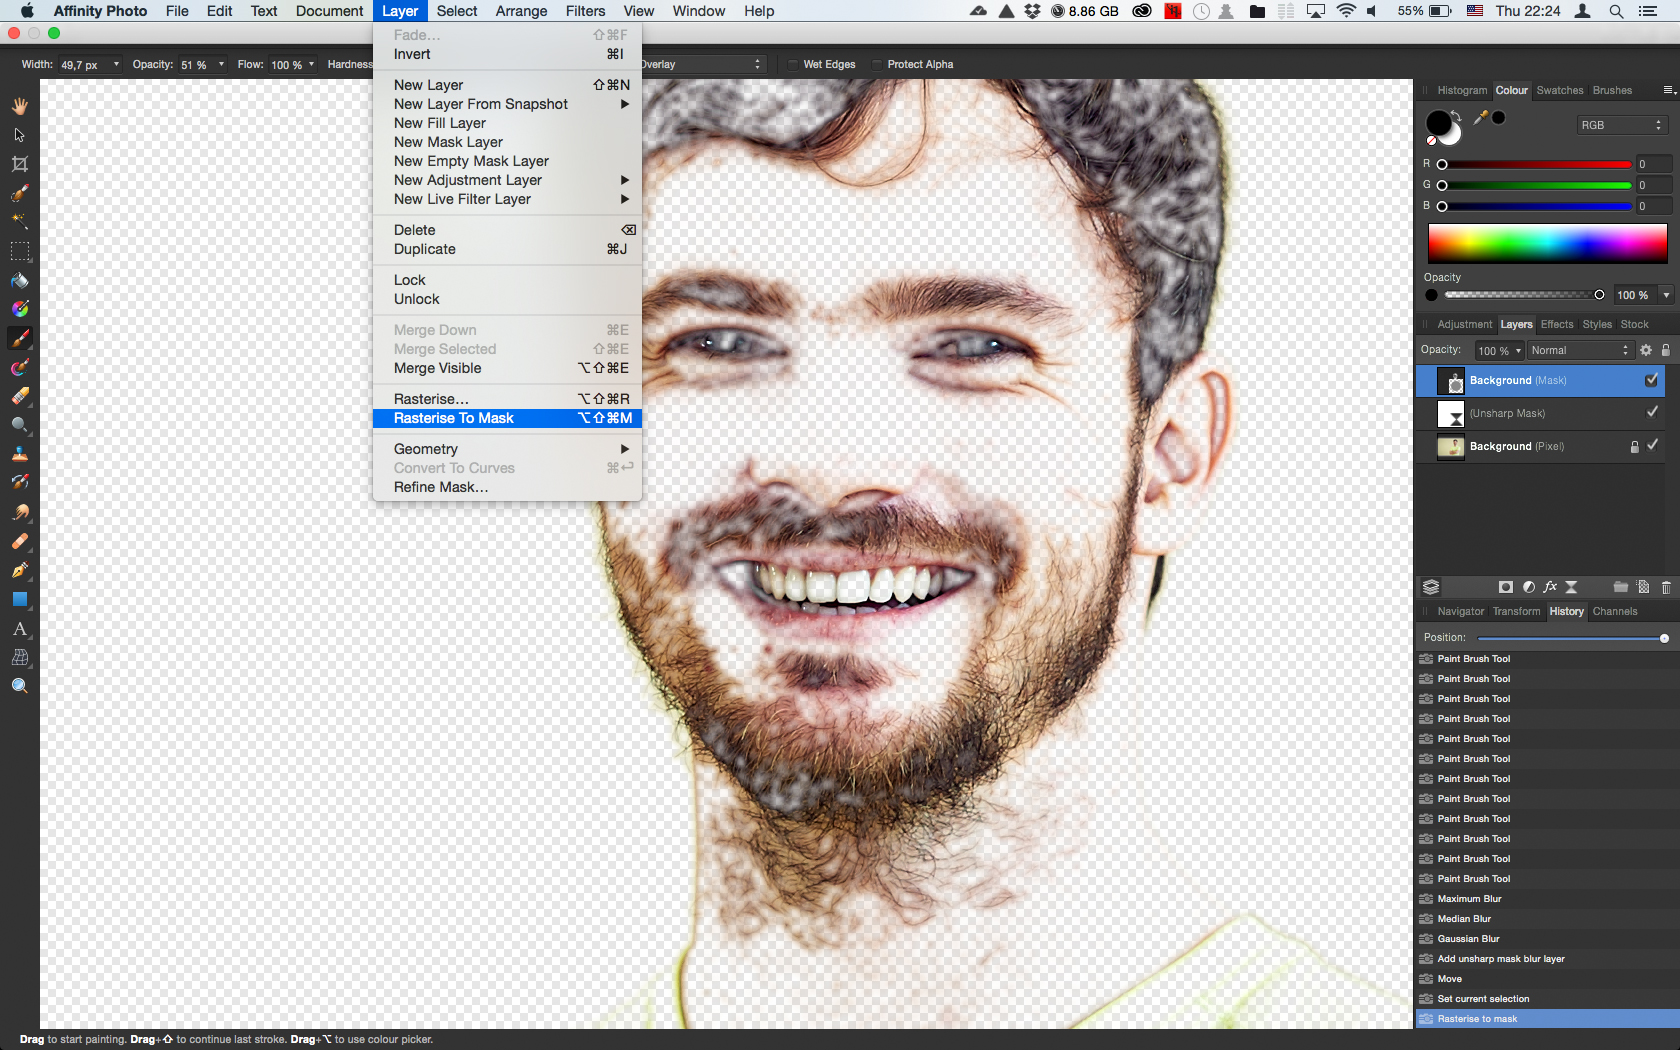
11. Activate the mask layer and choose Rasterise To Mask from the layer menu. Suddenly you can already see which portions of the image will be unaffected by the mask, i.e. sharpened.
-
How-to: Sharpening with edge masks
MikaG replied to MikaG's topic in Tutorials (Staff and Customer Created Tutorials)
10. This is the final version of the sharpening edge mask. Now it has to be applied to a sharpening filter to unfold its magic. Add a Unsharp Mask Live Filter and reorder the mask layer above the Unsharp Mask filter layer.
-
How-to: Sharpening with edge masks
MikaG replied to MikaG's topic in Tutorials (Staff and Customer Created Tutorials)
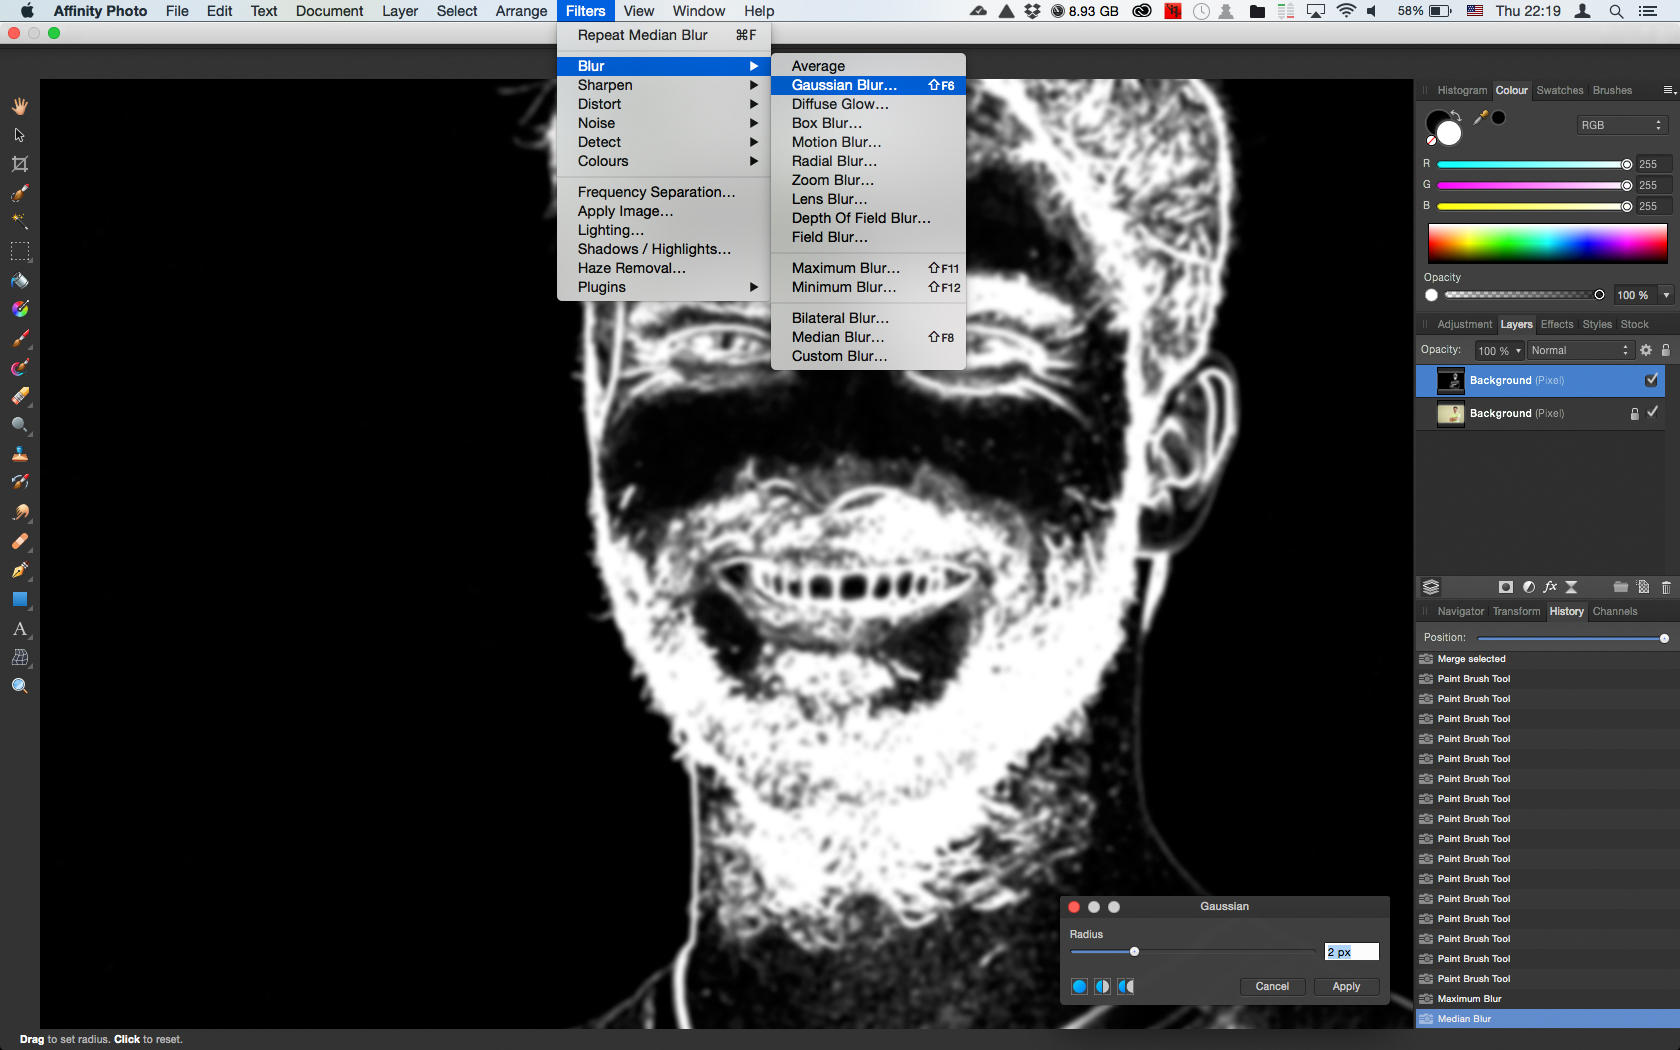
9. The last filter that is going to be applied is good’ole Gaussian Blur. Once again, the double amount of radius of the Maximum filter is a good value. In my case I chose 2 pixels.