
CircularWebs
-
Posts
19 -
Joined
-
Last visited
Reputation Activity
-

 CircularWebs reacted to firstdefence in Resize pasted objects
Make ya balls bigger, completely safe, GMO free, totally natural. No squirrels were harmed during the making of this video.
-
CircularWebs reacted to MEB in rulers percentage
Hi gazbirtles,
Welcome to Affinity Forums
It's not possible to change the grid/rulers to percentage (although you can set guides using percentages).
You can use snapping to easily centralise objects. Check the video tutorials below for more information:
Snapping and Dynamic Guides Snapping: Candidates Snapping: Object Creation Snapping: UI and Web Design -
CircularWebs reacted to bor in how to using Affinity Dsesigner for WPAP style..?
It's quite simple, just draw geometrical shapes on desired image.
Here You Have an detailed tutorial (for illustrator but it works the same way) https://design.tutsplus.com/tutorials/how-to-create-a-geometric-wpap-vector-portrait-in-adobe-illustrator--vector-16102
-
CircularWebs reacted to Mensch Mesch in AD Snowflake template with symbols for Affinity Photo/ iPad
In this short tutorial I'll will show you how to create an Affinity Designer template with nested symbols to draw snowflakes, ice crystals and other interesting things in all Affinity products.
The content of this tutorial isn't new but I think at this time of year a nice idea to draw some nice snowflakes, ice crystals, stars...
Have fun to draw your own...
and keep on drawin'
Norbert
-
CircularWebs reacted to MaryLou in How to draw a spiral
I was able to make a spiral following your instructions but wow.... what a LOT of work!! I think I'll lay off the spirals until Affinity adds that abiliby.
-
 CircularWebs got a reaction from dmstraker in Luminar 2018 notes
Thats really DEEP man........ Thanks for the plugin ref... although I'm not planning this step, how would using as a plugin affect Luminar as a stand alone app?
-
CircularWebs reacted to dmstraker in Luminar 2018 notes
I'm an inveterate tech twiddler. Anything new, I've got to have a go. That's how I found Affinity and it's now my main editor. Luminar has been doing well on the Mac and just out for PC so I thought I'd give it a twirl.
Installing as a plugin for Affinity works fine. Just Add in Edit/Preferences/Plugins, giving it C:Program Files/Skylum as the presets folder. It then appears under Filters/Plugins in Affinity.
Overall, it looks a bit like a cross between Nik and On1, with a simplified adjustment stack, applicable on multiple layers, either globally or painted in. It doesn't have On1's smart brush but is easier for using layers. Generally, though, if you like layers, stick with Affinity. Where it does shine is, like Nik, in the range of filters, such as the sunburst effect.
It does seem to be rather a memory hog (which I suspect Affinity is too) because with nothing else running on a 16Gb machine, it goes slowly and you quickly get 'low memory' messages.
-
CircularWebs reacted to R C-R in Fine Art Texture Collection And Clouds
1. Sign into your Affinity Store account at https://affinity.store/
2. Scroll to the bottom of the page & click on the "My account" link.
3. On the page that appears click on "Downloads & Product Keys."
4. On the page that appears, a list of all your downloads should appear with a download button next to each of them.
5. Use the buttons to download fresh copies of the zipped files as needed.
Also, from what I have read if you are a Windows user certain unzipping utilities do not work as well as others (they find errors that don't really exist in the zipped files), but as a Mac user I do not know anything specific about that.
-
CircularWebs reacted to JamesRB in Fine Art Texture Collection And Clouds
I have downloaded the above packages but am unable to unzip them as the clouds package
is zero MB and no sign of the Texture package. Also having supposedly downloaded the zip files I am prevented from being allowed to try again. Any thoughts appreciated.
-
CircularWebs reacted to MEB in Baby Portrait - Photorealistic AD Vector
Hi tinpixel,
Absolutely stunning work! Nice use of blur to add depth to the image as well.
Thanks for sharing and Welcome to Affinity Forums
-
CircularWebs reacted to tinpixel in Baby Portrait - Photorealistic AD Vector
Affinity Designer vector illustration of my daughter at 19-days old.
No pixels or vector brushes used here, just good old fashioned strokes and filled paths. Masks, transparency tool, layer FX and blend modes used where needed and a couple of adjustment layers to tweak the colours at the end.
I'd guess there's around 2,000 elements make up this image - around 500 are individually positioned head hairs, and many of the individual wool strands are actually three strokes twisted together too which ups the object count. With all the blurs and depth of field stuff, it nearly kills my MacBook and takes a good 20+ seconds for the screen to redraw after every zoom or edit on high quality view settings - spent a lot of time in wireframe and low quality mode at the end. When I get a faster Mac, I'd like to add some of the less important detail that's missing to make it more convincing (e.g. the almost invisible eyebrow hairs, more detail to eyes etc.) and tweak some of the bits that are annoying me.
No idea how long it took as I've been working on it on and off in my spare time (which is practically non-existent with a baby) since December - I'd estimate 30-50 hours.
Anyway, hope you like it!
-
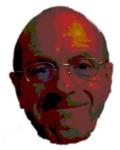
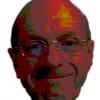
CircularWebs reacted to sumneuron in How to make semi-realistic faces via gradient / gaussian blur shading for pure vector art?
I generally use Affinity Designer for producing simple icons as a pay-once alternative to Adobe Illustrator. After getting pretty ok at doing so, I want to branch out and start making digital art. I have learned mostly just by fiddling and listening to some youtube channels, but also asking others who make digital art. Most of whom use pixel tools to produce the semi-realistic shading and effects. After trying that (and getting some ok results for my first attempt - first image) I wanted to try just making pure vector art using gradient shading / layered gaussian blurs (second image). Neither of these images are particularly good, or complete, but ok enough to encourage me to try and improve. Also the pixel method result in like 1000 layers of small pixel elements with multiple layer effect and small amounts of transparency, whereas the vector version was quicker.
So I am asking if someone could help with figuring out how to make a decent human face using only vector tools. I know (heard from others) that lips and eyes can be pretty hard and that generally one should learn how to draw first - prior to trying to shade digitally ( to better understand lighting and such).
I ask specifically about vector tools because often the crisp nature of vector elements often look specifically out of place.
I can post a layer by layer (only 23 so far) for the vector face to better document how I worked up to where it is.
-
CircularWebs reacted to MEB in Do NON-VIDEO Tutorials exist?
Hi BobsCreek,
Welcome to Affinity Forums
Besides the video tutorials, you can also check the Help file in the program which covers all features/functionality (available online here too).
If everything goes well Affinity Photo Workbook - the official guide - (similar to what we have done for Designer) should also be out soon.
-
CircularWebs reacted to IsabelAracama in Neon lights text effect
Hola,
Some people wanted to know how to achieve a NEON lights text effect in Affinity Designer, so I created this new tut a bit related to the 80's retrowave one I did some weeks ago.
Two simple effects in the FX panel and choosing the right font should be enough to create a nice looking neon graphic. Cheers!
-
CircularWebs reacted to Gear maker in PixelStick
I was just reading a forum entry asking "Does Affinity Offer an On-screen Ruler?" In it there is a mention of an app called PixelStick. I went out to the PixelStick website: https://plumamazing.com/product/pixelstick/, did some reading and I've got to admit the possibilities were exciting. FYI I have no connection to Plum Amazing or PixelStick other than I have just purchased it.
This app is so cool and it only costs $7. It does so many things that AD/AP still do not have the tools to accomplish. The really great feature is that it will sit on top of all other apps so even when using AD/AP it is visible. Though it can be hidden when desired.
-It can be custom scaled using the ruler in AD/AP then be used to measure the distance between any two points at any angle. Likewise any known object size can also be used to calibrate. Of course if the zoom or document dimensions in AD/AP are changed it needs to be recalibrated, which only takes a half minute. Calibrations can be stored so they can be reused say at 100%, 150%, 200% etc. If only it could sense the zoom itself...
-Because it's always shown I can set it for a distance then use it to show where I need to place an object or node. About the only real negative I have found is a node can not be placed on any of the 3 ticks, so they have to be placed close and then moved to be under the tick. Easy to do.
-When moving endpoints a loupe shows an enlargement for more accurate tick placement.
-Each end tick is shown in the center of a circle so planting the tick in the center of a circle is easy. This allows measurements of distance from the center to anything else.
-It displays the tangents for a circle at any angle.
-It displays perpendiculars for any angle.
-It displays the center point and points twice as wide.
-It measures any angle. Plus because it is visible on top AD any angle shown is easy to copy.
-It allows a baseline angle to be set and any angle can be measured or drawn with respect to this baseline.
-It counts the number of screen pixels anywhere on the screen. Not much use in AD, but possibly handy for AP.
-It works on any app currently displayed on the screen.
-It has other functions like a screen grab and a color reader.
-Pressing an opt H toggles it's visibility.
-Angles can be locked so they don't get changed when changing distances or moving.
-Distances can be locked so they don't change when changing angles.
There's probably another couple dozen functions it can be used for that I just haven't found in the couple hours I have been playing. I recommend you take a look to see if it will help you. There is a free download to try it out.
Mike
-
CircularWebs reacted to Alfred in Shirt design with Designer
Welcome to the Serif Affinity Forums, @Threadzpeak.
If your PNG image is designated as '(Image)' in the Layers panel, it is treated as a single object which can only be transformed globally or have adjustments applied to the entire image. In order to work at the pixel level (e.g. to copy and paste only a selected region instead of the whole image) you need to right-click on the layer in the Layers panel and choose 'Rasterize...' to convert it to a pixel layer: the layer type will change to '(Pixel)', and you will then be able to duplicate the selection to a new layer, or copy and use the 'New From Clipboard' option on the File menu if you want a completely separate image.
-
CircularWebs reacted to MEB in Shirt design with Designer
Hi Threadzpeak,
Welcome to Affinity Forums
Yes, Affinity Designer is able to do it. You have to change to Pixel Persona first to be able to work with pixel selections (the second icon right below the traffic lights). Then create the selection with one of the selection tools from the toolbar on right and press ⌘ (cmd) + J to duplicate the selection to a new layer. If you have placed the image over an existing document (instead of opening it directly) using the Place Image Tool or the File ▸ Place command it will be inserted as an Image layer type (you can check this looking at the label between parenthesis after the layer's name in the Layers panel). This type of layer cannot be manipulated at a pixel level. You must rasterise it first going to menu Layer ▸ Rasterise to be able to select and perform pixel based operations on it. Then just hide the original layer and export the file or create a new document and copy/paste the new layer there.
-
CircularWebs reacted to dmstraker in Multi-layer high-pass sharpening (with macro)
A way of sharpening is to add multiple high-pass layers, progressively reducing the radius and increasing the opacity.
Attached is a macro to do this, including the ability to tweak adjustments. Please try it out and let us know here if you find any better adjustments.
Apply it to a duplicate layer so you can switch the adjusted layer on and off to see the difference.
This seems to be quite labour-intensive, including as it readjusts when you zoom in. It can hence be a good idea to merge the effect into one layer (turn off the original layer and layer/merge visible to do this).
You can also try adjusting the opacity of the adjusted layer and even play with blend mode (eg. try Luminosity).
Dave's 6-Layer High Pass Sharpening.afmacro
-
CircularWebs reacted to DanT72 in How to make a logo transparent?
Hi, I need to delete the white background on my logo and make it transparent so I can place the logo in front of my website background. How do I do this in Affinity Designer? Thanks.
-
CircularWebs reacted to MEB in How to make a logo transparent?
Hi DanT72,
Welcome to Affinity Forums
Assuming that you logo is an image (raster) check this post for instructions.
If your logo is composed by vector object(s) set the background to transparent going to menu File ▸ Document Setup, Colour tab and ticking Transparent background.
-
CircularWebs reacted to MEB in How to import brushes textures???
Hi Hugo de Campos,
Welcome to Affinity Forums :)
I don't know to which video you are referring to, but you can find most of the community shared brushes (including some commercial ones) here.
Also check the resources section in the Forum here. If you post a link to the video we may be able to help you further.
-
CircularWebs reacted to bebop in Social media Artboards and export presets for all your social media needs
Thanks! You saved me a bunch of time today!
-
CircularWebs reacted to A_B_C in Social media Artboards and export presets for all your social media needs
Great work, thank you! :)
-
CircularWebs reacted to sach in Social media Artboards and export presets for all your social media needs
Thank you so much Budaloco!
best
alex
-
CircularWebs reacted to michiel in Social media Artboards and export presets for all your social media needs
Thanks Budaloco!