

dhayton
-
Posts
56 -
Joined
-
Last visited
Reputation Activity
-

 dhayton got a reaction from Smee Again in How can I reduce the shadows on my images
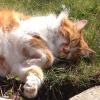
Another way is a sort of dodge and burn technique.
I start by adding a new layer with blend mode set to "Overlay" and filling it with 50%. Then paint on with white (to lighten) or black (to darken) areas. I typically set the brush opacity to about 5% so that the adjustments are subtle. You can always go over particular areas multiple times if needed. And if you lighten it too much, paint back over with black.
Just another option.
I've attached a quick (and I stress quick) example of what I mean (your original is on the left, my adjusted version is on the right).
-
 dhayton got a reaction from BiffBrown in Gradient Tool vs Gradient Map adjustment
Hello alescspra—
The gradient map lets you selectively color luminosity ranges of a photo (either color or b&w). Very crudely, the left end is the darker ranges; the right is the lighter ranges; the middle is, well, the midtones. If you select one of the stops on the gradient map, you can change the color used to replace the tone you're working on. I realize that might be a bit confusing, so you might look at the video I made that uses the gradient map to give a photo a vintage look. The first thing I do is apply a gradient map, about 10 seconds in:
I will try to make another video showing a more robust use for the gradient map—you can use it to create sepia tones (sort of what I did in the video) or selenium or tinted b&w.
Best,
Darin
-
dhayton got a reaction from BiffBrown in Gradient Tool vs Gradient Map adjustment
Alecspra—
I've finally had a chance to make a short video showing one way to use the gradient map. In this case, I used it to convert a color image to a cyanotype image. You could also use the gradient map to create selenium or sepia or Van Dyke or other tinted monochromatic images (e.g., tinted B&W images). Once you have a gradient map that offers a nice starting point, you can save it as a preset and then use it to color other images, adjusting it as needed for each image.
-
dhayton got a reaction from BiffBrown in Create a basic cyanotype image using a gradient map
In response to a question in the "Questions" forum, I created a short video showing how I use the gradient map to create a cyanotype image. I thought it might be helpful to post a link to the video here in the "Tutorial" forum too (perhaps not everybody lurks in the various forums just waiting for a new post of some sort).
-
 dhayton got a reaction from Jangbu in Create a basic cyanotype image using a gradient map
In response to a question in the "Questions" forum, I created a short video showing how I use the gradient map to create a cyanotype image. I thought it might be helpful to post a link to the video here in the "Tutorial" forum too (perhaps not everybody lurks in the various forums just waiting for a new post of some sort).
-
 dhayton got a reaction from WeiPhotoArts in Gradient Tool vs Gradient Map adjustment
Hello alescspra—
The gradient map lets you selectively color luminosity ranges of a photo (either color or b&w). Very crudely, the left end is the darker ranges; the right is the lighter ranges; the middle is, well, the midtones. If you select one of the stops on the gradient map, you can change the color used to replace the tone you're working on. I realize that might be a bit confusing, so you might look at the video I made that uses the gradient map to give a photo a vintage look. The first thing I do is apply a gradient map, about 10 seconds in:
I will try to make another video showing a more robust use for the gradient map—you can use it to create sepia tones (sort of what I did in the video) or selenium or tinted b&w.
Best,
Darin
-
 dhayton got a reaction from fab4 in A Winter Tree
On a foggy, predawn hike the other day I came across this tree. It seemed to call out for a photo.
-
 dhayton got a reaction from Alfred in A Winter Tree
On a foggy, predawn hike the other day I came across this tree. It seemed to call out for a photo.
-
 dhayton got a reaction from Madame in Photos from a mountaintop
I was experimenting with gradient maps and gradient fill overlays. Two different results.
-
 dhayton got a reaction from stokerg in Photos from a mountaintop
I was experimenting with gradient maps and gradient fill overlays. Two different results.
-
 dhayton got a reaction from noor in Sunrise from Pulpit Rocks
This past Sunday was a great day to be out. Here's the view looking east just after sunrise from Pulpit Rocks overlook (in eastern Pennsylvania).
-
dhayton got a reaction from Madame in Sunrise from Pulpit Rocks
This past Sunday was a great day to be out. Here's the view looking east just after sunrise from Pulpit Rocks overlook (in eastern Pennsylvania).
-
 dhayton got a reaction from Erwe in Sunrise from Pulpit Rocks
This past Sunday was a great day to be out. Here's the view looking east just after sunrise from Pulpit Rocks overlook (in eastern Pennsylvania).
-
dhayton got a reaction from Alfred in Sunrise from Pulpit Rocks
Alfred,
I assumed your question was rhetorical—my comment was meant as a bit of a joke (and the voice in my head as I typed it had that sort of hopeful "if only" tone). In any case, I hope my comments gave you an idea of what I did.
Best,
Darin
-
 dhayton got a reaction from David in Sunrise from Pulpit Rocks
This past Sunday was a great day to be out. Here's the view looking east just after sunrise from Pulpit Rocks overlook (in eastern Pennsylvania).
-
 dhayton got a reaction from Bauke in Sunrise from Pulpit Rocks
This past Sunday was a great day to be out. Here's the view looking east just after sunrise from Pulpit Rocks overlook (in eastern Pennsylvania).
-
 dhayton got a reaction from MattP in Sunrise from Pulpit Rocks
This past Sunday was a great day to be out. Here's the view looking east just after sunrise from Pulpit Rocks overlook (in eastern Pennsylvania).
-
dhayton got a reaction from Madame in Leafless Tree at Valley Forge
Here's a second version, also inspired by platinum-palladium printing.
-
 dhayton got a reaction from JFisher in Leafless Tree at Valley Forge
I was experimenting with gradient maps and recoloring. A sort of bland photo of a leafless tree picked up some character, I think.
-
 dhayton got a reaction from justwilliam in How can I reduce the shadows on my images
Another way is a sort of dodge and burn technique.
I start by adding a new layer with blend mode set to "Overlay" and filling it with 50%. Then paint on with white (to lighten) or black (to darken) areas. I typically set the brush opacity to about 5% so that the adjustments are subtle. You can always go over particular areas multiple times if needed. And if you lighten it too much, paint back over with black.
Just another option.
I've attached a quick (and I stress quick) example of what I mean (your original is on the left, my adjusted version is on the right).
-
 dhayton got a reaction from Plaristo in How can I reduce the shadows on my images
Another way is a sort of dodge and burn technique.
I start by adding a new layer with blend mode set to "Overlay" and filling it with 50%. Then paint on with white (to lighten) or black (to darken) areas. I typically set the brush opacity to about 5% so that the adjustments are subtle. You can always go over particular areas multiple times if needed. And if you lighten it too much, paint back over with black.
Just another option.
I've attached a quick (and I stress quick) example of what I mean (your original is on the left, my adjusted version is on the right).
-
dhayton got a reaction from noor in Leafless Tree at Valley Forge
I was experimenting with gradient maps and recoloring. A sort of bland photo of a leafless tree picked up some character, I think.
-
dhayton got a reaction from Madame in Leafless Tree at Valley Forge
I was experimenting with gradient maps and recoloring. A sort of bland photo of a leafless tree picked up some character, I think.
-
 dhayton got a reaction from Ros in People Walking in Oxford
Here are a couple shots from my recent trip to Oxford. The one a student off to exams. The other a woman returning from Waterstones. Both lost in thought.
-
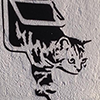
dhayton got a reaction from justwilliam in How do I make black transparent?
Hi TinPianoMan—
Jack’s method works well for making deleting the black in your illustration (or any color). Because I always screw up, I prefer to use masks because they are nondestructive. Here is how I would approach this problem:
Use the flood selection tool
Deselect the “Contiguous” option
Set the tolerance at 25%
Select the white
Create a new mask layer
And finally, deselect the pixels (cmd-d)
I've made a short video showing the process. The same technique can be used for different colors or shades. You can then create separate masks for each, selectively making different parts of the image transparent.
Best,
Darin