Lee D
-
Posts
5,466 -
Joined
Everything posted by Lee D
-
 Something that can effect how images look in Affinity Photo is the colour profile in Windows. See this FAQ post on what to check for in Windows. We also have a Spotlight article on Colour Management within Affinity. If you are still having issues, can you provide any screenshots comparing what you see to Affinity to others?
 -
Can you confirm the model of camera the .CR3 was taken on and your workflow. I can then do some testing on our test iPads when in the office. See this FAQ on also retrieving a crash report from iPadOS with regards to Photo.
-
This has been raised before and the issue may be with how AI is handling the layers within a PDF file, see this thread for more information.
-
Drag Select Not Working
Lee D replied to ArtMaker27's topic in Pre-V2 Archive of Affinity on iPad Questions
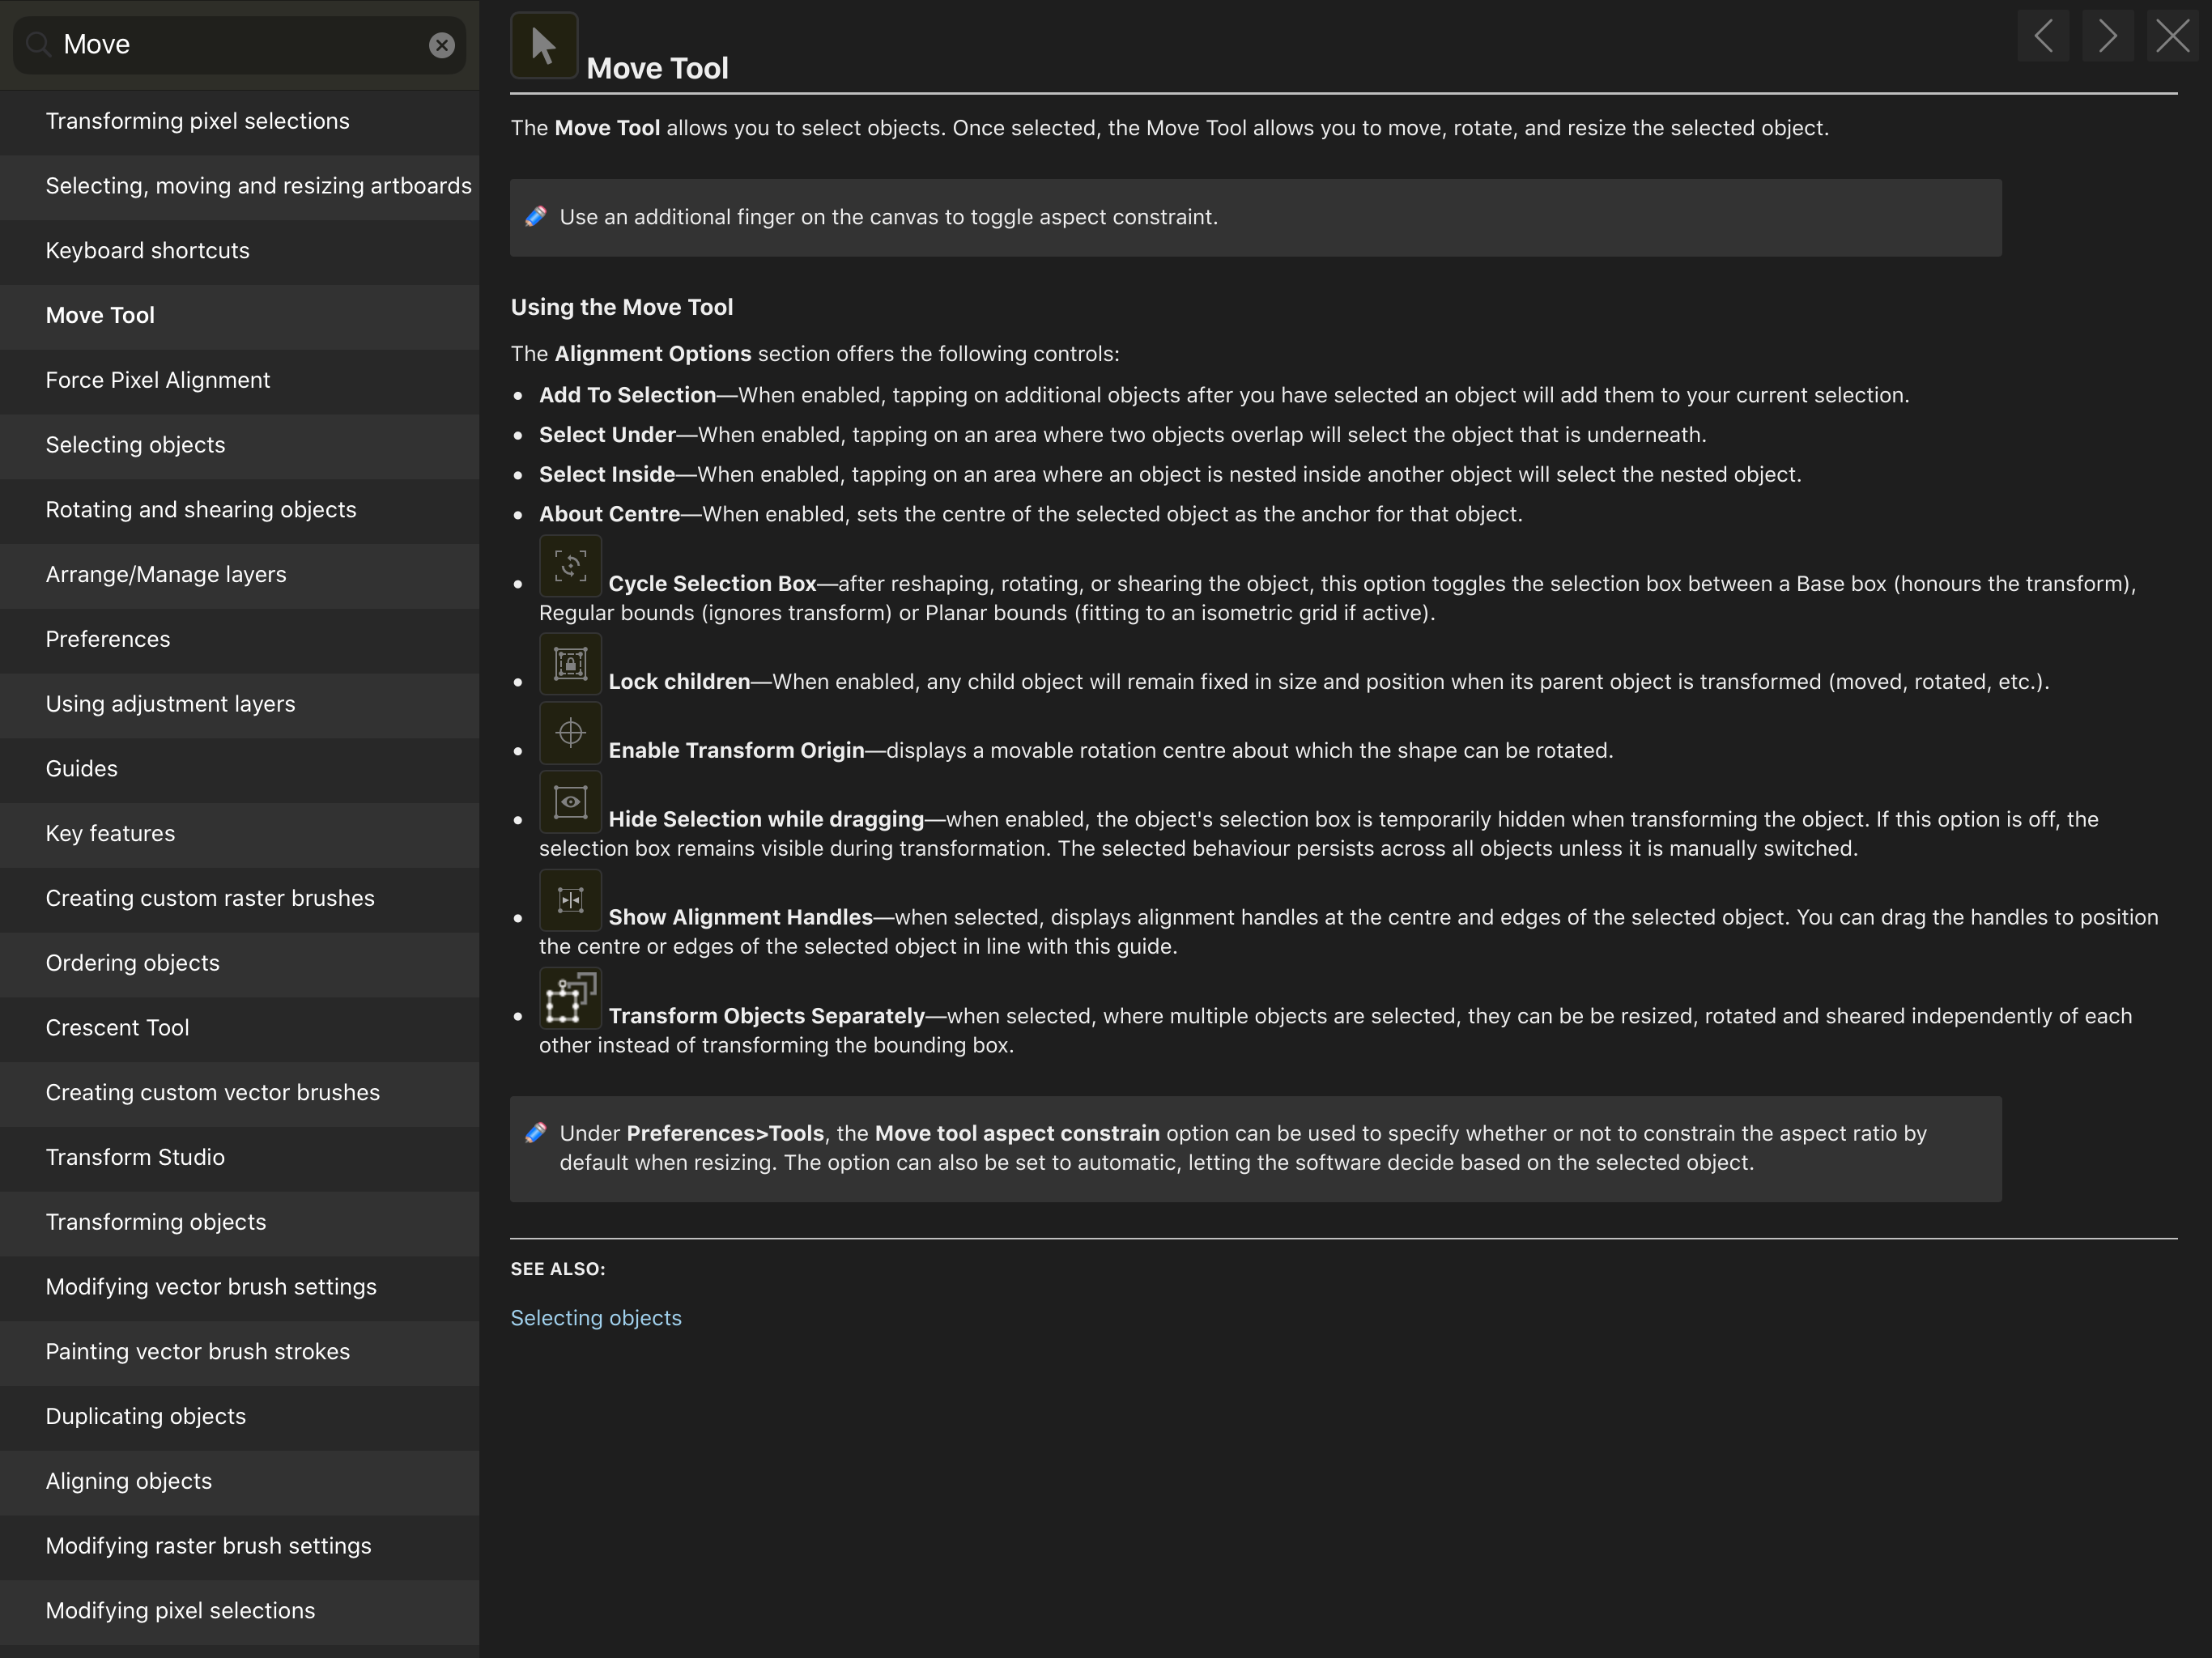
Snapping shouldn't make a difference when drag selecting, make sure the Move Tool is being used. There is an option in the apps Preferences > Tools > Select object when intersects selection marquee. This just means that any objects that have overlapping bounding frames are selected as well. If you are still having issues with drag selecting can you do a quick screen recording. The built in help shows what each of the icons are for on the Context toolbar when the Move Tool is selected.
-
My Inserted Photo Changed Color???
Lee D replied to ArtMaker27's topic in Pre-V2 Archive of Affinity on iPad Questions
If the document is still open, use the History studio to revert back to when you first inserted or before the fill/adjustment was applied to the entire image. -
We have this tutorial available showing how layers can be moved on the Layers studio within the iPad version of Affinity Photo. It's a case of watching for where the blue highlight line is, if all the width of the layers studio this means the layer will be placed there, if halfway it will be moved into the other.
-
If you wish to remove the shapes from the JPEG, select the shape on the Layers panel. Change the layers blend mode to Erase, repeat for the other shapes. Once this is complete you have then use File > Export and select PNG.
-
Email wrong
Lee D replied to Burnt1's topic in Pre-V2 Archive of Affinity on Desktop Questions (macOS and Windows)
The email address is only used in conjunction with the product key during installation. If you purchased direct from Affinity have you updated your account with a new address, this one will be used for you to login to your account and for emails. Updating this won't change the email address used when installing your existing apps. -
When opening RAW files, they will always open in the Develop persona to allow adjustments to be made before moving into the Photo persona. Other image formats will open directly in the Photo persona as most will have already been developed. At this point our RAW engine will try and retrieve the lens data written in the RAW files metadata to apply corrections and also to populate the context toolbar. Sometimes this data can't be read or is missing so no auto correction are be applied, however manually correction can be done in the Photo persona, if the lens make and model is listed. Changes are being made to our lens correction and is currently being tested in our 1.8 betas which you can install alongside your existing version to test.
-
We're aware that SVG files that use this particular method don't correctly open in Designer. This has been logged and passed over to the developers to investigate further, however we don't have a timescale for its resolve.
-
The Batch processing only has a few options available and doesn't use the same RAW processing as the Develop persona. Because of this, images will appear different after the processing to that if you had used the Develop persona. We've had requests to improve this feature and it may be something added in future updates.
-
Does this occur with every document or just that one? Can you export that document to PDF and then print? If it is occurring with just that one file can you PM me a link to download so I can take a look. You can also check to make sure you are running the latest printer drivers. Which version of macOS are you running?
-
@bfleming6164 If you have rotated your image before inserting the text if may be worth using the History studio to go back to before that point. Then switch to the Node Tool and draw a selection around all nodes. On the Context toolbar at the bottom select the Transform Mode icon (third in from right on the top level) and rotate the whole selection.
-
You can reset the Adjustments, which should bring back all the default presets. Hold down the CTRL key and open the app, when the window appears release the key, check Reset Adjustments and click Clear.
-
In Publisher, check to make sure you have the Text Frame panel enabled (View > Studio > Text Frame). Now select the text frame, on the panel set a Stroke colour and then the stroke width by clicking the field next to the colour option. If you're exporting to PDF you can enable printer marks, these will show you where to cut. You can find our online video tutorials online here, scroll to the bottom for some on exporting to PDF/printing.
-
If you access the Adjustments via the icon at the bottom of the Layers panel instead, this will just show a list of the Adjustment and add the adjustment layer and not show any presets.
- 11 replies
-
- 1
-

-
- affinity photo
- adjustments
- (and 3 more)
-
EPS Export Help!
Lee D replied to UNC2K3's topic in Pre-V2 Archive of Affinity on Desktop Questions (macOS and Windows)
The issue will be down to the overall size of the project 10350 x 32250px is large, in other measurements it's 107" x 335" or 2.7m x 8.5m. Usually for designs this big, it's best to design at scale and let your printer do the enlarging. -
From the Run Dialog you'll need to navigate to the below folder, you will find Crash Reports generated by our app. Please send us the .dmp file with the latest Created/Modified Date as they may narrow down the cause of the issue. %APPDATA%\Affinity\Publisher\1.0\CrashReports
-
Operation not permitted Error
Lee D replied to lazaroag96's topic in Pre-V2 Archive of Affinity on iPad Questions
Hi @lazaroag96 where are you exporting to as most read/write permissions are handled by the OS. If Photos check to make sure Affinity Photo has read/write access. Open Settings, scroll down and locate Photo and make sure that Photos is set to Read and Write. -
When exporting to PSD text layers will always be rasterised, this is due to how our export engine works. Our developers do want to redesign and it may be something done in a future update.
-
As @walt.farrell suggests we are aware of an issue where text highlights can't be seen on the pasteboard area when the Artboard or Page isn't also in view. This has been logged and passed over to the developers to look into further.
-
Issues with WMF
Lee D replied to Kaseyh's topic in Pre-V2 Archive of Affinity on Desktop Questions (macOS and Windows)
@Kaseyh We don't provide timescales on fixes as this is down to the developers. We do have available to download and install along side your existing versions our 1.8 betas, fixes will always be added to betas for testing first. -
Can you PM me a link to the brushes so I can do some testing? 可以给我PM刷子的链接,以便进行一些测试吗?
-
Once you have finished using the Pencil Tool, switch to the Move Tool, then on the Context Toolbar you will Fill and Stroke options. In terms of pressure, are you using a pen and tablet or mouse? Have you made sure the brush you're using has pressure or the Controller on the Context Toolbar is set to pressure? With the Pen/Pencil Tools you can adjust the Pressure profile on the Stroke panel to suit your needs.
-
Cannot import abr brushes through icloud
Lee D replied to KCI's topic in Pre-V2 Archive of Affinity on iPad Questions
Brush files (.abr) can be imported from iCloud into our Affinity apps, please make sure you're running the latest versions of the apps (1.7.3) if not the updates will be available through the App Store app.