Craig Deeley
-
Posts
50 -
Joined
-
Last visited
Everything posted by Craig Deeley
-
Mad scientists fun with Designer! designs-that-might-have-been Solid vector fills, effects, and one nice texture intensity brush.

-
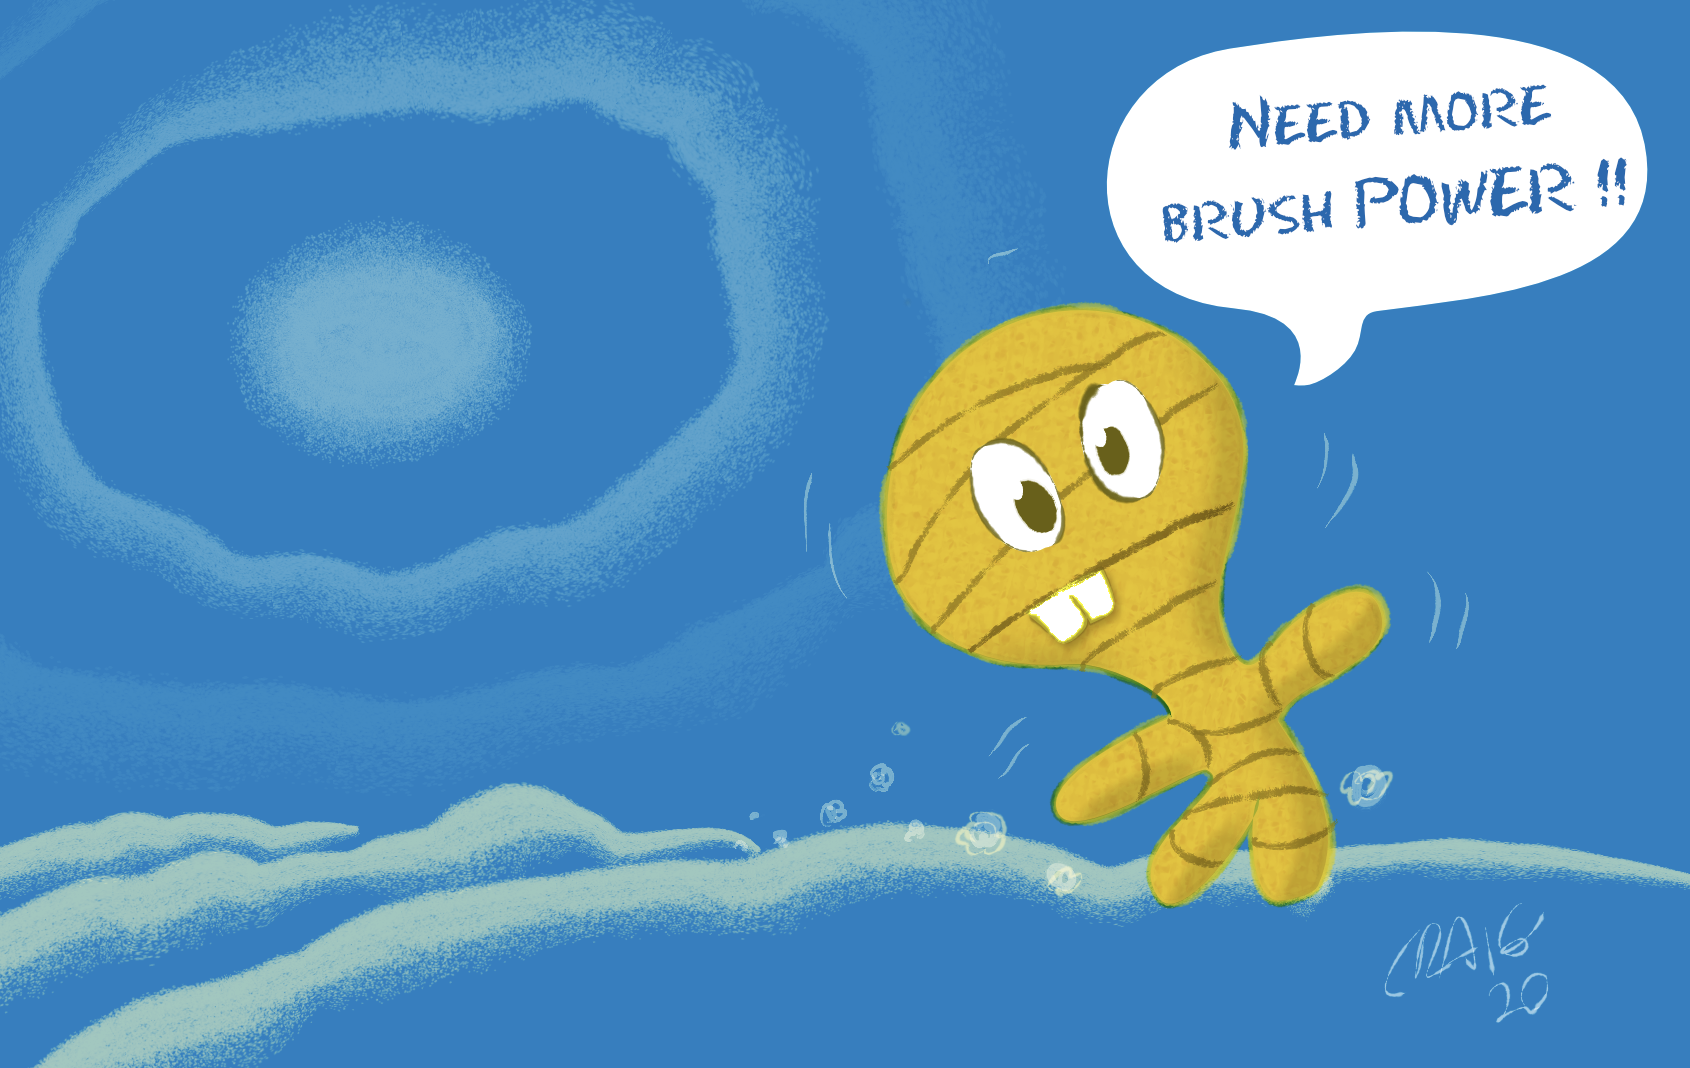
Happy 2020! If a little late. I am posting some interesting experiments with Texture Intensity brushes for Affinity Designer: http://i-toons.com/archive/CD_illustration_brushes2020.afbrushes.zip These were exported from the 1.8.1 version. This set has several focuses. 1. A fascination with Dave Coopers ink line where a stroke expands and shrinks (pressure) as it is drawn. https://www.youtube.com/watch?v=Aj3BxL85UUE 2. In the olden days of Creature House Expression 3 a feature that produced wonderful textured edges on fills was a favorite of mine for adding… wonderful textured edges to fills! The “edge” was applied to a fill and mapped along the edge of the fill. E3 used a similar technique as ADs textured intensity brushes… The trick to make the edge texture was to have basically a half brush stroke. One edge flat. The rest feathered or textured out as desired. The flat edge mapped directly to the fills edge. There was a little extra voodoo with pixel color at the strokes edge as well…) AD doesn’t have this edge feature - but something like it can be sort of faked. ADs brushes map to fills in a different way - they sort of center the stroke halfway over the edge of a fill. To get a brush to “join” to the fill - I made a brush that mirrors itself - with a 100% dark center. The brush must also meet at its ends so it wraps horizontally as well. The mirrored version seems to blend nicely with a fill - and can wrap in either direction (reverse curves). Some sample of how this looks are in the attached image. Sadly the stroke and fill don’t share the same “intensity” - if transparency is dropped… But the textured edge done this way can look ok. Brushes that don’t mirror like this extend out from the fill but often show hard fill edges. A future AD feature in the making. 3. I had been experimenting with hatch and dot pattern edges - looking for an illustration style I admired - and straying into a dot like airbrush look… See attached brushpower image. The hazy moon glow and sand dunes. AD has a lot going for it. The textured intensity brushes are the main reason I dig this software. The brush engine has a long way to go as I have mentioned in the past: Affinity Designer Brush UI enhancement: Affinity Designer brush-ui enhancement Identify and switch Brush and Stroke attributes option/tool: Switch brush With a little more power in the brush features - this would be such a stellar tool! Here's to 2020 and maybe making an illustrators wishes come true! ; ) If you happen to use any of these brushes. Post an example. I love to see how the brushes are used! Enjoy! Craig
-
Animation in the future?
Craig Deeley replied to Raybrite's topic in Feedback for Affinity Designer V1 on Desktop
I would love to see an animation app to go with the rest of the Affinity suite. It's not so far out really. Creature House had an animation twin to Expression3 (E3 was the application that Microsoft Expression became and Affinity Designers direct descendant) called LivingCells, that was very functional and was using the same basic underlying vector engine/content as Expression3. If they could do it all that time ago - I am sure it could be done again. I actually have that last version - but never used it. I animate in Flash (Adobe Animate). Nowadays Flash is being strangled off in favor of 1994 level tech - for animators - but there is no really good new (html5 Canvas at least) development tool that equates to Flash. Almost looks like an opportunity for a company that may already have the fundamental underlying engine. LivingCells is already becoming lost knowledge - but there is no reason why something like it should be lost: https://web.archive.org/web/20080620010851/http://www.livingcels.com:80/about.html Animation for the masses was made possible thru Flash. An animation app is a big ambition. But... Why not! -
After downloading the newest beta 1.7.0.3 I noticed that the Brush related UI hasn’t changed in several years and would like to suggest some productivity improvements. This is my situation. I am looking for a way to identify and switch to a brush quickly and easily from both the Brush menu(s) AND by means of clicking a brush stroke in an image. I have at this point, hundreds (and hundreds) of custom brushes. The previews of these brushes are in some cases very similar. I need a faster way to identify a Brush that may be stored in any of a large number of collections without having to hunt for the brush thru trial and error. My productivity problem: The sheer number of brushes I have makes searching for a specific brush from among many collections an extremely time-consuming task. Here is my first suggestion: Missing from the Brush palette is an easy way to spot a brush by name. Where the Brush palette shows a visual preview of the look of the brush and a size indication on the left, having the name of the brush appear in the palette would be far more helpful than the default size listed for quickly identifying a specific brush. See example: http://i-toons.com//storage/adbr04.jpg Being able to identify a brush in the Brush palette - by name - would make hunting for brushes in the Brush palette a little less time consuming However... My real desire would be the ability to do a fast switch to a Brush from a selection of the stroke that is already in a piece of art. I may be missing something that may have been changed in the newest beta - but what I still find is this: If I click on a stroke applied to the "canvas" I do see an indicator of the brushes identity in the menus top left. See upper portion of this image: http://i-toons.com//storage/adbr01.jpg A small preview of the brush. Clicking on this brings up a nice editing shortcut - but… This mini palette does not tell me what the brushes name is - nor does it give me an option to switch to the indicated brush See image: http://i-toons.com//storage/adbr02.jpg If I click then click the Properties button in this mini menu I do get a more involved Brush Editing menu - But - this menu also does not have the brushes name. See image: http://i-toons.com//storage/adbr03.jpg This is odd because the Brush Edit menu from the Brushes menu does have the name. This editing menu seems to be a different version of the full Brush editing menu. See image: http://i-toons.com//storage/adbr05.jpg Nor is there any option to switch to the selected brush from this Edit menu. Second suggestion: What I would like to see would be a way (or tool) to select a Brush stroke already applied to the “canvas” and have the brush both identified (named in all Brush menus) and the brush tools attributes switch to those of the selected brush stroke. Select stroke. Brush (tool) changes to (inheruts) the selected stokes attributes. Be able to immediately draw with those attributes. This fast switch would be a MAJOR productivity enhancement and time saver. If this feature doesn't exist - I would dearly love to have it added. Either in the form of a new selection tool addition or as something similar to the functionality of the Freehand tool or arrow tool in the application Expression3/Microsoft Expression Design. In those versions of the application, click (tap) a brush stroke on the “canvas” with the Freehand Pen or arrow selection tool and the tools attributes immediately switch to the clicked objects attributes. An example of why this would be useful. If I have several brushes in use in a drawing and want to use one of the strokes in my drawing... Just clicking on the stroke would switch me to the Brush. The drawn stroke would double as a palette and the file could even double as a Brush category - saving tons of time that is presently lost hunting up a brush in the Brushes/brush collections menus. Thanks Craig
-
- 3
-

-
- affinity designer
- brush
- (and 1 more)
-
Divide works. Yes! Thanks souacz for pointing that out. That's one click. The Close Path, Action with the Node Tool also works (two clicks) I guess if holding a key to close a path (no clicks) while actually drawing doesn't exist - I will ask for it as a feature request. Seems like a productivity/speed factor like zero clicks should be in there.
-
This feels like it might be quite a bit of a dumb question. When drawing a shape/fill freehand - with the pencil tool - is there a key or key combo that can be held while drawing, that will close the path? I am thinking of something like Illustrators pencil tool where holding the Option key (Mac) will close the path being drawn linking first and last node. I haven’t dug deeply thru the forums yet. I did look in the Affinity help: https://affinity.help/designer/en-US.lproj/index.html?page=pages/CurvesShapes/about_linesAndShapes.html?title=About Lines and Shapes I can’t seem to find what I am hoping exists. Any guidance is much appreciated.
- 5 replies
-
- 1
-
-
- pencil tool
- close path
- (and 1 more)
-
A small collection of AD Texture Intensity brush experiments
Craig Deeley replied to Craig Deeley's topic in Resources
thisldo, Thanks for sharing!! It was the pleasure I got from drawing and painting that got me started and keeps me loving making art. Seeing other artists using these brushes and creating very different imagery and effects is really exciting. Love your Raggedy Ann like image! I should really have given those brushes way better names tho... : )- 7 replies
-
- 1
-
-
- affinity designer
- texture intensity
- (and 1 more)
-
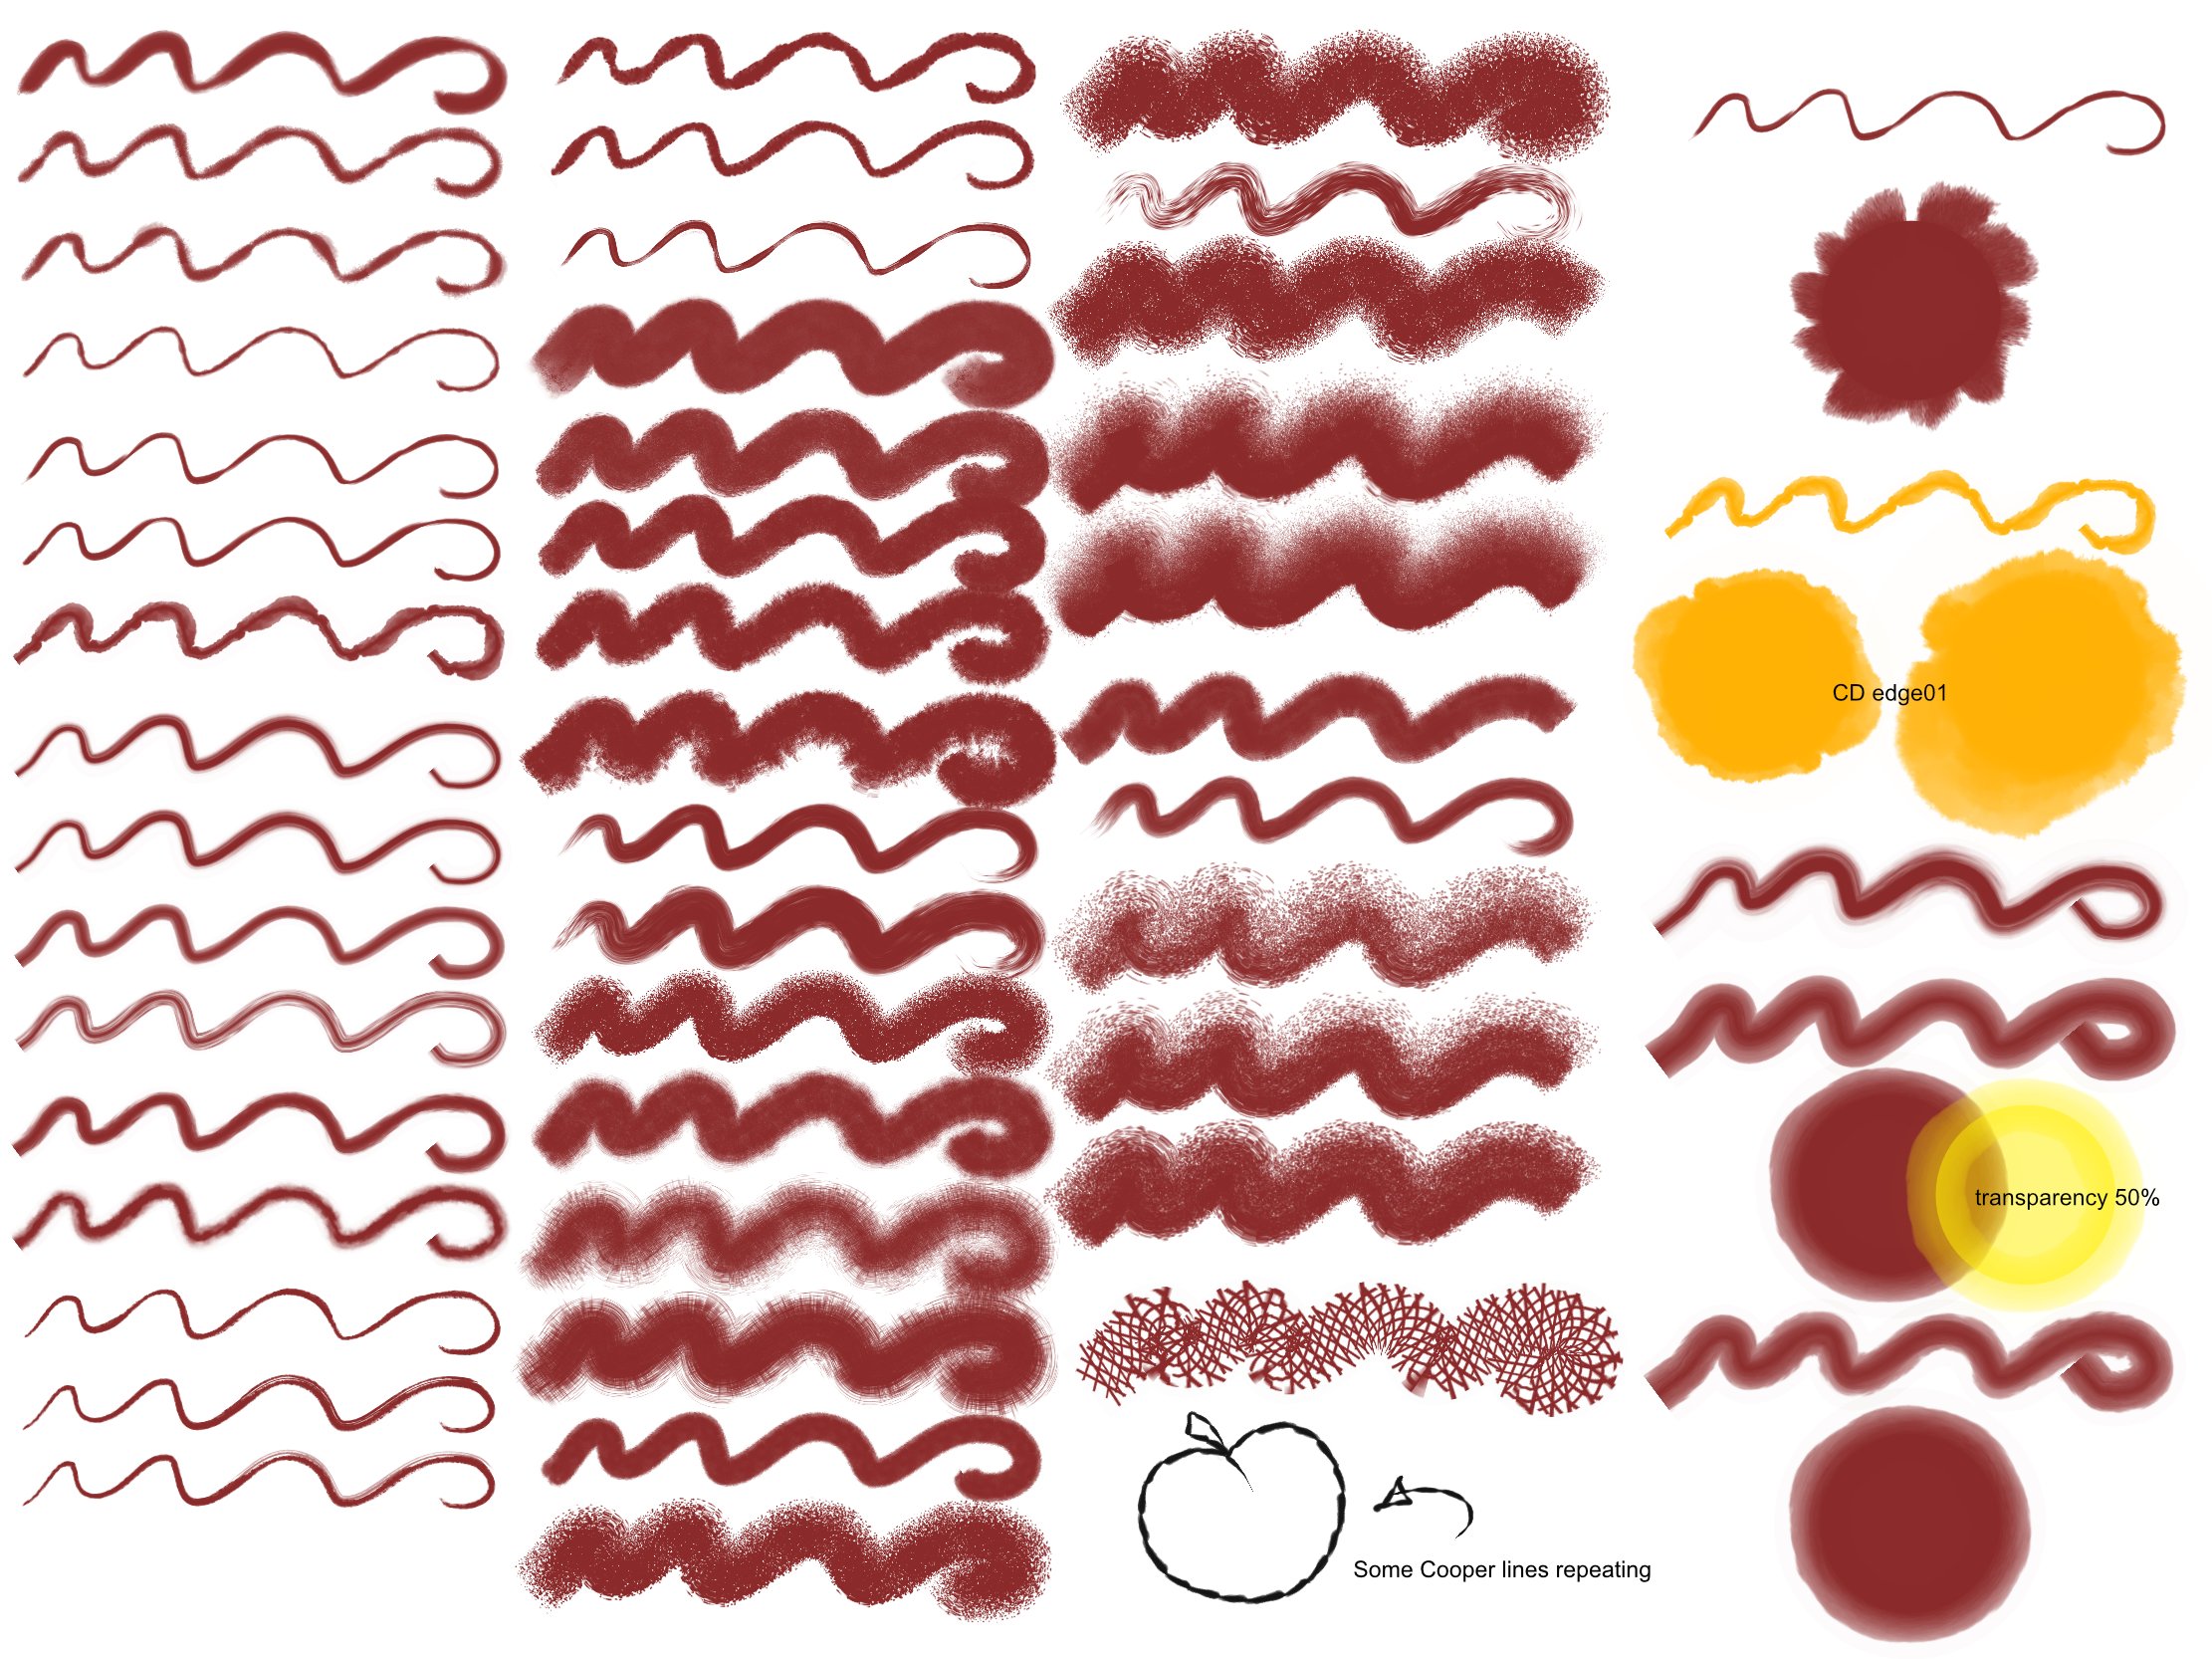
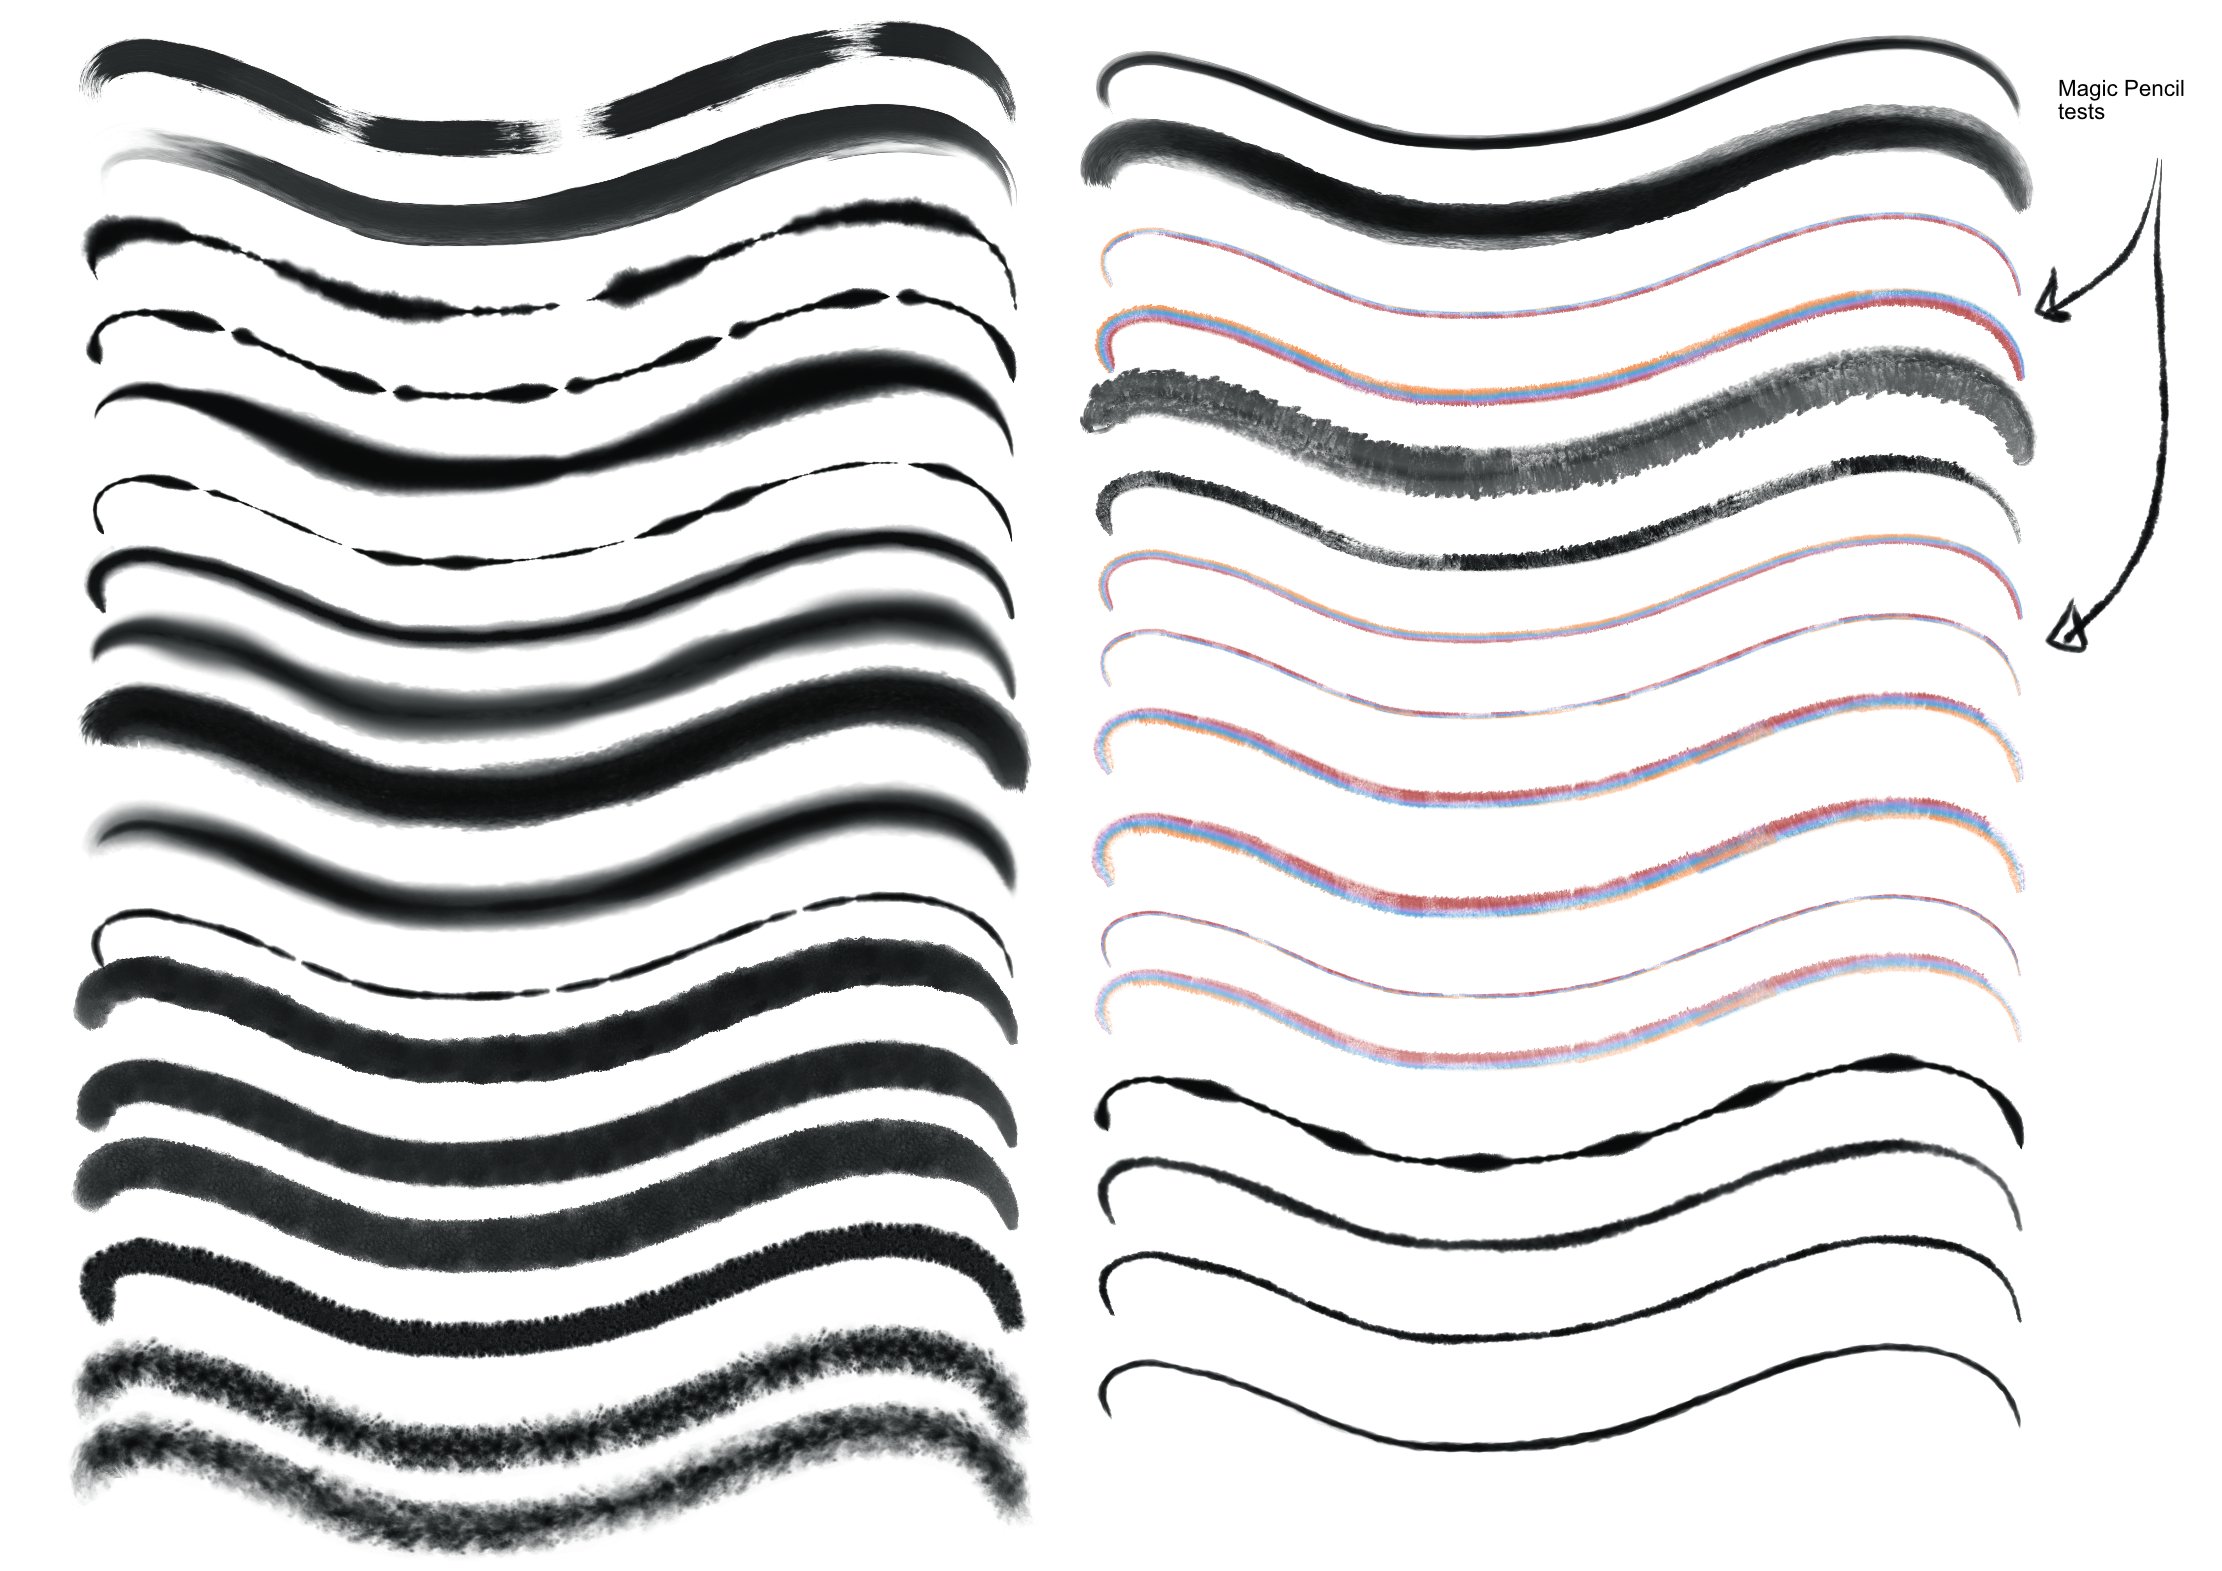
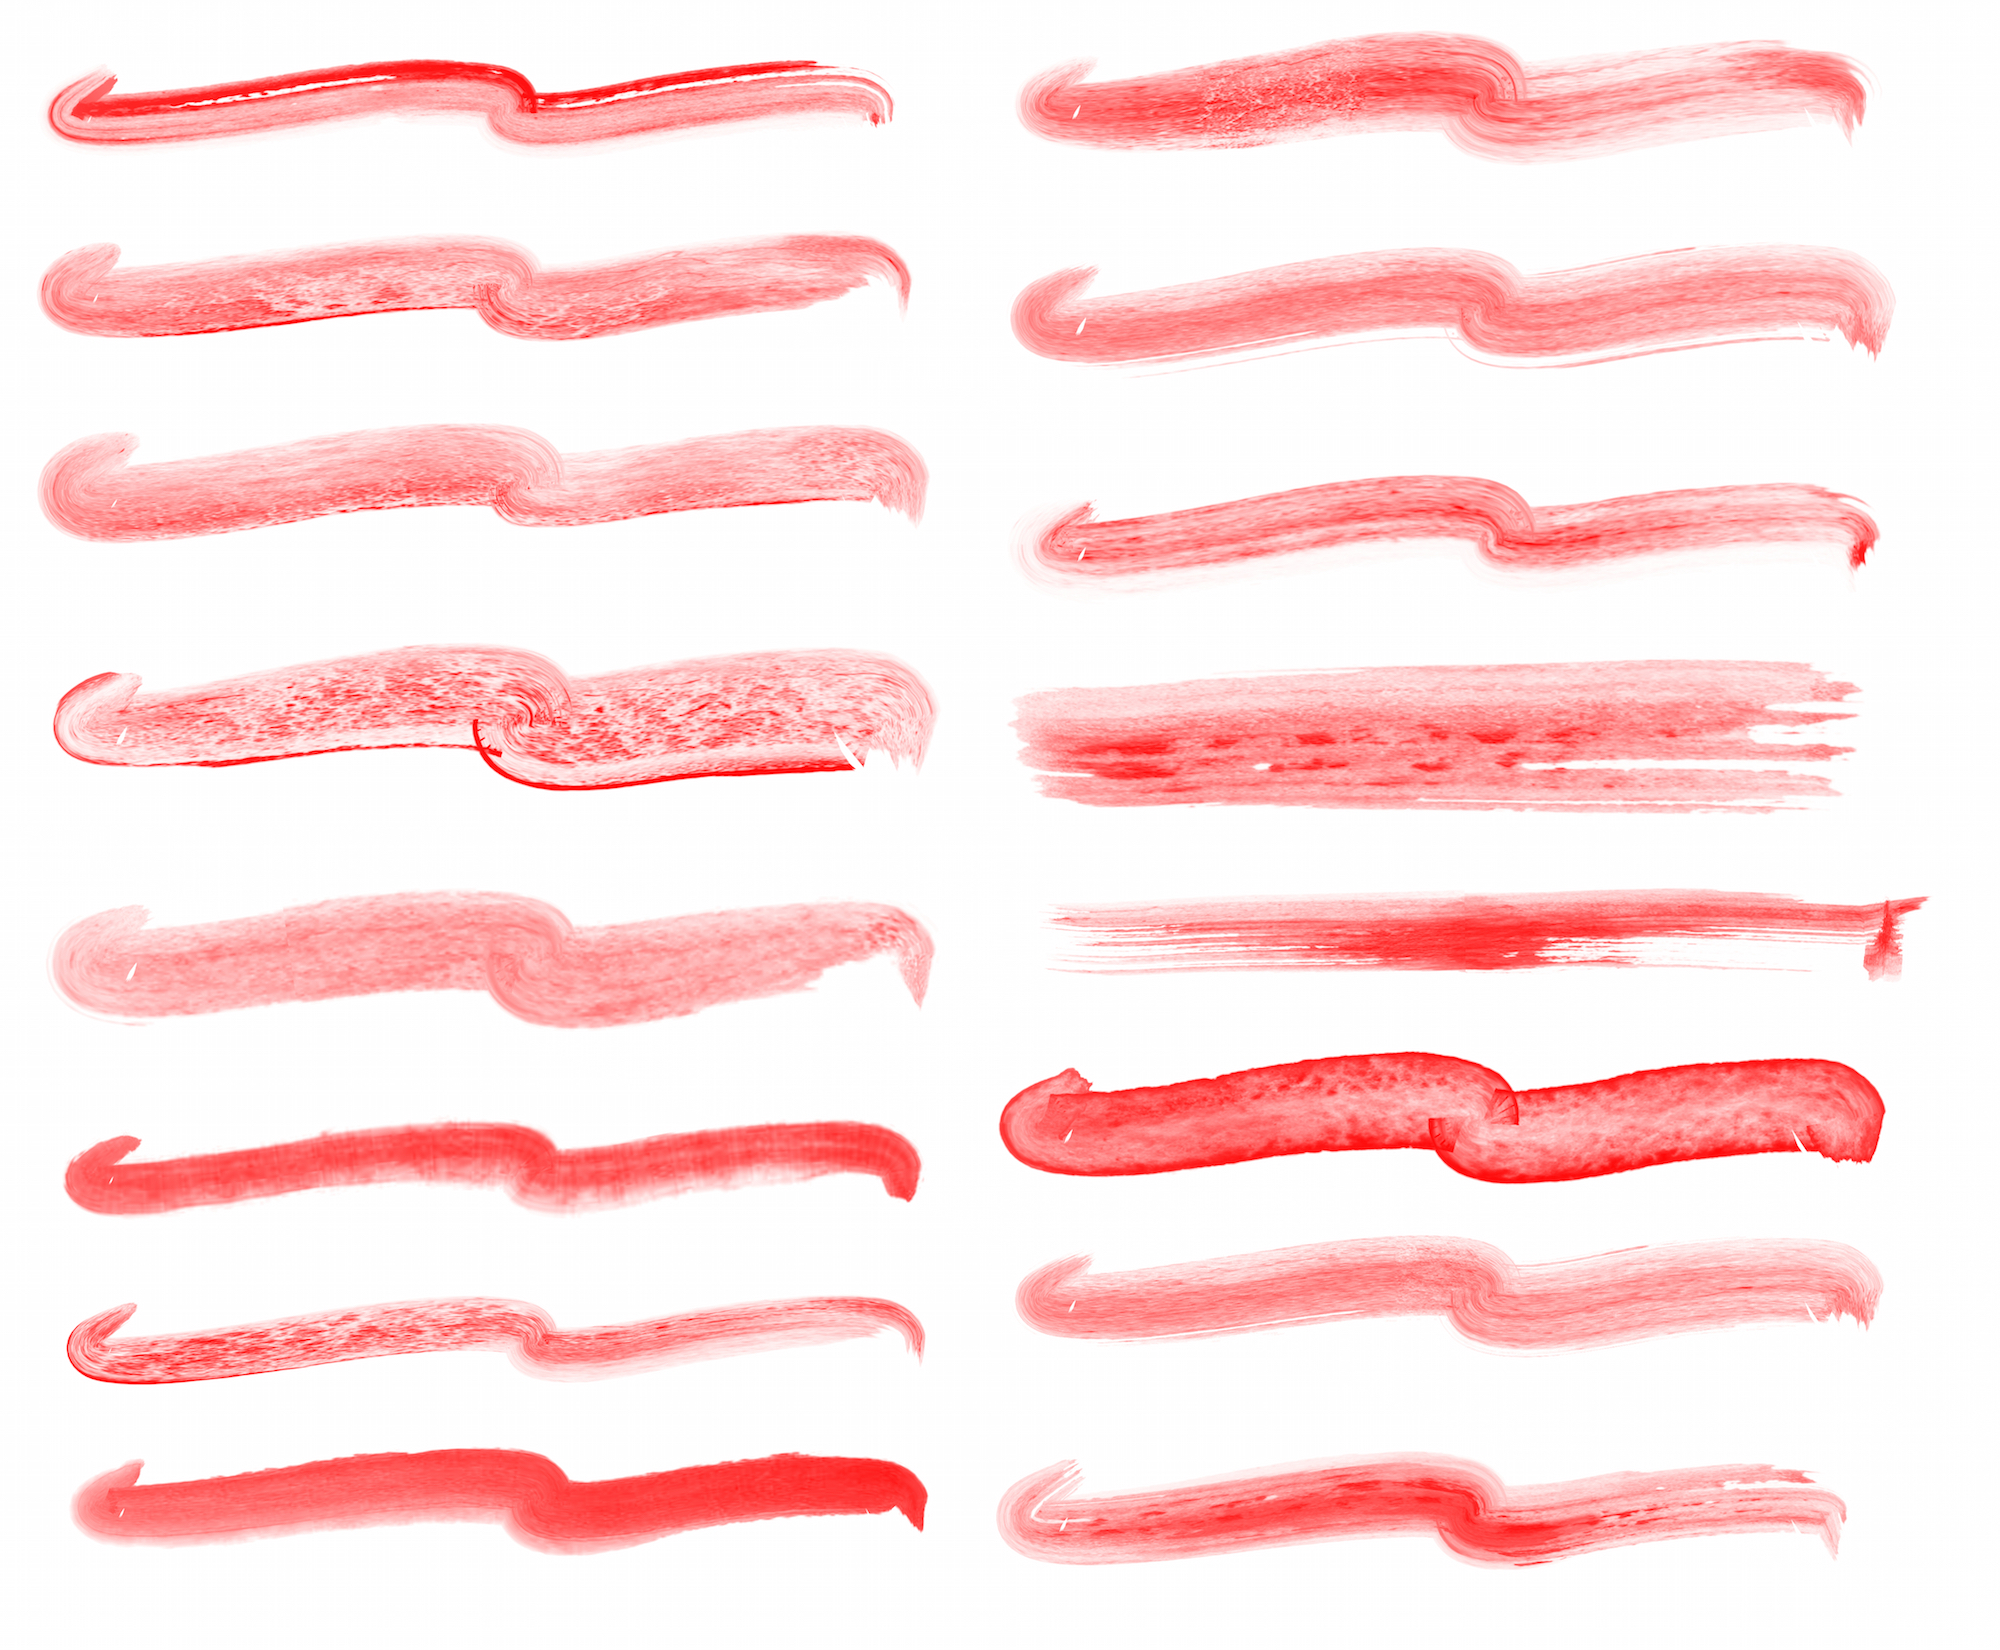
Sharing some AD brushes I made that were the result of some fun experimentation. Repeating strokes was a major theme in this set: CD_testbrush16-17.afbrushes These are brushes made while testing several notions. I am dropping these with no formal arrangement. They are grouped as they were created. Left side of the reference image attached: The first six brushes are designed to see how some “wet” watercolor or ink looking strokes might work when set to repeat. Further down are wet edged strokes for line like effects. Some have a generic texture that can be drawn over and over to create coverage. Coverage over large areas that doesn’t look like a flat fill. Just keep drawing until the strokes cover - like a watercolor fill. Right side: Strokes on the right column are mostly experiments in seeing how well the texture of Koh-I-Noor Magic FX Pencils could be emulated. These pencils are the most fun drawing tools imaginable. I was looking for a way to have several colored bands NOT draw as uniform bands (always in the same position) in emulation of the random effect of the real pencils. This was an interesting experiment - making the color bands look semi-random - but also making the bands link up and repeat. These were made from scans of strokes made with one of the actual pencils. The color examples are the actual pencils colors. To retain the original colors - don’t apply a stroke color to the brush. There are several more repeating “wet” brush strokes on the right side as well. Some of the line style brushes were used in the grumpy geezer image and this: Enjoy! If you do find a use for these brushes - please do share with me examples of artwork you create. I would love to see.
- 7 replies
-
- 8
-

-
-
- affinity designer
- texture intensity
- (and 1 more)
-
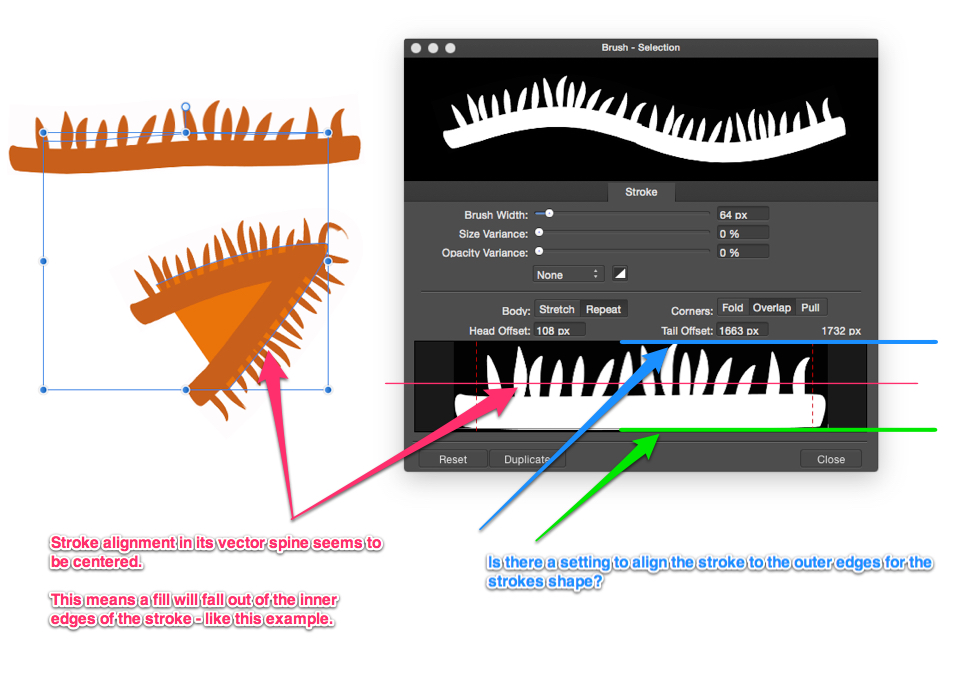
R C-R, Thanks for the feedback! Yes - those align tools are the right idea. But, as you noted - not for open curves. I could see an arbitrary allocation of Inside, Center, Outside being applied to open curves. Something defined like the attached image. The tools as is: Draw behind fill just covers the base of my stroke. Align center (closing the curves) is no good Align outside also cover the base of my stroke - so it is not really outside all the way. Looks like maybe I am asking for a feature request! : )
-
I have a question about how a textured stroke is aligned to its vector spine (or framework) in Affinity Designer. I have a stroke that I want to use as the outline of a fill. I am including a .afbrushes brush file with one brush in it and a .afdesign file with the stroke applied as an example. The example uses a brush stroke I created: CD_hairtest’’. This has a base and “hairs” standing up off the base. See attached image. This stroke is was built to be drawn freehand as an outline. I would apply a fill to the outline as a second step. My problem is: The textured bitmap seems to be aligned/placed in the center of the strokes “spine” and when I apply the fill - the fill shows halfway up the “hairs” of the stroke. I would like to be able to change the placement of the stroke on its "spine" or "frame" (not sure what word might be used to describe the vector container the bitmap stroke resides in) at the bottom (or top) or outside/inside of the strokes shape. I am including an image that may make what I am writing about more clear. I do not know if there is an option already in AD to set the stroke on the outside or inside edge of its spine/frame. I wasn’t able to find something that does this. Does anyone know if this feature exists and how to get to it? Thanks in advance if I am just being thick and need someone to point out the obvious. If the feature isn’t there - I can deal with adding a fill fitting under the stroke. It’s just a lot of extra work. If the ability to change the way a stroke is aligned around a fill isn’t available as an option - I would definitely like to see the idea added to a future feature list. Align stroke: Center. Inside. Outside. CD_hairtest.afbrushes.zip cd_hairtest.afdesign
-
retrograde and Alfred, You have touched on the number one missing aspect of AD's Brushes tool set. I have mentioned it before in other posts. At the very least being able to identify a stroke(brush) in the Brushes various control menus would make AD 1000 percent more effective as an art tool. Having a tap and switch functionality like the ancient Expression3 application would be ideal. I dream of the day. For art made with freehand brush strokes - and especially sequential or illustration art where many images share a common look (and tool sets including brushes) the ability to quickly identify and move between brushes is a must. All the more so when brush collections can have hundreds and hundreds of brushes. This one missing aspect of AD is the biggest hope I have for feature improvements for the application. The brushes used in the file on this thread should all be available (if at the moment impossible to identify) in the various brush sets I have shared on the forum. Miguel (MEB) has collected them all here: http://www.miguelboto.com/affinity/resources/ under Brushes.
-
affinity designer Whales dream of french fries
Craig Deeley replied to Craig Deeley's topic in Share your work
Lost in working with (curses) Adobe products. Work. Work. Work... But I keep trying to make Affinity Designer a go to tool for making my own stuff and expanding the options I have for making fun art. Miguel, I hope to be more active here again. Alfred and all: You all responding reminds me to get my butt in gear - thanks for looking!!! -
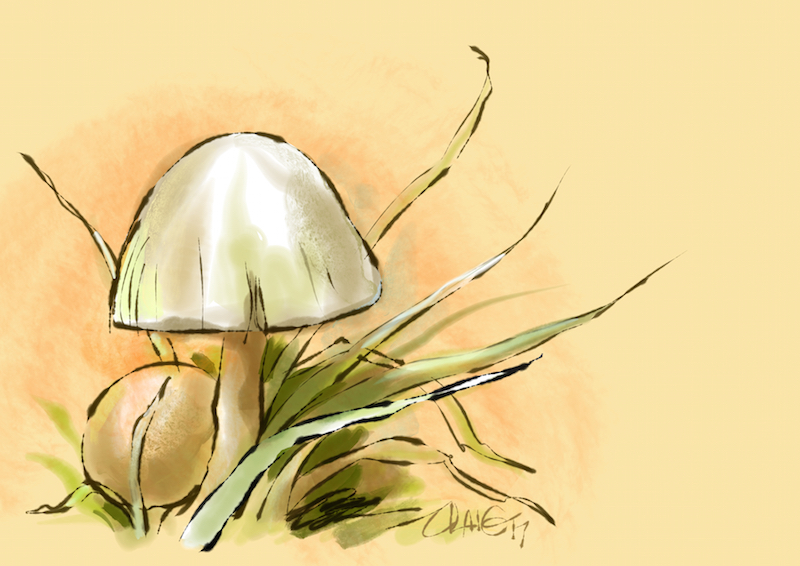
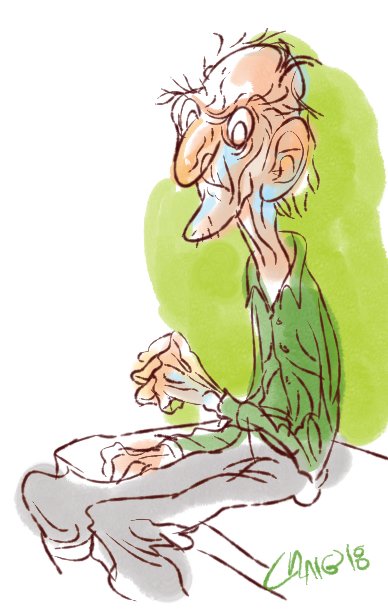
It's the organic look that can be achieved with a tool like AD - even if the look is a little out of fashion - that really is the most fun. Ink and watercolor-like effects - vector brushes. I am including the .afdesign file for digging around in. shroom2.afdesign
-
affinity designer Whales dream of french fries
Craig Deeley replied to Craig Deeley's topic in Share your work
The fries are in the skies! Cloud fries! (Or - I should admit it - my clouds looked like french fries more than clouds) I am a big fan of the raster(pixel) content built right onto the vector core. The ability to re-edit the vectors and still have the bitmap look has been a great idea where-ever it has been implemented. -
affinity designer AD Textured brushes - cloud brushes
Craig Deeley replied to Craig Deeley's topic in Resources
Abogaler, Right on! Thanks for sharing! -
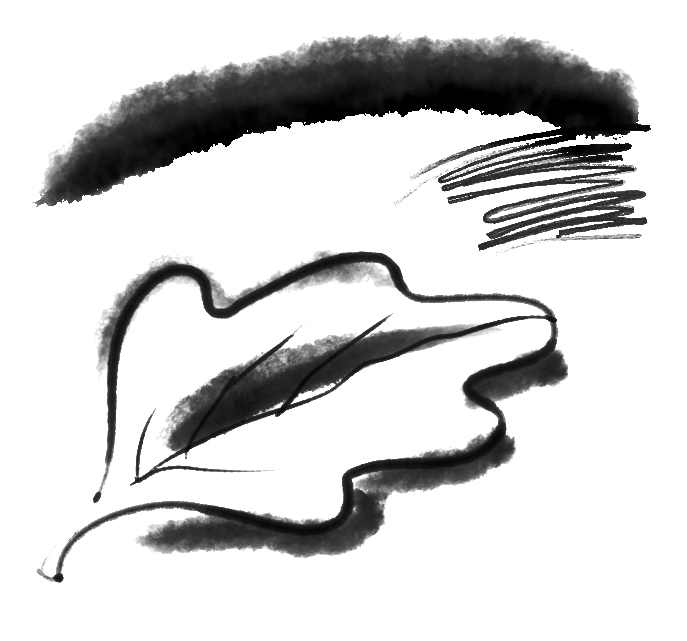
Paolo, I tried some rebuilding of the effects in AD. I wanted to see if this effect - the wet edge blending - would work with vector brushes. I am sure my first effort can be improved - but the bleed effect does happen. The way the blending interacts with strokes applied with a stylus/tablet - and particularly with light pressure is a little buggy, but the idea of vectors that can work with each other - blend a little - is exciting. An AD file that utilizes your layer structure - can be pulled from here: test_wetinkfile.afdesign.zip There is some sample art in the file on the appropriate layers. A wet ink and or sumi ink/watercolor look... The art on these layers can be deleted (don't delete the layers) and new art applied. Turning layers and elements on and off shows the way layers and layer effects are working. Thanks again!
-
affinity designer AD Textured brushes - cloud brushes
Craig Deeley replied to Craig Deeley's topic in Resources
brunzenstein, Sorry for any confusion about what those brushes are. Hope you like them and find them useful. I would love to see any AD art using the brushes I have shared. Alfred, Thanks for stepping in there to clarify! I am on a Mac (Macs) as well. It is very handy to know where some assets are stored. -
Paolo, These are excellent. Great entré into learning about Adjustment Layers for me. I wish I could get the same effects in AD. Got to look into it. Thanks!
-
Attached are a set of AD Textured Intensity brushes made from images of cloud formations. There are just four brushes here, created as an experiment - in search of lovely textured brush strokes. The attached image gives a nice demonstration of the look these offer. Raising a toast to the New Year (2017), Affinity Designers developers (keep it up!) and fantastic community. Thanks all! CD_cloud_brushes.afbrushes.zip
-
This is a personal partial feature wish list that would make AD even more outstanding. Most of these are work flow enhancements. The ability to use them would enhance, simplify and speed the work process. Some of these may exist already. If that is the case - the options are not clear or only available thru perhaps unnecessarily complicated steps. Brushes: Add a contextual menu item for Brush menu: Copy (Duplicate) to (another) category of a brush selected in brush menu. The present Duplicate and then having to manually copy the duplicate in the popout Brush menu calls for un-needed extra steps. Menu (top of working interface): Set Brush/Controller to Brush Defaults as the default setting. Reason: Remove the extra and sometimes forgotten step of setting the brush. Just about every custom brush is made with specific settings. These should be available from the start. My big number one wish list item: Identify and switch brush by selecting a stroke on the canvas. Select a stroke would identify the stroke and make it active in the Brushes menu. This should be the minimum action/behavior when selecting the brush on canvas. However, switching to this brush should also load the attributes applied to the stroke: Color, Width, Transparency, Direction. The Brush tool should inherit all of these attributes on selecting a stroke on the canvas. In the Brushes menu - if another Brush is selected while all the attributes are active - only the Brush would change but all other attributes would remain the same until manually changed. If this is problematic. Add an option in the pop up contextual menu - when clicking an item: Switch to this Brush/attributes. Alternately - IF the above brush switch is not easily implemented: Identify Name of Brush in the menu: Curve (clicking on the brush preview and mini adjustment panels) and make switching to the identified brush and option from this menu. The Brush revealed in this menu would be the bare minimum to enhance the brush palette to being quick switch usable. —— Fills: Same as above (Identify and switch…)- applied to fill. —— General context switching in menus based on selection: Context switching of adjustment menus or tools. For instance. If a stroke (only) is selected - the color options should switch to stroke on top (make it active on top) so that any adjustment can be made to the stroke without further clicking to activate/prioritize the stroke color. The attached image here shows the selected stroke - but the color circles remaining on fill as priority - requiring attention to change. ------ Select (enhanced select menu options) Under an overarching Select: Select (others) by same attribute (as a selected) For instance: Select (others) by same brush/stroke. Select (others) by same stroke color Select (others) by same fill color The attached image shows how bare the cupboard is under the Select menu. I may be unaware of a way to select an item where the selection is not dictated by the items bounding box. If this bounding box is the items selection area: Selection: Make option to select stroke center (outline) instead of bounding box when selecting strokes on canvas. And additional contextual option wish: Contextual (right click or Option Click(Mac) )menu option from canvas (drawing area) to Lock Selected (Item). Associated Context menu to Unlock All —— Color dropper: Color dropper should be a tool in the tools collection and easily invoked with a key command. Color dropper should be stroke or fill sensitive. If stroke only is selected - stroke should be on top in color stroke/fill menu. If an object has both stroke and fill - color menu does not change (will require manual changes). —— Copy and Paste effects: Copy and Paste Effects from one item to another. Either thru the Effects menus or another means. Drag and drop attribute option. Either a tool (similar to dropper) that acquires attributes and can carry the attributes to another item… Or a contextual menu that copies brush or style etc attributes and pastes them to some other object. ------ All of these features were built into original Creature House Expression3 in 2004. They would make outstanding feature tool enhancements to AD, E3's clear successor. Thanks!
-
Thanks all, Paolo, Yes. All but one are made for shorter to medium length strokes. "CD_monet01b_rep" repeats.
-
Attached are a set of AD Textured Intensity brushes made from actual brushstrokes from the famed painter. Usually I would not try to make strokes so literal. Nor would I borrow from such a famed source. In that sense these strokes are a bit of a digression for me. These are examples of brushes that use real strokes almost exactly. They carry the texture and variety of their source. Thick, skittering oil paint, and swashes of thinner oil run over uneven surfaces. I have become more and more a digital painter... but I love the texture of natural media. I find myself drawn to digital emulation of natural media. Or emulation perhaps of the texture of natural media - with a digital twist. I have never deliberately tried to make a textured brush for such applications as Photoshop, Expression3, Synthetik Studio Artist or Affinity Designer - that looked exactly like a natural media brush stroke. The idea seems a little too in conflict with what makes digital art potentially its own (great) thing. However. These are very nice, heavily textured oil paint strokes. Great for bold paint looks. Enjoy. CD_Monet_oilstrokes.afbrushes.zip
- 16 replies
-
- 17
-
-
-
- Textured Intensity Brushes
- Affinity Designer
- (and 1 more)
-
Textured pack E3 water - Intensity brushes
Craig Deeley replied to Craig Deeley's topic in Resources
Right on! Hope the users that visit here find good uses for these brushes. Its fun to revive good old brushes from E3. I needed them myself to migrate styles of art I created in 2002 or so to new work I want to do in AD. I am glad to see that the newest beta had fixed that hairline crack issue. Now all I need is a quick way to identify and switch brushes on the drawing "canvas". Just a feature like that would make AD close to functionally complete for me. -
I am posting another set of custom Textured intensity brushes for Affinity Designer: Textured pack E3 water - Intensity brushes (zip file - 9+mb) These are recreations of an original default set of water (Sumi ink) style brushes that came with the application Expression3 from the early 2000’s. These are more for fun than practical brushes. The default set sold me on E3 way back in the day - a HUGE shift from the very solid vector look of other vector applications of the time. Having a bitmap texture mapped to a vector skeleton = magic! These were originally meant I am sure as emulation of wet (and dryish) ink/brush strokes - but tended to be a little too limited to that look. Nevertheless they do make for some nice smokey brush strokes and have quite a bit of texture. Example images of the strokes are attached here. Hope the user base here finds this third set interesting.
-
affinity designer Dragon for Illustration Friday
Craig Deeley replied to Craig Deeley's topic in Share your work
Ronnie and all, Thanks! The idea is definitely to give the art a real world media spin - while retaining the editabilty of vector. AD is looking more and more like a go to tool for illustration, allowing a lot of flexibility in the work flow.- 7 replies
-
- 1
-
-
- illustration
- intensity brushes
- (and 1 more)