PitterPen
-
Posts
20 -
Joined
-
Last visited
Everything posted by PitterPen
-
Sure, I've attached a video that shows: I add a new vector layer, I select the Pencil tool, the Pencil shows 'no color' for the stroke (and fill) in the context tool bar, I change the fill to be orange, I draw a line and the line has stroke with color brown (not 'no color' as I would have expected). RPReplay_Final1681476888.mov
-
I think this is a bug, but I'm new to Affinity Designer so I could be wrong: This happens on Affinity Designer 2 on an iPad: Essentially, I set the stroke to be 'no color', then when I start drawing Affinity changes the stroke color. Here are the steps: I add a new vector layer and have that layer selected. I have the pencil tool selected. I set the stroke to "no color" (white with a slash through it) and I set the fill to orange. When I start drawing with the Pencil tool, the stroke immediately gets changed by the application to brown. I'm not sure why the stroke changes to brown if I had "no color" set before I started drawing. I was using brown on other layers, and it's like that overrides the selection I just made. Not sure if there is some kind of "inheritance override" rule, or if this is a bug. A workaround I'm doing for this is to let the application change the color to brown and draw 1 line with the brown stroke. Then I change the stroke to "no color" then delete the line I just drew. Now when I draw, the stroke has no color as I intended and stays on 'no color'. Thanks
-
I think it might be an iPad bug...I've attached a file that gets crazy spiked curves if you join the lines on my iPad (using the Join Curves button after selecting all with the Node tool). I just tried the same thing on my desktop and it worked fine (the lines joined in small short lines). Basically in the attached file are 3 lines, and I want to join them together into 1 line. It looks fine on the desktop, but is a mess on the iPad. how to join lines 4-13.afdesign
-
Hi, What is the typical workflow to join a bunch of lines you've drawn with the Pencil tool together to form 1 line? (this is on Affinity Designer 2 on iPad) The use case is I draw some hair on a character using the Pencil tool and have 30 curves created as separate vector layers. I'd like to be able to select those 30 layers and combine them into 1 line, as if I drew the whole thing without lifting the pencil. Here's what I tried that didn't work: 1. Use the Add objects together Boolean button (all the lines just disappeared when I clicked the Add button) 2. Select "Merge Selections" from the layers panel (nothing happened, i.e. nothing "merged", the lines were still separate layers and not connected) 3. Click the Close Node button (this created all kinds of new crazy lines, as I think it connects line ends to line starts, which is not going to work for me because the lines are facing various directions). I also tried overlapping a node with the nearest node so it turned yellow, THEN clicked Close Node, but that didn't work either (it still drew a long connecting line to some other node). 4. Click the Join Node button (This didn't work. I think the cause is some of the nodes have long handle bars on them, and thus when the application makes connections it make them crazy spiked - not a simple short line between two nodes like I need). Basically what I'm looking for is if 2 nodes are a few pixels apart, join them together with the shortest distance possible (not some crazy long line across the page or some huge spike of a curve). And I'd like to do this quickly if possible. If the answer is I have to correct all the handle bars of all the nodes one by one, that would take too long to be practical. Thanks
-
Ah, that worked! Thank you!
-
Hi, In Affinity Designer 2 on an iPad, how do I move multiple line nodes together as one? If I use the Node tool to click on a single node, I can drag it and the line around it reshapes. I want to do that same thing, but instead of selecting 1 node, I want to select many nodes and move them together. For example, say I have a line with 90 nodes that was drawn with the Pencil tool. I use the Node tool to lasso select 10 nodes next to each other. I then want to drag those 10 nodes away from the the rest of the line (while maintaining the shape of the selected nodes, and the nodes at the edges of the selection will of course stretch). However, I can't seem to figure out how to do this. If I switch to the Move tool, the application instantly undoes my 10 node partial selection and instead selects the whole object on that layer. Any ideas on how to do this? Thanks
-
Wow, thanks for all the information. That's good to know about the color pad lock and to have it highlighted (i.e. selected/on) to prevent color switch shifting. On a small note if the admins read this, a UI idea for V3 would be to make the padlock icon more clearly show when the color is locked vs. unlocked. E.g. the icon could show the top of the padlock visibly lifted up/open in an unlocked state, and the top of the padlock down when the color is locked. At a glance, I couldn't tell if clicking on it the padlock made it locked or unlocked.
-
Thanks. Your reply and others helped me see that each context takes some dialing in of the changes to taste.
-
Yeah, I was afraid to do that because I wanted an exact match, but when the exact match didn't look that good that's what I ended up doing (lol)
-
I think I better understand now what you were saying. I ended up using this kind of method of use the exactly color, then dial in brightness to taste.
-
Doh! Sorry I didn't see that! Thanks for clarifying. When I use the letters with the numbers, it works. However, in practice, it doesn't really look how I want it too. It's a bit too strong looking. What I ended up liking more is to: 1. Do an orange (the exact shade of orange) rectangle overlay with Blend = Color. 2. Add another rectangle overlay, that's gray (H = 0, S = 0). Set Blend = Luminosity (not Color), and adjust Luminosity and Opacity of the rectangle to taste. <--I believe this is essentially what the other posters were suggesting but I wasn't able to understand what they meant until I played around with these ideas more. Thank you much to all the posters, this discussion was most helpful. If the developers/admins read this, an idea for Affinity Photo V3 would be to add an X/Y grid slider to the Color Replacement Brush Tool (maybe under advanced so as not to confuse beginners). The values for X and Y could be Luminosity and Saturation, where 100% X and Y (the upper right corner of the X/Y grid) is the exact color you are trying to match (matched in terms of H, S, and L). That way you can dial in the match to taste when Hue isn't enough for matching. I really like the Color Replacement Brush, but when the result is vastly different from the target (e.g. brown when I'm trying to match to orange), the tool feels lacking.
-
No luck, I tried Normal mode and several other modes just to see, but I don't see any color changes. Seems like I'm doing something wrong or there's a bug because I should at least see something if I change R = 0.
-
Sure, I've attached a png export and the .afphoto file. This site said .afphoto attachments are not supported, but it looks like it attached it to the post anyway. Let me know if it didn't attach. In the file, I deleted everything but the green rectangle and I still see the discrepancy: Source of RGB truth.afphoto
-
Hummmm... interesting idea. I didn't even know Procedural Textures were a thing in Affinity Photo. I follow your logic, and it seems like it should work. But when I apply a Proc Texture as a child layer to a green rectangle, nothing happens (the color doesn't change). I'm likely doing something wrong as when I watch a tutorial video (linked below), all he does is enter 0 for R and the screen changes color instantly. I tired R = 0 and nothing happened to the green rectangle. I also tried all blend modes (Normal, color, etc.) for the Proc Text and the rectangle and no luck. Here's an image of my setup if anyone happens to see something off:
-
Would you expect to see the same R, G, and B numbers, for the same color, in the Color window and the Info window? The image below might better clarify. What I did was create a green rectangle using a swatch with color 2B675A. Then, in the Info window, I used the cross hairs to lock onto a pixel in the green rectangle. The R, G, and B values are: R: 41 G: 103 B: 89 If I then click on the green rectangle and look in Color RGB, the numbers are DIFFERENT for R and B: R: 43 G: 103 B: 90 Am I misunderstanding something or doing something wrong? I'm trying to match colors, and thus far I'm confused as to what is the source of truth for a color's RGB values. Thanks
-
Interestingly, no, I'm not able to match the brown to the orange just by adjusting Luminosity and Saturation. I can lighten the brown's Luminosity, but I can't increase the saturation enough. Specifically, if I use the Info window, I see the orange has an Info value of 86% saturation. I see the brown has an Info value 38% saturation. If I apply an HSL adjustment and crank the saturation to increase the brown by 100%, it only goes to Info value 73% saturation (where as it needs to go up to Info value 86%, the orange's saturation level). If I add 4 more HSL layers on top of that, all maxed out at adding 100% adjustment saturation, the brown's saturation tops out at Info value 76% (and won't go any higher, regardless of adding more HSL layers). It seems odd that I can't add any more saturation to the brown to get it to match the orange. In the Info window, the brown has the same Hue number and Luminosity number as the orange, but I can't get brown to the saturation level of the orange. It seems like color swapping was easy in Photoshop, so I'm probably missing something here. This feels way harder than it should be.
-
The short version of my question is: I want to replace one color with an exact different color (e.g. specified by hexadecimal). I've tried 2 approaches but neither have worked so I thought I see what is the official/common way to replace with an exact color? My scenario: I'm using Affinity Photo. I have an image of a green jacket. I want to make the green jacket (variations of 2B675A) an EXACT color of orange (variations of F26921). If I use the Color Replacement Brush, it paints the jacket brown (not orange as I would like). I get the Color Replacement Brush only paints hue (and not saturation or luminosity, so this may be working as designed). Since the Color Replacement Brush didn't work, I tried the "create 2 rectangles and match their color" approach I found in a YouTube video (linked below), but that approach also did not work. I got a brown-ish orange color, but no where near the orange I'm targeting. I also tired every adjustment layer in Affinity Photo and was quite surprised that HSL, Levels, Recolor (or any of the brightness ones) couldn't get the rectangle to match the color of the other rectangle exactly. So my question is, if the Color Replacement Brush and "matching rectangles" doesn't work, (and adjustments layers like HLS aren't exact enough), what is the workflow for replacing an exact color in Affinity Photo? (and not just a single pixel of color swap out, the method needs to take into account many subtle variations of a color, like all the colors in a green jacket) I also have Affinity Designer if that has a faster tool/workflow than Affinity Photo for this. Thanks for any ideas- Video on "matching rectangles" approach that didn't work for my colors:
-
I figured out what the issue was - in Channels I had the "white" 'Composite Alpha' Editable switch turned off. I was doing another tutorial and the video had me turning those off, looks like I forgot to turn them all back on. Thanks for taking a look-
-
If I click on the 'orange paint' layer, it looks like the opacity value = 100%. Here's a screen shot:

-
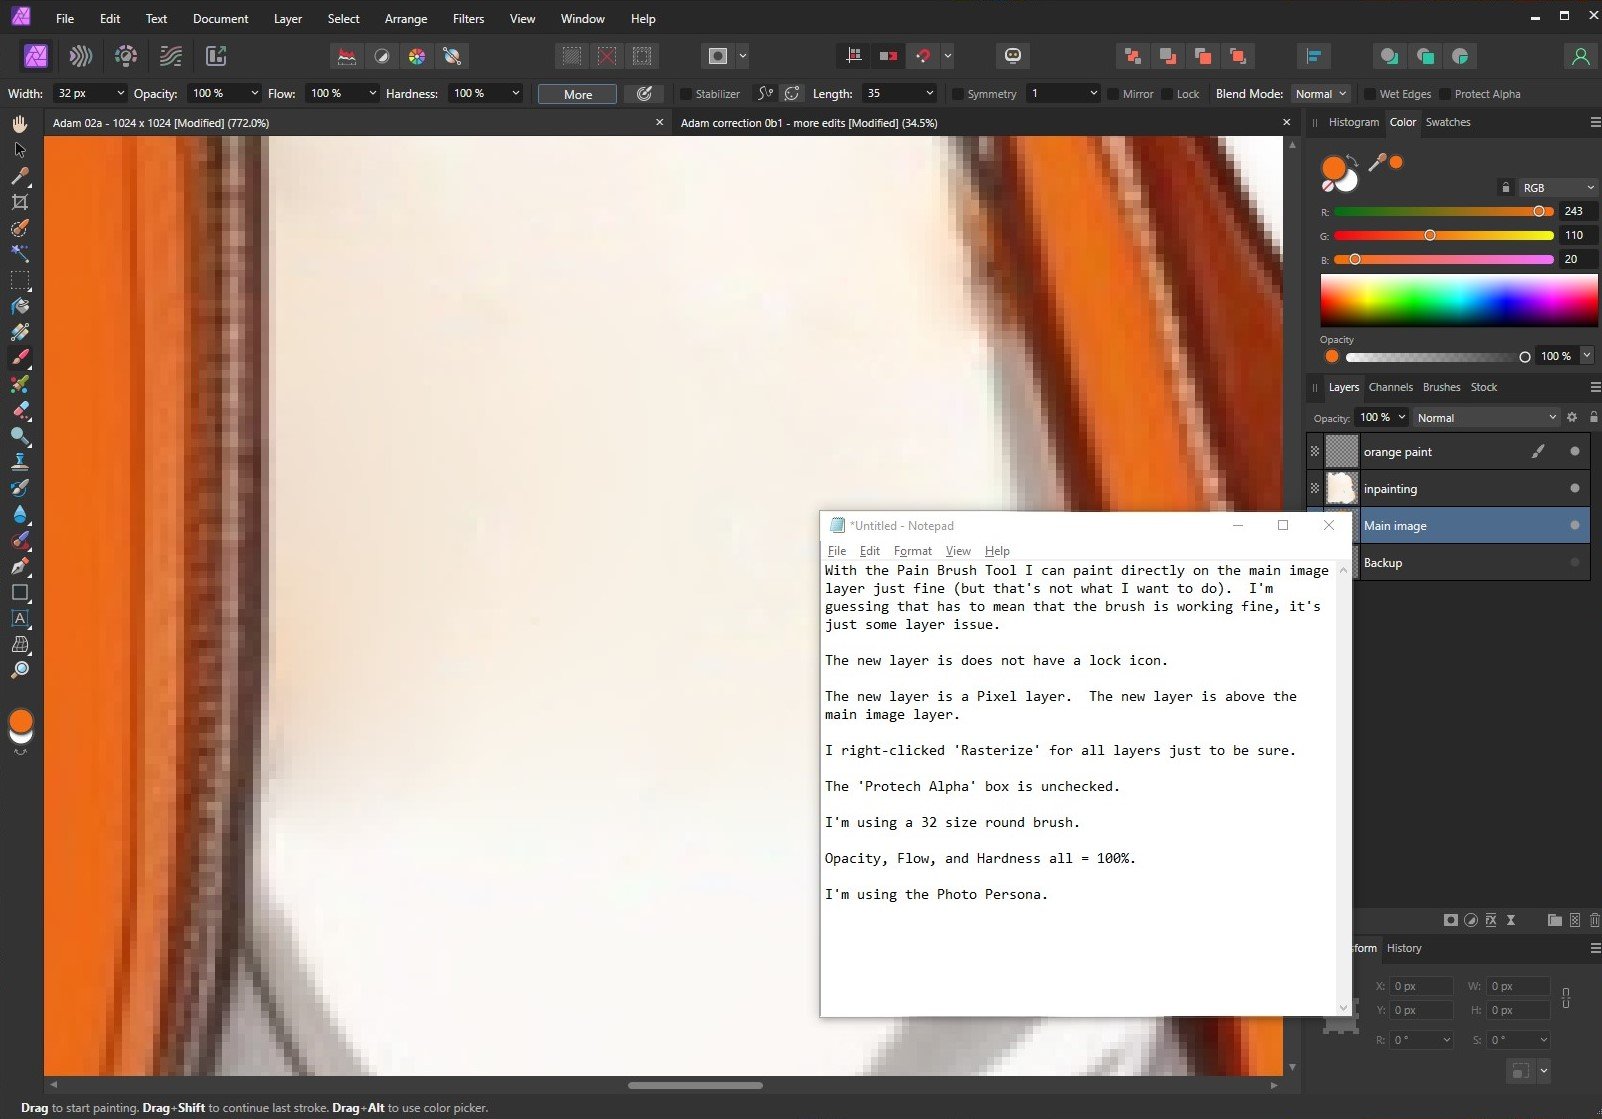
Hi, I would like to paint an orange line on a transparent pixel layer. When I use the paint brush though, nothing happens, no color, nothing. However, when I paint on the main image (below the transparent layer), an orange line is painted just fine (but that's not what I want to do). Some info and things I've tried: The new transparent layer is does not have a lock icon. The new layer is a Pixel layer. The new layer is above the main image layer. I right-clicked 'Rasterize' on each layer just to be sure. The 'Protect Alpha' box is unchecked. I'm using a 32 size round brush. Opacity, Flow, and Hardness all = 100%. I'm using the Photo Persona in Affinity Photo 2. If it helps, below I've attached a screen print of my Affinity screen showing that the 'orange paint' layer has nothing and is above the main image. Also, I followed the steps of the first minute of this video where he just adds a pixel layer and paints on it, so it seems like this is something Affinity should be able to do: I feel like I'm missing something fundamental here...any help would be much appreciated. Thanks