

jospo
-
Posts
41 -
Joined
-
Last visited
Posts posted by jospo
-
-
On 3/19/2021 at 2:01 PM, Gabe said:
Hi @jospo,
I can't seem to replicate this here. Any chance you can attach a screen recording of this in action?
Hi Gabe,
Sure, here it is in action: https://jmp.sh/fjPzEYu
Petr
-
Hello, this issue might be related to this one, but my workflow is different so I thought to post it anyway.
Steps to reproduce:
1) Create new AP document (doc 1) and export it to PDF with bleeds.
2) Insert exported PDF (from doc 1) it into new AP document (doc 2).
3) In doc 2 set the Page box to Trim Box.
4) Now update the doc 1 file and export it again to PDF with bleed so there is a new version of the file.
5) Now in the doc 2, go to Resource Manager and click Update for doc 1.
6) This will change the Page Box from BleedBox to TrimBox.
Thanks!
Petr
-
Hello,
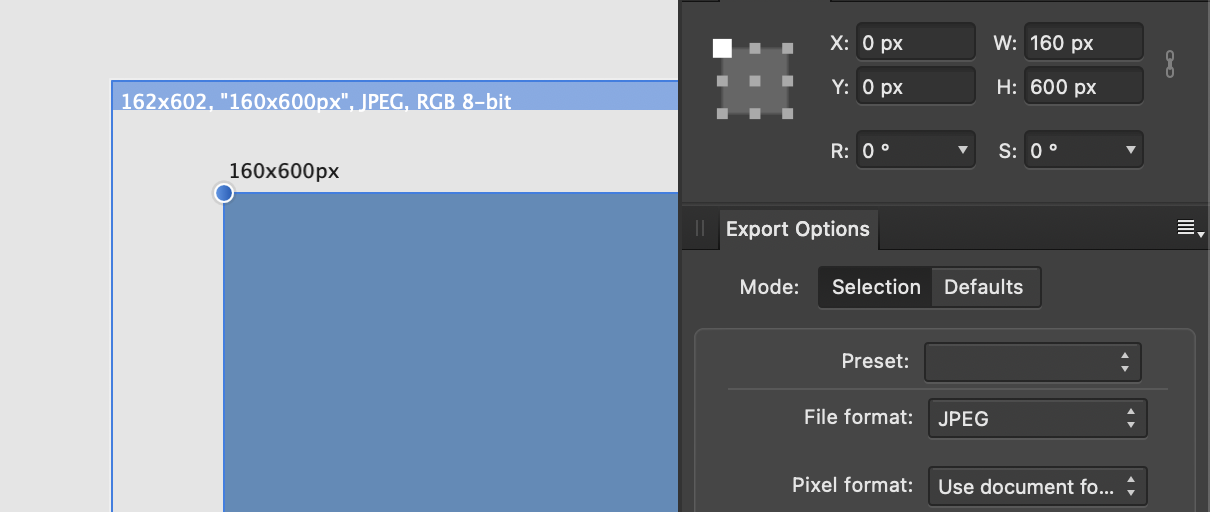
this is probably a bit unusual workflow for AD as it does not offer unsharp mask layer adjustment filter, but I am using it to sharpen the image when exporting graphics to jpg (great for web banners). I found out you can copy the unsharp mask layer from the Affinity Photo and insert it in the Affinity Designer document. It works fine and the output is sharp as expected, but there seems to be an issue with the slice size. It is about 1 pixel off on both sides. You can see the slice is set correctly to specific size, but the actual image size is 2 px bigger. It think this is because the unsharp mask adds extra 1px when there is an object aligned right to the edge. I am attaching a sample file where you can see the issue.
Thanks!
Petr
AD version: 1.9.0 running Big Sur 11.3 Beta

-
Thanks, I can confirm the workaround works fine.
-
Affinity Designer v1.8.4 on macOS:
I have noticed that when placing Adjustment Layer on top of other layers, bleed is not preserved when exported to PDF.
You can see that in the attached example. Just export it to PDF with bleeds on.
Thanks!
Petr
-
In fact when the files are in the /cs_CZ subfolder, the spelling and hyphenation is not recognized by the macOS system in the Settings / Keyboard preferences (it should show "Čeština (Knihovna)" which means "Czech (Library)"). When I copy them directly to /Spelling directory, I can see the option in the Keyboard preferences: https://jmp.sh/ISAHs41
So now I stored the files in both /Spelling and /Spelling/cs_CZ directories and it works in both AP and macOS system.
Thanks
Petr
-
Hello Gabe,
Thanks for sharing the screen. Previously I stored the Czech dictionary and hyphenation files directly in the /Spelling directory. It worked fine before but after the AP update it stopped. When I tried to copy the files under the /cs_CZ subdirectory as it's shown in your video, it worked fine.
Thanks a lot for your help, the issue is resolved now.
Petr
-
High Siera and Catalina, both with the same results.
-
The dictionary is installed in /Users/{username}/Library/Spelling.
But I can see the same files also in the /Users/{username}/Library/Containers/com.seriflabs.affinitypublisher/Data/Library/Spelling directory. I assume AP copied them there by itself: https://jmp.sh/AnGPTzx
-
Hi Gabe,
I tried to rename the folder to reset all the settings, but the hyphenation is still not available. When I look in the 'com.seriflabs.affinityPublisher.old' directory, I can see the hyphenation dictionary is listed there: https://jmp.sh/UJKldld.
It is also listed in the newly created 'com.seriflabs.affinityPublisher' directory: https://jmp.sh/FsHtJxV
Cheers,
Petr
-
Thanks Gabe,
I am using MAS version. When I try to change hyphenation settings, It looks like this: https://jmp.sh/bbtXKtA
Thanks!
Petr
-
Hello,
After updating to 1.8.4 I am unable to select Czech hyphenation from the drop down. It is installed properly in the /Library/Spelling directory and worked fine before. I can use hyphenation in other applications such as Pages without any issues.
If I open a document where the hyphenation was previously enabled, it's shown as unknown: https://jmp.sh/uKB9exw
When I create a new document, the option is missing completely: https://jmp.sh/kjIXKWt
You can get the spell check and hyphenation files for example from here.
Thanks!
Petr
-
Hello, I have a question regarding the afpub file size.
I tried to include a afdesign document into the afpub (set as linked in the File Manager), but after saving the afpub file is still huge.
Is the linked file always saved with the document? Is there any way how to exclude linked files from saving and shrink the afpub file size?
Thanks
Petr
-
When adding Gradient Map and clicking on gradient colours to edit them, AD crashes.
-
Hi guys, just a few issues with bleeds when testing 1.7.0.3:
It seems that bleeds are exported only when exporting all artboards at once. When exporting individual artboard to PDF, bleeds are not preserved.
Also I did not find a way how to enable/disable bleeds in Export persona > Slices settings. It exports always without bleeds.
Thanks!
Petr
-
3 hours ago, fde101 said:
This should really be in a separate thread.
Ok, will post this in a separate thread. Thanks
-
Hi guys, just a few issues with bleeds when testing 1.7.0.3:
It seems that bleeds are exported only when exporting all artboards at once. When exporting individual artboard to PDF, bleeds are not preserved.
I did not find a way how to enable/disable bleeds in Export persona > Slices settings.
Thanks!
Petr
-
Hello, just a suggestion for improvement.
When I place an image to document with bleeds so it is overlapping artboard and then rasterise the image, it is cropped to the edges of the artboard. It would be better to rather crop the image to the edges of bleeds not to the artboard. It makes problems when exporting PDF with bleeds and the image is therefore cropped incorrectly.
Thank you!
Petr
- Krustysimplex and Dazmondo77
-
 2
2
-
3 hours ago, firstdefence said:
Obvious question but are you Exporting the PDF as PDF for Print.
Yep, below are my Export settings:
And here is the PDF Output Preview (no bleeds, no spot colours):
Thanks
Petr
-
Hello,
my client wants to print certain image in one spot colour only (no CMYK colours at all) and I would like to find a way how to do this in AD.
I tried to create Gradient Map Adjustment layer and create simple gradient with spot colour on one side and white on the other. But when I export it to PDF, the spot colour is gone, only standard CMYK remains. Also I noticed that when I add on top of all layers an object with spot colour, it is converted to CMYK as well even if it sits on top of all layers and should remain as it is. Another odd thing I noticed when using Gradient Map Adjustment layer is that bleeds are for some reason ignored when exporting to PDF.
Attached is a test file with all layers and also two exported PDFs. First one is exported when Gradient Map Adjustment layer is enabled: spot colour and bleeds are missing. The other one is with Gradient Map Adjustment layer disabled. Bleeds are there, also spot colour for the text on top of the image is there, but of course the image itself is not toned to spot colour gradient.
As Gradient Map Adjustment layer does not seem to be an option, is there anything else I can try to achieve spot colour only output?
Thank you for any suggestions
Petr
-
Sounds good, thanks Walt!
-
Hello,
just a suggestion – it would be great to somehow indicate that the text overflows the text frame especially when the "eye" icon is enabled to hide the overflowing text. For example make the "eye" icon red when there is more text that is hidden.
This can be useful as I don't need to double check if all lines fit into text frames.
Thanks!
Petr
-
Hello,
small feature suggestion - when moving object, sometimes the numbers showing the distance are not visible. It would be nice to solve this by offsetting the text a little bit.
Thanks
Petr
-
20 minutes ago, MattP said:
It's not just you, but it's certainly very very rare - and I think it has something to do with the number of active fonts you have... Do you happen to have around 3000 or more by any chance? We're looking into this right now...
Thanks Matt for looking into this. I have about 800 font families installed.


Page Box is changed from BleedBox to TrimBox after Resource Manager update
in V1 Bugs found on macOS
Posted
Thanks Gabe, I can confirm it is indeed fixed in the latest Beta.