AGain
-
Posts
27 -
Joined
-
Last visited
-
I supposed this was considered a "feature" and not a "bug", but nevertheless it is not intuitive at all even if it's "by design". In any case I'll live with that now that I know the secret meaning 🤔. Thanks once more.
-
Hi Walt, reading your reply, you are saying that the brush context toolbal rule the general behaviour of all those (poor) brushes that do not have set in their panel a specific "blend mode"... . But there are "chosen" brushes who have their own blend mode set in their panel and just for that they are capable to change the context. This is not imho good logic design because: - you don't' have always the context toolbar active (and if it's not, you don't realize who is ruling the context toolbar setting or the brush setting ?) - if you have the context toolbar active w. whatever blend mode then you never know if that blend mode is defined in the context toolbar and "not set" in the brush or if it's set in the brush and by consequence has modified the context . The only way to check is open the brush and see. For me it's very confusing and should be corrected. Andy
-
 AGain reacted to a post in a topic:
Blend Modes disaligned between Edit Brush settings and Context Toolbar
AGain reacted to a post in a topic:
Blend Modes disaligned between Edit Brush settings and Context Toolbar
-
I don't know if it's a bug or a feature, I guess it is a bug. This is what happens in AD2.2.1 for Mac 1. blank new document, go to Pixel Persona 2. Select any brush 3. Double click or right click the brush and choose "edit brush". Now suppose you want to change there the "Blend Mode". So you select for example "Multiply" (or else). 4. Immediately in the "context toolbar" (independently if it's visible or not, the worst happens if it's not visible because you don't realize what is going on) the "Blend Mode" also changes to what you selected in the edit brush panel that is "Multiply" in this case. This means that whatever blend mode you select in the "edit brush" this is reflected in the context toolbar. so far so good. If you do the same with other blend modes they are changed also in the context toolbar and what you change in the context toolbar is reflected in the brush settings. 5. Now the bug: if you go back to edit the brush and now you select as a Blend Mode "Don't set Blend Mode", close the edit bursh panel => nothing actually changes in the context toolbar and therefore in the brush behaviour because ... in the "context toolbar" the Blend Mode is not updated and it is still the previous "Blend Mode" we selected which was "multiply" in my example. Instead this Blend Mode should change to at least "Normal" (because Don't set Blend Mode does not exist...) to reflect the change done in the edit brush menu. The result is that you think you have reset your brush selecting "Don't set Blend Mode", but unless you also go to the context menu and you set that to "Normal" the context menu is disaligned with the "edit brush" panel and it remains with a wrong blend mode. Not only that but if you select another brush which is set to "Don't set Blend Mode" it doesn't work as you expected because the active Blend Mode is what is still selected in the "Context Toolbar" ... . I hope my point is clear. Andy
-
AGain reacted to a post in a topic:
Clone Brush Tool (Stamp) in Affinity Designer
-
 DEWLine reacted to a post in a topic:
Jack Kirby Inspired Pencil Brushes - Pixel Persona
DEWLine reacted to a post in a topic:
Jack Kirby Inspired Pencil Brushes - Pixel Persona
-
Hello, I had imported some brushes (pixel) from a website. But as they are, they are not so usable so I had to modify some parameters to have them right. Because the settings I like at the end are always the same and the only thing changing is the shape of the brush, one of the operation I was trying to achieve was to duplicate the settings of a modified brush into another brush in the same category. I don't think it's possible, but maybe the community has found some way to achieve this ? Thanks Andrea
-
AGain reacted to a post in a topic:
Jack Kirby Inspired Pencil Brushes - Pixel Persona
-
Robert Hansford reacted to a post in a topic:
Jack Kirby Inspired Pencil Brushes - Pixel Persona
-
Jack Kirby Inspired Pencil Brushes - Pixel Persona
AGain replied to Robert Hansford's topic in Resources
For all of those who can be interested in these pencil prototypes, I donwloaded and tried. They are, imho, very usefull and I like them a lot because you can use them as they are or, as I did, learn and see the effects. I modified some of them a little bit to fit to my "style" (let's say . In particular I found the pressure curve too subtle and changed, or the scatter x,y dynamics (increased a bit). or the rotation dynamics. But overall they are very good and I could delete a lot of stuff donwloaded from other "photoshop" free but useless stuff sites. thanks -
Robert Hansford reacted to a post in a topic:
Jack Kirby Inspired Pencil Brushes - Pixel Persona
-
Benfischer reacted to a post in a topic:
Mid century modern cat (Affinity Designer2)
-
Jack Kirby Inspired Pencil Brushes - Pixel Persona
AGain replied to Robert Hansford's topic in Resources
Hi Robert, thanks for your re-publishing. I downloaded them and I appreciated especially the first set. The second set I guess is more "experimental" type, but interesting to learn anyway. -
AGain reacted to a post in a topic:
Jack Kirby Inspired Pencil Brushes - Pixel Persona
-
Hi Robert, I saw the link to the pencil brush in a old post you wrote , does not work anymore. is that brush still available ? thanks in advance
-
AGain reacted to a post in a topic:
Jack Kirby Inspired Pencil Brushes - Pixel Persona
-
I answered myself having found in the community a place for free resources which is really interesting: "Crazy Brush and Assets Library"
-
Jack Kirby Inspired Pencil Brushes - Pixel Persona
AGain replied to Robert Hansford's topic in Resources
the link is not working 😞 -
affinity designer Mid century modern cat (Affinity Designer2)
AGain replied to Benfischer's topic in Share your work
I like the cat and the color ! -
AGain reacted to a post in a topic:
Mid century modern cat (Affinity Designer2)
-
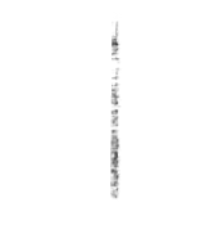
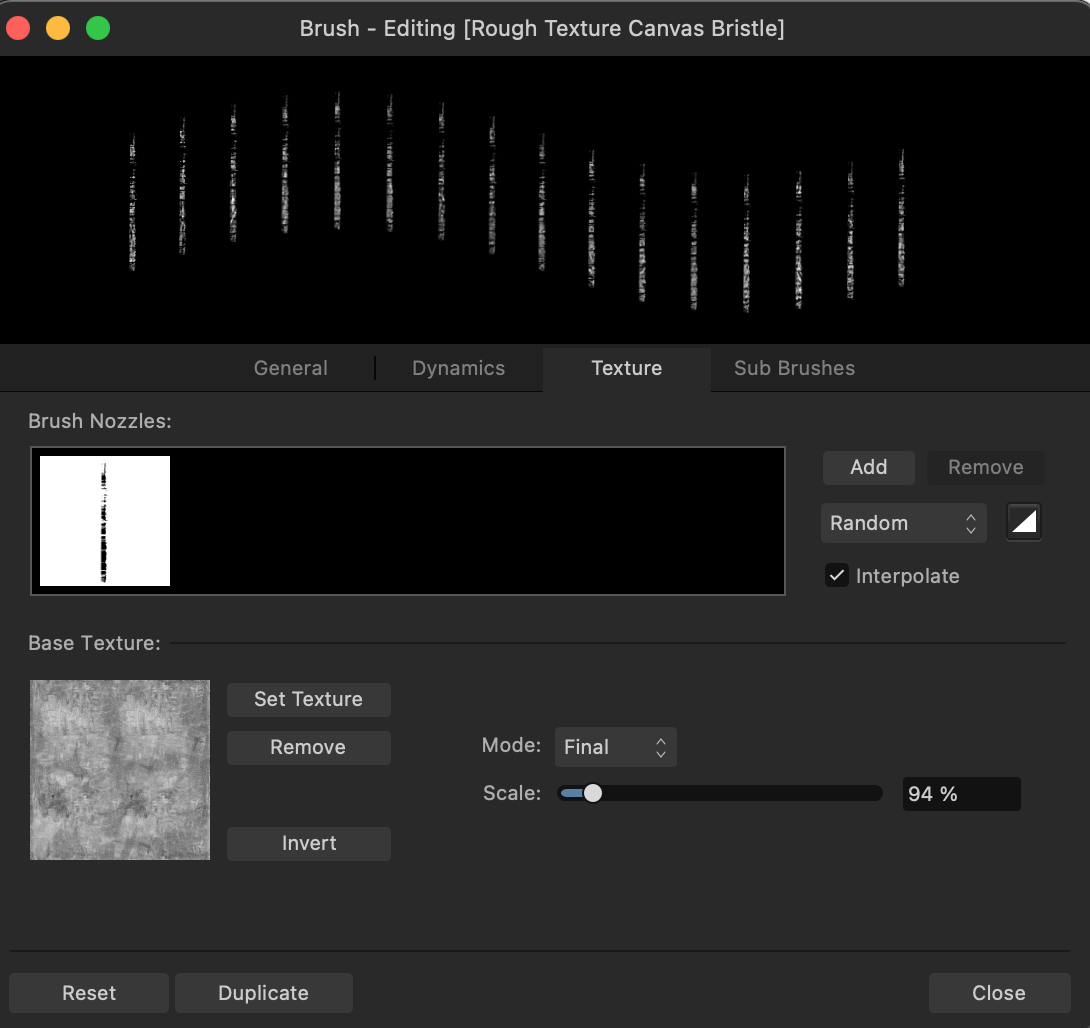
Hi Community, I have this very basic question about imported pixel brushes to draw: I'm in Pixel Persona and I have correctly imported several sets of photoshop brushes (.abr) downloaded from web in order to find the "perfect" pencil to draw in my style. The import procedure is not a problem, but many of the pencil brushes have in the nozzle something like in the attached pictures, and when I start drawing the effect is useless because the shape does not translate into something "logic" let me say I guess I should manage the parameters but how ? How should I set them in the pixel brushes window in order to use this type of "vertical sticks" as a drawing tool ? Do you have any pointer to learn how to modify these imported brushes so that I can use them to draw as I would normally do with a pencil ? Or maybe these brushes are not compatible and I should throw them away ? I also have seen that most of the original brushes in AD2 (2.0.4) for Mac have a round shape instead of this vertical shape, so maybe I should create brushes my self which is at the end the option I am thinking. In this last case do you have any pointer to recreate more realistic pencils than those already present in AD2 which I don't like much ? Thanks for any suggestion ag

-
Reorder a brush in the list of brushes
AGain replied to AGain's topic in Affinity on Desktop Questions (macOS and Windows)
Well, now that you told me that for some it could work and for others it doesn't, I tried again (in pixel persona) the following brushes moving the first on top toward the last at the bottom (I assume that the list of visible brushes extends well below the visible ones): Basic => it does not work. brush is not moved at all. Dry Media => it does not work. Engraving => it does not work and it duplicates or randomly move other brushes ... and so on. I noticed that in many cases NOT only it does not work, but it sometime duplicates at the bottom other brushes OR sometime it moves other brushes at the bottom. -
I am on AD2 (2.0.4) on macos. I have this behaviour and I think it's a bug, but I open the discussion here. I am on pixel persona I open the category of brushes I want to use. The list contains a lot of brushes (>30) and I decide to reorder some of them. I want to move the top brush down to the bottom of the list. So I select the top brush then while keeping pushed the left button of the mouse I move the cursor to the bottom edge of the visible list so that it starts to roll down fast the list of brushes until it stops at the bottom where the last brush is. A that point, here's the issue, I position the blue line of the cursor where I want to move the brush and I release the button and I expect the moved brush gets there. Result is: ... nothing moved, the brush is still on top but It moved down another unwanted brush. Any help ? I think it's easy to replicate but if you want I can make a short video of the issue. thanks AG
-
@Andy05 ... 😔 yes you are right ... so I learned another thing here .... Reading the help it says: "If this option is switched off, objects and selections can occupy partial pixels." I didn't even imagine/know that a selection could be moved by PARTIAL PIXELS. It would be interesting for me to understand in which use case someone would use this partial pixel allocation, but this is another story maybe...
-
AGain reacted to a post in a topic:
Copy and Paste of part of a rasterized image does not work as I would expect
-
Dear Community, I ask your support to understand this behaviour as it happens only with AD2 and not with other softwares. (I have the macos version) 1. I have an image (just a screenshot from an old videogame) 2. I import it as usual in AD2 first with the place command tool. Note the both the empty document setup is set a 300dpi and also the imported image is 300dpi. 3. after I import it , I switch to Pixel Persona 4. My objective would be simply to duplicate a part (the little monster sprite), therefore I first rasterize the image 5. then I use the square marquee tool and copy and paste (see the video attached) the part I want. 6. Result is a downgraded pixelated copy of the original pixels which is not what I want . Of course I could go to other softwares to do this thing... but what am I doing wrong ? Thanks in advance Screen Recording 2023-02-27 at 11.16.28.mov