

carl123
-
Posts
8,529 -
Joined
Reputation Activity
-

 carl123 got a reaction from Lisbon in Adding Color to negative/missing portions of text
Duplicate the text layer
Change the duplicated layer to Impact font (which is a close match for the Insomnia font)
Change colour to red and drag/resize font to cover the original font (line up first and last letters as best as possible)
Drag Red font below original text in Layers panel
Starting on the left tweak character spacing (kerning) on red font to match black font
May need additional tweaking depending on what characters are used in the final text but an interesting problem none the less
-
 carl123 got a reaction from Alfred in Adding Color to negative/missing portions of text
Duplicate the text layer
Change the duplicated layer to Impact font (which is a close match for the Insomnia font)
Change colour to red and drag/resize font to cover the original font (line up first and last letters as best as possible)
Drag Red font below original text in Layers panel
Starting on the left tweak character spacing (kerning) on red font to match black font
May need additional tweaking depending on what characters are used in the final text but an interesting problem none the less
-

 carl123 got a reaction from nmrdxt in Failed to open file "The file is already open in another application."
Sorry same darn message on both files
I've only seen that "missing parent" file message once before and the document could not be recovered without it
I think the official support staff will need to conform this but as it's a weekend it may be a while
Also, I don't know enough about Macs to advise if there is somewhere else you could look for a backup (Time Machine?)
But check back later in case someone else does
-
 carl123 got a reaction from Canterslowly in Affinity Designer file is corrupted suddenly
@Canterslowly
The 3 files you uploaded have all being recovered and are attached
The Chickens and Flowers files was a bit strange. You uploaded a 48.71MB file but when recovered it was a massive 1.2GB. By resaving it a few times I have managed to get it down to 732MB but it still seems massive compared to the original. If you copy the 2 Artboards in that document to a new file it will reduce a lot more (down to 176MB) but I uploaded the 732MB file just in case Affinity support want to analyse it to see what it contains that makes it so big now.
It opens and saves fine for me, so not sure why it would not save for you
As regards why you are getting so many corruptions I don't know. I notice that you use symbols a lot which I don't, so I can't say how reliable that part of the software is, maybe others can comment on that or Affinity support may be able to delve deeper with you into the issues you are having.
EDIT: On submitting this post the forum software appears to have renamed the Chicken and Flowers file (adding some numbers at the front) it was not me so you can just ignore that mysterious filename - the file still downloads OK
More Florals may be OK-recovered.afdesign Sakura 2 Repeat Pattern - recovered.afdesign 493743013_ChickensandFlowers2-recovered.afdesign
-
 carl123 got a reaction from BiffBrown in Makros not working
The Light Leaks macros works on all image sizes in 1.6
In 1.7 it appears to work "correctly" only when your image is about 3500px or more (wide)
You can see this by extending the canvas around your small image so the canvas size is, say, 5000px wide
If you then run the Flash macro you will see that the main effect is way outside your original image.
To "fix" it, before running the macro from the Library panel change the drop down from "No scale" to "Min Fit" (some of the other options may also work)
Not sure if it gives exactly the same effect as when run on 1.6 but now the macros do at least work on smaller images
-

 carl123 got a reaction from Frozen Death Knight in Feature Requests
It was so popular that they "recently" made a LIve Filter Layer for it
My missus has never looked so pretty
-
 carl123 got a reaction from Kaffeepause in Affinity Designer file is corrupted suddenly
First you need to find a unicorn egg then smash it with Thor's hammer and burn the pulverised eggs shells in the fires of Hades, the resulting incense will attract them.
Alternatively, you could just wait to see if/when they see this thread. But bear in mind they have a lot of threads to catch up on after the holidays, so the unicorn egg route would be the quickest option.
-
 carl123 reacted to StrongEagle in Failed Install - Solution (Work Around at Least)
I got the error message that Affinity could not be installed (insufficient privileges). Running as admin made no difference.
So, I looked at the folder tree that the installer created. At the bottom of the tree is "Designer". Somehow, this folder has been installed so that even a computer admin cannot access this folder, not even read permissions. This is apparently why the install fails... the folder is inaccessible except to some unknown owner that we cannot reveal.
The solution is to create a new directory under Program Files/Affinity (I used "Des 2"). When I installed to the directory I made, everything worked fine, and I've had no usage issues since.
-
 carl123 got a reaction from Craig smith in I’m wondering what kind of lap top would you recommend, I only have £ 200 limit
There are (surprisingly) quite a few new sub £200, Windows 11, laptops available. Most of which, I assume, will meet the minimum specifications Affinity states for their products
Would I buy one for serious work, nope!
Would I buy one for a "child" needing one for school work, absolutely!
Would I buy one for occasional use when visiting clients and showing them some design work, possibly!
Check Currys...
https://www.currys.co.uk/gbuk/windows-laptops/laptops/laptops/315_3226_30328_xx_ba00010671-bv00308565/1_20/price-asc/xx-criteria.html
-
 carl123 got a reaction from Cantisani in Affinity Photo Photoshop Plugins
Bear in mind these plugins also work standalone so you don't need APhoto plugin support if you want/need them
-
 carl123 got a reaction from shushustorm in Expand/Collapse selected layers
Have you tried selecting all layers in the Layers panel then right-clicking and selecting Expand Selection?
-
 carl123 got a reaction from LostInTranslation in Export all Artboards or Pages as individually named images?
Export Persona
-
 carl123 got a reaction from chasm in An Easy Way to eliminate gray lines between photos
Basically, create a Rectangle shape and cover the first image with it
Do the same for the 2nd and 3rd images with 2 more Rectangles
Select those 3 Rectangles in the Layers panel and create a Group with them by using Layer > Group
Drag that group onto the thumbnail of the image layer in the Layers panel
This then creates a mask, where only the areas of the image where we placed the 3 Rectangle show up
I have attached a document saved with History, so all the steps I took are visible in the History panel. You can replay them from the beginning, step by step, to see what I did
maskimage3.afpub
-
 carl123 got a reaction from NotMyFault in Possible 1.10.4 Bug -- Grayed-Out Tools When Using a Snapshot Document
When you create document from a snapshot, initially, there are no layers selected, most filters require a layer to be selected or else they will be grayed-out
-
 carl123 got a reaction from RokaDesign in Child Layer for the Mask
Not sure why that is, at the moment
Can you place it on the layer called Background, it should then drop to the same position under the mask layer
-
 carl123 got a reaction from jmwellborn in View the most requested features
I think you will find that a "poll" was one of the top 100 requested features on this forum
Never happened.
-
 carl123 got a reaction from hugo.paradox in How to duplicate objects around an ellipse
Explore...
ZERO TWO ZERO TWO ZERO
-
 carl123 got a reaction from v_kyr in Detailed area selection?
@henryb
Try turning off Hardware Acceleration in Edit > Preferences > Performance if it is on
-
carl123 got a reaction from NotMyFault in How to duplicate objects around an ellipse
Explore...
ZERO TWO ZERO TWO ZERO
-
 carl123 got a reaction from GarryP in How to duplicate objects around an ellipse
Explore...
ZERO TWO ZERO TWO ZERO
-
 carl123 got a reaction from henryb in Detailed area selection?
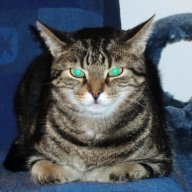
Just select the total outline of the dog - don't try to deselect the bits, say, where the chair shows through in above image
Once selected hit the Refine button then use the Matte Brush to paint around the fur edges (and where the chair shows through) which does a pretty good job (in this case) of separating the fur from the background
If you look at the attached APhoto file, not the JPG file, (in my original post) you will see that I used a HSL adjustment layer and Levels adjustment layer to desaturate the original layer the rest is essentially as you have surmised
There are many different ways one can desaturate the image - no one method is correct in all situations
-
carl123 got a reaction from henryb in Detailed area selection?
@henryb
Try turning off Hardware Acceleration in Edit > Preferences > Performance if it is on
-
carl123 got a reaction from Alfred in Outline with Transparent Objects
You can create a new non-transparent pixel layer in the same shape as your semi-transparent one, then apply the Outline to that and hide the fill
E.g.
Use the Flood Select Tool to select the shape
Create new pixel layer
Paint solid colour (e.g. black) to fill in pixel selection on the new pixel layer
(I also deselected then filled in the hole - not sure if you wanted that or not)
Add Outline FX to new layer and set fill Opacity to 0%
Designer file is also attached
strokeshape.afdesign
-
carl123 got a reaction from henryb in Detailed area selection?
A slightly different approach...
I selected and refined the selection of the dog then outputted it to its own layer
Then I just "lowered" the colours on the original layer
APhoto file attached
dogincar.afphoto
-
 carl123 got a reaction from ESPR in Unable to select more than 1 layer at a time when recording a macro
Select the lower of the top 2 layers and Arrange > Group
Select the layer above the new group just created and Arrange > Move Inside