carl123
-
Posts
8,535 -
Joined
Everything posted by carl123
-
 The problem has something to do with the Live High Pass filter layer. Delete (not hide) that layer and the problem goes away. Not sure why it is doing this Note: The unwanted space on the exported image gets larger as you increase the Radius slider in the Live High Pass filter
 -
Someone may need to see the document to see what those Find results are pointing to If you can't upload the document here, the support staff will give you a Dropbox link so you can send it directly to them
-
Sorry, you have to click Format first, the 1st item in your list (I forgot that step)
-
In the Find & Replace dialog you will see a Cog wheel icon next to Find, click that to bring up the Cog menu/dialog
-
No, Font Manager just lets you assign a "temporary" font to replace the missing one, so you can print or export your document. You will still get the preflight error warning you that the original font is unavailable on your system. Yes, you use the Find & Replace dialog Use the Cog menu and under Fonts change the ALL dropdown to Missing Then in the Font Family dropdown you can select the missing font Click OK in that dialog to close it and then click Find in the Find & Replace panel You will then get a list of all the occurrences that missing font is located in your Document. Clicking any of those occurrences will take you to the page where that font is used You can then change it manually or if you prefer you can use the same Find & Replace panel to assign a new font to replace the missing one for all occurrences where that missing font is found Either way, this change is permanent and preflight will no longer give an error for that missing font
-
RAW FILES - SOMETHING BIG IS COMING
carl123 replied to carl123's topic in Affinity on Desktop Questions (macOS and Windows)
With the Move Tool active, select the developed Raw layer and you will get an option to Replace Image in the context toolbar. When you use that option to replace the original image with a new version of that image, the previously applied Raw edits will be applied to that image also -
Affinity Designer 2
carl123 replied to ianrobertdouglas's topic in Affinity on Desktop Questions (macOS and Windows)
Try this... (works in my test document but I don't know the complexity of yours) Select all the Layer layers in the Layers Panel Right-click and select Expand All Select > Select All Right-Click any child Layer and select Release All child layers should be released but the Layer layers will still be there. But they will be empty, so you just ignore them or delete them if you want to -
Designer Unable to Edit in Publisher (Mac M1 Sonoma)
carl123 replied to PatDoran's topic in V2 Bugs found on macOS
Try doing a Save or Save As to a new file name then open that Designer file in Publisher -
I just click once then use the Right Arrow key
-
The background layer's colour can also be changed by selecting the Rectangle in Layer 1 and using the colour panel to change the colour
-
Photo 2.3.1 Pixelized image when reloading afphoto file
carl123 replied to Sylvain Hamel's topic in V2 Bugs found on Windows
Loading a RAW file in the Develop Persona only performs the basic operations needed to load the file but if you then do other things like exposure, curves, noise, shadows etc then all that additional processing has to be redone when you open the APhoto document before the preview (pixelated) image is updated. Which would explain the increase in time when opening an APhoto document compared to just opening the RAW file If I load the sample file you uploaded in your first post it takes me 22 seconds until it is unpixellated For some reason you appear to have duplicated the RAW layer in the APhoto file. If you did this so you have a backup then this is not necessary as the original RAW file is not touched. But far more importantly duplicating this (not needed RAW layer) increases the time for "depixelation" to occur significantly. By deleting that additional RAW layer or simply hiding it, and resaving the APhoto file, then the time it takes until the image is unpixellated drops to 11 seconds (half the original 22 seconds). It looks like each RAW layer has to be processed separately. So don't duplicate the RAW layer if you don't have to As an additional experiment after deleting your (not needed) RAW layer I then went back into the develop persona and reset all the adjustments (lots) you did to the RAW file back to their defaults. This then enables the file to be fully opened (unpixellated) in just 4 seconds so it's clear that whatever adjustments you do to the RAW layer increases the time to process the document when you reopen it. But there is not much you can do about this, it's just an observation. Not sure why it takes your PC 1 to 2 minutes to "display properly" but it may just be that my PC is faster than yours. You may want to post your PC's specs memory, cpu, drive, (SSD?) for analysis, also a screenshot of Edit > Settings > Performance may be useful -
How to go back to the normal setup
carl123 replied to EvaZ's topic in Affinity on Desktop Questions (macOS and Windows)
Redo what you did but this time select the top three items (not just the top two) -
Imported photo shown incorrectly
carl123 replied to Eric Du's topic in Affinity on Desktop Questions (macOS and Windows)
-
Near the Develop button there is an Output: option If you select Raw Layer Linked or Raw Layer Embedded you can develop and save the AFPhoto document then go back in and continue editing the Raw file from where you left off Please read the Help file for further Help
-
Go into shortcuts and remove the shortcut for Convert to Curves Ctrl+Enter (Windows) or Cmd+Return (Mac)
-
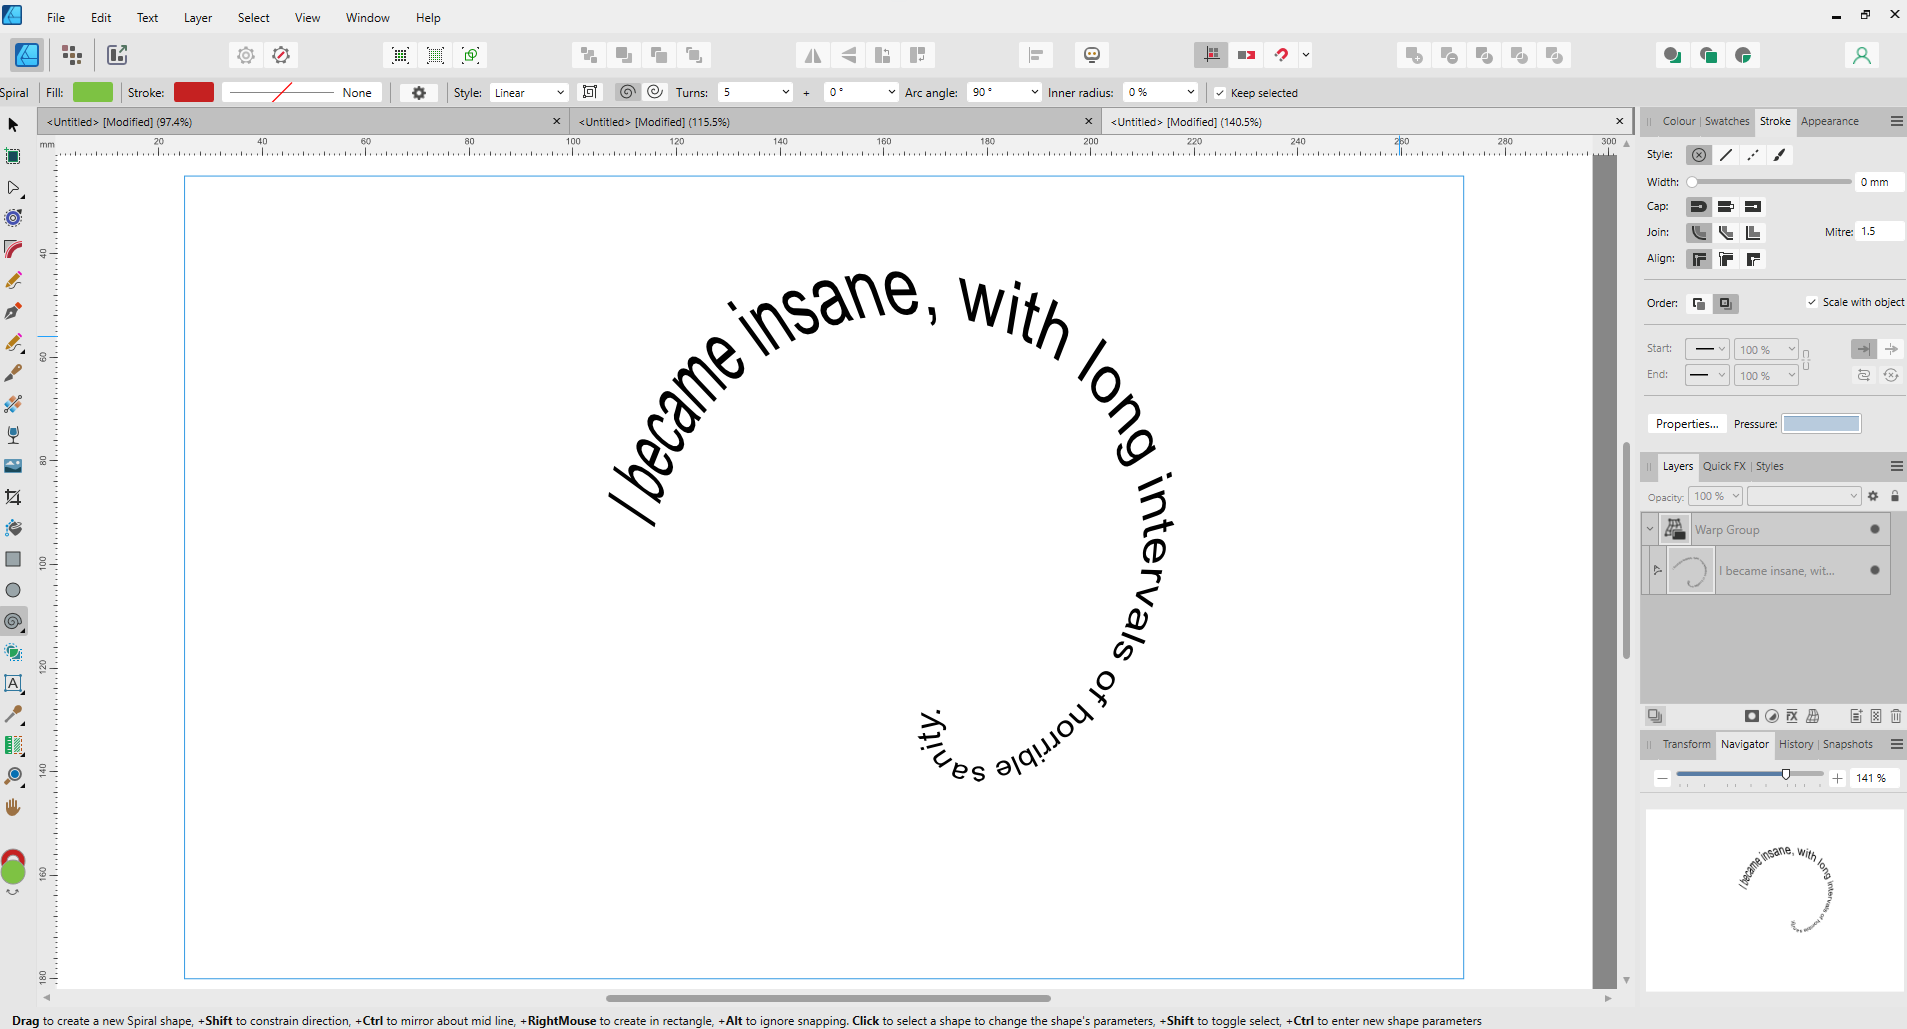
In Affinity Designer: The Spiral Tool using Text on the Spiral's Path Then enclosed in a Perspective Warp Group May be worth experimenting with (Note: Text remains editable)

-
1. If Save History is switched on mid-edit, history will be saved from when you opened the document to the last edit. The Undo Limit is settable in Edit > Settings, this limits how far back you can go in the History panel. 2. Yes, size is dependent on the particular edits done 3. I never do time-lapse - someone else may be able to advise re this
-
Change "Candidates" to All layers
-
Designer - bad behaviour : Select Bottom / Select Top
carl123 replied to FrM's topic in V2 Bugs found on Windows
Select any child in the group Make sure Edit all Layers is off (in the Layers panel) Then Select > Select All -
In APhoto v2 Make a 20cm x 20cm rectangle Use transform panel to place rectangle at desired coordinates, over image Use Select > Selection from Layer and Delete (to marquee select the rectangle & delete it) Activate Crop Tool (which, in this instance will automatically crop to selection)
-
Sounds like you are not copying the right dictionary.propcol file Are both Publisher versions exactly the same? Were both Publisher installations from the same source (Affinity website or Microsoft store)? and were they the same as regards you installed either the ".exe" version or the "MSIX" version?
-
No Crop Ratio. No develop.
carl123 replied to Sandy SP's topic in Affinity on Desktop Questions (macOS and Windows)
Try View > Show Context Toolbar -
All the ALT key does is disable snapping But if you drag from a middle handle then SHIFT-drag works in reverse for placed images There may be a good reason for this (that I don't understand) but it does get a bit confusing at times when working with placed images
-
See if this new feature (v2.4) does what you want...