Lindsay Wilson
-
Posts
25 -
Joined
-
Last visited
-
 G13RL reacted to a post in a topic:
When expanding stroke, ignore self-intersections/crossovers
G13RL reacted to a post in a topic:
When expanding stroke, ignore self-intersections/crossovers
-
Hi, yes the problem's still there. Both in Photo 2.0.3 and Designer 2.0.4. Haven't actually used the desktop software in a while, been using the iPad apps which don't have this problem, but it's still annoying.
-
Rudolphus reacted to a post in a topic:
Preserve stroke widths when splitting a tapered path
-
Rudolphus reacted to a post in a topic:
When expanding stroke, ignore self-intersections/crossovers
-
Lindsay Wilson reacted to a post in a topic:
Splitting tapered path does not preserve stroke widths
-
Lindsay Wilson reacted to a post in a topic:
When expanding stroke, ignore self-intersections/crossovers
-
lepr reacted to a post in a topic:
Preserve stroke widths when splitting a tapered path
-
lepr reacted to a post in a topic:
When expanding stroke, ignore self-intersections/crossovers
-
NotMyFault reacted to a post in a topic:
When expanding stroke, ignore self-intersections/crossovers
-
loukash reacted to a post in a topic:
When expanding stroke, ignore self-intersections/crossovers
-
user_0815 reacted to a post in a topic:
Preserve stroke widths when splitting a tapered path
-
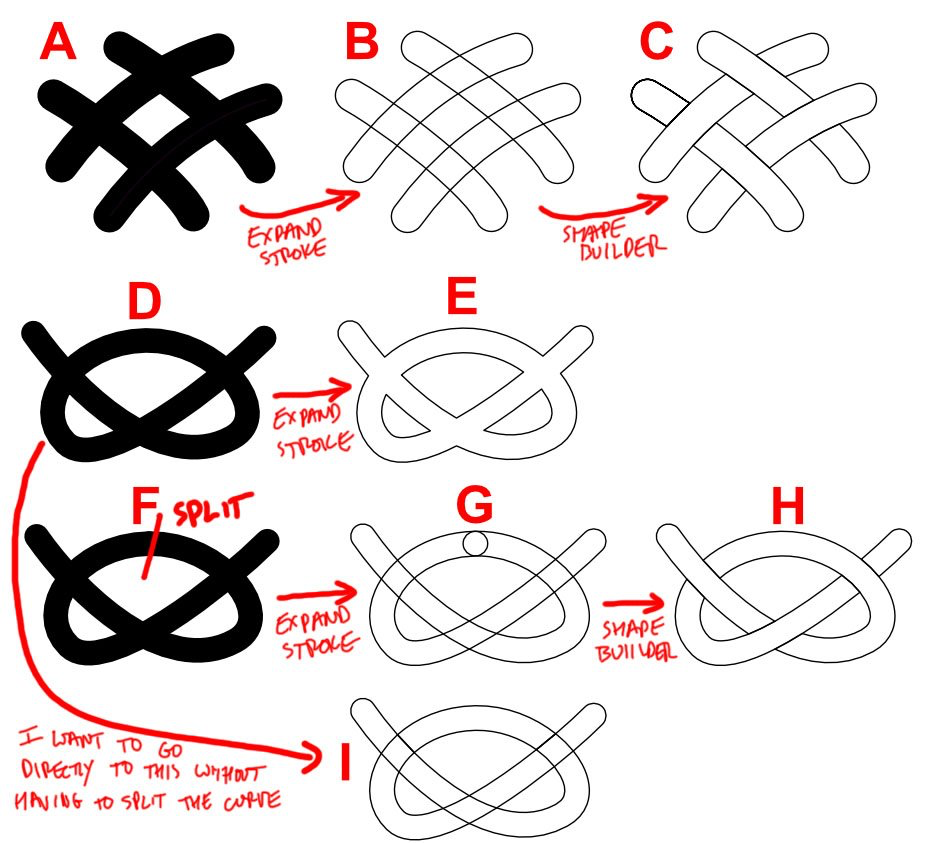
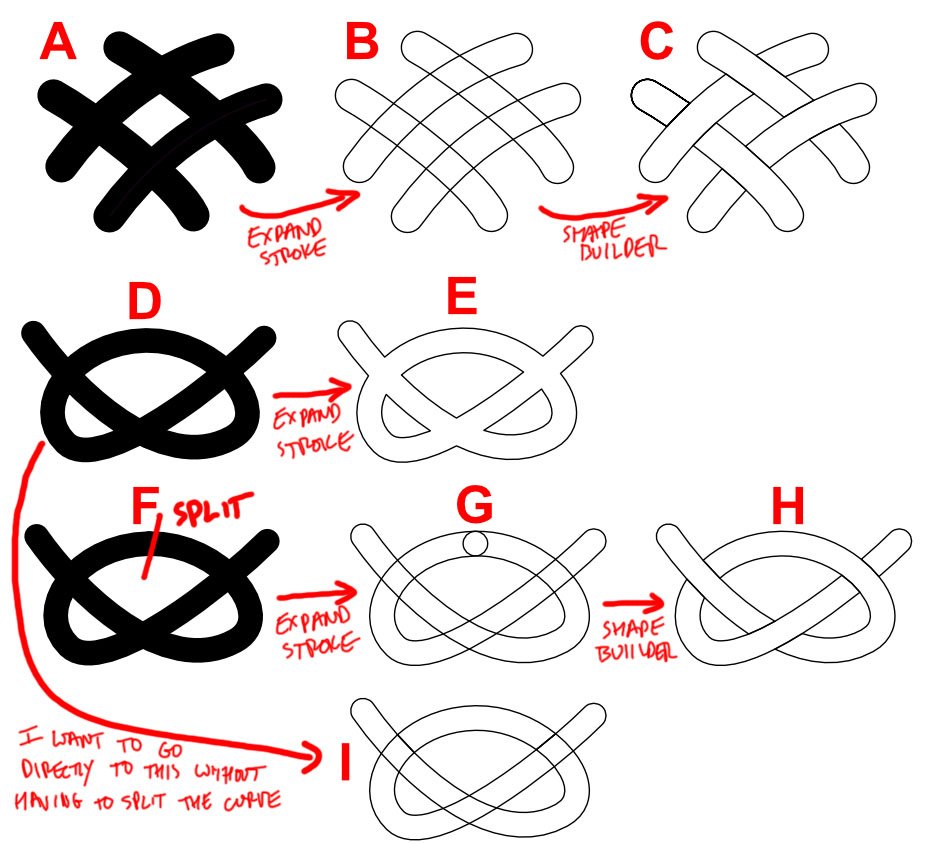
Summary: If I have a single self-intersecting curve in Designer (“D” in the attached) and expand the stroke, it produces “E”. The intersections have been erased/joined, however its best to describe. What I’d like it to produce instead is “I”, where the edges of the stroke at the intersections are left alone. This all arose from my experiments using expand stroke then shape builder to build up interlacing knot work designs. If all the curves are discrete, “A”, then this works great, and produces “C”. However, if any of the curves self-intersect, like “D”, the it fails, because expand stroke doesn’t produce the stroke edges at the intersections. I hope this makes sense. A fix is to deliberately split the stroke somewhere and then expand the resulting curves. However, there are certain situations where I can’t do this (namely, where I have used a tapered stroke profile) and would really prefer to just expand the one curve directly. If it was possible to add an option to control how expand stroke behaves at self-intersections, it would be awesome. It could either do the default behaviour, where it simply outlines everything that appears black, or it actually traces the edges of the stroke. ADDITIONAL: A similar option would also be invaluable for the contour tool!

-
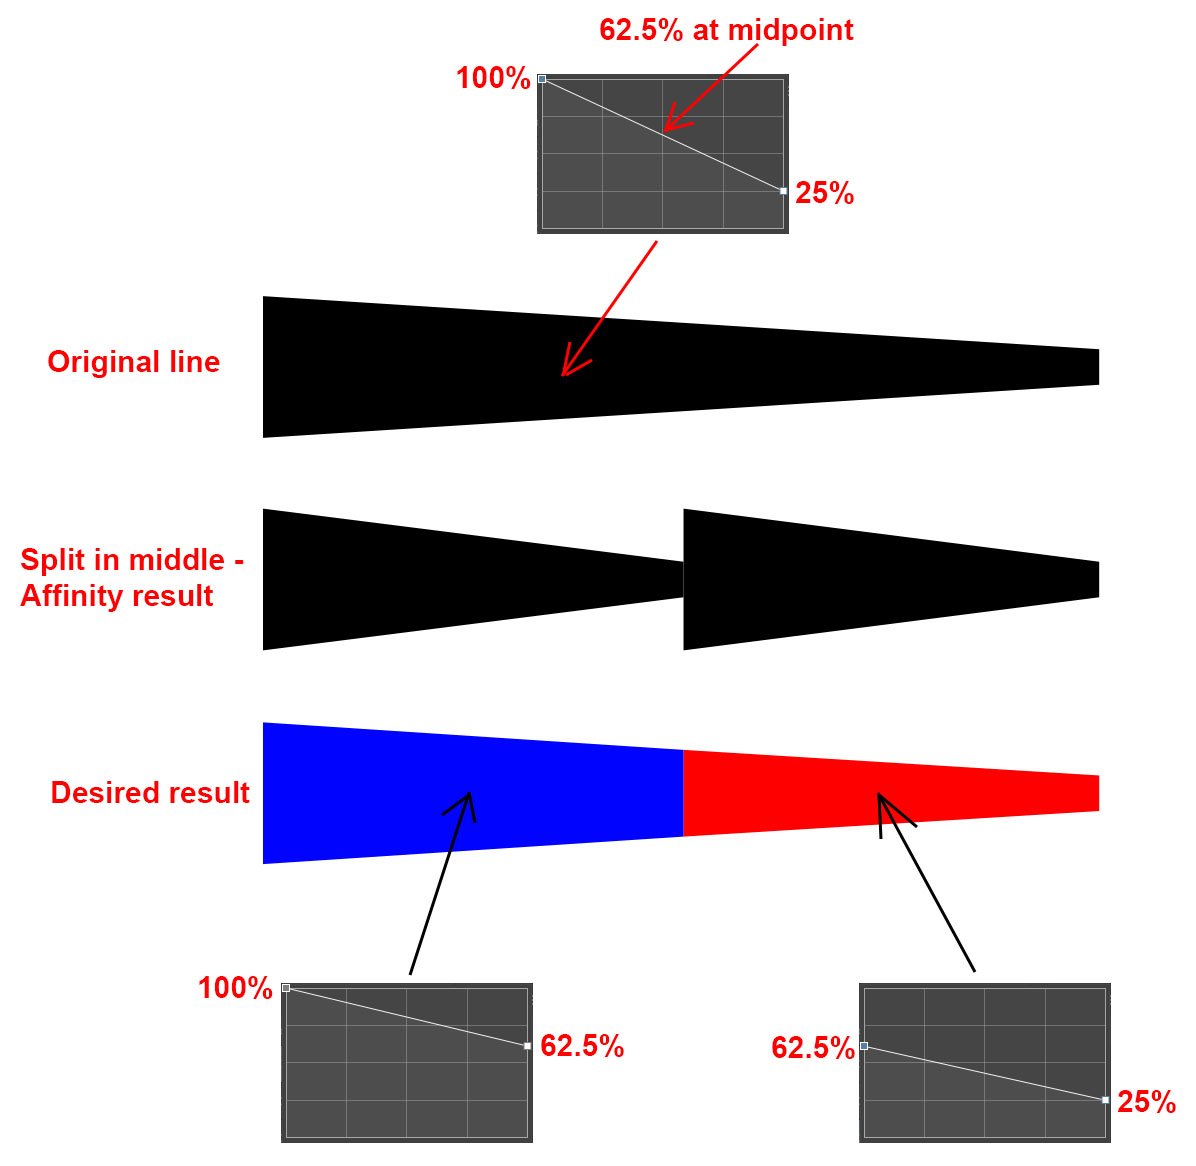
Suppose I have a path in designer and have used the pressure curve to apply a tapered stroke profile to it, like shown in the attached image. For example, I set the width to 50pt and then taper from 100% to 25%. If I cut the path in the middle, each half has the same overall style as the original, i.e. both have 50pt weight and taper from 100% to 50%. This is not what I’d like. Instead, the split paths should maintain the original visual appearance as the original path. The first path should taper from 100% to 62.5% and the second path from 62.5% to 25%. This would be an extremely desirable feature to have. It should look at where the original curve was split, then split the pressure curve similarly at the same ratio along its length. Now, I am aware that I could expand the stoke of the original path first, then split it, and this would maintain the visual appearance. However I do not want to do this, for a few reasons. I want to be able to edit the path subsequently, and I need to be able to expand the path after the split (this relates to creating interlacing knot works from self-intersecting curves, by expanding stroke and then using the shape builder).
-
Thanks for getting back. This is actually tied in with using expand stroke then the shape builder for creating knotwork/interlacing patterns from self-intersecting paths (I have another post on that here:https://forum.affinity.serif.com/index.php?/topic/180721-expand-stroke-on-self-intersecting-curves-to-create-knotworkinterlace/. Unfortunately I can't expand the stroke first, because then it doesn't properly show the stroke at the crossovers! I hadn't realised there was a reuqests section, I'll definitely post it over there.
-
lacerto reacted to a post in a topic:
Selecting objects by intersecting marquee - problem
-
@lacertoInteresting stuff. You're right, it does indeed appear to be the area that would be filled. Why it's different when using the marquee instead of clicking, I can't understand. It also makes it impossible to use the marquee + crossing within a closed shape - e.g. say you have several small shapes inside a larger circle, you'll always end up selecting the outer circle as well. Now I understand what that option in Illustrator does There's a setting for "Object selection by path only" - sure enough, if that's on, then you have to click on the actual stroke for it to be selected, and it ignores the filled area. However, even with the option off, if the path has no/empty fill, then Illustrator still ignores the filled area and reverts to only clicking on the path. Affinity considers the filled area regardless of whether it's really filled or not. The Alt select option in Inkscape is very useful, as it allows dragging freehand across the objects to be selected, you're not just confined to a marquee. Another sort of behaviour, which I've been accustomed to for so long without realising, is used for marquee selection in Rhino. If you drag from left to right, then it selects enclosing objects, but if you drag right to left, it selects crossing objects. Very easy way to choose the behaviour without having to worry about modifier keys.
-
@R C-R Hmm...so for you is it selecting the big black line when clicking anywhere within the bounding box (apart from near the edges)? Or is it only within the area I highlighted? For me, it's definitely only in the highlighted area.
-
@R C-R Clicking directly (as in, "on the black area") works fine for me too, I didn't mean to imply that it didn't. It's the clicking elsewhere I have issue with.
-
Affinity Designer 2.0.4, Windows 10 64-bit. Screenshot attached. Top shows a single path of 50pt width, tapered using the pressure curve from 100% to 25%. Middle is what happens after splitting the path in the middle with the knife tool. Each half has the same overall style as the original path - i.e. they BOTH have 50pt width and taper from 100% to 25%. Perhaps this is by design (e.g. Illustrator behaves the same way), but I would have assumed that it would be clever enough to preserve the widths on both sides of the split, i.e. producing an exact visual split, like shown at the bottom. In this example, both lines still have 50pt width, but the first tapers from 100% to 62.5%, and the second from 62.% to 25%. If this is indeed by design, it would be extremely useful to have an option to select which behaviour it uses!
-
@walt.farrell Thanks for the reply. Perhaps I'm being obtuse, but to me, "clicking directly on it" means "clicking ON the black region". Not "clicking somewhere NEAR the black region". No other software I use regularly (e.g. Illustrator, Rhino, Inkscape) behaves like this. Part of the problem in Designer also seems to be caused by the use of a tapered stroke. If I use the pressure curve to produce a tapered stroke, the selectable region still behaves as if the path had a full-width stroke. I.e. at the narrow end of the path, it easily gets selected even when clicking away from the path. Just to nail it flat once more - clicking anywhere in the highlighted area selects the curve. I still say this is weird.
-
lacerto reacted to a post in a topic:
Selecting objects by intersecting marquee - problem
-
@NotMyFault Very neat idea - I wasn't aware of how to use the image brushes! Unfortunately, while that produces the _appearance_ of the lines, they're not usable vectors.
-
Lindsay Wilson reacted to a post in a topic:
Expand stroke on self-intersecting curves to create knotwork/interlace
-
@N.P.M. I'm aware of alt-clicking, but it's clunky, especially when it doesn't seem to work with the node tool. I still stand by my original claim that having an object get selected when you don't click directly on it (which is essentially what this all boils down do) is dumb!
-
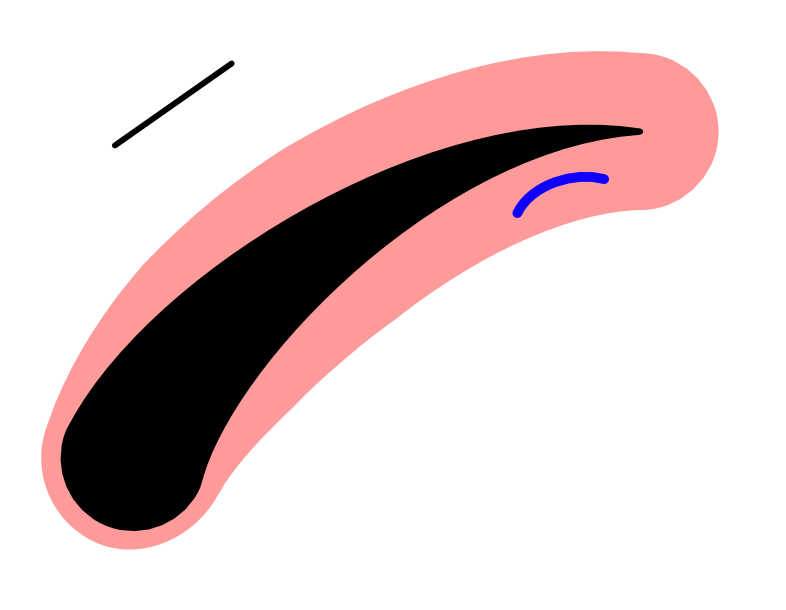
@MikeTO @Old Bruce @walt.farrellthanks for getting back. If indeed that is by design, I'm afraid that's pretty silly. I understand if the object had a fill, that's no problem, but to still behave the same way on an object with no fill? Weird. Anyway, here's an example file, along with a screenshot. I'm on Win 10, 64 bit, and using the latest version of Designer (2.0.4). The big line has a variable-width stroke, set using the pressure curve. Forget for a moment about the click+drag selection thing, and only consider selection by clicking. Try clicking near the big line to select it - you'll see that if you click anywhere roughly within the red-highlighted area, the big line gets selected. This seems weird - I understand having a slight tolerance, but even at the thin end of the line, it still gets selected when clicking relatively far away. Logically, I would expect to only be able to select the line when clicking on the black area - for example, this is what Inkscape does. Illustrator, on the other hand, selects only when clicking on the actual curve path (at least in my version). Now for the fun part - try to select the short blue line by clicking on it. You can't. Even though it's separated from the big line, it's still within the big line's "sensitive zone", so the big line gets selected in preference. The blue line also happens to be below the big line - if you move it above, then you can select it, but I positioned it below to demonstrate the point. For the click+drag, if you start anywhere within the red area, then the big line again gets automatically selected. This is a really peculiar behaviour. Somebody please tell me I'm doing something wrong, or there's a setting I've missed, otherwise I'm going to like Designer a lot less! Selection demonstration.afdesign
-
@GarryP It's wrapped up with making knotwork interlaces using expand stroke and the shape builder. I have another post on the topic, link below. If you have a self-intersecting curve, then expand stroke does not correctly produce fully-outlined intersections that shape builder can then use. The only way I can currently get it to work is by splitting the curve, so each piece is NOT self-intersecting, then doing expand stroke + shape builder on them. However, if my original path has a tapered stroke, splitting it screws up the widths, hence why I'm wanting to do this splitting thing.
-
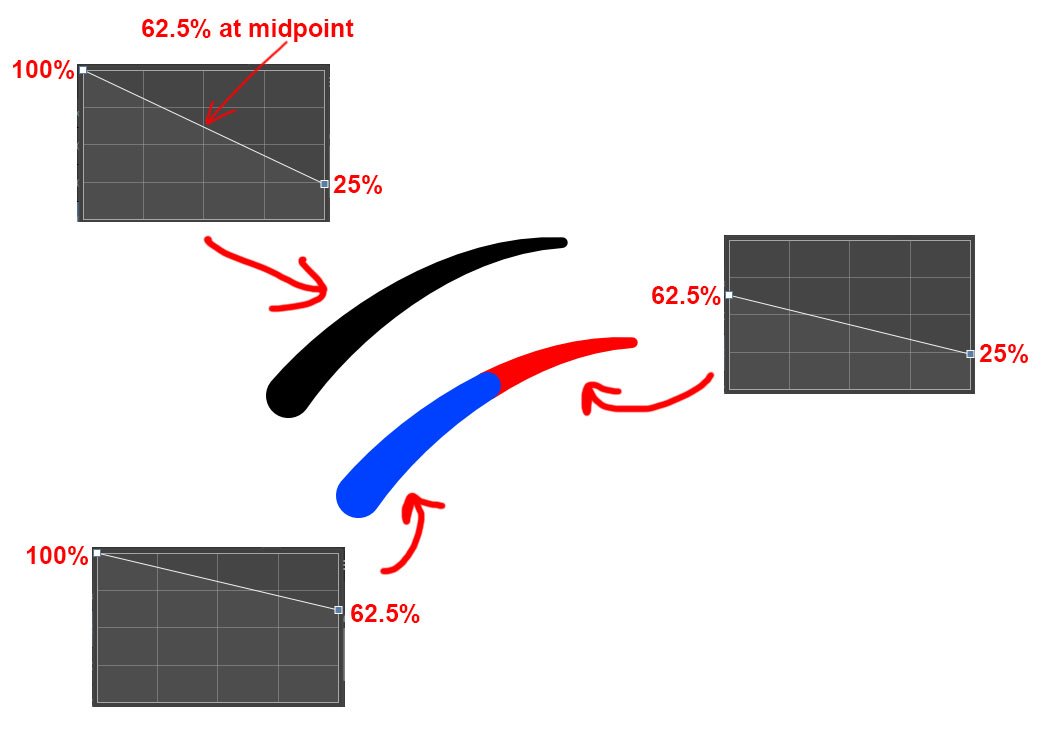
@GarryP I only moved the lines apart in the drawing so they were more visible - it doesn't need to make a gap. Calculating the required line widths would actually be very easy - see example below. If the original line went from 100% to 25%, and it was split exactly in the middle, then the new segments should go from 100% to 62.5% and 62.5% to 25% to match up. Just in linear proportion to how far along the line was split.
-
I've recently been playing around using a combination of expand stroke and the shape builder tool to create interlacing knotwork designs. It's very powerful for this, but I'm running into a problem with self-intersecting curves. Take a look at the attached screenshot. Simple case first. I have multiple separate curves (A). Expand stroke gives (B). Then shape builder to give (C). Now, a single self-intersecting curve (B). If I do expand stroke directly on this (E), the crossovers are all welded together and the outline of the stroke isn't visible. Hope that makes sense. To get it to work, I have to split the curve into parts (F) so that each part is NOT self-intersecting. Then expand stroke gives (G), with the intersections fully visible, and shape builder gives the final result (H). This is alright, but there are situations where it is not easy. Either in a large knotwork, where it's hard to keep track of what goes over/under what, or if I have applied a variable-width stroke to the curve, in which case splitting it messes up the stroke widths (I posted another topic on this). I would really like to be able to just go directly to a fully-outlined curve, i.e. I want to go straight from (D) to (I). Maybe this just isn't possible - neither Inkscape nor Illustrator do this either - but if there's a way I'd really like to know about it!