veles
-
Posts
10 -
Joined
Everything posted by veles
-
It's extremely niche, but I've used Rasterbator ( https://rasterbator.net/ ) for several large-scale projects.
-
The placement of the tiles looks too rigid and artificial in my AP example. Doing it the way you suggested works, but because I'm using positional jitter and the tiles are not supposed to touch or overlap this involves a lot of trial and error. I have to make hundreds of rows of these tiles and creating them this way would be too time consuming. Thank you very much. This is exactly what I was looking for. I'll experiment with this setting. This brush setting in combination with grid snapping should get me close enough to what I'm looking for. Now I just have to figure out how to use grid snapping for horizontal lines 😅.
-
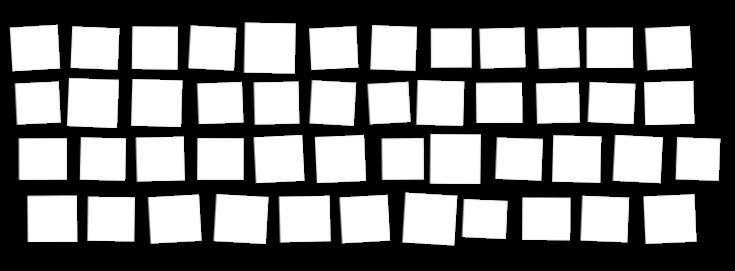
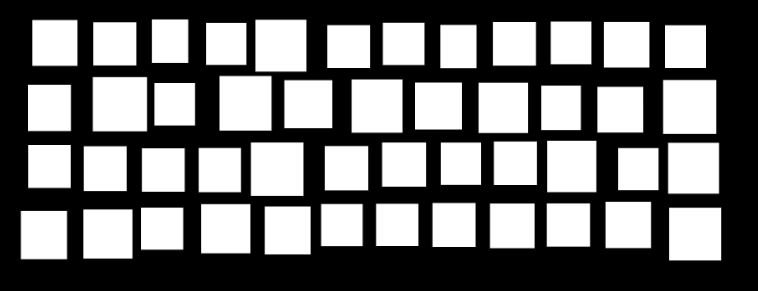
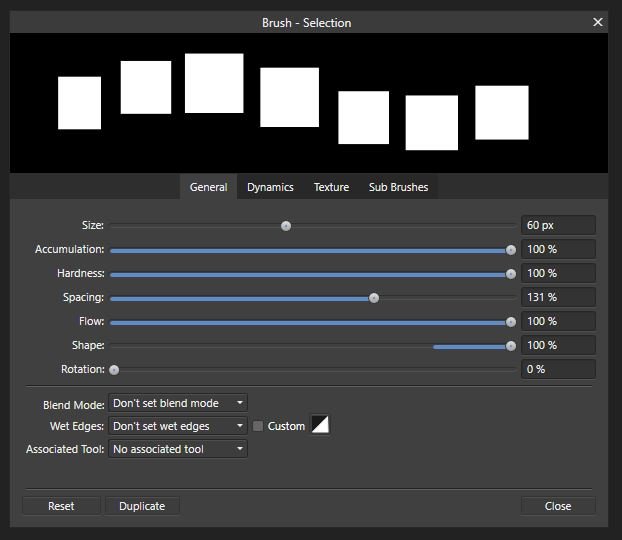
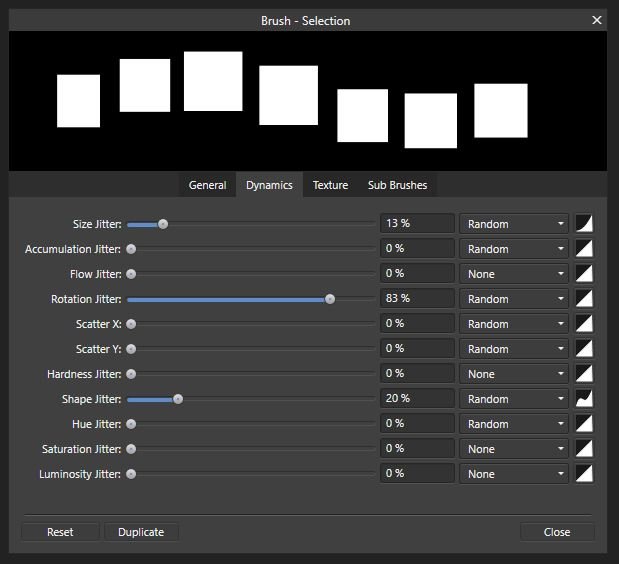
I'm trying to create this in AP: I made this in PS with four parallel, horizontal lines, using a basic, square brush with minimal angle jitter and moderate shape and size jitter. Very basic. The goal is to create subtle variations that will make the arrangement of the rectangles appear handmade and not mechanic. This is the closest I could get to it in AP: Obviously, this is unusable for my purposes. I'm wondering if I just don't know how to adjust the brush settings to achieve the desired effect. Here are the brush settings I used: The problems I've encountered: 1. The 'Rotation Jitter' setting doesn't seem to do anything on its own. It looks like it has to be combined with 'Rotation'; however, when combined with 'Rotation' everything is either rotated in only one direction or the angle variation is too great. 2. I'm either using it wrong or the shift modifier is glitching when used in combination with the brush tool for straight vertical and horizontal lines. I've tried: click>shift+drag, shift+click+drag, shift>click+drag. None of the key combinations work correctly and the closest result is this: For some reason Affinity insist on connecting the end of the fist line with the beginning of the subsequent one. I don't see a shift key modifier option under the 'Brush Tool' in the 'Keyboard Shortcuts' menu, so it's possible that, technically, this function isn't available in AP. Any suggestions and workarounds are welcome. I'm on Windows and using a mouse but have access to a drawing tablet.

-
affinity photo In the style of AI-generated Art (a bit of Role Reversal here)
veles replied to DelN's topic in Share your work
I like it. It reminds me a bit of Dave McKean's illustrations. -
Thank you very much for your help.
-
I make quick rough concept sketches. The emphasis is on speed using keyboard shortcuts, quickly switching between patterns, and working in a single layer. Here is an extremely simplified example of what this might entail. It took me approximately 30 seconds to do this in a single Photoshop layer. I'd like to know if this workflow is possible in Affinity Photo? The only way I know how to do this in Affinity Photo takes a lot longer and it requires several layers involving multiple steps per pattern: 1. select areas to be filled 2. create a fill layer 3. navigate through the menu to the file with the desired pattern 4. apply the pattern 5. deselect 6. merge down 7. repeat 1-6 for each pattern Another problem that adds a lot of unnecessary steps is a glitch that swaps foreground and background colors every time I switch tools. Having to constantly undo the resulting mistakes and fight to use the selected color is frustrating and time consuming. Is there a way to fix this?
-
That was the problem. Thank you very much. I apologize if this sounds stupid, but what's the difference? I had no idea there was such thing as an image layer. I just assumed the layer was automatically named that way.
- 6 replies
-
- 1
-

-
- affinity photo
- affinity designer
- (and 3 more)
-
When I attempt to cut out or make a copy of a selection from a pixel layer, the selection is ignored and the entire layer gets copied/cut. The problem persists with all selection tools and with both keyboard shortcuts (ctrl+x, ctrl+c, ctrl+v) and clicking on the "Cut"/"Copy" and "Paste" options from the File menu. The problem is present in Photo as well as in Designer's pixel persona. The only workaround is to copy the layer, make the selection, invert the selection and erase the parts that are not needed. Very frustrating. Is there any way to fix this?
-
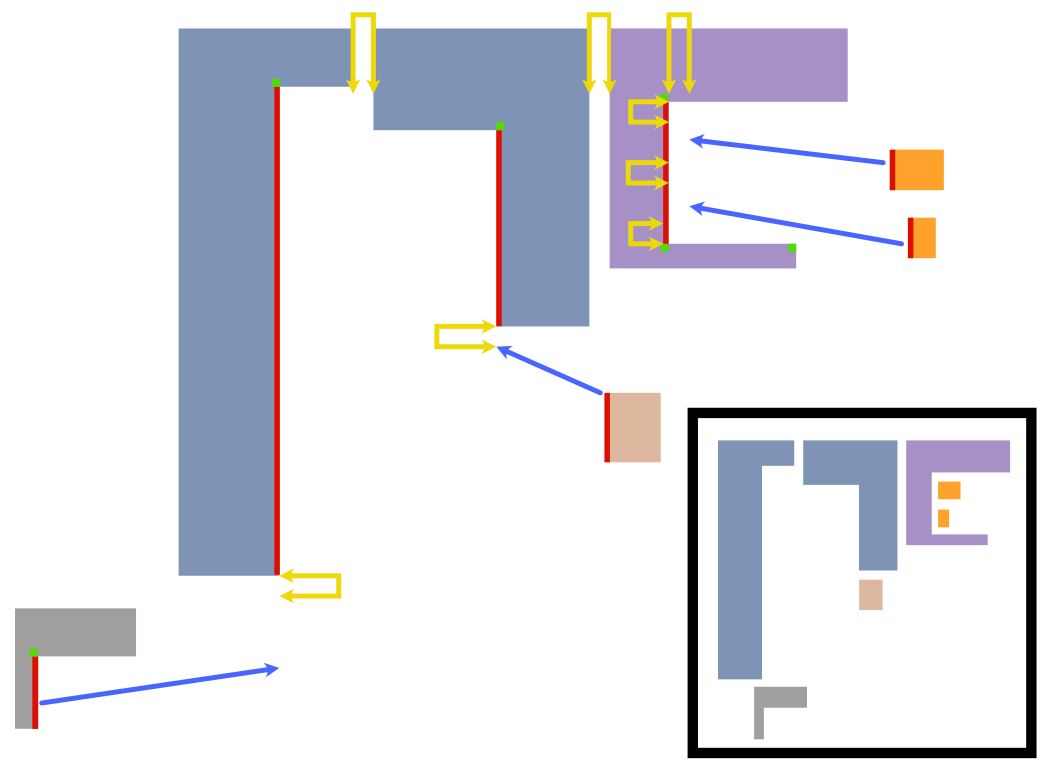
Hi there. I've owned this software for quite some time, but this is my first post here. I'm importing multiple objects from different files and arranging them in a specific way. They are created to fit together so that there's equal spacing between and around each object (think Mondrian's work). I thought this would be incredibly quick and easy to do, but I'm completely stumped. Here is a simplified representation of what I'm trying to accomplish. For greater clarity I've included only a small number of objects. Normally, the entire page would be completely filled. I need to line up the sides marked with red, keeping the spacing between objects consistent throughout the document--approximation of the final result is shown in the black rectangle. The problem I've encountered is that snapping and measurements features seem to only work on nodes that are on the bounding boxes. There is no way to line up anything with the nodes marked with green. I can't get anything to snap to them. If I create a new object I can use those nodes as the starting point and the cursor will snap to them but, as mentioned, I'm not creating new objects. I will have pages filled with these objects, so using the transform panel would be too time consuming. I've tried every combination of options in the snapping panel but nothing seems to be working. In summary: how do I line up objects with the nodes that are not on the bounding boxes, and how do I measure the distance from an object to the lines converging in such a node?