Bail
-
Posts
16 -
Joined
-
Last visited
Everything posted by Bail
-
John and V Kyr Thank you both for very helpful suggestions. I shall start with the three-Step Sharpening article to get myself ready for Real World Image Sharpening . As ever I am so impressed by the knowledge and kind assistance provided by the advanced members on the Affinity Forum. Thank you one and all. I have been doing my bit to advance the cause of Affinity Photo through my local photography club and also by a recent article I have posted on Macfilos blog http://macfilos.com/photo/2017/10/30/image-processing-affinity-photo-adobe-the-way-forward-for-fuji-fans
-
John Thanks to your help I am now trialling Topaz Infocus for a month. It seems to do something additional to and different from my normal High Pass sharpening in Affinity Photo. It also seems to do some of the same kind of sharpening and detail enhancement I am still trying to understand the best adjustment to workflow.It would seem to be sensible to do the following: 1 Develop RAW as normal in AP 2 Use Topaz Infocus for deconvolution sharpening and very modest sharpening and detail enhancement 3 Finish off at end of layer process with very gentle High pass sharpening if more required. Does this make sense?
-
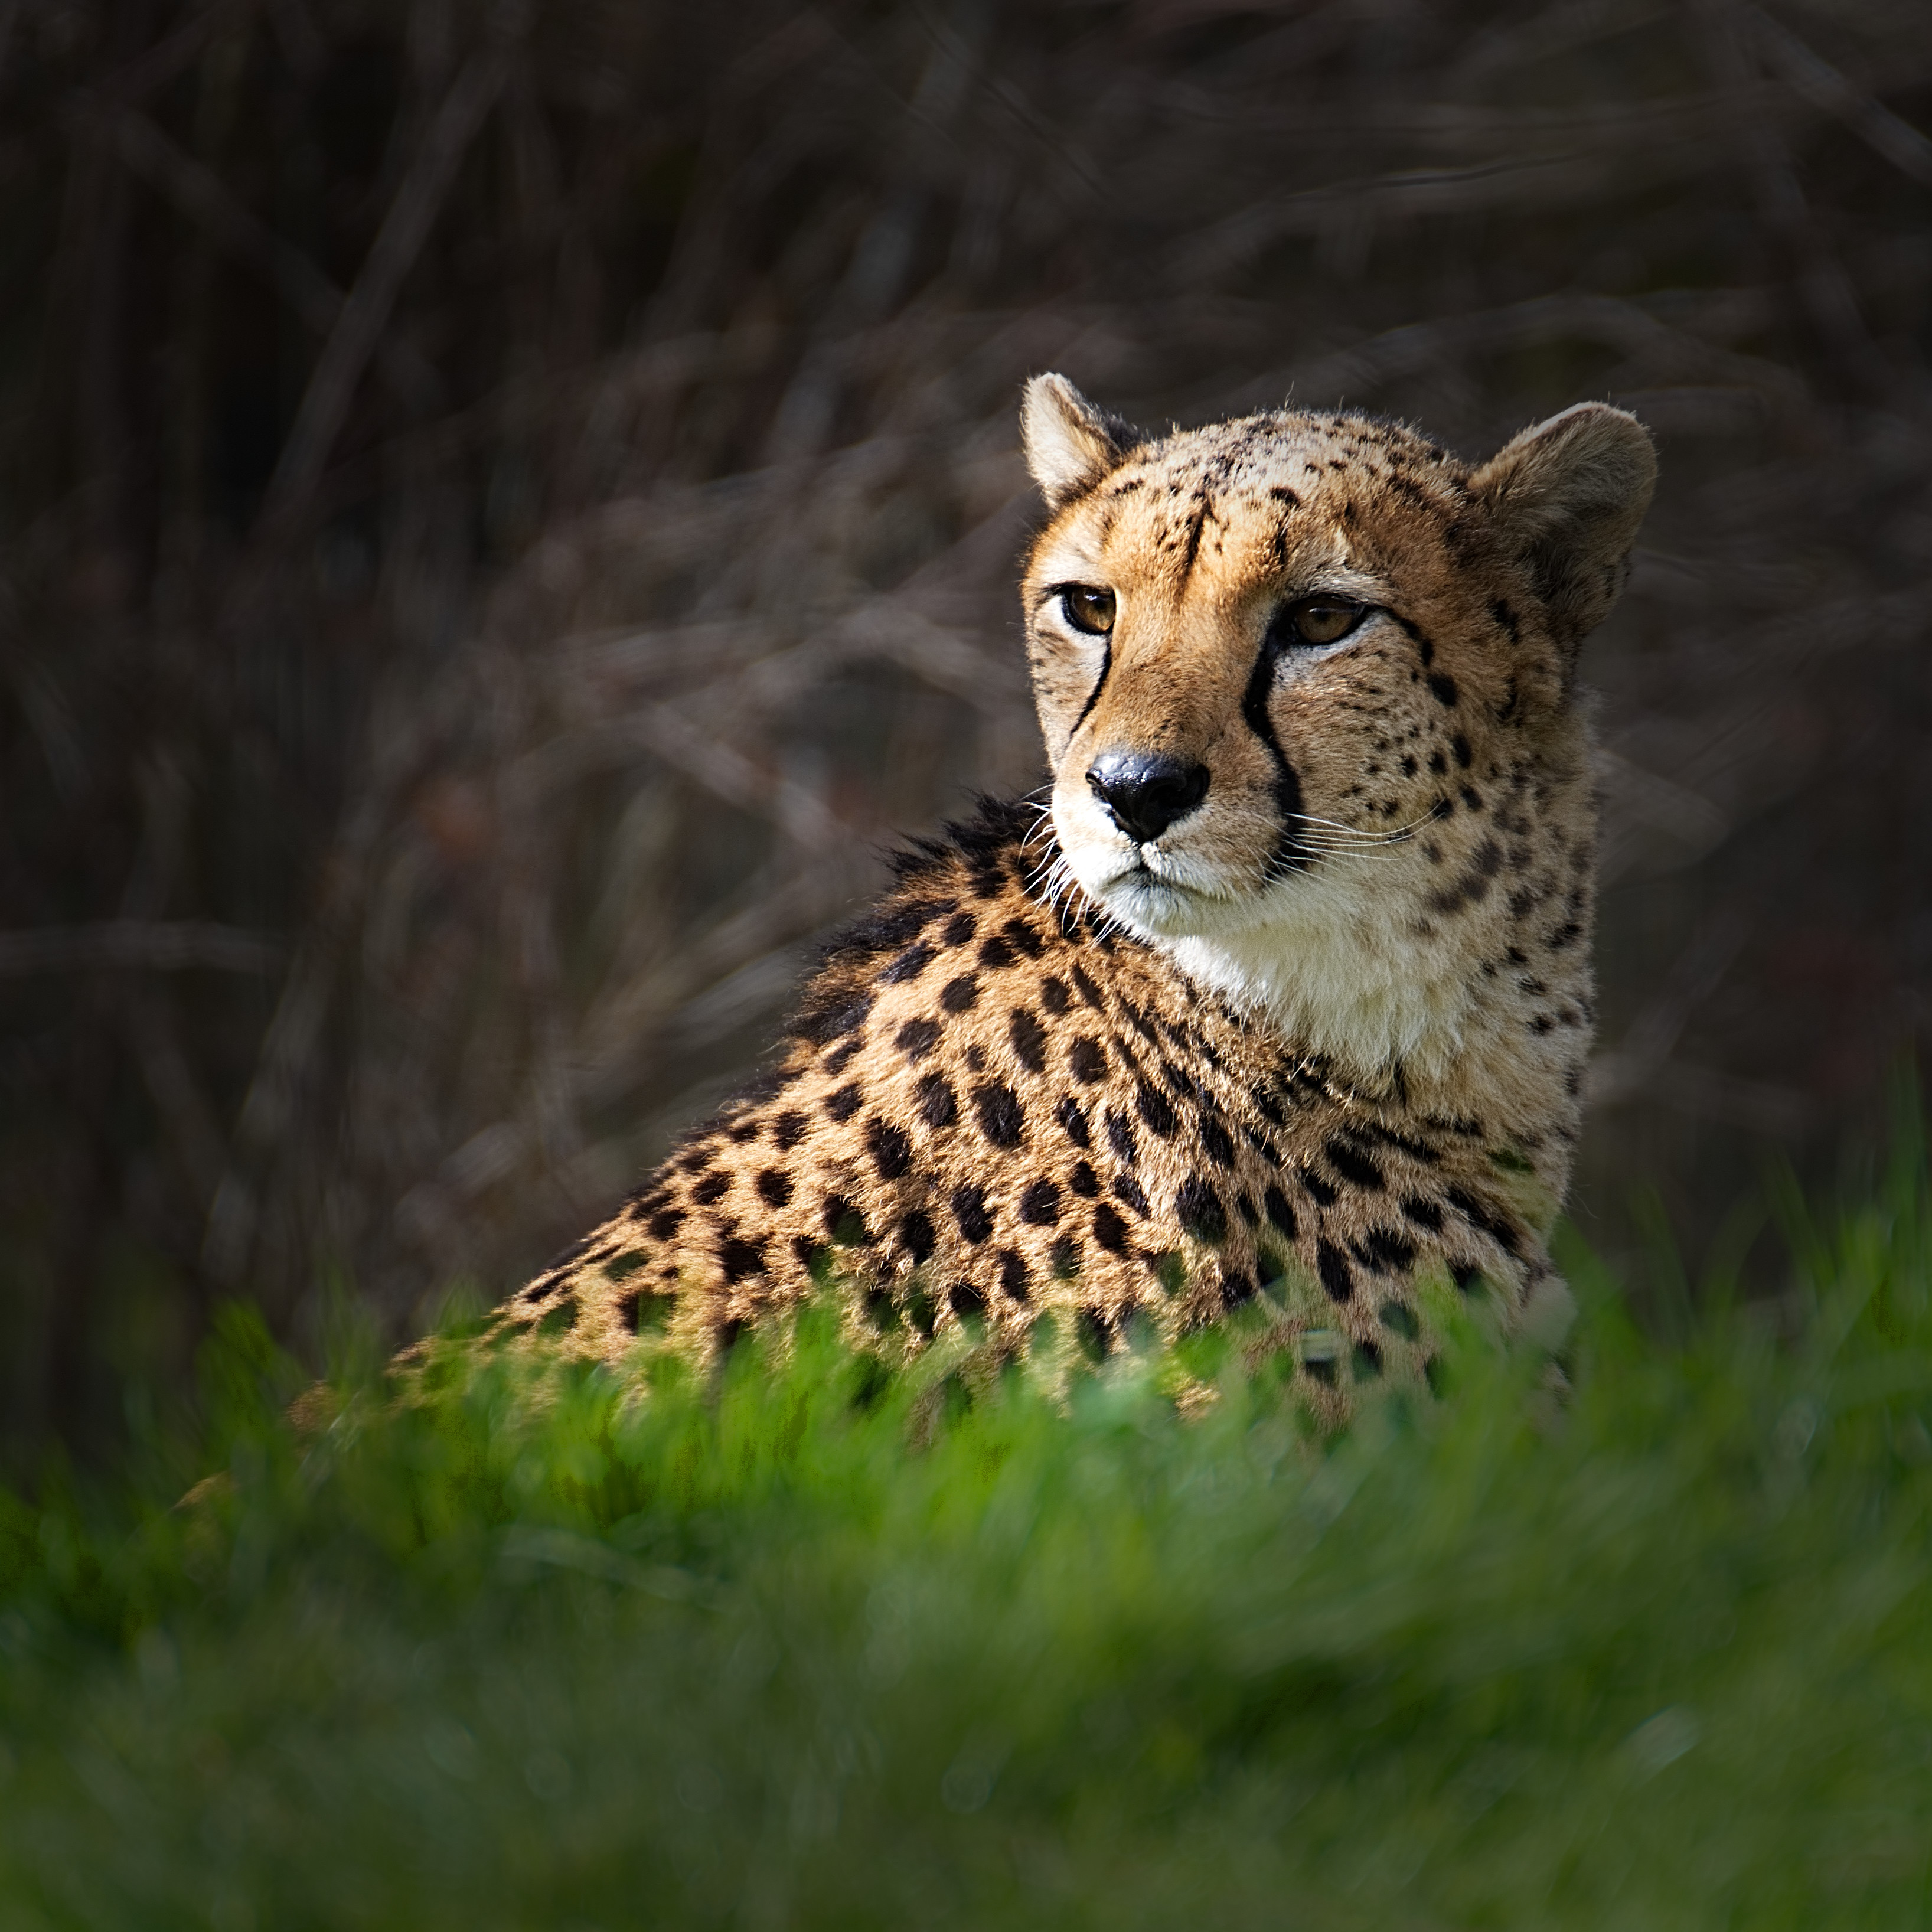
John Thanks this very speedy response. I visited Cambridge in Colour and read your post there. Astra is PC only and I have a Mac but I have downloaded RAW Therapee and will have a look at that. Thanks for pointing me in the right direction. Glad you like the Cheetah. I wasn't pleased to be told the image needed improvement but if it can I will have a go. Best wishes
-
I have used Affinity Photo for two years since leaving Photoshop and am very satisfied. Recently a professional photographer suggested that one of my images below could be improved by using a deconvolution sharpener on it. This image was taken at Chester Zoo on my X-T2 with the 100-400 lens at 600mm, full frame equivalent. I sharpened the image by modest use of the High pass Filter and am pleased with the result. However, I realise I have almost no knowledge of deconvolution sharpening which I thought naively was more about removing the blurring associated with AA filters which of course the X-T2 sensor does not have. Can any one help? 1What does Deconvolution sharpening actually do? 2 Does Affinity Photo enable such sharpening? If so how? 3 If not what software do people use? Does anyone using Fuji cameras use it? Any guide on these issues would be much appreciated. Thanks in advance.

-
Hi MEB Many thanks your suggestions. I checked out both the brush opacity and the layer selection and both were fine. Then I noticed I had Protect Alpha checked. As soon as I unchecked this, all is working fine. I don't really understand the Protect Alpha bit so I don't know how I had come mistakenly to check it. Any way, you solved my problem, thank you. All best wishes, David PS No point in uploading a file as High Pass inoperative with all the ones I tried!
-
I have been using Affinity Photo for well over a year since I left Adobe Photoshop when they changed their business model and overall I am delighted. I have just experienced a problem with my normal sharpening routine on the High Pass Filter. My routine is: Choose Layer, New Live Filter Layer, High Pass Filter In Dialogue box check monochrome Drag radius slider UP until level of detail to be sharpened becomes visible Get rid of dialogue box Select High Pass Filter Layer Set Blend Mode to Linear Light Choose Layer, Invert With High Pass Filter Layer selected use the Paint Brush tool, take hardness down all the way, increase the brush size and then, in the colour tab, make sure colour set to white. With Paint brush, Click Drag to paint in the sharpening on the areas you want to sharpen This routine has worked faultlessly until yesterday when it stopped. Normally, as you brush over the detail you want to sharpen you can see the effect as you brush but not now. I should stress that in all other respects (layers, filters, masks etc) Affinity Photo is working fine. In particular the Unsharp Mask filter is working fine.I suspect therefore the fault I have with the High Pass Filter may be something I have done rather than with Affinity. Any ideas? I would be very grateful for any help. Bail
-
First congratulations on the standard of the video tutorials. As a former PS CS4 and CS6 user, I was happy until Adobe introduced their CC rental model and I vowed late in 2014 to start migrating away from PS if I could. I was therefore an enthusiastic AP beta tester from early 2015 and purchased on launch. The important point is that I am already a far more skilful AP user(around masks, blend modes, layers, sharpening to name but four) than I was a PS user. There is an appallingly steep learning curve in PS but AP is much more focussed, accessible and easier to learn. Part of this is due to it being aimed squarely at Photographers only and partly because your videos are a great help to get going. I measure success in terms of the quality of images I have produced and been successful with in my local club competitions and salon "acceptances"and 2015 has been a lot better than 2014. I attribute some good part of this to AP and the ease of learning which your tutorials have given. I have to remain with Adobe until end November 2015 but can't wait to cancel my subscription. I haven't saved a .psd file for three months now. No gripes, Thanks a million!
-
Using Channels for Masks
Bail replied to evtonic3's topic in Tutorials (Staff and Customer Created Tutorials)
One good example of using channels is in selecting just the sky. Please see the attached teaching point on the byThom site: http://www.bythom.com I have tried to follow his PS routine in Affinity Photo but am unsuccessful so far but will keep on trying particularly as I have just found the above helpful comments. My inexperience with channels means I am on a steep learning curve and, even though I can use other methods to select the sky, I want to be able to use the channels method for future use. I shall also look for some videos/tutorials on channels. Thanks to everyone who contributed above Bail -
In Affinity Photo (as in Photoshop), I find that my prints are darker than I want despite screen and printer profiling as well as having a correct profile for my paper/printer combination (Fotospeed PF Lustre 275 plus Epson R3000). Of course, I realise that my print will never be exactly equivalent to what I see on the screen due to the different types of light involved. However, in Photoshop I had a nice Action which was called "Lighten for Printing" which basically brightened up the printed image and reduced the gap between the brightness of screen and printed image. Happily this works equally well in Affinity by: 1 Layer - New Layer from Snapshot 2 Set mode to Screen 3 Set Layer Opacity to desired percentage for Lightening e.g. 10%, 20% or whatever. However whereas this is a one click running of a stored action in Photoshop, in Affinity by the above method it is a bit more trouble. Does Affinity have any equivalent to Actions or might this be in the pipeline for the future? By the way, I could not be more pleased with the switch from Photoshop to Affinity Photo. It is a pleasure to use an application which has been designed from the ground up for Photographers. Please would the whole Affinity team take a bow? Best wishes, Bail
-
Removal of Halos
Bail replied to Bail's topic in Pre-V2 Archive of Affinity on Desktop Questions (macOS and Windows)
This method works as I mentioned above but only for small areas of halo. it's limitation is the need to constantly change colours since even a seemingly uniform blue sky exhibits a subtle gradient towards/away from the light source. I have found a better solution on the internet called "Removing halos using Photoshop" which is a YouTube clip by Dan Hughes. This method merely requires making a simple Lasso selection of the halo plus surrounding area, then CMD J to put selection on a new layer, then blend mode to Darker Colour, then Black to foreground colour, then V to select Move tool, then use arrow keys to move whole selection a few pixels. This completely removes the halo and can cope with large lengths of halo (one side of mountain for example). Obviously the other side of the mountain has to be a separate selection. Hope this helps others facing the same problem Best wishes Bail -
Removal of Halos
Bail replied to Bail's topic in Pre-V2 Archive of Affinity on Desktop Questions (macOS and Windows)
You could create a new Pixel Layer with the Blend Mode set to Darker. Select the Brush Tool and then use the Eye Dropper to sample the colour of the sky. Painting over the Halo using the Brush Tool should darken the Halo effect. Thank you very much. it works a treat! PS Re other query above, Halos can occur at dark/light boundaries and are exacerbated by over sharpening. this was not the case here as a slight halo visible before sharpening. -
Please could i have some advice on the best way in Affinity Photo to deal with halos, typically in landscapes where a dark skyline is against a bright sky? Many thanks in advance, Bail
-
Coranda, Success! Brilliant advice. I can now enter competitions starting in just over a month without using Photoshop. Your instructions are now printed out and ready for use on my desk. Thanks again, Bail
-
Resizing Images
Bail replied to Bail's topic in Pre-V2 Archive of Affinity on Desktop Questions (macOS and Windows)
Just a heartfelt thank you to Paul Bravery and MelG for their patient help in enabling me at last to resize images correctly. Much appreciated. Bail -
Resizing Images
Bail replied to Bail's topic in Pre-V2 Archive of Affinity on Desktop Questions (macOS and Windows)
Paul, Thank you for your help but I am still unable to achieve the results I need. Sorry to be dim :) I am happy with adding a pixel layer and filling with black but can't succeed in getting 1400 pixels wide by 1050 high images for both Landscape and Portrait. Incidentally, I don't use keyboard shortcuts which is why I framed my original request in menu commands from Photoshop. By working backwards from Photoshop menu commands I do see you are of course right that the same keyboard shortcuts in Photoshop open the Resize Document and Resize Canvas dialogue boxes but finding them wasn't my problem. What I want to know is the precise order of every step needed to achieve what I want. Each step means really which sizes to enter in each dialogue box for both formats of image as well as use of the lock. Please can you try again? Once again apologies but this is a real showstopper presumably because I am just not appreciating something you take for granted? Thanks in advance Bail For help, I am attaching a Landscape and a Portrait example of what I want
-
Affinity Photo is excellent ( the InPainting brush is better than excellent) and I am close to leaving Photoshop CC in November when my contract expires. One thing I am having trouble with in Affinity is resizing images. For my photo society I need to end up with images 1400 wide and 1050 pixels high, both landscape and portrait format. I have tried time after time to achieve this in Affinity. Clearly I am being slow here but really need help! In Photoshop current easy procedure is: Landscape: Image: Image Size, Check the resample and constrain boxes and reduce image width to 1400 pixels. Image, Canvas Size, uncheck relative box, select the canvas colour to black, and set the height to 1050 pixels Portrait Image: Image, Image size, Check the resample and constrain proportions boxes and reduce the image height to 1050 pixels Image, Canvas size, uncheck the Relative box, select the canvas colour to black, and set the width to 1400 pixels I would be very grateful if someone could provide me with the steps I need to do in Affinity Photo to replicate this end result? Bail