BlueLiner
-
Posts
68 -
Joined
-
Last visited
Everything posted by BlueLiner
-
Also a fan of DaVinci Resolve and Fusion. Lots of tutorials can be found on Youtube and the free version is likely all you will need. I was a former Vegas Pro user and have not looked back.
-
Windows version, right? If so, Windows is associating ".afphoto" file extension with the v1 application not the v2. To change: Windows 11: Right-click the Start button (or use the WIN+X keyboard shortcut) and select Settings. In the Settings window, choose Apps from the left panel, and then click Default apps on the right. Scroll down and select Choose defaults by file type. Click or tap one of the file types in the list. Pick a program from the pop-up list or choose to look for an app in the Microsoft Store. Select OK to save your changes. From now on, Windows will open that program when you open a file with that extension from File Explorer Windows 10: Right-click the Start button (or use the WIN+X hotkey) and choose Settings. In the Settings window, select Apps from the list. Choose Default apps on the left. Scroll down and select Choose default apps by file type. Locate the file extension for which you want to change the default program. If you’re unsure about the extension, open File Explorer, find the file, and use the View > File name extensions option to show file extensions. In the Choose default apps by file type window, select the program to the right of the file extension. If there isn’t one listed, choose Choose a default instead. In the Choose an app pop-up window, pick a new program to associate with that file extension. If none listed suits your preference, try looking for an app in the Microsoft Store. Windows 10 will now open the program you chose each time you open a file with that extension from File Explorer
-
Key Object Alignment Option
BlueLiner replied to Thomas Fazanaro's topic in Affinity on Desktop Questions (macOS and Windows)
In AD v2, let's say you want to align one object centered horizontally to a second object, select the 1st object then while holding SHIFT down select the 2nd object, release the shift key (both should be selected) then click while holding down ALT, click on the one you want to align to and click the horizontal center align icon. You can also align two objects to a 3rd in the same way, just ALT click on the their object you want to center to. Screen Recording.webm
-
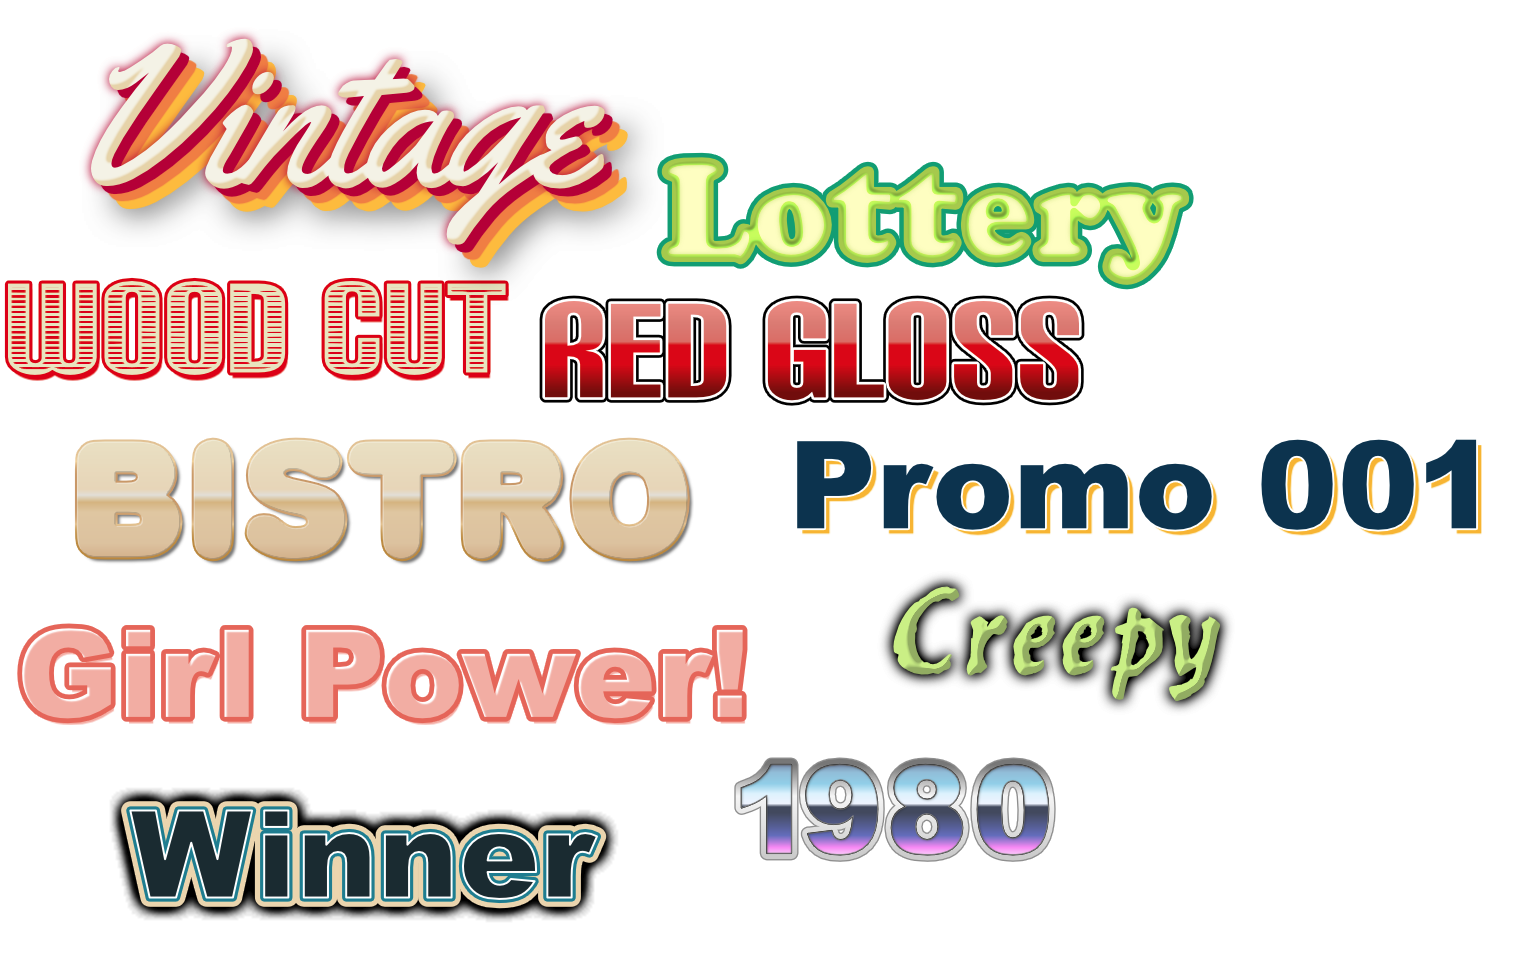
The best way would be to sort of disassemble what I did. In Affinity Designer, write some text like "Vintage" and choose a font for it like I used, although it can create a nice effect on many fonts, and then apply the style to it. Next go to layers and the Vintage Layer and click on FX to open up the "Layer Effects" panel. Layer Effects is the secret sauce. Click on each item with a check box to see how the layer was modified by the effect. Take note that the "Scale with Object" box is checked. This is very important with styles as when text or objects get resized, the effect will not size properly if this is not checked and you may get poor looking results when you scale vectors. A good challenge is when you seem some stylized text you like, say on a website or in an email your received, try and recreate it using the Layer Effects. Some things can't be done solely with layer effects but you would be surprised what you can do. Keep in mind styles retain fills and strokes too so you can do some cool stuff there too. Make sure your stokes are also set to scale with object. Here are some examples of ones I have made.
-
You are very welcome. I am glad you like it.
-
Thanks. I moved from CorelDRAW a couple of years ago. It still has some capabilities that Affinity Designer doesn't so I fire my old copy of X7 when needed.
-
I had something similar happen to me in Windows where if I dragged in a picture it would be somewhat pixelated but it if I used the place tool, it was fine. Not sure why, but try the place tool
-
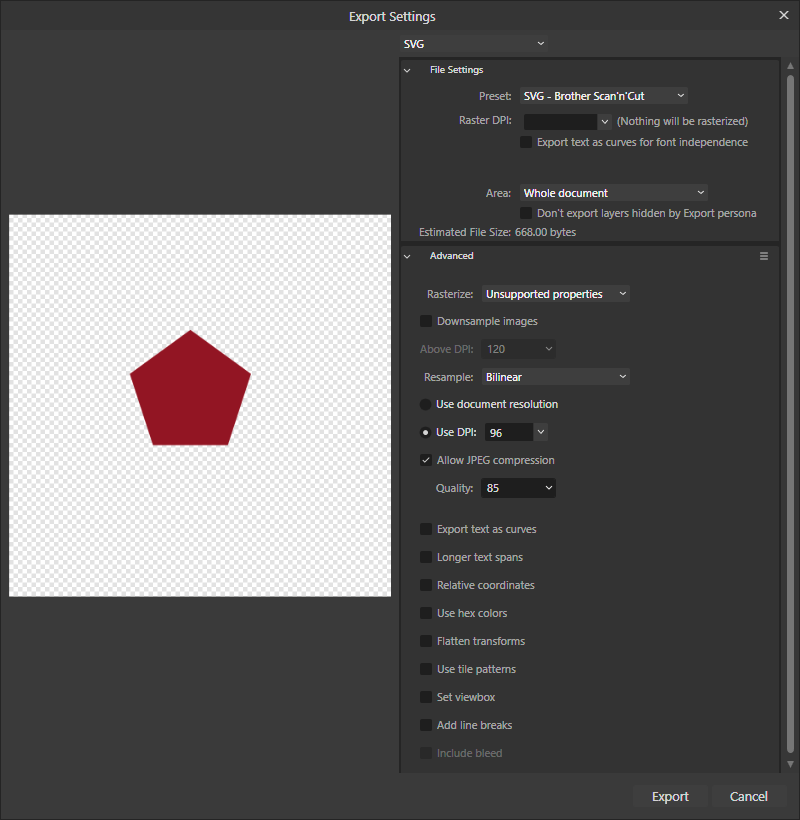
... and for Affinity Designer v1, her are the export settings I use for Brother Scan'n'cut / Cricut so that I get a 1:1 size in cutting software. Total aside, but I think I use these same settings for Autodesk Fusion360 when I want to import an SVG file. I sometimes find it easier to make an SVG then extrude and tweak for 3D printing.
-
To export an SVG for a Brother Scan'n'cut or Cricut so that the SVG imports at the same size in the cutting machine software, I use the following SVG Export settings and it works great:
-
Expand Stroke Error
BlueLiner replied to gskidmark's topic in Affinity on Desktop Questions (macOS and Windows)
I redrew it by tracing your with the pen tool and set the stroke to 6PT as well. Mine looks a little thinner though but I tried at 14pt as well and I could not recreate it. I have attached my file. I used the following stroke settings: StrokeTest.afdesign
-
Another trick might be to draw a rectangle at least as large as the object you want to pump up the noise on. Make it 50% Gray and max the noise on the fill. Change the layer to say Linear Light (try others as well - used ) and make it a child of the object you want noisier so it is clipped. To make even heavier, rasterize the 50%gray rectangle and size up. Again try setting to OVERLAY, VIVID, LINEAR, etc.) As you resize the rectangle you will see the noise get chunkier. Keep in mind this noise is rasterized so it is best to do once the target object if sized properly. Consider just a small increase in size but duplicate, still clipped by the original object and reposition.
-
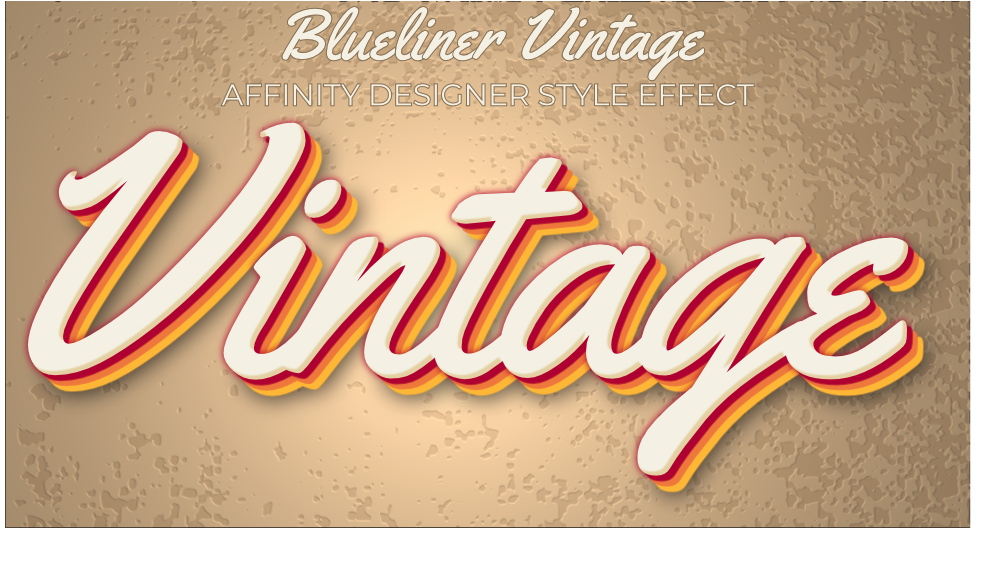
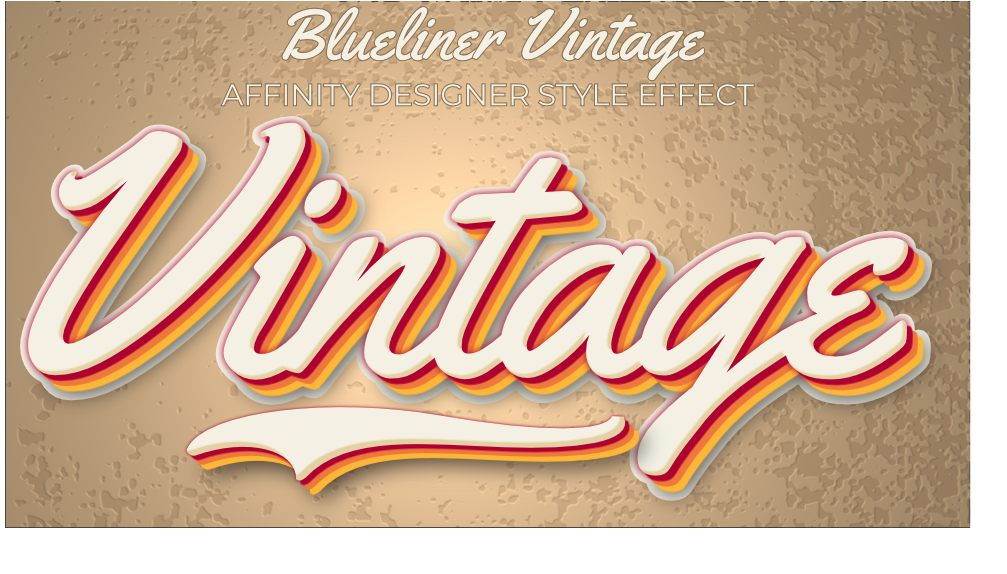
I have been playing around with styles lately making a bunch for different email marketing campaigns I have been working on. I started off here on the forums to see what others have done and what is possible. In doing so, I came across a post from the pre v2 archive section of the forums from someone looking for a style to recreate an effect in Affinity Designer. See the original post here. I think I have come close just casually playing with it and I thought I would share the style here (See attached v2 AD Style). Here is the original: When I make styles for use with text, I like to design it with the text but then apply to a shape then save style from the shape so the font is not saved with it unless I typically use that font with the style. Below is a single v2 style applied to a font I have called "yellowtail" (Not sure where I got it, probably w/CorelDRAW). I then added the border around the text and the tail. I will show both. Just the style applied: With added tail, just drawn with the pen tool with same style applied) and an underlying layer under the text. I have attached a copy of the tail as well for those who are not comfortable with the bezier pen tool. I hope someone finds this useful. With In AD v2 more is possible in "styles" than v1 and I encourage more "Styles" creation and sharing Cheers! Blueliner Vintage (AD v2).afstyles Tail for Vintage Txt.afdesign
-
I just drew it with the pen tool Here's just the swoosh. Sometime with sports tails, like say baseball themed text, I will convert the font to curves and build the tail directly onto the letter I am trying to flow into that swoosh. The sample provided had it as a separate piece so I did the same. In this way you can drop in with other fonts so more interchangeable. Resize and rotate as needed. Edit the nodes too if you like! Tail for Vintage Txt.afdesign
-
I have been playing around with styles lately making a bunch for different email marketing campaigns I have been working on. I started off here on the forums to see what others have done and what is possible. I came across this post and I think I have come close to this one (See attached v2 AD Style). When I make styles I like to design it with text, then apply to a shape then save style from the shape so the font is not saved with it unless I typically use that font with the style. I didn't do that here but unless you have the same font, I don't think it matters. Below is a single v2 style applied to a font I have called "yellowtail" (Not sure where I got it, probably w/CorelDRAW). I added the border around the text and the tail. I will show both: Just with Style applied With added tail, just drawn with the pen tool with same style applied) and a border around text. Vintage_ADv2Only.afstyles
-
I am seeing the same thing.
-
Seems to work for me as well in AP v2.1.1. I added a curves adjustment then selected LAYER-New Live Mask Layer-Hue Range...
-
If a simple compass dial I would use the cog tool and make one or two cogs. Two if I want say a larger tick every 10 degrees as I show below. When happy, I might duplicate the cog(s), hide, and then make the copies visible and convert to curves.
- 24 replies
-
- 3
-

-
- designer 2
- bug
- (and 2 more)
-
Affinity Macros
BlueLiner replied to hsantini's topic in Affinity on Desktop Questions (macOS and Windows)
Funny you say that.... I was taken aback when I saw that as well. -
Affinity Macros
BlueLiner replied to hsantini's topic in Affinity on Desktop Questions (macOS and Windows)
As Walt said, it is easy enough to make, but here it is... Convert to 16 bit.afmacro -
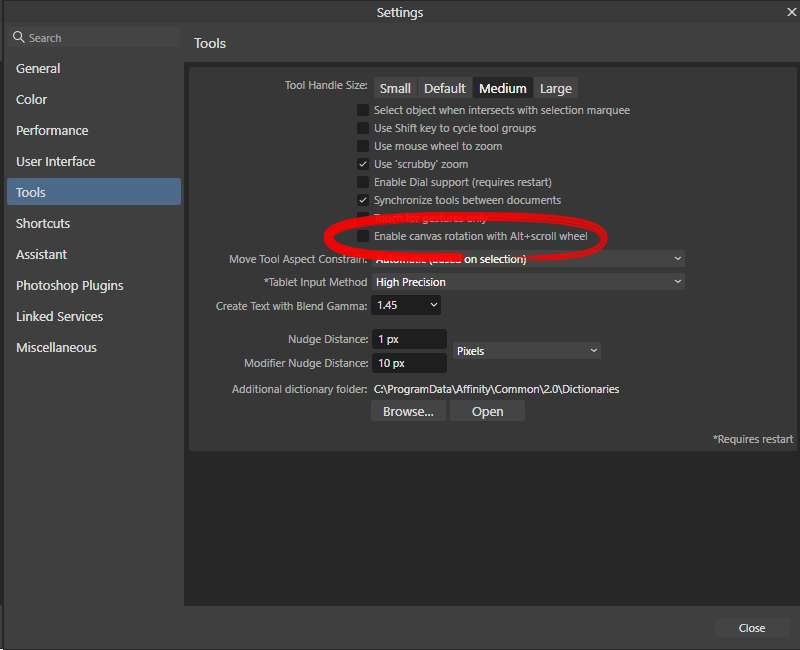
Unforgivable since version 1
BlueLiner replied to OSea's topic in Affinity on Desktop Questions (macOS and Windows)
Canvas rotation used to drive me nuts. Easy enough to reset per Hangman, but I suggest disabling alt + scroll wheel rotation. Go to your settings and under Tools, uncheck "Enable canvas rotation with Alt+scroll wheel".
-
Be sure to use the FRAME TEXT TOOL [T] and not Artistic text. Here's a video in case I am misunderstanding the question: Affinity Photo 2 2023-06-13 23-29-55 - Copy.mp4
-
Farbeinstellungen der Oberfläche
BlueLiner replied to PixelNik's topic in Affinity on Desktop Questions (macOS and Windows)
Ich würde es auch gerne wissen. -
If I need tangential snapping, I use Inkscape, CorelDRAW, or Fusion360 (CAD Software) and bring back into Designer as a SVG. AD does not have tangential snapping. If you do not need specific circle diameters and want that shape, a quick way is to either turn on the grid or draw say two squares, and then with the pen tool draw a polygon then round the corners with the corner tool. Affinity Designer 2 2023-06-08 16-11-07 - Copy.mp4
-
If all you want is a square or rectangle with two colors, why not just draw a square, then say a rectangle converted to curves then clipped to the square. Edit the nodes as desired. Here is a screen cap but I use the pen tool for the clipped shape with my 2nd color then move its nodes around as desired (and probably remove the stroke - I forgot to in the video): www_screencapture_com_2023-6-8_00_01.webm