Didge
-
Posts
216 -
Joined
-
Last visited
-
 Ulysses reacted to a post in a topic:
Processing Large Stacks is Veeeeeery Slow ...
Ulysses reacted to a post in a topic:
Processing Large Stacks is Veeeeeery Slow ...
-
I have Deleted V2 and Gone Back to V1
Didge replied to Didge's topic in Feedback for the Affinity V2 Suite of Products
I agree and disagree ... MacOS didn't conform to the user interface guidelines of anything else when it was first released - but it *established* the guidelines for a new generation of GUI-based user interfaces - which just goes to prove that doing things in a new way is the only means by which things progress. I agree that Blender does many things in an unusual way, but in my experience, *most* things are much more efficient and intuitive - provided one is prepared to 'let go' of the old way of doing things. I found it pretty easy to learn with limited reference to the user guide, and I agree that users need to adjust their expectations when using Blender, because in most ways it is actually *better* than other products. I cannot say the same about Affinity. I hold to the comments I made in my original post - the product does its job very well, but the UX has gone backwards, mainly due to bad design choices when it comes to the GUI and basic usability. I still overwhelmingly prefer v1 to v2 - its just simpler and more elegant. -
GripsholmLion reacted to a post in a topic:
I don't like the new UI design
-
GripsholmLion reacted to a post in a topic:
I don't like the new UI design
-
 oscarlosan reacted to a post in a topic:
I don't like the new UI design
oscarlosan reacted to a post in a topic:
I don't like the new UI design
-
oscarlosan reacted to a post in a topic:
I don't like the new UI design
-
imagodespira reacted to a post in a topic:
I don't like the new UI design
-
oscarlosan reacted to a post in a topic:
I don't like the new UI design
-
How to stack Bias / Dark / Flat frames ?
Didge replied to Didge's topic in Affinity on Desktop Questions (macOS and Windows)
Thanks NotMyFault, Yes - it seems the heading of my post is probably misleading - I'll repost as a Feature Request. -
Hi, I use APhoto for stacking astrophotography images, and it works very well. I want to create Master Bias / Flat / Dark frames, but this is not possible in APhoto, because APhoto expects images to contain stars so the images can be registered / aligned. Of course, this step is normally bypassed when stacking calibration frames. The 'Stack' button is inactive until Light frames are defined, and APhoto cannot be 'tricked' into stacking calibration frames by pretending they are Light frames - it rejects all the images because they contain no stars and cannot be registered / aligned. Can a feature please be added to APhoto to stack calibration frames by bypassing the registration /alignment step ? Many thanks, Gary
-
How to stack Bias / Dark / Flat frames ?
Didge replied to Didge's topic in Affinity on Desktop Questions (macOS and Windows)
Anyone ? -
How to stack Bias / Dark / Flat frames ?
Didge replied to Didge's topic in Affinity on Desktop Questions (macOS and Windows)
I'm replying to my own post in the hope it will get some attention ... As things stand in AP, it is impossible to stack flat/bias/dark frames because AP insists on registering/aligning frames, which cannot be done with compensation frames because they do not contain stars. Can we have an option to bypass the registration/alignment steps so we can stack frames to create master bias/dark/flats ? James - your thoughts on this ? @James Ritson -
I don't like the new UI design
Didge replied to Zaxonov's topic in Feedback for the Affinity V2 Suite of Products
Yes - which is why I gave specific examples in my earlier posts, if you care to read them. There are many well constructed examples in these threads of why users do not like specific aspects of the UI, many of them addressing similar themes - eg the lack of context for binary selections. You might add more value to these threads by responding to specific aspects of user comments, rather than criticising their content. -
I don't like the new UI design
Didge replied to Zaxonov's topic in Feedback for the Affinity V2 Suite of Products
I don't appreciate being called naive. The point is that there is no way to know whether a thread has been read by Affinity or not - that is just a fact. I'm not 'implying' anything - simply stating facts. If you read my post carefully, you'll see that I referred to hundreds of POSTS - not hundreds of users. -
I don't like the new UI design
Didge replied to Zaxonov's topic in Feedback for the Affinity V2 Suite of Products
You might be right - my point is that there is no way to know for sure. -
I don't like the new UI design
Didge replied to Zaxonov's topic in Feedback for the Affinity V2 Suite of Products
You might be right - my point is that there is no way to know for sure. -
I don't like the new UI design
Didge replied to Zaxonov's topic in Feedback for the Affinity V2 Suite of Products
Seems this thread is heating up again - probably because none of the issues raised in it seem to have been addressed in the recent AP update. The least Affinity could do is show whether the thread has been read by someone at Affinity who understands good UI design. This update is a terrible step backwards - I just hate using V2. And its not just me - there are hundreds of posts in these threads where users agree that v2 is a horrible mess. -
 Westerwälder reacted to a post in a topic:
I don't like the new UI design
Westerwälder reacted to a post in a topic:
I don't like the new UI design
-
I don't like the new UI design
Didge replied to Zaxonov's topic in Feedback for the Affinity V2 Suite of Products
Wholeheartedly agree ... the new UI is a step backwards vs v1 - which I still prefer. But we've had ZERO feedback from Affinity on this thread ... or any of the other threads I've started/joined on this topic ... James ??? @James Ritson -
oscarlosan reacted to a post in a topic:
Comments on v2 - a real disappointment
-
NotMyFault reacted to a post in a topic:
How to Simulate a Bayer Matrix
-
How to Simulate a Bayer Matrix
Didge replied to Didge's topic in Affinity on Desktop Questions (macOS and Windows)
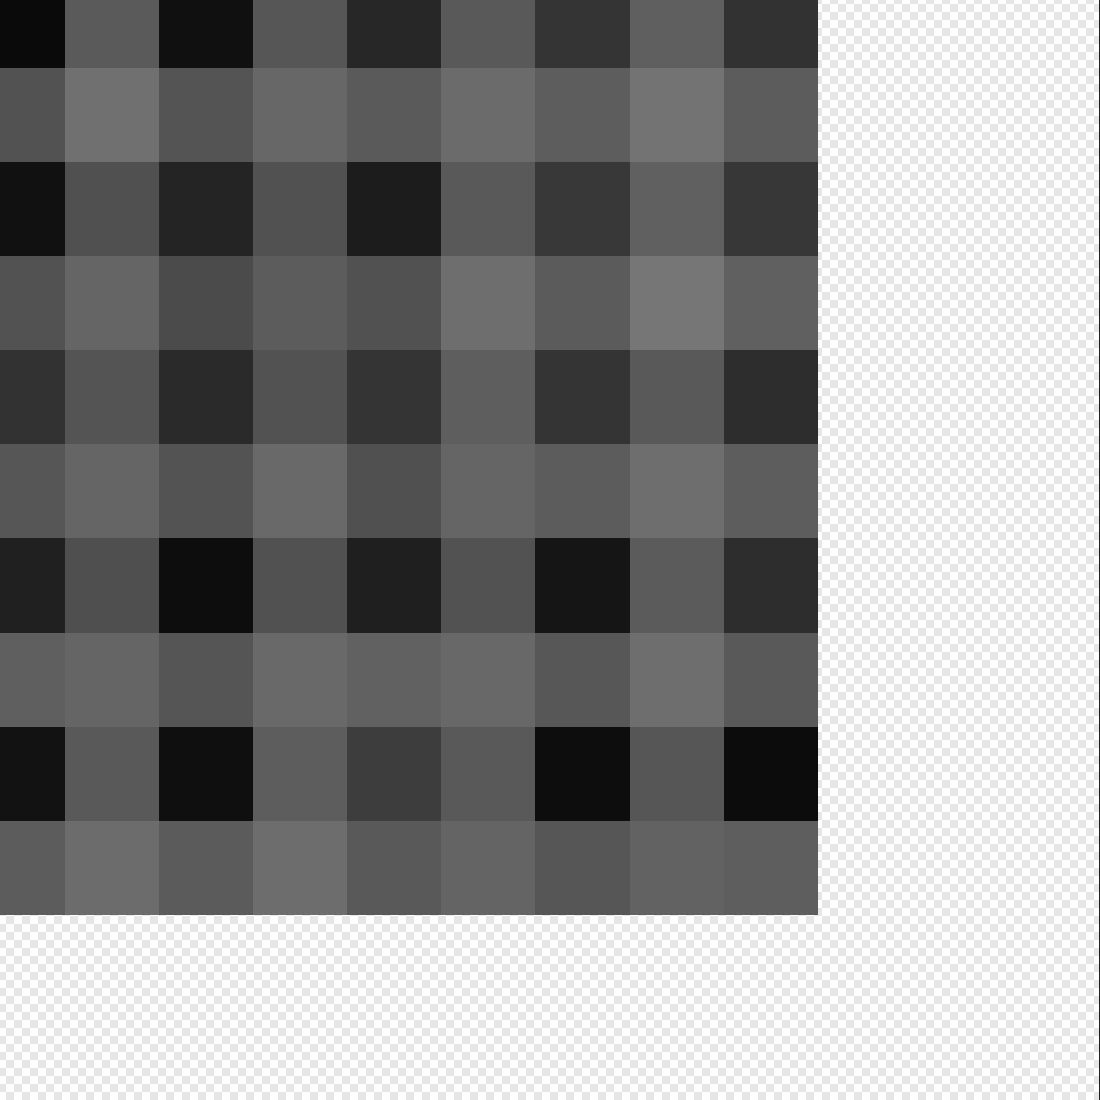
Hi NMF, Thanks for that info - very helpful ! I suspect there is something else going on though ... I initially placed the background image very carefully - making certain the 1st pixel was in the top left corner. I made the background image exactly the same size as the canvas - 6,248 x 4,176 - so I didn't need to resize it. If you look at the image at the top and turn all the bayered layers OFF, then the image fills the entire canvas, corner to corner. BUT - if you select any of the Bayered layers and turn OFF all the PT and channel layers, the embedded image fills the entire canvas except for the right-most 3 columns, and the bottom 2 rows. Here's the interesting bit ... something I just tried ... If you switch ALL the layers in a set to OFF, the background is entirely black, except for the right-most 3 columns, and the bottom 2 rows - which are white. It looks like my initial mask was missing those rows/columns - I filled those to black, now everything is OK !! Thanks again for your help and suggestions - they really helped a lot -
How to Simulate a Bayer Matrix
Didge replied to Didge's topic in Affinity on Desktop Questions (macOS and Windows)
Hi NMF, Thanks for your help again The original image is 6,248 x 4,172, the same size before / after duplication. Interestingly, the aspect ratio of the image is 3:2 ... The same as the number of empty columns/rows on the right/lower margin of the image - 3 columns and 2 rows - probably related. I haven't applied any masks to the PT filters, so they should be all white. The AP file uses linked images, so it probably won't work unless you can link it to an image of the same resolution - but here it is attached. FYI - this was edited using AP 2Beta 2.1.0.1713, so might not open in a lower version. Any advice greatly appreciated:) Also, 3 images attached - original, layered + reconstituted using bilinear interpolation. I'm actually amazed at how good it is! Gary RGB Experiment 4 - Bayered.afphoto NGC 3324 @ 6,248 x 4,176.tiff RGB Experiment 4 - Bayered.tiff RGB Experiment 4 - deBayered.tiff -
How to Simulate a Bayer Matrix
Didge replied to Didge's topic in Affinity on Desktop Questions (macOS and Windows)
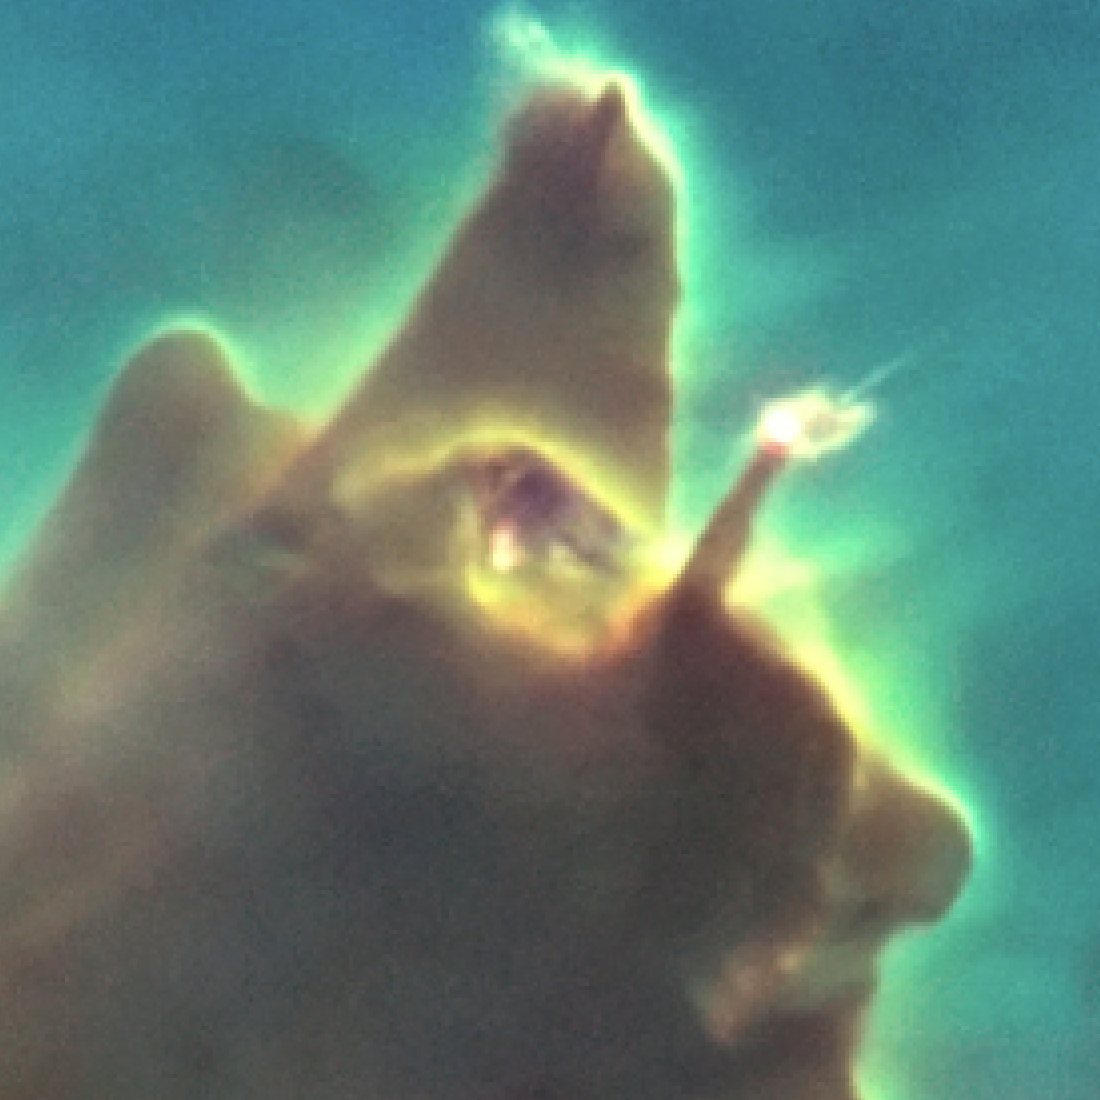
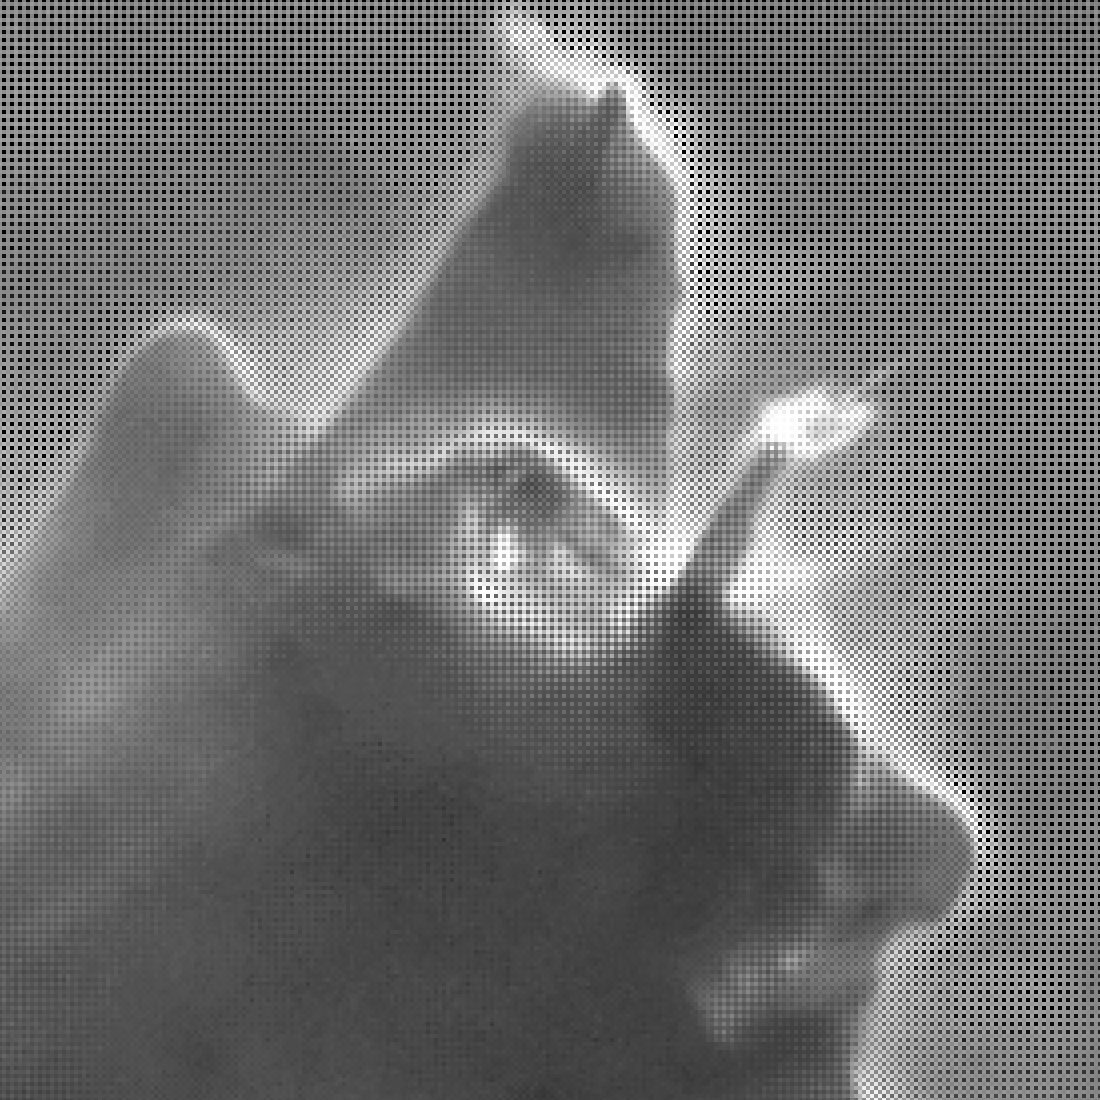
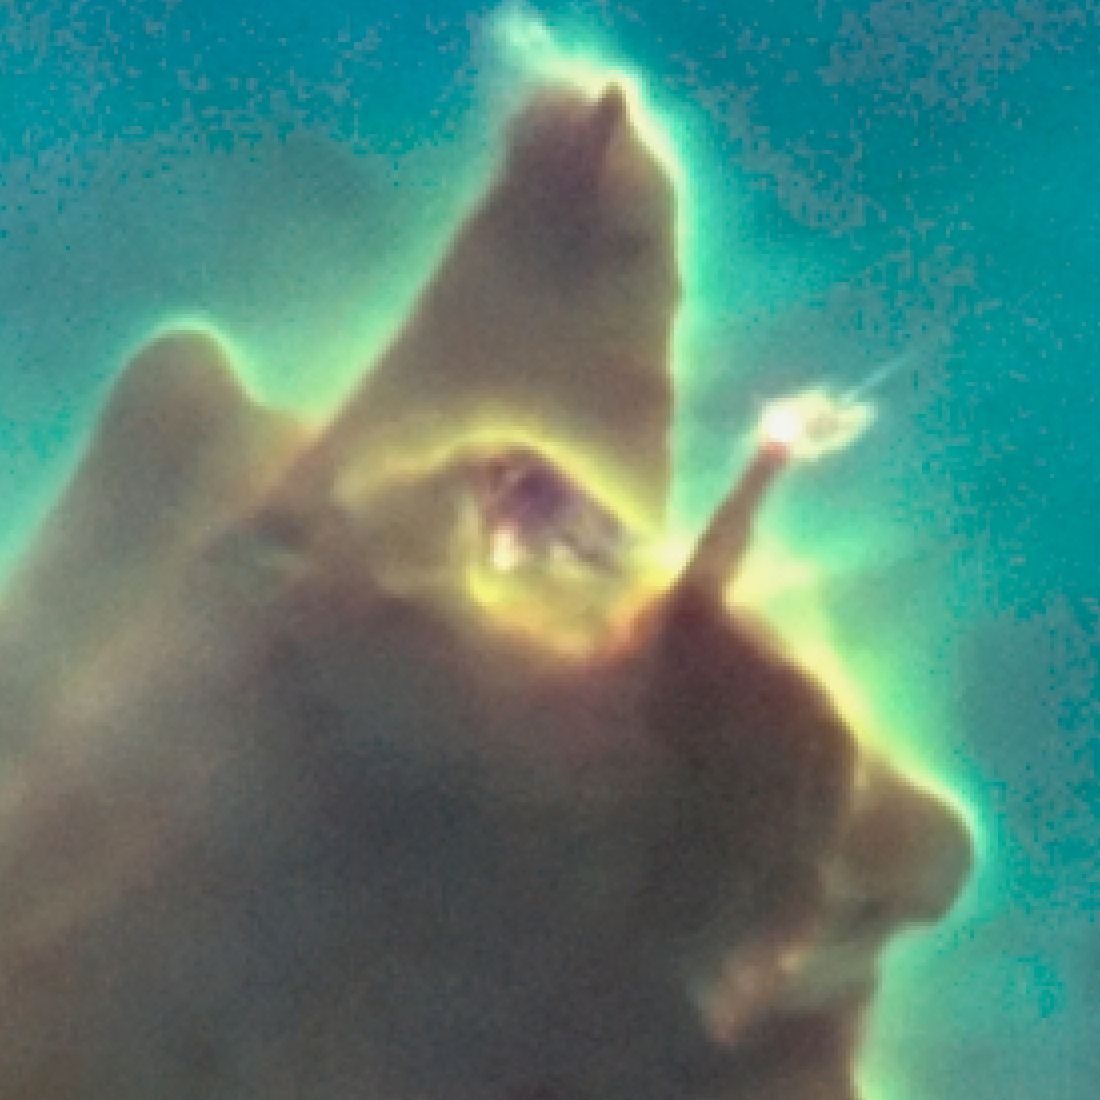
Hi NMF, Thanks so much for your post - that was extremely helpful. I've used your suggestion of osci filters to create 3 Bayer masks - that was actually very straightforward. Then I used channel filters to separate the original image into 3 layers for RGB, applied the Bayer masks to the respective channel, used a procedural filter to remove the colour information from each layer, added the layers together to create a faked OSC RGGB image, saved that as TIFF then converted that to FITS. Then I opened the FITS file using AP, set the deBayering method to RGGB and bingo ! Even at full resolution, the reconstituted image is very difficult to distinguish from the original image, which was rather surprising given that 75% of the R&B channels and 50% of the G channel is thrown away during the process. Example attached - from a HST image of the Pillars of Creation in the Eagle Nebula. Its a shame AP doesn't support different delayering methods, so I cant test it using anything other than Bilinear. The only remaining problem is that the Bayer masks don't go all the way to the edge of the image ... as in the pic below, for some reason it refuses to go to the last 3 columns and the last 2 rows - if you have any ideas on how to fix that ? Thanks again for your help - the osci filters certainly did the trick ! Didge
-
Hi, I'm doing a uni project on image quality, and one of the topics relates to Bayer Matrices. I'm hoping to use Affinity Photo to produce a simulated Bayer matrix from a standard RGB image - that is, to separate the original image into 3 layers (R,G,B), where each layer has the opposing pixels deleted - just like a normal RGGB image. I've been exploring Procedural Textures for this, but can't see any way to selectively delete individual pixels (or more correctly, to set their brightness to zero) in a matrix pattern. Can anyone suggest a way to do this ? Many thanks