TexanInParis
-
Posts
15 -
Joined
-
Last visited
-
 walt.farrell reacted to a post in a topic:
"Save failed because the file could not be written to" message appearing every time I try to save.
walt.farrell reacted to a post in a topic:
"Save failed because the file could not be written to" message appearing every time I try to save.
-
Well, I have no clue what might have changed, but I suddenly seem to be able to create and save new files anywhere using the Affinity Photo app from the Apple App Store! Just for the heck of it, I decided to test editing one of my existing projects with the "regular" copy of the app. It let me edit and save fine. So, I thought maybe it's still broken if I try to create a new .afphoto file. Nope, that works, too! I do know that there have been several updates to MacOS since I first complained about this. Maybe Apple fixed it.
-
The updated "Beta" version says it's Version 1.10.0.251. As noted earlier, I'll post an update if and when I finally get the update from the Apple App Store. If the updated version ends up not being "sandboxed" anymore, I'll use that instead of the Beta.
-
UPDATE: Just received an email notice that Affinity Photo 1.10 is now available. I opened the "beta" version 1.9.4, and sure enough, it offered to download the update. The software still says "Beta", but I assume I can continue to use the updated version with no problem. I don't see an option to "Check for Updates" in the 1.9.4 version I downloaded from the Apple App Store, and I don't see any update offered yet. If and when I finally do get the update from Apple, I'll see if it's still "sandboxed" and can't save files. I'll report back here what I find out.
-
@aadesh.mistry Don't know what to tell you. The beta installed and works fine with no license key for me. Where did you get the beta download? I found it in the beta forum here.
-
@aadesh.mistryNope. Only solution is to install the beta software that isn't sandboxed. No word from Affinity about fixing the App Store version - or even if they can.
-
@NotMyFault OK, I found the Procedural Texture filter, but I'm not sure what I need to set or enter. You can see the color I'm using for the background in the lower left corner. Thanks, John

-
 TexanInParis reacted to a post in a topic:
Adjust parallax
TexanInParis reacted to a post in a topic:
Adjust parallax
-
Old Bruce reacted to a post in a topic:
Adjust parallax
-
@Old Bruce I took a quick look at the Stack feature, and it seems I'll need to first crop the images down to just include the part that I want in the final stack of layers. My original images look like the attached file, and I just want the plastic model in the middle. (It's the London Tower Bridge if you're curious.)
-
@Old Bruce Thanks! I knew that “parallelogram” was wrong, but I just couldn’t think of the correct word. Must be getting old. 😅 (I first started working with computers in the early 1960’s - which makes me ancient in technology terms.)
-
I'm creating a file that's a series of overlaid images showing the construction of a building model. I started a new document using the FHD 1080p (1920 x 1080) template and then flood filled it with a background color compatible with my construction images. To create a new layer, I do these steps. 1) Starting with a blank workspace, I drag and drop a jpeg file containing the image for the next layer of construction. Images were shot on a wood veneer table, so I do the following steps to isolate the image to Place into my master document. 2) Crop and rotate the imported image, leaving the aligned bottom edge of the construction image against the bottom of the edited image and the lower corners of the image (all are basically a quadrilateral with a wider bottom than top) at the lower left and right of cropped result. 3) Choose the Selection Brush and delineate the area I want to keep. 4) Use Refine to make sure I have all the elements of the layer and none of the wooden table. 5) Select New Layer with Mask and hit Apply. When I first saw this "ghosting" I thought leaving the original layer behind the cropped layer and its mask might be the cause, so I was deleting the original layer and leaving just the cropped selection and its mask. Turns out it makes no difference. 6) Save As the cropped and masked image as .afphoto 7) Open the master document that start out as a plain image all one color. 8). Use File / Place and select the .afphoto saved in Step 6. Size and place the image towards the bottom of the master document and centered. (I'm using X: 330 px; Y: 820 px; and Width: 1260 px.) 9) Starting with the second image, the perspectives don't exactly match the base layer because I wasn't precise about the height and angle I used to shoot each individual photo. To fix this, I use the Perspective tool to correct the sides and top edge to exactly match the layer below. When I get it corrected, I save the master file with the new image layer. 10) To get my set of final images, I make each layer visible one at a time. I then Export the document with the single image layer revealed as a .png file. I can see on the screen before I do the export that there are "ghost" edges appearing. These edge lines also appear in the exported .png file. (See attachments.). Because this image starts with a single flat color, I can "fix" it before each export by painting over the lines with the same color using the Paint Brush tool. Crude, but it seems to work. I can't imagine what I'd do if the area behind the cropped and placed images was another complex image. The first attached image shows the center of my workspace in my master document with the base layer placed - no funny edges. The second image shows what it looks like after I place a second layer and align it using the Perspective tool (which I'm aware changes the .afphoto file into a pixel layer). The image is selected, and you can see the boundary of the image as a vertical line on the left. When I de-select the layer, I can usually see a faint line where the ghost will appear in the export. The third attached image shows the exported .png file - you can see a "ghost" line in the location of the left edge of the Placed photo. BTW, I've noticed a similar behavior in the iPadOS version - that is not a beta copy, so this problem existed before the latest update.
-
Dan C reacted to a post in a topic:
Adjust parallax
-
OK, to answer my own question - Use the Perspective Tool!! Great video here that explains how to use it:
-
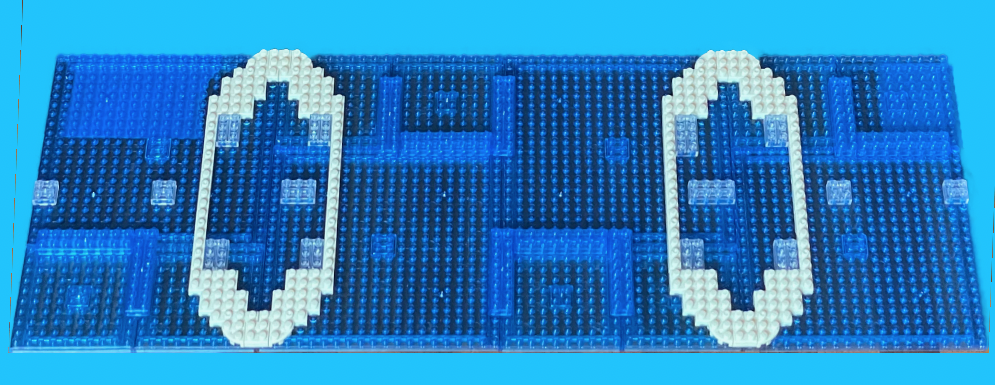
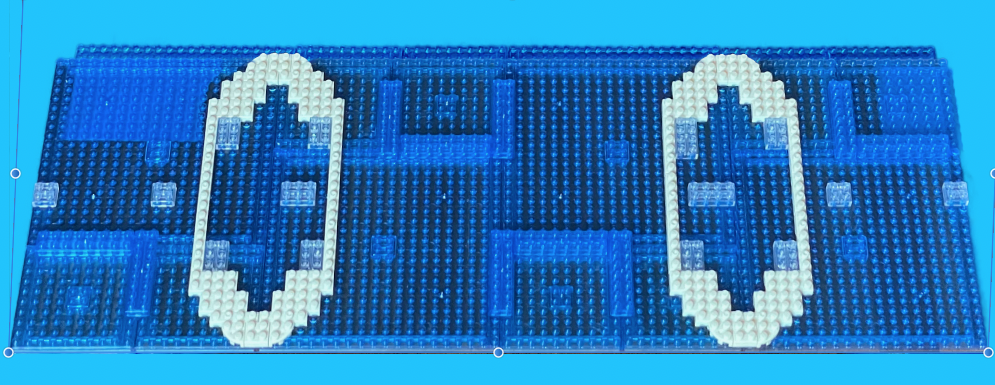
I have a couple of parallelogram images that I'm trying to layer on top of each other. When I size the "top" one to be the same width and height and positioned at the same lower left X and Y coordinates, the "top" one is wider at the top. I've tried a combination of Shear and Resize with aspect both locked and unlocked, and I've accidentally gotten closer, but they're still not identical. I went looking for a tutorial and did watch the move and resize video, but that's not exactly what I want to do. Anyone have any tips or tricks? If you're curious about what I'm doing, I building a series of frames showing the construction of a plastic model one layer at a time. I plan to use these to make a video that "magically" makes the layers appear one at a time on top of each other. Think of watching a house being built one brick at a time. As much as I tried to position the camera at exactly the same spot for each frame, they're not all exactly identical. I'm attaching photos of two samples layers individually and a third showing the two on top of each other. BTW, the lines you see in the second and third images are a display bug when you create layers from two afphoto files (both have transparent backgrounds) on top of each other, but the lines don't show up in exported .png files.
-
@Dazmondo77 MAS? As in Multi-Agent System? No, I suspect because the original version I downloaded from the App Store is sandboxed, it's broken. The Beta isn't sandboxed, so it works. Now if Serif accepted Apple Card, I wouldn't have had a problem.
-
@Dazmondo77 @Lee D I switched to the 1.9.4 Beta, and I'm not having any problems. I am discovering that some layer on layer stacking I was doing on my iPad Pro (I'm building frames for a video showing the stages of a project under construction) was just a bit "off". I'm going through the 40 layers I've built so far and am having no problem with Save to the file on iCloud so far. Keeping fingers crossed!
-
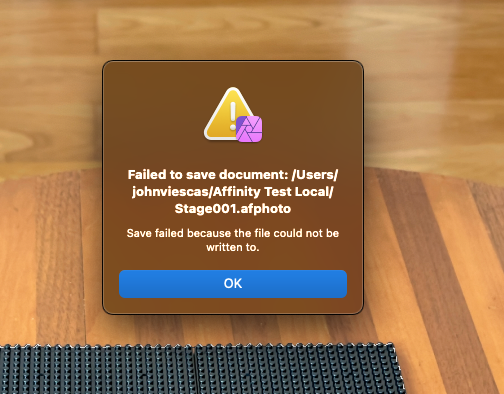
@Lee D I've tried saving to a folder on my hard drive with the same result. I tried your link to the Beta version, but all that does is take me to the forum. I'd be happy to try the Beta software if I could find it. (BTW, I'm a former Microsoft MVP, so I'm well-versed in dealing with Beta versions.) I might try @Jonopen's suggestion to try to overwrite the "blank" file it does create. My file is 2.8GB and growing, so it might also be a size issue. In the meantime, I'm chugging along in my project on my iPad Pro with few issues. UPDATE: I found the Beta download by digging deeper in the Beta forum. Will post there if I see the same problem.
-
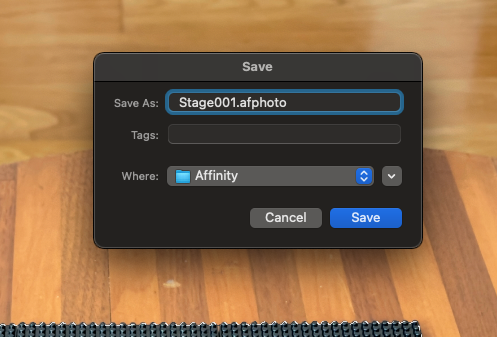
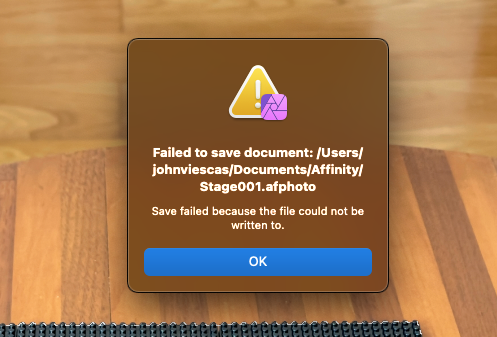
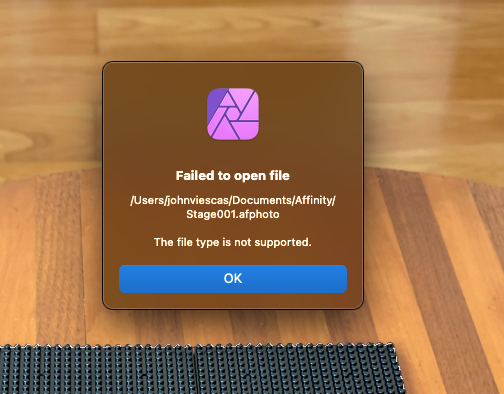
I can't save anywhere in iCloud or directly to my hard drive on my Mac. The file gets created, but it has zero bytes. I saw another thread where a large number of Fonts in a version purchased from the App Store might be a problem (I bought it there so I could use my Apple Card), but I found only 250 or so fonts installed. I'm using Affinity Photo 1.9.3 on macOS Big Sur (11.3.1). I'm able to save to iCloud from the app on my iPad Pro, but not the full version installed on my Mac.