Failix
-
Posts
85 -
Joined
-
Last visited
Everything posted by Failix
-
When I want to crop challenging images, I work with brushes and masks. But sometimes I need a quick crop for screen presentations or tutorials, and removing the white background is very helpful. Then I'll probably continue to work with a copy of the white parts of the image to be preserved, and of course I create these with the selection brush and sometimes with the magic wand, depending on the situation. Postscript: Just realized that it's enough to put a selection around the area to be protected and then invert the selection before using the "remove white parts of the image" filter. So it is very usable after all ...
-
Thank you very much! This is close to what I was looking for. However, it works differently in Photoshop and more usable in my opinion, see screenshots.

-
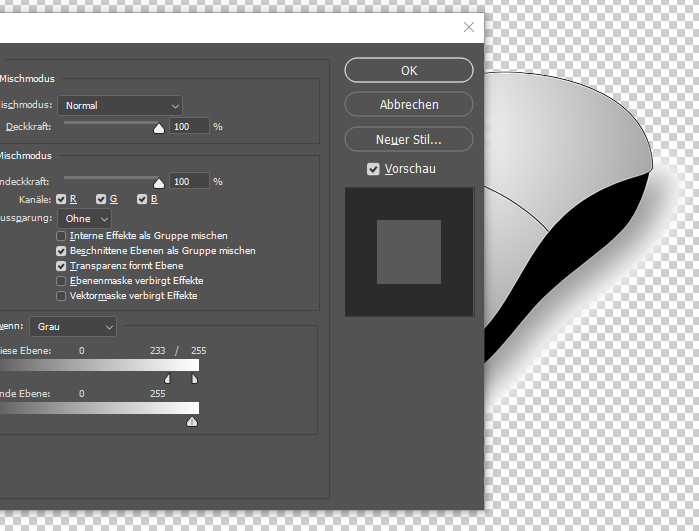
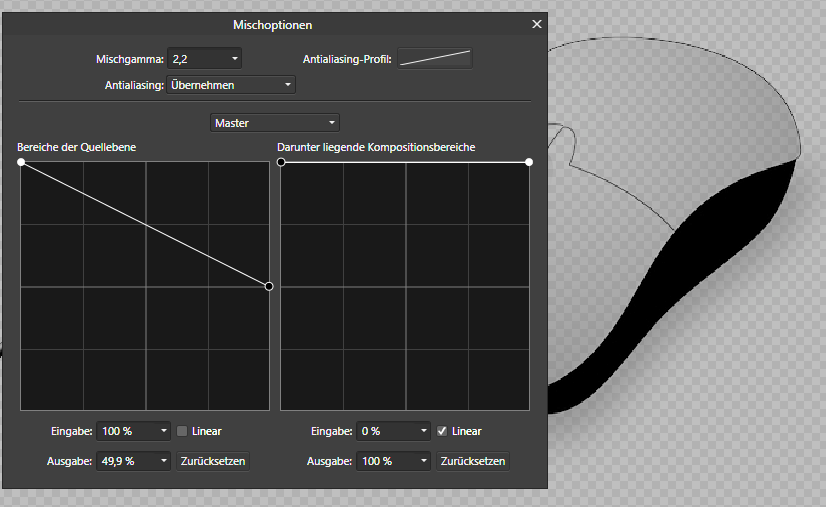
Here is a very simple example. The white in the mouse could also be the eyeballs of a human or the label on a computer component. You have to protect it somehow before applying the filter. Additional question: in Photoshop I have these blend sliders that allow me to control exactly how much white is removed. I can't find anything comparable in Afffinity Photo, but I imagine I saw a video about it a long time ago. Unfortunately I can't find it anymore, or am I wrong and this option doesn't exist in AFP?
-
I just googled for this filter and landed here – thanks for the explanation. 😊 This filter removes all white pixels in the image, not just the background. In order not to destroy the inside of the image, I select the needed pixels with the quick selection tool, copy them and paste them after applying the filter. Is there a faster way to do this?
-
Thank you, "warp" was the missing word. And the answers are disappointing ... but not so bad. I will find another way, possibly other software.
-
Hello all, I have created a shape in Designer. Now I want a text to adapt to this shape. I have not found a way to do this, not even via Google. Here is the primitive example, shape and text: So I want the text to flatten from the bottom left to the top right and take the bottom curve of the shape. Thanks for any tips! I've also attached the sample file in case anyone wants to use it. Regards, Felix text-to-shape.afdesign
-
Hi @Dan C, Thank you very much. May I make another wish? The Resource Manager should become a studio view so that you can keep it open permanently. If I'm honest, I'd like it to be like the link palette in InDesign – or at least a bit like that. 😉 Regards, Felix
-
Yes, all that doesn't sound so good. As I wrote above, I'd rather do the work of converting the PDF to JPG, everything else is too risky for me by now.
-
Ah, now I understand. So in any case I will convert all the PDFs to JPG and reposition them. Thank you both for the help!
-
Hi there, I have problems finding an image in the Resource Manager of Publisher (1.10.1.1142 / Win 10) when it is duplicated in the document. Maybe you can follow the steps below: places a number of pictures in a document (arrangement does not matter) click on one of the pictures with the mouse open the Resource Manager the name of the clicked picture is highlighted in blue in the Resource Manager close the Resource Manager duplicate the clicked picture and click on it open the Resource Manager again the clicked image is no longer highlighted The reason for this is that the duplicated pictures are grouped in the Resource Manager. This group is closed by default. So you have to know the name of the clicked picture to be able to open its group. With many duplicates, this quickly becomes very confusing. I think this is a bug. In my opinion, these groups should be open by default or I consider the grouping unnecessary. What do you think? Regards, Felix
-
Thanks for the advice! But it's all ok, the fonts are available in the PDF. As a way out, I would otherwise have converted the PDF to be placed into JPG.
-
Thank you very much! How stupid of me, I tried out too few export options, but relied on the presets. So: I can't get rid of the strange lines at "Interpret" with any of the offered PDF versions. But when I use PDF/X-1a:2003, "Passthrough" works (and it's the only option). This solves my problem for the time being, but we don't know why "Passthrough" causes such problems during export. Actually, I thought the placed PDF then behaves like an image ...
-
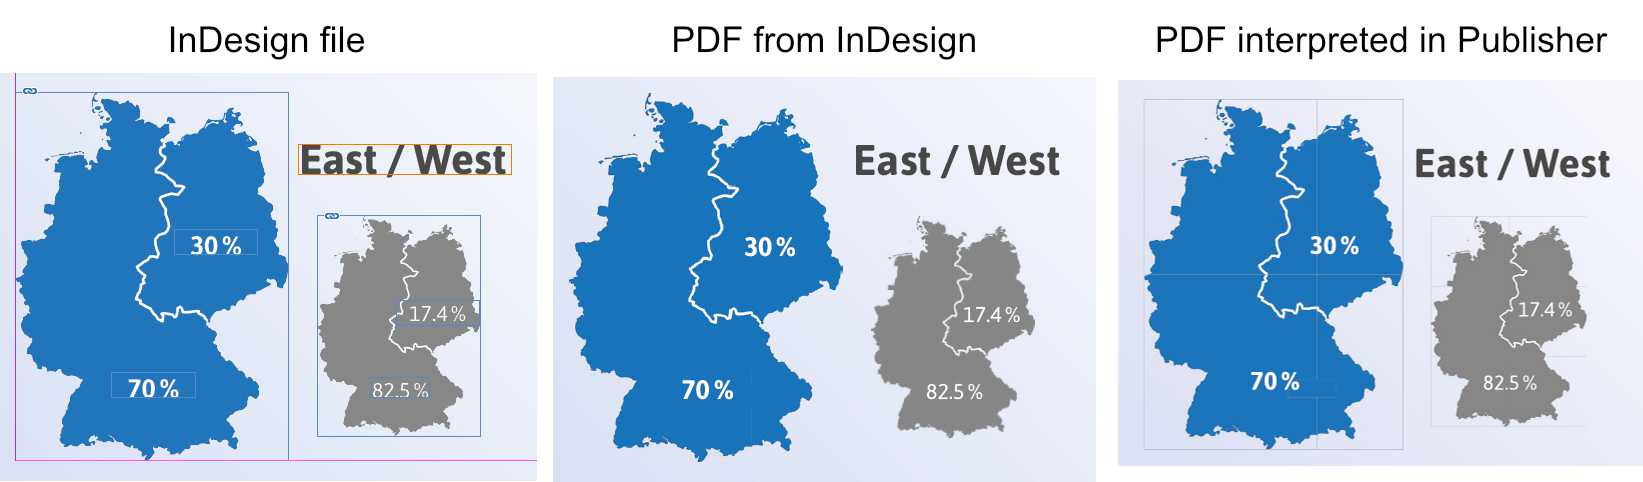
Hi there, I have two problems with a PDF placed in Publisher (1.10.0.1127 / Win 10). This PDF was once created with InDesign and printed without any problems. 1. When I set the PDF in Publisher to "Passthrough", it is missing in a new PDF created with Publisher. 2. If I set the placed PDF to "Interpret", it is present in a new PDF, but Publisher displays strange lines in the graphics (which are also exported). Here is a screenshot: I first thought they were the graphic frames from InDesign, but they are not, as you can see on the left. Does anyone have any ideas about this? Regards, Felix
-
Thank you, now I know! But I don't find that good, rather confusing. And it has also confused me ...
-
No, unfortunately there is nothing to be done. All other settings of the preset remain the same, only the page number changes - for all presets. It really shouldn't be like that ...
-
Hi all, when I use a custom page template in Publisher (1.10.0.1127 / Win 10), I can temporarily change the settings for a new document, e.g. the page number. Unfortunately, the currently used page number is then taken over into the preset and affects the next new document, which I think is a big bug. A preset is a preset - without saving it again, the page settings cannot be changed permanently, or do you see it differently? Regards, Felix
-
Ah, that's the way you do it. Works! Thanks!
-
And same for me (Win 10).
-
@MEB Ok, I did not export TIFF, but PDF. Didn't think the result would be different in these file formats, but it does. Sorry!
-
@MEB But this works only for the screen view, it has no effect on the exported document. I remember having such white lines also in exports from InDesign. However, they were irrelevant for the print shop and did not appear in the proof or in the print. Regards, Felix
-
No, the size of the circles does not need to be changed, only the stroke width. So this is hardly any work. Regards, Felix
-
Hi thomasdg, You have to set the outline of the circles to "center" and the line to 10 pt, then you have the same look without disturbing white edges. Your outline is on "inside". Why Publisher behaves like this, I don't know. "Er steckt ja noch in den Kinderschuhen", as we say in German. Regards, Felix
-
Yes, now I have done it too. But the result is not what I had with me before I wrote. I must have really clicked on the sort option.
-
@carl123 I do not manage to recreate what I see in the video. The lines cannot be moved when they are selected ...
-
Yes, it was, it is! And it's in the top right of the second of two columns in my table. Now I know that I have to be careful when I work with tables - I guess I clicked around a little too carelessly. Thank you both for your support!