Rabalias
-
Posts
12 -
Joined
-
Last visited
-
It would be really great to be able to set the opacity of a brush, and have opacity jitter as a brush option, in photo/designer pixel persona. I use flow/accumulation jitter to achieve a similarish effect, but it isn't the same thing, and the way "paint" accumulates over a brush stroke combines with pressure jitter in an unhelpful way, making it very hard to get the level of opacity you want by varying pressure. If opacity and opacity jitter were available as brush settings, this would solve the above problem. I am currently taking online drawing classes which assume you'll be able to do this (because photoshop can do it), and it's quite frustrating that Affinity doesn't offer anything equivalent.
-
[Wrote this while you were writing your most recent comment @anon2 - perhaps what I'm describing below is simply "the mathematics of alpha blending"?] Ok, I think I see what's going on (and your comments make a bit more sense to me now @anon2). If the colour of your brush is set to pure black, then accumulation x flow ~= the effective opacity of your brush. So e.g. at 70% flow and accumulation you get the same output as opacity 50%, provided you make just one click of your brush, no swiping. If you click hold and swipe, you pretty much get the equivalent to 100% opacity, regardless of flow/accumulation because each spot of paint is additive with the rest, so it doesn't take long to add up to a fully saturated spot of black. (Sort of. See next para.) What's still a bit weird is, click-hold-swipe seems to cap out at a number slightly short of black, at lower flow/accumulation rates. For example, if you set flow/accum at 10%, then no matter how much you swipe back and forth, your paint spot won't go below RGB=49. If you lift your pen and paint one stroke over another then it will get back down to pure black; but if you keep swiping back and forth then it doesn't. So flow and accumulation (combined) create a sort of single-spot opacity, while accumulating over the length of a brush stroke into a fully opaque version of whatever colour you've chosen, except that at low values this isn't completely true, and I'm not sure why that is.
-
@anon2 I'm not sure I follow - your earlier post, while helpful, does not seem to explain the weirdly non-linear way these three numbers work? That was what I was referring to in my sentence that you quote above.
-
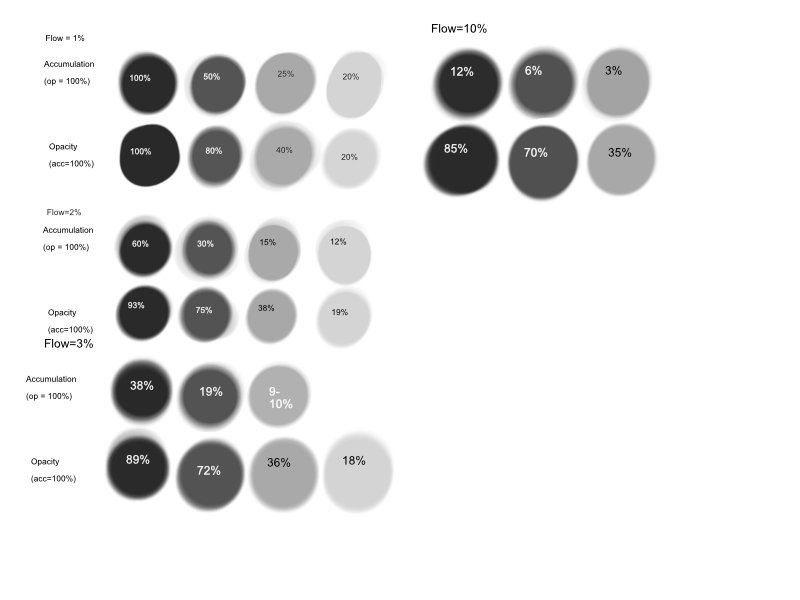
PS: some of the spots vary slightly from their equivalents in other rows - this is I think due to rounding. Affinity won't let you have 19.5% accumulation, or suchlike, so you end up with things being very slightly out.
-
Well this has just got weirder (for me at least). I have tried plotting various flow, accumulation and opacity numbers to see how they compare. In each of the examples below, I swished my brush around a bit on a spot, without taking the pen off the sheet, just to get an even level of coverage. (Reducing opacity seems to lead to an instant reduction in coverage, without needing to swish around, whereas reducing accumulation or flow seems to lead to a higher reduction in coverage initially, but swishing around then brings you up to a ceiling coverage within a couple of seconds.) If you set flow to 1%, opacity to 100% and accumulation to 100%, this is roughly equivalent to setting flow and accumulation to 100% and opacity to 83%. This is also approximately equivalent to setting flow to 2%, opacity to 100% and accumulation to 60%, or flow to 2%, opacity to 93% and accumulation to 100%. This is also approximately equivalent to setting flow and accumulation to 11% (opacity at 100%). I could spew out a bunch more numbers here - see attachment for the experiments I've seen fit to record - but the lesson seems to be that the relationship between opacity and flow/accumulation is far from straightforward. It looks like Affinity is probably doing something close-ish to multiplying flow by accumulation - hence (roughly) if you reduce flow by a factor of 10, you have to increase accumulation by a factor of 10 to keep the output constant. Which... just, really confusing way of doing things. Working out how opacity then fits into all this is just very confusing indeed. You can see that in my data, the relationship between column 2 and column 3 is the same for opacity and accumulation: if you halve one and get a given result, then instead halving the other will also have the same effect. And yet: the same relationship does not hold for column 1, or between the different levels of flow. For instance, if you multiply flow by 10, you should divide accumulation by 10(ish) to get the same output. But you do not divide opacity by 10. ¯\_(ツ)_/¯ I feel I need a mathematician or Affinity coder to explain to me what on earth is going on here TBH.

-
 Rabalias reacted to a post in a topic:
Accumulation vs Flow - what's the difference?
Rabalias reacted to a post in a topic:
Accumulation vs Flow - what's the difference?
-
Brush opacity
Rabalias replied to Rabalias's topic in Pre-V2 Archive of Affinity on Desktop Questions (macOS and Windows)
Sorry, my mistake. -
I understand (from @anon2) that when editing a brush in IOS MacOS, you can use the context toolbar to change opacity and this is stored as a property of the brush. In Windows, not only is this not possible, but whenever you switch brushes, Opacity jumps to 100%. The same bug also occurs in Photo. (Do I need to make a separate post in the Photo bug report area?)
-
Rabalias reacted to a post in a topic:
Accumulation vs Flow - what's the difference?
-
@anon2 if opacity is a brush setting, that setting seems to be hard-coded at 100%. Every time I switch brushes or edit my current brush, opacity returns to 100% - and this is true even if I edit the context menu opacity slider while editing a brush. It appears impossible to set brush opacity at anything other than 100%.
-
(Sorry, forgot to add the key. It's Flow on the y-axis, Accumulation on the x-axis, 12/50/100 in each case.)
-
Thanks @NotMyFault. Long story short, I tried replicating your second graphic above, and it worked exactly as above for opacity vs flow, but when I tried it setting accumulation (12/50/100) on the x axis instead of opacity (and holding opacity constant at 50%), it looked nothing like your graphic, and indeed the result was that I got essentially identical crosses in every row and column, except the top left which was fainter than the rest. (Checking with the dropper shows the increase in flow and accumulation very slightly changes the RGB values in each part of the cross, but only by 1-2 units of whatever RGB is measured in.) (I've attached the graphic although it probably qualifies as the most boring graphic in this thread...) So while you are saying the same thing everyone else is saying, that accumulation is essentially opacity but brush-specific, the behaviour of the brush when I vary accumulation but hold global opacity constant - does not look at all like a brush-specific opacity. It looks... exactly like flow again. So what's going on here? By the way: every time I go into my brush settings to change accumulation, global opacity resets to 100%. This seems strange to me if the intent is that opacity should be a global value that doesn't vary between brushes. But I guess my behaviour during this experiment - which is to go into a single brush and change its accumulation at each stage - is a little weird. Probably Affinity assume that I'm gonna create three brushes with varying accumulation, and not keep going in to change the settings.
-
That's a great video, but it doesn't answer the question. The main point it makes about opacity is to say that if you paint over the same spot again and again without lifting your brush, the opacity will remain constant. And it says that accumulation is the same as opacity. Well, I tried this with various opacity/accumulation/flow settings and - see below - basically they all work the same way. You can see that the lower opacity setting leads to a lighter colour, but I think that's just because the scale is slightly different. If I do a further 10 strokes on the bottom row (20 total), with opacity set to 10%, I get the exact same results as doing 10 strokes total with flow or accumulation set to 10%. So all this seems to be telling me is that flow and accumulation are indeed the same as opacity (albeit with a weirdly different scale) and also the same as each other. I am still none the wiser as to how I might use flow differently from accumulation - if indeed they are at all different.
-
Rabalias joined the community
-
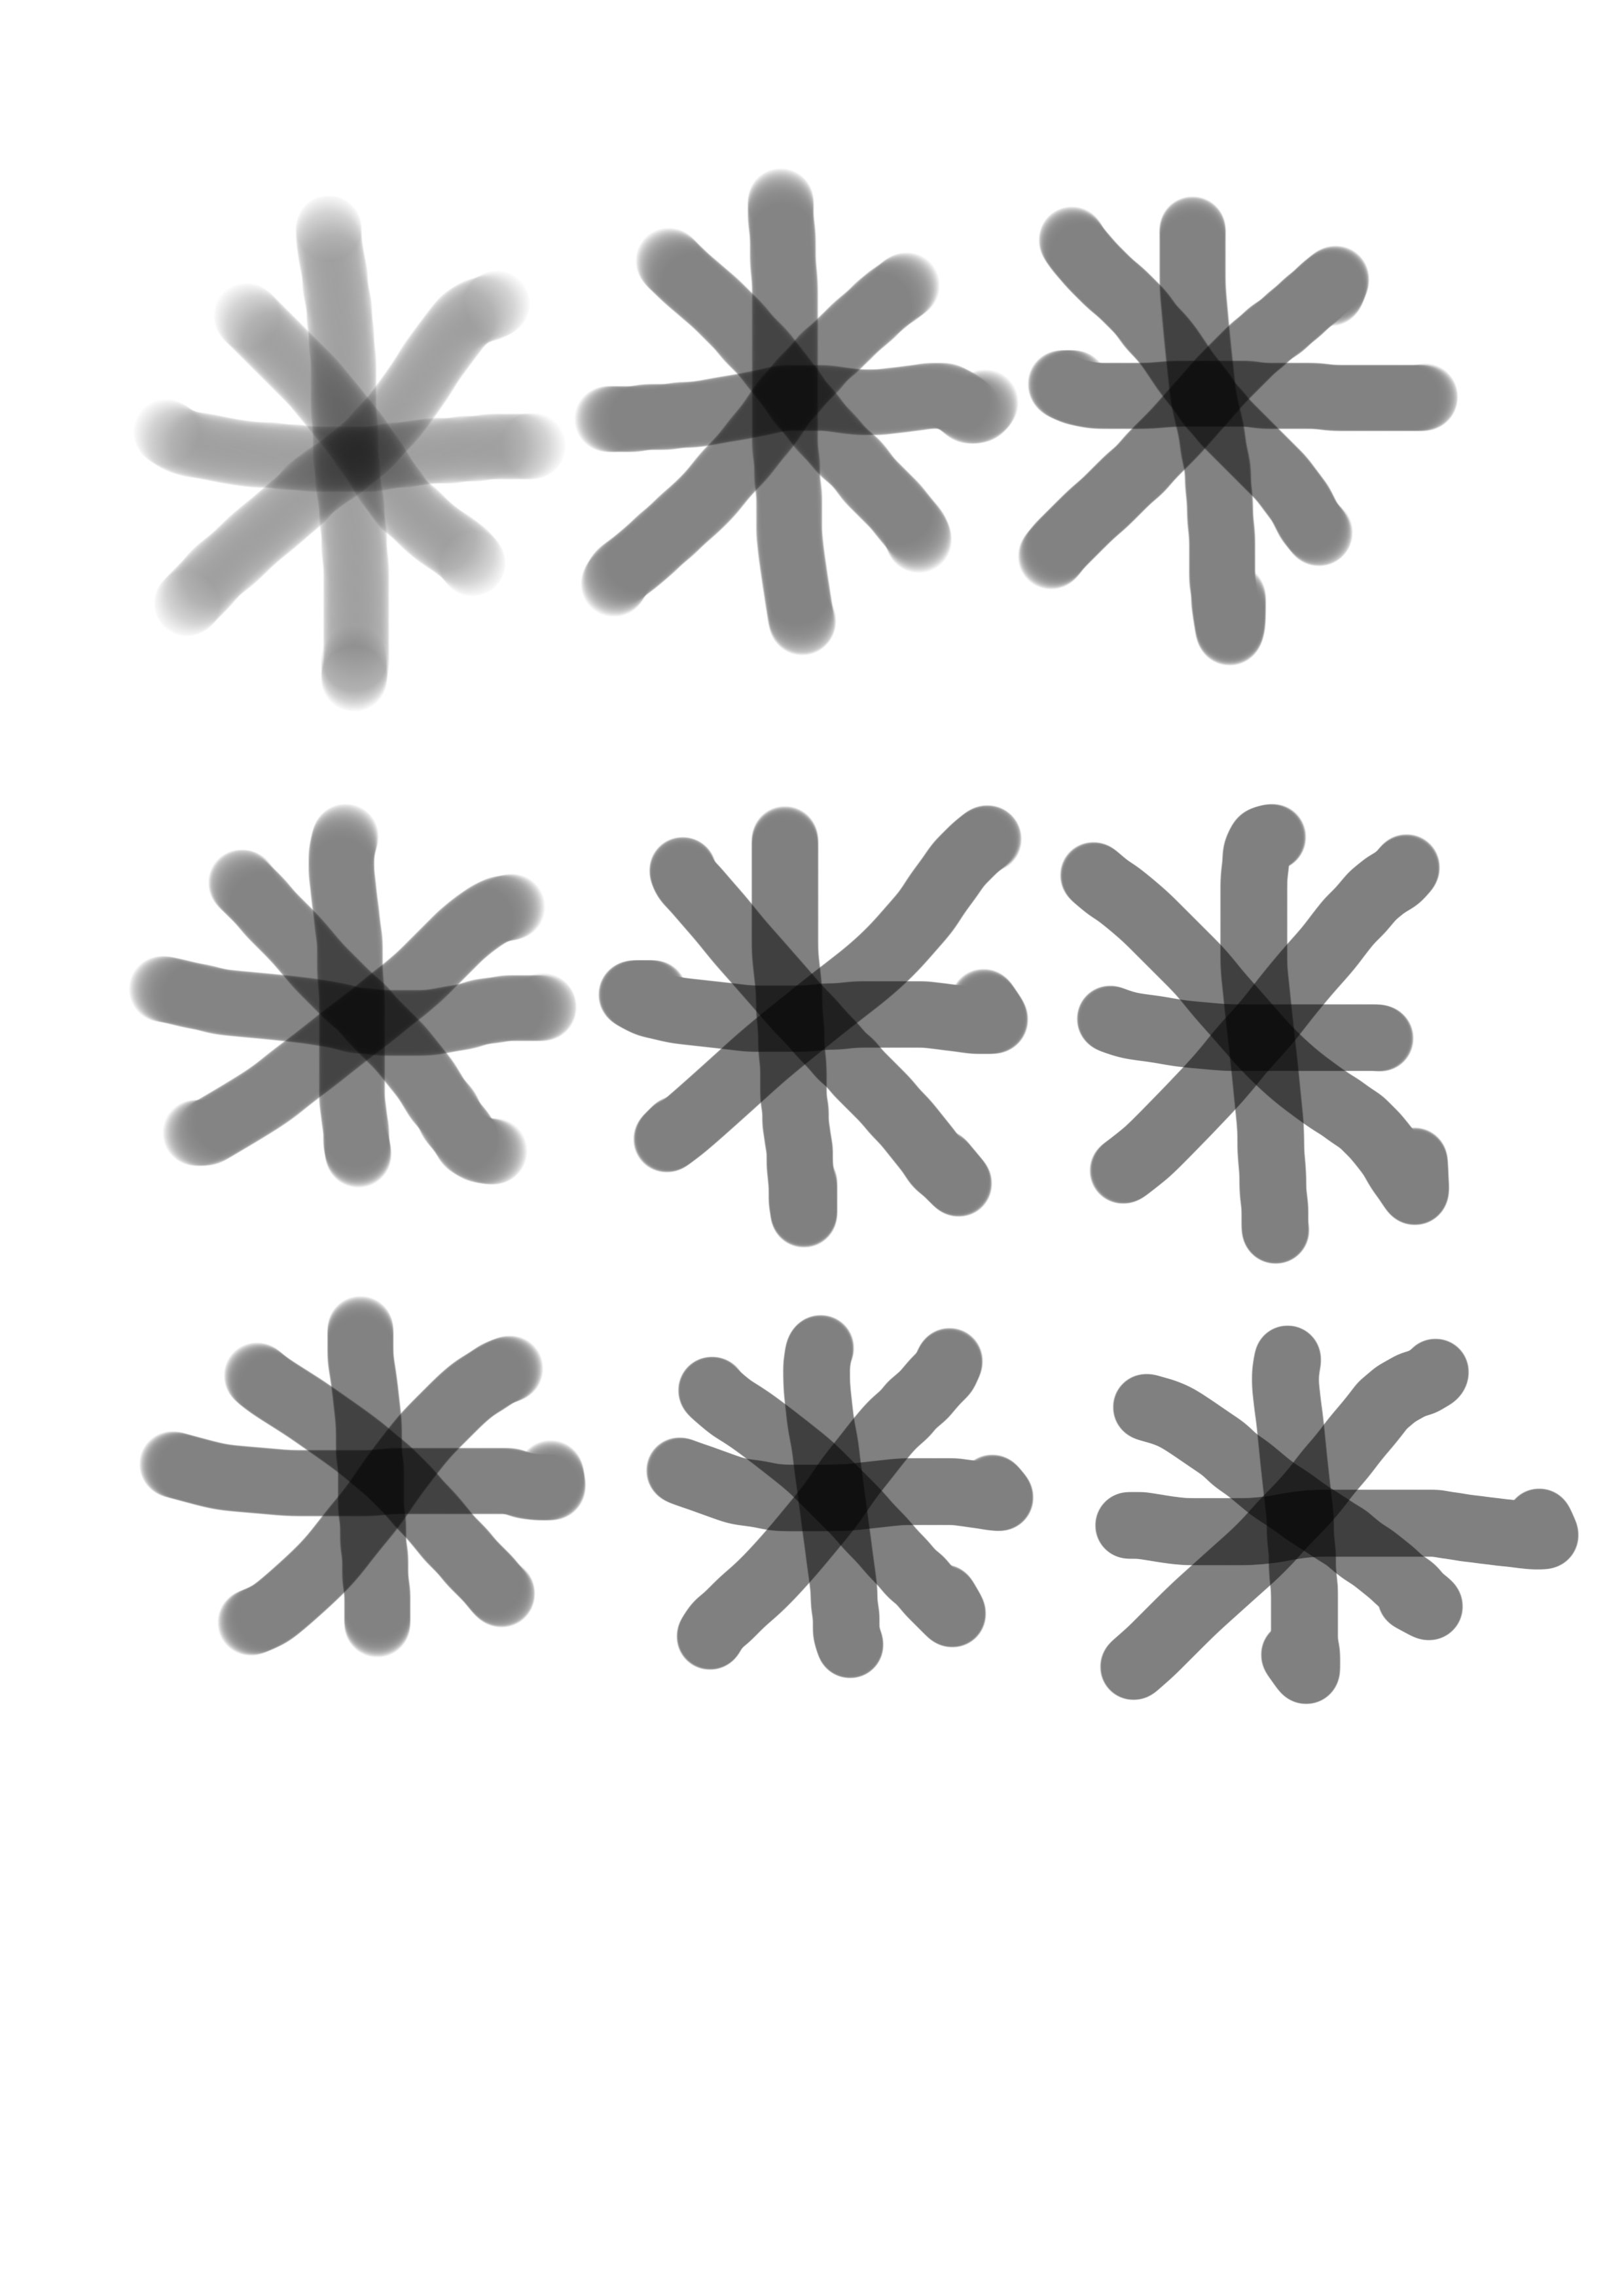
I've heard people say in articles/videos that accumulation is how diluted your paint is, and flow is how much paint you have on your brush. Ok, fine - but of course in reality there is no paint on my brush. I've also heard it said that accumulation is equivalent to opacity; however this is clearly untrue, as I understand that opacity functions quite differently e.g. in photoshop, if you reduce opacity then your whole brush stroke has a smoothly reduced opacity, while accumulation and/or flow reductions still lead to a fully opaque stroke building up. Furthermore, having run some tests where I set flow and accumulation to various levels, I can't see any difference in effect between e.g. 10% flow and 50% accumulation, vs 50% flow and 10% accumulation. They seem to be completely interchangeable, albeit I don't have much of an artist's eye so I may be missing some subtle difference. You can see this in the attached image - accumulation increases on the x axis, flow on the y axis. So what's the practical difference between flow and accumulation? In what circumstances would it be important to choose one over the other?