markw
-
Posts
1,211 -
Joined
-
Last visited
Everything posted by markw
-
Also make sure in APhoto’s Preferences > General, that you have; ‘Save thumbnails with documents’, turned on.
-
OOPS! Sorry about that, my bad!☺️ I forgot I was working in the current beta version of Photo when I made the example file. As it doesn’t use anything specific to the beta app to achieve it, attached here is the same file for APhoto v2.1.1. Packet_Shot_APhoto_v2.1.1.afphoto
-
I’ve included the APhoto file in my post above, download it and you can see how it’s constructed. If you still have questions they may have to wait a little bit till later today when I hopefully have more time to answer them!
-
Is this the sort of thing you have in mind? Packet_Shot.afphoto

-
Corrupted afphoto: how to recover?
markw replied to frozenjazz's topic in Affinity on Desktop Questions (macOS and Windows)
If you have Affinity Publisher you can create a new document in that and then go to; Document > Add Pages From File… and choose your problem APhoto file. If it opens as a new page in Publisher you can delete any unwanted blank pages and then send the document over to APhoto via: File > Edit In Photo… where you can use Save As… to make a new working version of the file. The resulting file may not be 100% as before the original got corrupted but it may still be better than nothing. -
Probably need to see a screen shot of your settings in the Liquify persona. But if your brush has low Opacity and/or Speed settings it can look initially like nothing has happened. Having the Mesh visible can help in seeing if anything has actually deformed.
-
Straight lines without borders
markw replied to fredrikonline's topic in Affinity on Desktop Questions (macOS and Windows)
I wonder what is the final intent of the document in question? It’s just that I note you are zoomed in to 900% to see this "problem", which looks like an antialiasing issue. What dose the line actually look like at it’s, for want of a better term, final intended use size? -
v 2.1.1 is the latest Mac retail version. I don’t know if this is what you saw, but yes a cursory glance at the Check for Updates window can look like it’s saying there is a v2.2.1.1! But that very first ‘2’ is actually part of the app’s name; ‘Affinity Photo 2’
-
When creating a New document, under the ‘Colour’ tab make sure the 'Transparent Background’ tick-box is selected. In any existing documents that have the white background, in the Menubar go to: Document > Transparent Background and select it there.
-
AD2 page sizes
markw replied to jackamus's topic in Affinity on Desktop Questions (macOS and Windows)
For me on Catalina in both retail and beta apps, the only Preset sizes missing after selecting; File > New… are: A2, A1 & A0. But like jackamus after creating a new Document, if I go into ‘Document Setup’ those three missing preset sizes are available there. So I suspect the bug is in the New File setup window.🤔 -
Install .affont files?
markw replied to Intuos5's topic in Affinity on Desktop Questions (macOS and Windows)
@Chrislan Have you tried installing AF fonts from the app’s ‘Account’ window? All your Affinity add-on purchases or Free add-ons should be shown there. If any are currently not installed they will have a cloud symbol with a down pointing arrow. For any AF Fonts just click the cloud symbol and they will download and install automatically ready for use.
-
Not sure if this is a solution for you but there is so little information in the original image I would try using the Pen tool and/or Curve shapes available in APhoto to highlight the similarities in layout between the two mechanisms. I obviously don’t know much about the subject, but more detail could be added in this way the more you do know of course. WatchMechanism.afdesign
-
I perhaps could have been clearer🤔, sorry!☺️ After the edited file has gone back to Apple Photos (my version is; Version 5.0 (161.0.120) ), in Affinity Photo (current retail and latest beta version) go to: File > Open Recent or use the 'Recent' tab in the Account window. There is where I see the “temporary” .aphoto file called ‘Apple Photos Document’. I can reopen it again now in Affinity Photo and use ‘Save As…’ to keep it in a new location of my choice. Interestingly, if after passing the edited image back to Apple Photos, Apple Photos then claims that it has encountered a problem and does’t retain the edits made by Affinity Photo, all is not lost. As the temporary working file with all the edits is still available in Affinity Photo it can be reopened and the image exported manually from it, in the format of your choice, which can the be added to Apple Photos as a new import.
-
After editing an image stored in Apple Photos with Affinity Photo you can still access the “temporary” working file that AP created during the editing process by going to Recent in AP where it will be called; Apple Photos Document. Reopen it and then use ‘Save As…’ if you wish to permanently keep it. Note that this document will only contain the last Apple Photos image to have been edited in this way, so if you are wanting to keep AP working files for multiple images stored in Apple Photos you need to do the 'Save As…' thing immediately after processing each Apple Photos image.
-
Another option might be; Layer > New Adjustment Layer > Lens Filter. Choose a colour and set the colour’s Opacity Density slider to 100%
-
affinity designer The red Mk1 Austin Mini Cooper S from the Italian Job
markw replied to VectorVonDoom's topic in Share your work
Once again your work leaves me speechless…!!! -
three round buttons
markw replied to Mollyc's topic in Affinity on Desktop Questions (macOS and Windows)
Interesting…, I see that your file Title Field is above the toolbar icons too and not centred in the middle of them. So what you are seeing could be because you are using 1.10.6 on El Capitan. -
three round buttons
markw replied to Mollyc's topic in Affinity on Desktop Questions (macOS and Windows)
Even in the v1 apps (as per the screenshot) after modifying a file you should see an asterisk added to the end of a file’s Name field and an [M] added to the file's name field on a Tab when viewing multiple Tabs.
-
Actual Size; will use your screen’s pixel resolution and your documents dimensions + DPI setting to workout the zoom level required to display the document on your screen at it’s physical printed size. 100% Zoom; matches document pixels to screen pixels 1:1 I believe. Pixel Size; Well, I confess I’m not really sure what that’s showing given that 100% already matches document pixels to screen pixels? But it zooms in to 200%+/- on a A3 (4959x3507px), 300dpi document.
-
As suggested by carl123 earlier I would go with clipping/masking the tick marks. The attached file has History saved with it so you can move though it to see the steps. Each tick mark can still be individually adjusted later if needed. Dial Marks.afdesign
-
Having positioned your new sign, I would then using the Pen tool just place a Curve above it, set it’s Blend mode to Multiply and then choose a blue/grey fill colour and maybe mess with the curves Opacity as well till you get the desired look.
-
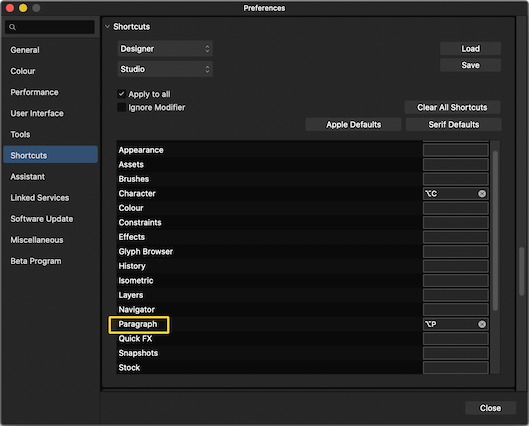
Yes I think some confusion may have crept in here! Thomaso’s screenshots are from Publisher v1 where the Menu entries and Shortcuts entries for the Paragraph panel are found under different headings than where they are now found in the v2 apps. As to Mr. Doodlezz’s double entry at the bottom of his last screenshot, that is odd, I don’t see that here?
-
In Designer the entry to set a shortcut for the Paragraph panel should be found in the ‘Studio’ Shortcuts sub-menu.
-
If it helps I think VLC (Free app) should be able to open and play .mts files and probably convert and save them to a variety of other formats if required: https://www.videolan.org/
-
apple color emoji support V2
markw replied to Faccia's topic in Affinity on Desktop Questions (macOS and Windows)
Yes, it is a head scratcher!🤔