markw
-
Posts
1,211 -
Joined
-
Last visited
Everything posted by markw
-
How do I download V1?
markw replied to Stolzy's topic in Affinity on Desktop Questions (macOS and Windows)
That seems a bit odd to me? Have you tried signing out and then back into the App Store? And to clarify, we are talking about trying to re-download the app from the Mac App Store, correct? You are logged into the same Store account you originally used when you purchased the app? In 'Purchased' what do you see? (Perhaps a small screenshot similar to my one earlier) -
How do I download V1?
markw replied to Stolzy's topic in Affinity on Desktop Questions (macOS and Windows)
@Stolzy You should still be able to download v1 from the Mac App Store if that is where you purchased it from. Sign in using the same account info that you used when originally purchasing the app. In your past purchases, do you see a small cloud icon with a downwards arrow next to Photo? Clicking on the cloud icon will start the download to your Applications folder.
-
Cleaning Up Scanned Image
markw replied to Chris911's topic in Affinity on Desktop Questions (macOS and Windows)
Well, whichever method you go for, Masking and painting or using the Pen Tool, it will take some time, so find your music or audiobook choice and settle in…😉 On a related note; how big will the finished “plate” be? -
Cleaning Up Scanned Image
markw replied to Chris911's topic in Affinity on Desktop Questions (macOS and Windows)
True, but the individuality of any given letter could be "added" after laying everything out and then tweaking nodes where desired. -
Cleaning Up Scanned Image
markw replied to Chris911's topic in Affinity on Desktop Questions (macOS and Windows)
Are you using the vector Pen Tool to do this? I know you don't "need" vectors per say but the advantage would be that having done one 'A' for example you have then effectively done all your A's as it can be reused elsewhere. -
Cleaning Up Scanned Image
markw replied to Chris911's topic in Affinity on Desktop Questions (macOS and Windows)
How important is the look of the “font” used in the sample photo? As another possibility might be to look on the web for a suitable Copperplate font to use. Then it’s just a question of typing out what you need, which would probably be the quickest way. -
At the start of your recording the document contains no layers. When the Fill tool was used APhoto automatically generated a Pixel layer so that the “paint” had somewhere to go. Unlike a vector object this new Pixel layer’s Colour & Noise is “fixed” and, without resorting to FX, Filters, etc… can’t be changed after applying it. It can only be changed by applying a new fill colour. Right at the end of your recording after you set the Noise level to 100% if you had used the Fill tool again on the layer, the first grey colour would have been replaced with the new one with noise.
-
In the attached first screenshot I have added a Square Rectangle at the bottom of the Layer stack which has a red stroke applied to the inside edge of it via the Stroke panel. Is this the kind of outline you want around your document? Yes/No? Using; Document > Flatten now will rasterise all the document’s content into one layer. See second screenshot.
-
Doing the above will give you your outline. When you merge everything together it will look as it should. But again I'm still not sure what editorial advantage you hope this merging down will give?
-
Dose my post immediately above your last post help explain what is happening in you document? As for merging the content of the document into one layer, I think it’s hard for us looking in from the outside, as it were, to see what editorial advantage/s you are hoping to gain by doing that?
-
The white your are currently seeing, outside of and surrounding your rounded rectangle, is just the document/canvas fill colour, it is not something that can have effects applied to it or otherwise be interacted with. The background white can be turned Off to give you a Transparent document background if needed, but that’s all. In order to have a line around the outer edge of the document there first needs to be some form of object filling the whole canvas like for example a square cornered rectangle that can have a stroke applied to it. Regarding your current rounded rectangle it already has a thin black stroke could that not be changed to something more to your liking e.g. width, colour etc… in the Stroke panel?
-
I’m still unsure of what you are expecting to happen? Sorry. After flattening everything down it all becomes one Pixel layer for me as expected. As the original white Rectangle had rounded corners so dose the now new single Pixel layer. When you add the Outline Effect where do you expect to see it applied? In the attached I’ve used Merge Visible which has given me the Pixel layer at the top. I have then used the Outline Effect to give the red border. I then turned off your four original vector layers.
-
My thinking exactly!
-
If using Control+Option+Click&Drag Left/Right to resize a Vector Brush in Designer the brush outline and/or crosshairs indicating its canvas position disappear. To get them back requires an additional click on the canvas to see where your brush is. This bug first showed up last March as part of a more general problem with the Vector brush: https://forum.affinity.serif.com/index.php?/topic/183978-changing-brush-attributes-via-clickdrag-with-modifier-keys-broken-in-catalina-in-all-latest-betas-1736/ But this remaining problem probably now needs it’s own Bug ticket.
-
Frequency Separation might be worth playing with perhaps… Here’s a quick test and the settings I tried. C2023 H2 Lemmon-16 bit - FSeperation.afphoto
-
Document size
markw replied to jackamus's topic in Affinity on Desktop Questions (macOS and Windows)
These have been missing for a while now in v2’s New Document Print lists. Why? An oversight or an executive decision perhaps? It is a mystery! At the moment once having chosen, say A3, and hitting Create you can then go to Document setup and select the A0, A1 or A2 presets from there. Yes, it’s clunky! But if these are sizes you need often then best to just add the missing A sizes to the New Document Print lists yourself. Once added you can drag them into their rightful places within the current options for neatness. -
Yes, I used Affinity Photo as per your first screenshot where you are using it for your example. Here is a short recording of what I get following my “Quick Fix” idea. Since suggesting that though, I found that if you just slightly extend the background, that also makes the white edge (which is approximately 1/40th of a millimetre) go away. (Second half of recording) ResizeTest.mp4
-
Just found common Word file extensions like .doc and .docx are show as well. Still looking...
-
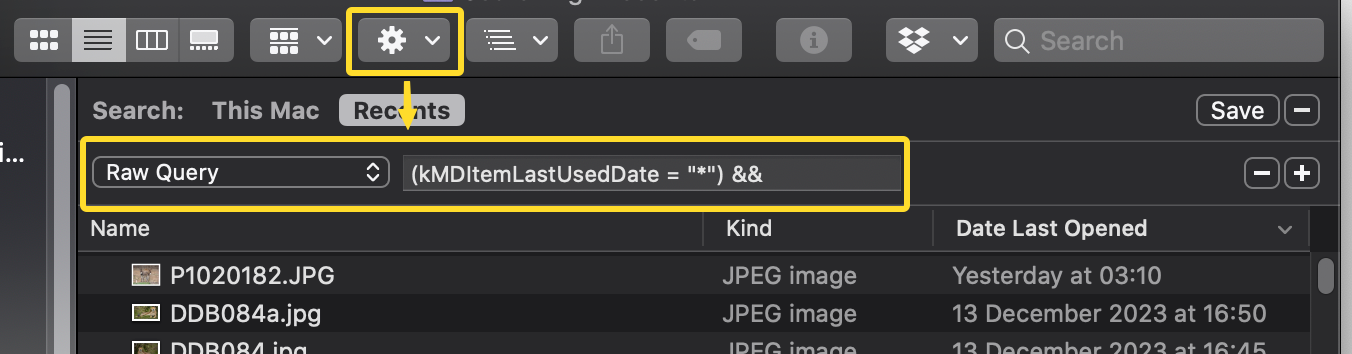
Clicking on the Cog icon in the Finder window and choosing; Show Search Criteria, the default criteria would appear to be for my system as shown here:
-
Well, that’s interesting, it’s not a feature of Finder I normally have active but turning it on just now and I too find the same thing; no Affinity files show up! But it's not just Affinity files not showing? Only items with common; Text, Image, Video or Audio file extensions are shown for me. The only exception to this, that I have found so far, are for the app Glyphs, it's own .glyphs files are shown.
-
bevel not matching corner curve of shape?
markw replied to Myke's topic in Affinity on Desktop Questions (macOS and Windows)
If you use the Rectangle Tool in conjunction with the Corner Tool you can easily make sure that all successive corners are using the same centre for the corner radius. Example: Make sure Show Rulers is active. Assuming that the Rounded Rectangle tool’s 25% radius is just what you want for the corners of the outer square; Select Rounded Rectangle Tool > Draw out square to required size as a Guide and Lock Layer. Switch to normal Rectangle Tool > Draw out the same sized square again above the first one. Now switch to Corner Tool > and select all 4 corners and adjust the centre point inwards till the corner radius matches the base square. With the second square and Corner Tool still selected zoom in on one of the Red indicators of where that corner’s centre is. Now drag in horizontal and vertical guides to cross at the Red indicator. Zoom out a bit if needed. Select Move Tool > Duplicate this square and scale down proportionately. Back to the Corner Tool and select all 4 corners then bring the corner centre indicator in until it is over the guide crossing point. And repeat… Now when you use the bevel effect on the outer most square the inner radius of the effect will be correct. So to go back to the point raised in the original post, the Bevel effect as applied there, is actually correct. It only looks wrong because of the incorrect corner radius used by the inner two squares.
-
bevel not matching corner curve of shape?
markw replied to Myke's topic in Affinity on Desktop Questions (macOS and Windows)
Setting 25% for all three squares won’t work as the centres used for the corners of each successive square will be different. Ideally the same centre should be used for setting the radius of the corners of all three squares in order to maintain the correct curve and distance to the edge of the next square. If the outer square is 25% then the inner two will need to be less, think of adjusting the Corner % of these squares as redefining the centre points used for their respective corners.
-
Affinity Photo Contact Sheet
markw replied to Sapfromcornwall's topic in Affinity on Desktop Questions (macOS and Windows)
Same goes for me! Have to wonder why Apple buried it deep in the system, almost like they didn't want people to use it! -
Not to worry, if not exactly this, then we have all at some point had a similar moment of brain fog!🥴
-
Why do you need this saved as an .eps file? as the sample file contains no vector elements. To remove the white background that you have in the sample file you provided open it in APhoto and in the Menubar go to; Document > Transparent Background. Then go to; Filters > Colour > Remove white paper. Now Export the logo as a new .png file. If you need the logo as a true vector file, then as previously suggested, contact the designer and ask them to send it to you in your preferred vector format. Alternatively you could trace what you have with the pen tool in any Affinity app and recreate it that way or use an online or stand alone vector tracing app.