HappyLlama
-
Posts
6 -
Joined
-
Last visited
-
 loxy reacted to a post in a topic:
[AD] Strokes scale with object + Nested objects
loxy reacted to a post in a topic:
[AD] Strokes scale with object + Nested objects
-
HappyLlama reacted to a post in a topic:
How to scale images using percentages?
-
HappyLlama reacted to a post in a topic:
How to scale images using percentages?
-
HappyLlama reacted to a post in a topic:
How to scale images using percentages?
-
HappyLlama reacted to a post in a topic:
How to scale images using percentages?
-
 HappyLlama reacted to a post in a topic:
How to scale images using percentages?
HappyLlama reacted to a post in a topic:
How to scale images using percentages?
-
HappyLlama reacted to a post in a topic:
How to scale images using percentages?
-
HappyLlama reacted to a post in a topic:
How to scale images using percentages?
-
HappyLlama reacted to a post in a topic:
How to scale images using percentages?
-
HappyLlama reacted to a post in a topic:
How to scale images using percentages?
-
Further to my original question and in response to the request to include example images, usually the concept I've worked to elsewhere was that anything that is 50% grey (128,128,128 in a 0-255 scenario) would be unaffected, anything lighter will apply in one direction, (ie up and left) and anything darker will apply in the opposite direction (ie down and right) and within that you can adjust how much this is affected either vertically and horizontally, the problem I'm having is that using a displacement map of 50% grey with darker blurred vertical strokes it is applying it in both the vertical and horizontal directions equally so I wasn't sure if there was a workaround to this?
-
Indeed I meant map, my bad, I have corrected my original question
-
HappyLlama reacted to a post in a topic:
Directional Displacement in Affinity Photo
-
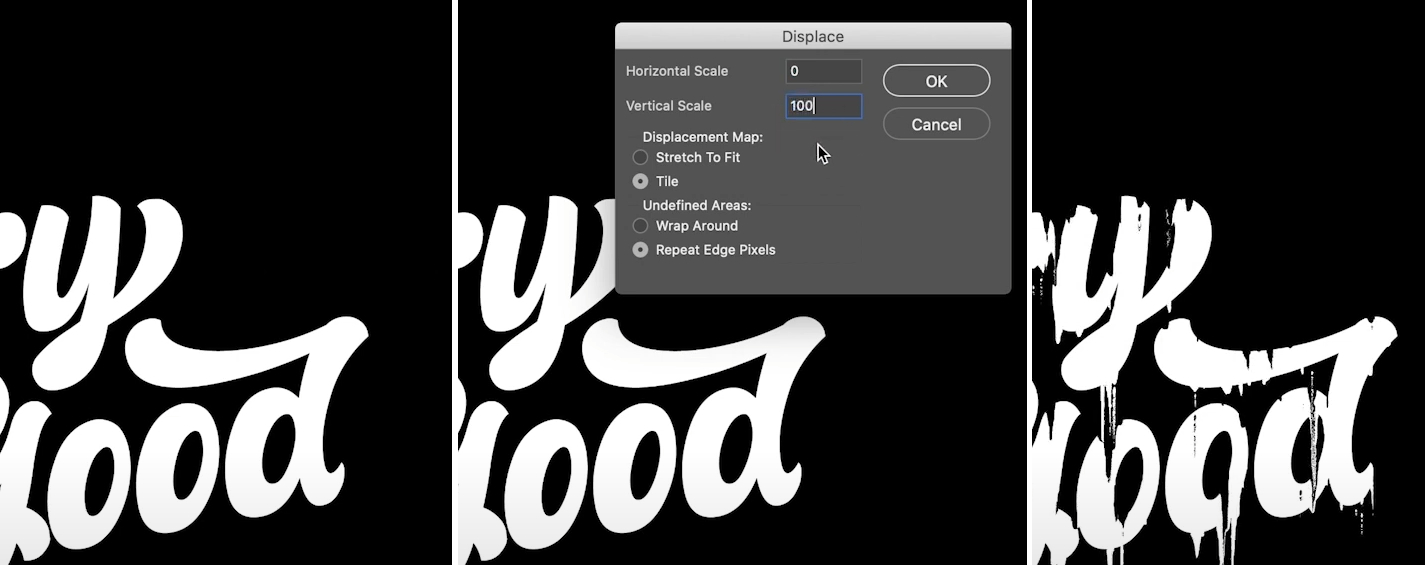
Hope this helps to explain it. The first image shows the before, applying effect and then result of applying displacement vertically down whilst the second image shows how it appears applying the effect in affinity in all 4 directions.

-
Having moved over from a different programme I'm trying to fathom if the use of displacement maps is comparable so excuse me if I'm asking a silly question or if this is something that isn't an option, but I can't seem to find any way of applying a displacement map to one axis or in one direction, I can only see the one option to apply in every direction. I'm trying to apply a displacement map to an image in the vertical axis, preferably just applying downwards. Does anybody know a way to do this? Thanks in advance.
-
jmwellborn reacted to a post in a topic:
Introduce Yourself
-
Hi all, I'm Martin from the North East of England. I've been working in graphic design for some 30 years now, originally starting in traditional pasteup, good old spraymount and rotring pens before I eventually moved onto computers using Ventura and Aldus FreeHand before eventually switching over to another well known developer. Recently found Affinity Photo and Designer through an ad and was that impressed with them I ended up buying both products for my wife who was wanting to get into digital art on her mac and as such I have essentially been learning both programs through teaching her how to use them. I'm currently using the trial versions myself on a PC but hoping they're still on offer by the time I can afford to buy them all for myself, although I have to admit that even at full price they are ridiculously good value for money considering the quality of the tools.
-
This is something that baked my noodle for some time but one workaround I found was to save the artwork or element that you're wanting to resize as its own file, and then place it either into a new document or even the current one, as it treats it as a new embedded file, at which point you can then scale it as much as you want.